manual radio set CHEVROLET CRUZE 2015 1.G Owners Manual
[x] Cancel search | Manufacturer: CHEVROLET, Model Year: 2015, Model line: CRUZE, Model: CHEVROLET CRUZE 2015 1.GPages: 417, PDF Size: 5.89 MB
Page 22 of 417
Black plate (15,1)Chevrolet Cruze Owner Manual (GMNA-Localizing-U.S./Canada-7707493) -
2015 - crc - 11/24/14
In Brief 1-15
Storing a Favorite Station
Stations from all bands can be
stored in the favorite lists in any
order. Up to six stations can be
stored in each favorite page and the
number of available favorite pages
can be set.
To store the station to a position in
the list, press the corresponding
numeric button 1 to 6 until a beep is
heard.
See“Storing a Station as a
Favorite” inAM-FM Radio on
page 7-7.
Setting the Clock
Adjusting the Time or Date
To set the time and date for the
radio with navigation:
1. Press CLOCK.
2. Select Set Time or Set Date.
3. Turn the MENU/SEL knob to adjust the highlighted number.
4. Press the MENU/SEL knob to select the next number. 5. To save the settings, press
BACK on the radio faceplate.
Setting the 12/24 Hour Format
To set the 12/24 hour format for the
radio with navigation:
1. Press CLOCK.
2. Highlight 12/24 Hour Format.
3. Press the MENU/SEL knob to select the 12 hour or 24 hour
display format.
4. To save the settings, press BACK on the radio faceplate.
For detailed instructions on setting
the clock for the vehicle's specific
audio system, see Clock on
page 5-4.
Satellite Radio
If equipped, vehicles with a
SiriusXM®satellite radio tuner and a
valid SiriusXM satellite radio
subscription can receive SiriusXM
programming.
SiriusXM Satellite Radio
Service
SiriusXM is a satellite radio service
based in the 48 contiguous United
States and 10 Canadian provinces.
SiriusXM satellite radio has a wide
variety of programming and
commercial-free music, coast to
coast, and in digital-quality sound.
A fee is required to receive the
SiriusXM service.
Refer to:
.www.siriusxm.com or call
1-866-635-2349 (U.S.).
.www.xmradio.ca or call
1-877-209-0079 (Canada).
See Satellite Radio on page 7-10.
Portable Audio Devices
Some vehicles have a 3.5 mm
(1/8 in) auxiliary input and a USB
port in the center console. External
devices such as iPods
®, laptop
computers, MP3 players, CD
Page 24 of 417
Black plate (17,1)Chevrolet Cruze Owner Manual (GMNA-Localizing-U.S./Canada-7707493) -
2015 - crc - 11/24/14
In Brief 1-17
+x−:Press + to increase the
volume. Press −to decrease the
volume.
For more information, see Steering
Wheel Controls on page 5-2.
Cruise Control
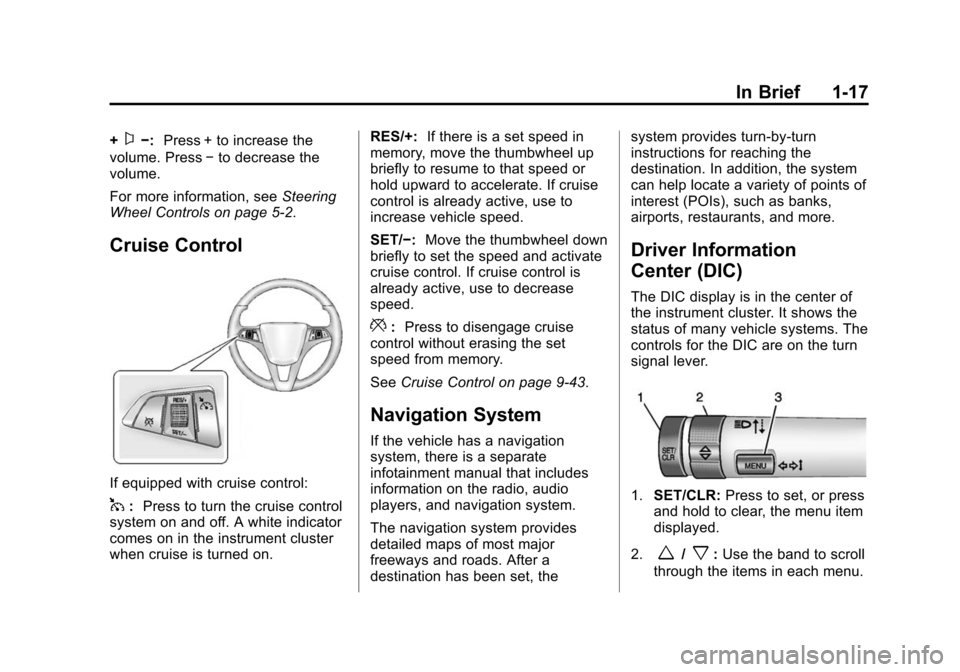
If equipped with cruise control:
1: Press to turn the cruise control
system on and off. A white indicator
comes on in the instrument cluster
when cruise is turned on. RES/+:
If there is a set speed in
memory, move the thumbwheel up
briefly to resume to that speed or
hold upward to accelerate. If cruise
control is already active, use to
increase vehicle speed.
SET/−: Move the thumbwheel down
briefly to set the speed and activate
cruise control. If cruise control is
already active, use to decrease
speed.
*: Press to disengage cruise
control without erasing the set
speed from memory.
See Cruise Control on page 9-43.
Navigation System
If the vehicle has a navigation
system, there is a separate
infotainment manual that includes
information on the radio, audio
players, and navigation system.
The navigation system provides
detailed maps of most major
freeways and roads. After a
destination has been set, the system provides turn-by-turn
instructions for reaching the
destination. In addition, the system
can help locate a variety of points of
interest (POIs), such as banks,
airports, restaurants, and more.
Driver Information
Center (DIC)
The DIC display is in the center of
the instrument cluster. It shows the
status of many vehicle systems. The
controls for the DIC are on the turn
signal lever.
1.
SET/CLR: Press to set, or press
and hold to clear, the menu item
displayed.
2.
w/x: Use the band to scroll
through the items in each menu.
Page 46 of 417
Black plate (17,1)Chevrolet Cruze Owner Manual (GMNA-Localizing-U.S./Canada-7707493) -
2015 - crc - 11/24/14
Keys, Doors, and Windows 2-17
will bypass the 30-second delay
and immediately arm the alarm
system.
The vehicle alarm system will not
arm if the doors are locked with
the key.
If the driver door is opened without
first unlocking with the RKE
transmitter, the horn will chirp and
the lights will flash to indicate
pre-alarm. If the vehicle is not
started, or the door is not unlocked
by pressing
Kon the RKE
transmitter during the 10-second
pre-alarm, the alarm will be
activated.
If a door, the hood, or the trunk is
opened without first disarming the
system, the turn signals will flash
and the horn will sound for about
30 seconds. The alarm system will
then re-arm to monitor for the next
unauthorized event.
Disarming the Alarm System
Do one of the following to disarm
the alarm system or turn off the
alarm if it has been activated:
.PressKon the RKE transmitter.
.Unlock the vehicle using the
Keyless Access system,
if equipped.
.Start the vehicle.
To avoid setting off the alarm by
accident:
.Lock the vehicle after all
occupants have left the vehicle
and all doors are closed.
.Always unlock a door with the
RKE transmitter or use the
Keyless Access system,
if equipped.
Unlocking the driver door with the
key will not disarm the system or
turn off the alarm.
How to Detect a Tamper
Condition
IfKis pressed on the RKE
transmitter and the horn chirps and
the lamps flash three times, an
alarm occurred previously while the
alarm system was armed.
If the alarm has been activated, a
message will appear on the DIC.
See Security Messages on
page 5-33.
Immobilizer
See Radio Frequency Statement on
page 13-12.
Immobilizer Operation
This vehicle has a passive
theft-deterrent system.
The system does not have to be
manually armed or disarmed.
The vehicle is automatically
immobilized when the key is
removed from the ignition.
Page 107 of 417
Black plate (4,1)Chevrolet Cruze Owner Manual (GMNA-Localizing-U.S./Canada-7707493) -
2015 - crc - 12/2/14
5-4 Instruments and Controls
Wiper Parking
If the ignition is put in OFF while the
wipers are on LO, HI, or INT, they
will immediately stop.
If the windshield wiper lever is then
moved to OFF before the driver
door is opened or within 10 minutes,
the wipers will restart and move to
the base of the windshield.
If the ignition is put in OFF while the
wipers are performing wipes due to
windshield washing, the wipers
continue to run until they reach the
base of the windshield.
nL(Windshield Washer): Pull
the windshield wiper lever toward
you to spray washer fluid and
activate the wipers. The wipers will
continue until the lever is released
or the maximum wash time is
reached. When the lever is
released, additional wipes may
occur depending on how long the
windshield washer had been activated. See
Washer Fluid on
page 10-25 for information on filling
the windshield washer fluid
reservoir.
{Warning
In freezing weather, do not use
the washer until the windshield is
warmed. Otherwise the washer
fluid can form ice on the
windshield, blocking your vision.
Compass
The vehicle may have a compass
display in the Driver Information
Center (DIC). The compass receives
its heading and other information
from the Global Positioning
System (GPS) antenna, StabiliTrak,
and vehicle speed information.
Avoid covering the GPS antenna,
located on the roof, for long periods
of time with objects that may
interfere with the antenna's ability to
receive a satellite signal. The
compass system is designed to operate for a certain number of
miles or degrees of turn before
needing a signal from the GPS
satellites. When the compass
display shows CAL, drive the
vehicle for a short distance in an
open area where it can receive a
GPS signal. The compass system
will automatically determine when
the GPS signal is restored and
provide a heading again. See
Compass Messages on page 5-27
for more information on the
messages that may be displayed for
the compass.Clock
The infotainment system controls
are used to access the time and
date settings through the menu
system. See
Operation on page 7-4
for information about how to use the
menu system. For vehicles with a
connective radio or navigation
system, see the infotainment
manual.
Page 108 of 417
Black plate (5,1)Chevrolet Cruze Owner Manual (GMNA-Localizing-U.S./Canada-7707493) -
2015 - crc - 12/2/14
Instruments and Controls 5-5
Setting the Time and Date
To set the time and date for the
radio with CD:
1. Press CLOCK.
2. Select Set Time or Set Date.
3. Turn the MENU/SEL knob toadjust the highlighted number.
4. Press the MENU/SEL knob to select the next number.
5. To save the settings, press the MENU/SEL knob.
To set the time and date for the
radio without navigation:
1. Press CLOCK.
2. Select Set Time or Set Date.
3. Turn the MENU/SEL knob to adjust the highlighted number.
4. Press the MENU/SEL knob to select the next number.
5. To save the settings, press OK screen button. To set the time and date for the
radio with navigation:
1. Press CLOCK.
2. Select Set Time or Set Date.
3. Turn the MENU/SEL knob to
adjust the highlighted number.
4. Press the MENU/SEL knob to select the next number.
5. To save the settings, press BACK on the radio faceplate.
If auto timing is set, the time
displayed on the clock may not
update immediately when driving
into a new time zone.
Setting the 12/24 Hour Format
To set the 12/24 hour format for the
radio with CD:
1. Press CLOCK.
2. Highlight 12/24 Hour Format.
3. Press the MENU/SEL knob to select the 12 hour or 24 hour
display format. 4. To save the settings, press the
MENU/SEL knob.
To set the 12/24 hour format for the
radio without navigation:
1. Press CLOCK.
2. Highlight 12/24 Hour Format.
3. Press the MENU/SEL knob to select the 12 hour or 24 hour
display format.
4. To save the settings, press OK screen button.
To set the 12/24 hour format for the
radio with navigation:
1. Press CLOCK.
2. Highlight 12/24 Hour Format.
3. Press the MENU/SEL knob to select the 12 hour or 24 hour
display format.
4. To save the settings, press the BACK on the radio faceplate.
Page 139 of 417
Black plate (36,1)Chevrolet Cruze Owner Manual (GMNA-Localizing-U.S./Canada-7707493) -
2015 - crc - 12/2/14
5-36 Instruments and Controls
Vehicle
Personalization
Use the audio system controls to
access the personalization menus
for customizing vehicle features.
The following are all possible
personalization features. Depending
on the vehicle, some may not be
available.
Infotainment System Audio
System Controls
Using the Faceplate
MENU/SELECT Knob
.Press to enter, select, or activate
a highlighted menu option.
.Turn to highlight a menu option.
.Press to enable or disable a
system setting.
/BACK
.Press to exit a menu.
.Press to return to a previous
screen.Using the Touch Screen
Press a screen feature to:
.View more feature options.
.Enable or disable the feature.
w:
Press to scroll up.
x:Press to scroll down.
Back: Press to return to the
previous menu.
To access the
personalization menu:
1. Press Config on the Home page
on the infotainment system
display or CONFIG on the
faceplate.
2. Select the desired feature to display a list of available
options.
3. Select the desired feature setting.
Personalization Menus
The following list of menu items may
be available:
.Languages
.Time and Date
.Radio Settings
.Phone Settings
.Navigation Settings
.Display Settings
.Vehicle Settings
Each menu is detailed in the
following information.
Languages
Select Languages, then select from
the available language(s).
Time and Date
Manually set the time and date. See
Clock on page 5-4.
Radio Settings
Select and depending on the radio
the following may display:
.Auto Volume
.Gracenote Options
.XM Channel Art
.Max Startup Volume
Page 140 of 417
Black plate (37,1)Chevrolet Cruze Owner Manual (GMNA-Localizing-U.S./Canada-7707493) -
2015 - crc - 12/2/14
Instruments and Controls 5-37
.Maximum Startup Volume
.Number of Favorites Pages
.Radio Favorites
.RDS Options
.XM Categories
.Software Versions Menu
Auto Volume
This feature adjusts the volume to
minimize the effects of unwanted
background noise that can result
from changing road surfaces, driving
speeds, or open windows. This
feature works best at lower volume
settings where background noise is
typically louder than the sound
system volume.
Select Off, Low, Medium, or High.
Gracenote Options
Select and the following may
display:
.Normalization Normalization
This feature improves voice
recognition and media groupings.
See
“CD Player,” “USB,” “Auxiliary
Devices,” and“Bluetooth Audio” in
the infotainment manual.
Select to enable or disable.
XM Channel Art
This feature turns the XM Audio
page background on the XM
Channel display on and off.
Select to enable or disable.
Max Startup Volume or Maximum
Startup Volume
This feature sets the maximum
startup volume. If the vehicle is
started and the volume is greater
than this level, the volume is
adjusted to this level.
Press + or −to increase or
decrease the volume. Number of Favorites Pages or
Radio Favorites
Press to set the number of favorites
to display.
Select the desired number.
RDS Options
Select and the following may
display:
.RDS
.Text Scroll Freeze
.RDS Text
RDS
Select to turn RDS on or off. See
“RDS (Radio Data System)” in
AM-FM Radio on page 7-7.
Text Scroll Freeze
When on, this allows the RDS Text
to scroll across the radio screen.
Select to enable or disable.
Page 141 of 417
Black plate (38,1)Chevrolet Cruze Owner Manual (GMNA-Localizing-U.S./Canada-7707493) -
2015 - crc - 12/2/14
5-38 Instruments and Controls
RDS Text
When on, this allows the RDS
information from the station to be
displayed.
Select to enable or disable.
XM Categories
This allows which available XM
Categories are used and displayed.
Press to enable or disable available
categories.
Software Versions Menu
Press to display information about
the system and update software if
available.
Phone Settings
Select and depending on the radio
the following may display:
.Device List
.Pair Device
.Pair Device (Phone)
.Pair Device (GPS)Device List
Select to connect to a different
phone source, disconnect a phone,
or delete a phone.
Pair Device
Select to pair a new device. See
“Pairing a Phone/Device”
in
“Bluetooth” in the infotainment
manual.
Pair Device (Phone) or Pair
Device (GPS)
Select to pair a new phone. See
“Pairing a Phone” in“Bluetooth
(Infotainment Controls)” inBluetooth
(Infotainment Controls) on
page 7-19 orBluetooth (Voice
Recognition) on page 7-22 or
Bluetooth (Overview) on page 7-17
or “Pairing a Phone/Device”
“Bluetooth” in the infotainment
manual.
Navigation Settings
See “Navigation Settings” under
“Configure Menu” in the
infotainment manual.
Display Settings
Press and the following may
display:
.Home Page Menu
.Rear Camera Options
.Display Off
.Map Settings
Home Page Menu
Select and the following may
display:
.Customize
.Sort
.Restore Home Page Defaults
Customize
This feature allows the selection of
what icons will be on the first
Home Page.
Select and follow the screen
prompts.
Sort
This feature allows the icons on the
Home Page to be moved.
Page 142 of 417
Black plate (39,1)Chevrolet Cruze Owner Manual (GMNA-Localizing-U.S./Canada-7707493) -
2015 - crc - 12/2/14
Instruments and Controls 5-39
Select and follow the screen
prompts.
Restore Home Page Defaults
This feature will restore the Home
Page to the factory settings.
Select and follow the screen
prompts.
Rear Camera Options
For more information on Rear
Camera Options, seeRear Vision
Camera (RVC) on page 9-48.
Display Off
Press to turn the display off. The
display will return when any radio
buttons are pressed or the screen is
touched (if equipped).
Map Settings
See “Map Settings” in“Configure
Menu” in the infotainment manual.
Vehicle Settings
Select and the following may
display:
.Climate and Air Quality
.Comfort and Convenience
.Collision Detection Systems
.Lighting
.Power Door Locks
.Remote Lock/Unlock/Start
.Return to Factory Settings?
Climate and Air Quality
Select and the following may
display:
.Auto Fan Speed
.Remote Start Auto Heat Seats
.Auto Defog
.Auto Rear Defog
Auto Fan Speed
This feature sets the climate control
fan speed to maintain the interior
temperature.
Select High, Medium, or Low. Remote Start Auto Heat Seats
When on, this feature will turn the
heated seats on when using remote
start on cold days.
Select On or Off.
Auto Defog
When turned on and high humidity
is detected, the climate control
system may adjust to outside air
supply and turn on the air
conditioner or the heater. The fan
speed may slightly increase to help
prevent fogging. When high
humidity is no longer detected, the
system will return to its prior
operation.
Select On or Off.
Auto Rear Defog
When on, this feature turns on the
rear defogger at vehicle start when
the interior temperature is cold and
fog is likely. The auto rear defog
function can be disabled by
pressing
1. When off, the feature
can be turned on by pressing
1.
Page 153 of 417
Black plate (2,1)Chevrolet Cruze Owner Manual (GMNA-Localizing-U.S./Canada-7707493) -
2015 - crc - 11/24/14
7-2 Infotainment System
.Set up the tone, speaker
adjustments, and preset radio
stations.
For more information, see Defensive
Driving on page 9-3.
{Caution
Contact your dealer before adding
any equipment.
Adding audio or communication
equipment could interfere with the
operation of the engine, radio,
or other systems, and could
damage them. Follow federal
rules covering mobile radio and
telephone equipment. The vehicle has Retained
Accessory Power (RAP). With RAP,
the audio system can be played
even after the ignition is turned off.
See
Retained Accessory Power
(RAP) on page 9-23.
The vehicle may have a base radio,
which is included in this manual.
See the infotainment manual for
information on the connective radio
and the navigation system, audio
players, phone, and voice
recognition. There is also
information on settings and
downloadable applications (if
equipped).
Theft-Deterrent Feature
The theft-deterrent feature works by
learning a portion of the Vehicle
Identification Number (VIN) to the
infotainment system. The
infotainment system does not
operate if it is stolen or moved to a
different vehicle.