ABS CHEVROLET CRUZE 2016 1.G Owners Manual
[x] Cancel search | Manufacturer: CHEVROLET, Model Year: 2016, Model line: CRUZE, Model: CHEVROLET CRUZE 2016 1.GPages: 377, PDF Size: 6.35 MB
Page 4 of 377
Chevrolet Cruze Owner Manual (GMNA-Localizing-U.S./Canada/Mexico-
9234744) - 2016 - CRC - 3/9/16
Introduction 3
Danger, Warning, and
Caution
Warning messages found on vehicle
labels and in this manual describe
hazards and what to do to avoid or
reduce them.
{Danger
Danger indicates a hazard with a
high level of risk which will result
in serious injury or death.
{Warning
Warning indicates a hazard that
could result in injury or death.
Caution
Caution indicates a hazard that
could result in property or vehicle
damage.
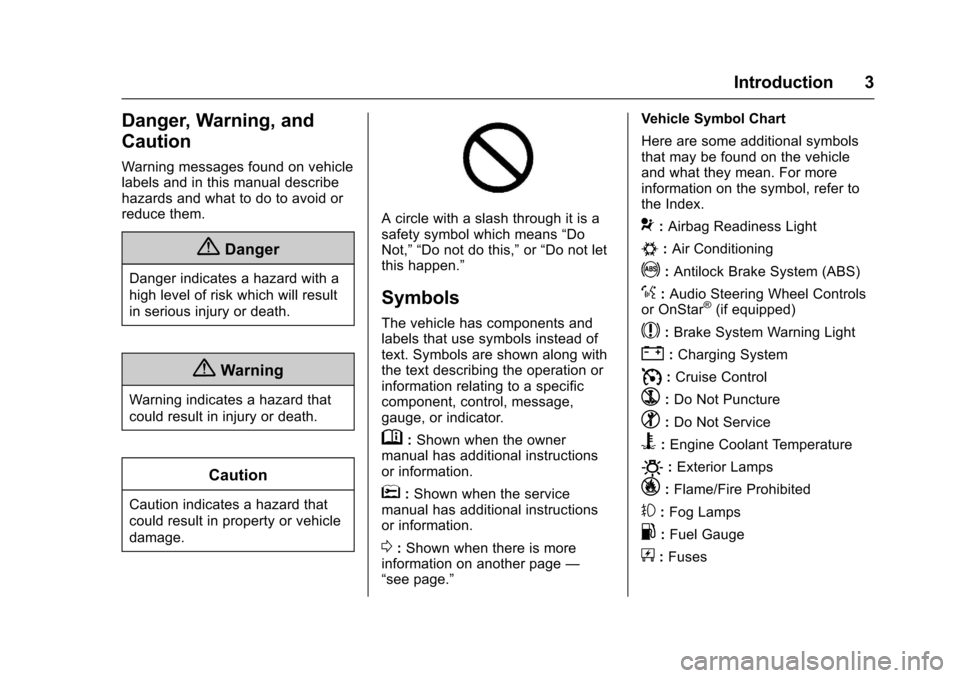
A circle with a slash through it is a
safety symbol which means“Do
Not,” “Do not do this,” or“Do not let
this happen.”
Symbols
The vehicle has components and
labels that use symbols instead of
text. Symbols are shown along with
the text describing the operation or
information relating to a specific
component, control, message,
gauge, or indicator.
M: Shown when the owner
manual has additional instructions
or information.
*: Shown when the service
manual has additional instructions
or information.
0: Shown when there is more
information on another page —
“see page.” Vehicle Symbol Chart
Here are some additional symbols
that may be found on the vehicle
and what they mean. For more
information on the symbol, refer to
the Index.
9:
Airbag Readiness Light
#:Air Conditioning
!:Antilock Brake System (ABS)
%:Audio Steering Wheel Controls
or OnStar®(if equipped)
$: Brake System Warning Light
":Charging System
I: Cruise Control
`:Do Not Puncture
^:Do Not Service
B:Engine Coolant Temperature
O:Exterior Lamps
_: Flame/Fire Prohibited
#:Fog Lamps
.:Fuel Gauge
+: Fuses
Page 43 of 377
Chevrolet Cruze Owner Manual (GMNA-Localizing-U.S./Canada/Mexico-
9234744) - 2016 - CRC - 3/9/16
42 Keys, Doors, and Windows
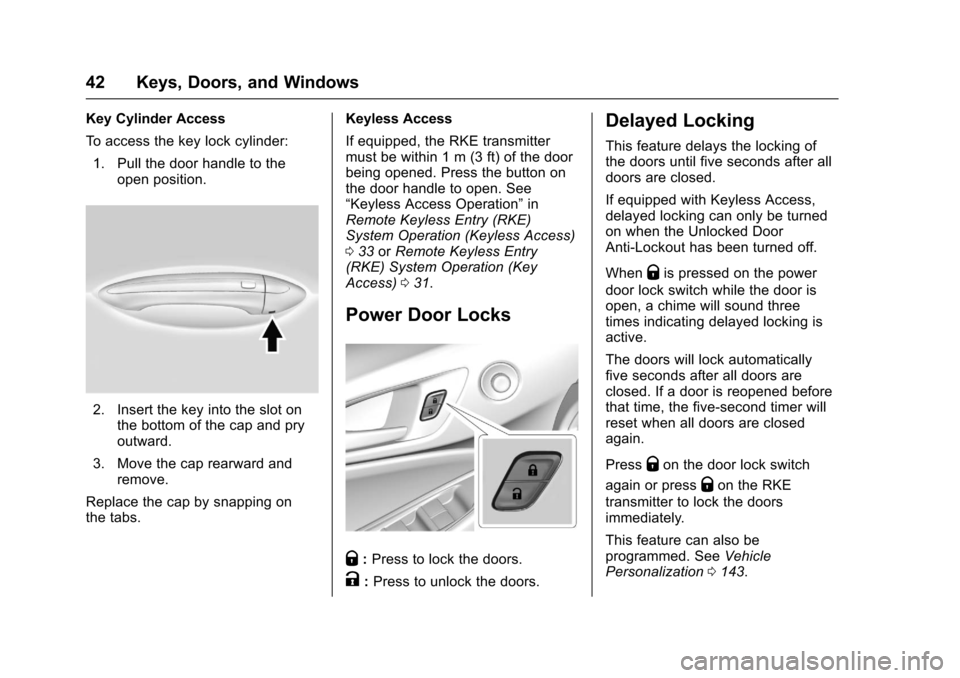
Key Cylinder Access
To access the key lock cylinder:1. Pull the door handle to the open position.
2. Insert the key into the slot onthe bottom of the cap and pry
outward.
3. Move the cap rearward and remove.
Replace the cap by snapping on
the tabs. Keyless Access
If equipped, the RKE transmitter
must be within 1 m (3 ft) of the door
being opened. Press the button on
the door handle to open. See
“Keyless Access Operation”
in
Remote Keyless Entry (RKE)
System Operation (Keyless Access)
0 33 orRemote Keyless Entry
(RKE) System Operation (Key
Access) 031.
Power Door Locks
Q:Press to lock the doors.
K:Press to unlock the doors.
Delayed Locking
This feature delays the locking of
the doors until five seconds after all
doors are closed.
If equipped with Keyless Access,
delayed locking can only be turned
on when the Unlocked Door
Anti-Lockout has been turned off.
When
Qis pressed on the power
door lock switch while the door is
open, a chime will sound three
times indicating delayed locking is
active.
The doors will lock automatically
five seconds after all doors are
closed. If a door is reopened before
that time, the five-second timer will
reset when all doors are closed
again.
Press
Qon the door lock switch
again or press
Qon the RKE
transmitter to lock the doors
immediately.
This feature can also be
programmed. See Vehicle
Personalization 0143.
Page 63 of 377
Chevrolet Cruze Owner Manual (GMNA-Localizing-U.S./Canada/Mexico-
9234744) - 2016 - CRC - 3/9/16
62 Seats and Restraints
{Warning
A safety belt that is improperly
routed, not properly attached,
or twisted will not provide the
protection needed in a crash. The
person wearing the belt could be
seriously injured. After raising the
rear seatback, always check to be
sure that the safety belts are
properly routed and attached, and
are not twisted.
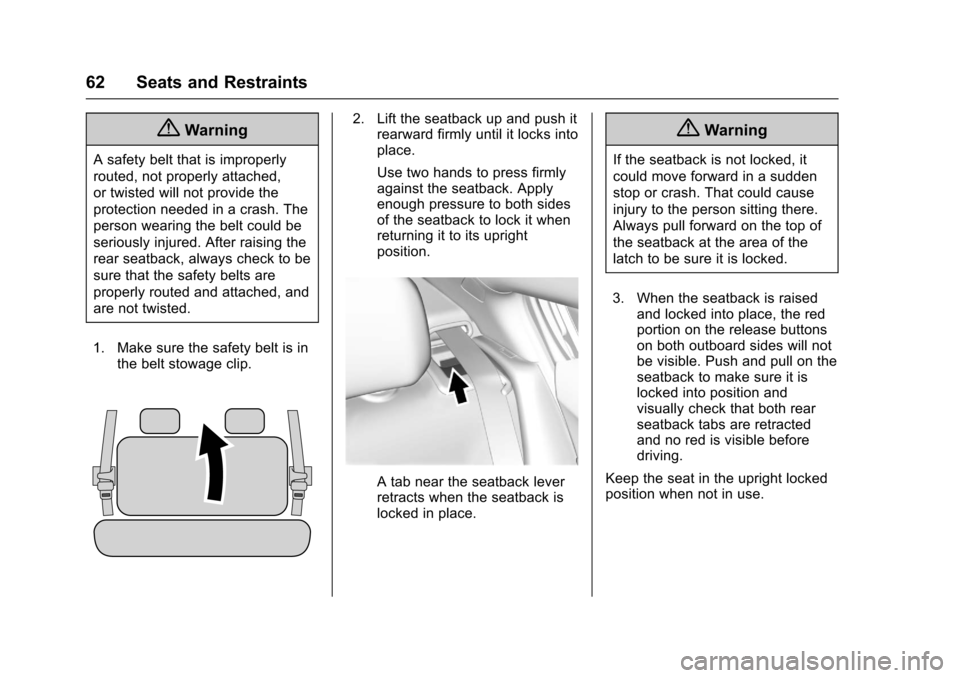
1. Make sure the safety belt is in the belt stowage clip.
2. Lift the seatback up and push itrearward firmly until it locks into
place.
Use two hands to press firmly
against the seatback. Apply
enough pressure to both sides
of the seatback to lock it when
returning it to its upright
position.
A tab near the seatback lever
retracts when the seatback is
locked in place.
{Warning
If the seatback is not locked, it
could move forward in a sudden
stop or crash. That could cause
injury to the person sitting there.
Always pull forward on the top of
the seatback at the area of the
latch to be sure it is locked.
3. When the seatback is raised and locked into place, the red
portion on the release buttons
on both outboard sides will not
be visible. Push and pull on the
seatback to make sure it is
locked into position and
visually check that both rear
seatback tabs are retracted
and no red is visible before
driving.
Keep the seat in the upright locked
position when not in use.
Page 104 of 377
Chevrolet Cruze Owner Manual (GMNA-Localizing-U.S./Canada/Mexico-
9234744) - 2016 - CRC - 3/9/16
Instruments and Controls 103
Instruments and
Controls
Controls
Steering Wheel Adjustment . . . 104
Steering Wheel Controls . . . . . . 104
Heated Steering Wheel . . . . . . . 105
Horn . . . . . . . . . . . . . . . . . . . . . . . . . . 105
Windshield Wiper/Washer . . . . 105
Compass . . . . . . . . . . . . . . . . . . . . . 106
Clock . . . . . . . . . . . . . . . . . . . . . . . . . 107
Power Outlets . . . . . . . . . . . . . . . . 108
Wireless Charging . . . . . . . . . . . . 110
Warning Lights, Gauges, and
Indicators
Warning Lights, Gauges, andIndicators . . . . . . . . . . . . . . . . . . . . 111
Instrument Cluster (Base Level) . . . . . . . . . . . . . . . . . . . . . . . 112
Instrument Cluster
(Uplevel) . . . . . . . . . . . . . . . . . . . . 114
Speedometer . . . . . . . . . . . . . . . . . 117
Odometer . . . . . . . . . . . . . . . . . . . . . 117
Trip Odometer . . . . . . . . . . . . . . . . 117
Tachometer . . . . . . . . . . . . . . . . . . . 117
Fuel Gauge . . . . . . . . . . . . . . . . . . . 118
Engine Coolant Temperature Gauge . . . . . . . . . . . . . . . . . . . . . . 119 Safety Belt Reminders . . . . . . . . 120
Airbag Readiness Light . . . . . . . 121
Passenger Airbag Status
Indicator . . . . . . . . . . . . . . . . . . . . 121
Charging System Light . . . . . . . 122
Malfunction Indicator Lamp
(Check Engine Light) . . . . . . . . 122
Brake System Warning Light . . . . . . . . . . . . . . . . . . . . . . . . 124
Antilock Brake System (ABS) Warning Light . . . . . . . . . . . . . . . 125
Up-Shift Light . . . . . . . . . . . . . . . . . 125
Lane Keep Assist (LKA) Light . . . . . . . . . . . . . . . . . . . . . . . . 125
Vehicle Ahead Indicator . . . . . . 126
Traction Off Light . . . . . . . . . . . . . 126
StabiliTrak
®OFF Light . . . . . . . . 126
Traction Control System (TCS)/ StabiliTrak
®Light . . . . . . . . . . . 127
Tire Pressure Light . . . . . . . . . . . 127
Engine Oil Pressure Light . . . . 127
Low Fuel Warning Light . . . . . . 128
Security Light . . . . . . . . . . . . . . . . . 128
High-Beam On Light . . . . . . . . . . 128
Front Fog Lamp Light . . . . . . . . . 129
Lamps On Reminder . . . . . . . . . 129
Cruise Control Light . . . . . . . . . . 129
Door Ajar Light . . . . . . . . . . . . . . . 129
Information Displays
Driver Information Center (DIC) (Base Level Cluster) . . . . . . . . 130
Driver Information Center (DIC) (Uplevel Cluster) . . . . . . . . . . . . 133
Vehicle Messages
Vehicle Messages . . . . . . . . . . . . 136
Battery Voltage and ChargingMessages . . . . . . . . . . . . . . . . . . . 136
Brake System Messages . . . . . 136
Compass Messages . . . . . . . . . . 136
Cruise Control Messages . . . . . 137
Door Ajar Messages . . . . . . . . . . 137
Engine Cooling System Messages . . . . . . . . . . . . . . . . . . . 137
Engine Oil Messages . . . . . . . . . 138
Engine Power Messages . . . . . 138
Fuel System Messages . . . . . . . 138
Key and Lock Messages . . . . . 138
Lamp Messages . . . . . . . . . . . . . . 139
Object Detection System Messages . . . . . . . . . . . . . . . . . . . 139
Ride Control System Messages . . . . . . . . . . . . . . . . . . . 141
Airbag System Messages . . . . 141
Safety Belt Messages . . . . . . . . 141
Security Messages . . . . . . . . . . . 141
Service Vehicle Messages . . . . 142
Starting the Vehicle Messages . . . . . . . . . . . . . . . . . . . 142
Page 126 of 377
Chevrolet Cruze Owner Manual (GMNA-Localizing-U.S./Canada/Mexico-
9234744) - 2016 - CRC - 3/9/16
Instruments and Controls 125
Antilock Brake System
(ABS) Warning Light
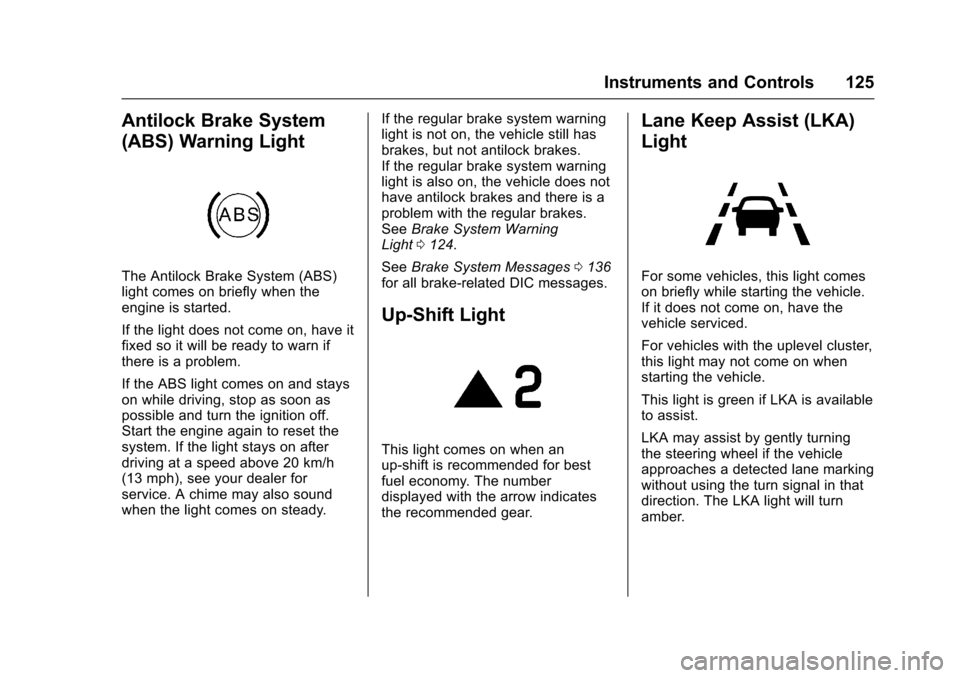
The Antilock Brake System (ABS)
light comes on briefly when the
engine is started.
If the light does not come on, have it
fixed so it will be ready to warn if
there is a problem.
If the ABS light comes on and stays
on while driving, stop as soon as
possible and turn the ignition off.
Start the engine again to reset the
system. If the light stays on after
driving at a speed above 20 km/h
(13 mph), see your dealer for
service. A chime may also sound
when the light comes on steady.If the regular brake system warning
light is not on, the vehicle still has
brakes, but not antilock brakes.
If the regular brake system warning
light is also on, the vehicle does not
have antilock brakes and there is a
problem with the regular brakes.
See
Brake System Warning
Light 0124.
See Brake System Messages 0136
for all brake‐related DIC messages.
Up-Shift Light
This light comes on when an
up-shift is recommended for best
fuel economy. The number
displayed with the arrow indicates
the recommended gear.
Lane Keep Assist (LKA)
Light
For some vehicles, this light comes
on briefly while starting the vehicle.
If it does not come on, have the
vehicle serviced.
For vehicles with the uplevel cluster,
this light may not come on when
starting the vehicle.
This light is green if LKA is available
to assist.
LKA may assist by gently turning
the steering wheel if the vehicle
approaches a detected lane marking
without using the turn signal in that
direction. The LKA light will turn
amber.
Page 194 of 377
Chevrolet Cruze Owner Manual (GMNA-Localizing-U.S./Canada/Mexico-
9234744) - 2016 - CRC - 3/9/16
Driving and Operating 193
Driving and
Operating
Driving Information
Distracted Driving . . . . . . . . . . . . 194
Defensive Driving . . . . . . . . . . . . . 194
Drunk Driving . . . . . . . . . . . . . . . . . 194
Control of a Vehicle . . . . . . . . . . . 195
Braking . . . . . . . . . . . . . . . . . . . . . . . 195
Steering . . . . . . . . . . . . . . . . . . . . . . 195
Off-Road Recovery . . . . . . . . . . . 196
Loss of Control . . . . . . . . . . . . . . . 196
Driving on Wet Roads . . . . . . . . 197
Hill and Mountain Roads . . . . . 198
Winter Driving . . . . . . . . . . . . . . . . 198
If the Vehicle Is Stuck . . . . . . . . 199
Vehicle Load Limits . . . . . . . . . . . 200
Starting and Operating
New Vehicle Break-In . . . . . . . . . 204
Ignition Positions (KeyAccess) . . . . . . . . . . . . . . . . . . . . . 204
Ignition Positions (Keyless Access) . . . . . . . . . . . . . . . . . . . . . 206
Starting the Engine . . . . . . . . . . . 207
Engine Heater . . . . . . . . . . . . . . . . 210
Retained Accessory Power (RAP) . . . . . . . . . . . . . . . . 211
Shifting Into Park . . . . . . . . . . . . . 211 Shifting out of Park . . . . . . . . . . . 212
Parking . . . . . . . . . . . . . . . . . . . . . . . 213
Parking over Things
That Burn . . . . . . . . . . . . . . . . . . . 213
Engine Exhaust
Engine Exhaust . . . . . . . . . . . . . . 213
Running the Vehicle WhileParked . . . . . . . . . . . . . . . . . . . . . . 214
Automatic Transmission
Automatic Transmission . . . . . . 214
Manual Mode . . . . . . . . . . . . . . . . . 216
Manual Transmission
Manual Transmission . . . . . . . . . 217
Brakes
Antilock BrakeSystem (ABS) . . . . . . . . . . . . . . . 219
Parking Brake . . . . . . . . . . . . . . . . 220
Brake Assist . . . . . . . . . . . . . . . . . . 221
Ride Control Systems
Traction Control/Electronic Stability Control . . . . . . . . . . . . . 221
Cruise Control
Cruise Control . . . . . . . . . . . . . . . . 223
Driver Assistance Systems
Driver Assistance Systems . . . 225 Assistance Systems for
Parking or Backing . . . . . . . . . . 226
Assistance Systems for Driving . . . . . . . . . . . . . . . . . . . . . . 228
Forward Collision Alert (FCA)
System . . . . . . . . . . . . . . . . . . . . . . 229
Side Blind Zone Alert (SBZA) . . . . . . . . . . . . . . . . 231
Lane Change Alert (LCA) . . . . . 231
Lane Departure Warning (LDW) . . . . . . . . . . . . . 233
Lane Keep Assist (LKA) . . . . . . 233
Fuel
Fuel . . . . . . . . . . . . . . . . . . . . . . . . . . 235
California Fuel Requirements . . . . . . . . . . . . . . . 236
Fuels in Foreign Countries . . . 236
Fuel Additives . . . . . . . . . . . . . . . . 236
Filling the Tank . . . . . . . . . . . . . . . 236
Filling a Portable Fuel Container . . . . . . . . . . . . . . . . . . . 238
Trailer Towing
General TowingInformation . . . . . . . . . . . . . . . . . . 238
Conversions and Add-Ons
Add-On ElectricalEquipment . . . . . . . . . . . . . . . . . . 239
Page 197 of 377
Chevrolet Cruze Owner Manual (GMNA-Localizing-U.S./Canada/Mexico-
9234744) - 2016 - CRC - 3/9/16
196 Driving and Operating
Curve Tips
.Take curves at a reasonable
speed.
. Reduce speed before entering a
curve.
. Maintain a reasonable steady
speed through the curve.
. Wait until the vehicle is out of
the curve before accelerating
gently into the straightaway.
Steering in Emergencies
.There are some situations when
steering around a problem may
be more effective than braking.
. Holding both sides of the
steering wheel allows you to turn
180 degrees without removing
a hand.
. Antilock Brake System (ABS)
allows steering while braking.
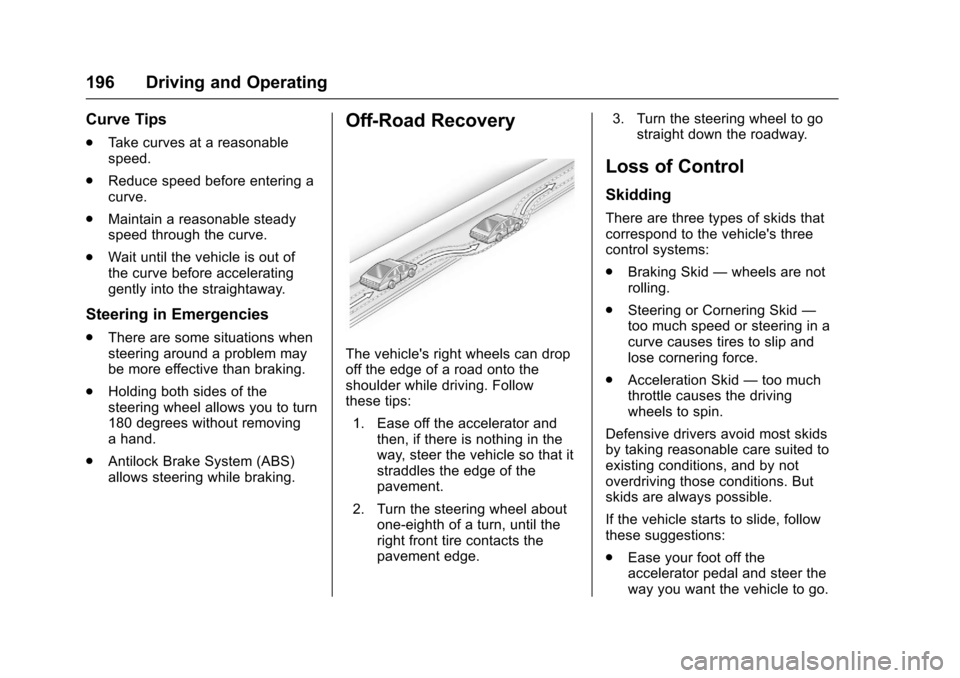
Off-Road Recovery
The vehicle's right wheels can drop
off the edge of a road onto the
shoulder while driving. Follow
these tips:
1. Ease off the accelerator and then, if there is nothing in the
way, steer the vehicle so that it
straddles the edge of the
pavement.
2. Turn the steering wheel about one-eighth of a turn, until the
right front tire contacts the
pavement edge. 3. Turn the steering wheel to go
straight down the roadway.
Loss of Control
Skidding
There are three types of skids that
correspond to the vehicle's three
control systems:
.Braking Skid —wheels are not
rolling.
. Steering or Cornering Skid —
too much speed or steering in a
curve causes tires to slip and
lose cornering force.
. Acceleration Skid —too much
throttle causes the driving
wheels to spin.
Defensive drivers avoid most skids
by taking reasonable care suited to
existing conditions, and by not
overdriving those conditions. But
skids are always possible.
If the vehicle starts to slide, follow
these suggestions:
. Ease your foot off the
accelerator pedal and steer the
way you want the vehicle to go.
Page 199 of 377
Chevrolet Cruze Owner Manual (GMNA-Localizing-U.S./Canada/Mexico-
9234744) - 2016 - CRC - 3/9/16
198 Driving and Operating
Hill and Mountain Roads
Driving on steep hills or through
mountains is different than driving
on flat or rolling terrain. Tips include:
.Keep the vehicle serviced and in
good shape.
. Check all fluid levels and brakes,
tires, cooling system, and
transmission.
. Shift to a lower gear when going
down steep or long hills.
{Warning
Using the brakes to slow the
vehicle on a long downhill slope
can cause brake overheating, can
reduce brake performance, and
could result in a loss of braking.
Shift the transmission to a lower
gear to let the engine assist the
brakes on a steep downhill slope.
{Warning
Coasting downhill in N (Neutral)
or with the ignition off is
dangerous. This can cause
overheating of the brakes and
loss of steering. Always have the
engine running and the vehicle
in gear.
. Drive at speeds that keep the
vehicle in its own lane. Do not
swing wide or cross the
center line.
. Be alert on top of hills;
something could be in your lane
(e.g., stalled car, accident).
. Pay attention to special road
signs (e.g., falling rocks area,
winding roads, long grades,
passing or no-passing zones)
and take appropriate action.
Winter Driving
Driving on Snow or Ice
Snow or ice between the tires and
the road creates less traction or
grip, so drive carefully. Wet ice can
occur at about 0 °C (32 °F) when
freezing rain begins to fall. Avoid
driving on wet ice or in freezing rain
until roads can be treated.
For Slippery Road Driving:
.Accelerate gently. Accelerating
too quickly causes the wheels to
spin and makes the surface
under the tires slick.
. Turn on Traction Control. See
Traction Control/Electronic
Stability Control 0221.
. The Antilock Brake System
(ABS) improves vehicle stability
during hard stops, but the
brakes should be applied sooner
than when on dry pavement.
See Antilock Brake System
(ABS) 0219.
. Allow greater following distance
and watch for slippery spots. Icy
patches can occur on otherwise
Page 220 of 377
Chevrolet Cruze Owner Manual (GMNA-Localizing-U.S./Canada/Mexico-
9234744) - 2016 - CRC - 3/9/16
Driving and Operating 219
Brakes
Antilock Brake
System (ABS)
This vehicle has an Antilock Brake
System (ABS), an advanced
electronic braking system that helps
prevent a braking skid.
When the vehicle begins to drive
away, ABS checks itself.
A momentary motor or clicking noise
may be heard while this test is going
on, and it may even be noticed that
the brake pedal moves a little. This
is normal.
If there is a problem with ABS, this
warning light stays on. SeeAntilock
Brake System (ABS) Warning
Light 0125.
If driving safely on a wet road and it
becomes necessary to slam on the
brakes and continue braking to
avoid a sudden obstacle, a
computer senses the wheels are
slowing down. If one of the wheels
is about to stop rolling, the computer
will separately work the brakes at
each wheel.
ABS can change the brake pressure
to each wheel, as required, faster
than any driver could. This can help
you steer around the obstacle while
braking hard.
As the brakes are applied, the
computer keeps receiving updates
on wheel speed and controls
braking pressure accordingly. Remember: ABS does not change
the time needed to get a foot up to
the brake pedal or always decrease
stopping distance. If you get too
close to the vehicle in front of you,
there will not be enough time to
apply the brakes if that vehicle
suddenly slows or stops. Always
leave enough room up ahead to
stop, even with ABS.
Using ABS
Do not pump the brakes. Just hold
the brake pedal down firmly and let
ABS work. You may hear the ABS
pump or motor operating and feel
the brake pedal pulsate. This is
normal.
Braking in Emergencies
ABS allows you to steer and brake
at the same time. In many
emergencies, steering can help
more than even the very best
braking.
Page 222 of 377
Chevrolet Cruze Owner Manual (GMNA-Localizing-U.S./Canada/Mexico-
9234744) - 2016 - CRC - 3/9/16
Driving and Operating 221
Caution
Driving with the parking brake on
can overheat the brake system
and cause premature wear or
damage to brake system parts.
Make sure that the parking brake
is fully released and the brake
warning light is off before driving.
To release the parking brake, hold
the regular brake pedal down, then
push down momentarily on the
parking brake pedal until you feel
the pedal release. Slowly pull your
foot up off the parking brake pedal.
If the parking brake is not released
when you begin to drive, the brake
system warning light will be on and
a chime will sound warning you that
the parking brake is still on.
Brake Assist
The Brake Assist feature is
designed to assist the driver in
stopping or decreasing vehicle
speed in emergency driving
conditions. This feature uses the
stability system hydraulic brake
control module to supplement the
power brake system under
conditions where the driver has
quickly and forcefully applied the
brake pedal in an attempt to quickly
stop or slow down the vehicle. The
stability system hydraulic brake
control module increases brake
pressure at each corner of the
vehicle until the ABS activates.
Minor brake pedal pulsation or
pedal movement during this time is
normal and the driver should
continue to apply the brake pedal as
the driving situation dictates. The
Brake Assist feature will
automatically disengage when the
brake pedal is released or brake
pedal pressure is quickly
decreased.
Ride Control Systems
Traction Control/
Electronic Stability
Control
System Operation
The vehicle has a Traction Control
System (TCS) and StabiliTrak®, an
electronic stability control system.
These systems help limit wheel slip
and assist the driver in maintaining
control, especially on slippery road
conditions.
TCS activates if it senses that any
of the drive wheels are spinning or
beginning to lose traction. When this
happens, TCS applies the brakes to
the spinning wheels and reduces
engine power to limit wheel spin.
StabiliTrak activates when the
vehicle senses a difference between
the intended path and the direction
the vehicle is actually traveling.
StabiliTrak selectively applies
braking pressure to any one of the