manual radio set CHEVROLET CRUZE 2017 2.G Owners Manual
[x] Cancel search | Manufacturer: CHEVROLET, Model Year: 2017, Model line: CRUZE, Model: CHEVROLET CRUZE 2017 2.GPages: 405, PDF Size: 6.76 MB
Page 22 of 405
Chevrolet Cruze Owner Manual (GMNA-Localizing-U.S./Canada/Mexico-
9803785) - 2017 - CRC - 4/13/16
In Brief 21
Vehicle Features
Infotainment System
Base radio information is included in
this manual. See the infotainment
manual for information on other
available infotainment systems.
Read the following pages to
become familiar with these features.
{Warning
Taking your eyes off the road for
too long or too often while using
any infotainment feature can
cause a crash. You or others
could be injured or killed. Do not
give extended attention to
infotainment tasks while driving.
Limit your glances at the vehicle
displays and focus your attention
on driving. Use voice commands
whenever possible.The infotainment system has built-in
features intended to help avoid
distraction by disabling some
functions when driving. These
functions may gray out when they
are unavailable. Many infotainment
features are also available through
the instrument cluster and steering
wheel controls.
Before driving:
.
Become familiar with the
operation, faceplate buttons, and
screen buttons.
. Set up the audio by presetting
favorite stations, setting the
tone, and adjusting the
speakers.
. Set up phone numbers in
advance so they can be called
easily by pressing a single
button or by using a single voice
command if equipped with
Bluetooth phone capability.
See Defensive Driving 0201.
To play the infotainment system with
the ignition off, see Retained
Accessory Power (RAP) 0219.
Radio(s)
O
:
. Press to turn the power on.
. Press and hold to turn the
power off.
. Press to mute/unmute the
system when on.
. Turn to decrease or increase the
volume.
g:
. Radio: Press and release to fast
seek the strongest previous
station or channel.
. USB/Music/Pictures: Press to go
to the previous content. Press
and hold to fast rewind.
d:
. Radio: Press and release to fast
seek the next strongest station
or channel.
. USB/Music/Pictures: Press to go
to the next content. Press and
hold to fast forward.
Page 24 of 405
Chevrolet Cruze Owner Manual (GMNA-Localizing-U.S./Canada/Mexico-
9803785) - 2017 - CRC - 4/13/16
In Brief 23
c:Press to reject an incoming
call or end a current call. Press to
mute or unmute the infotainment
system when not on a call.
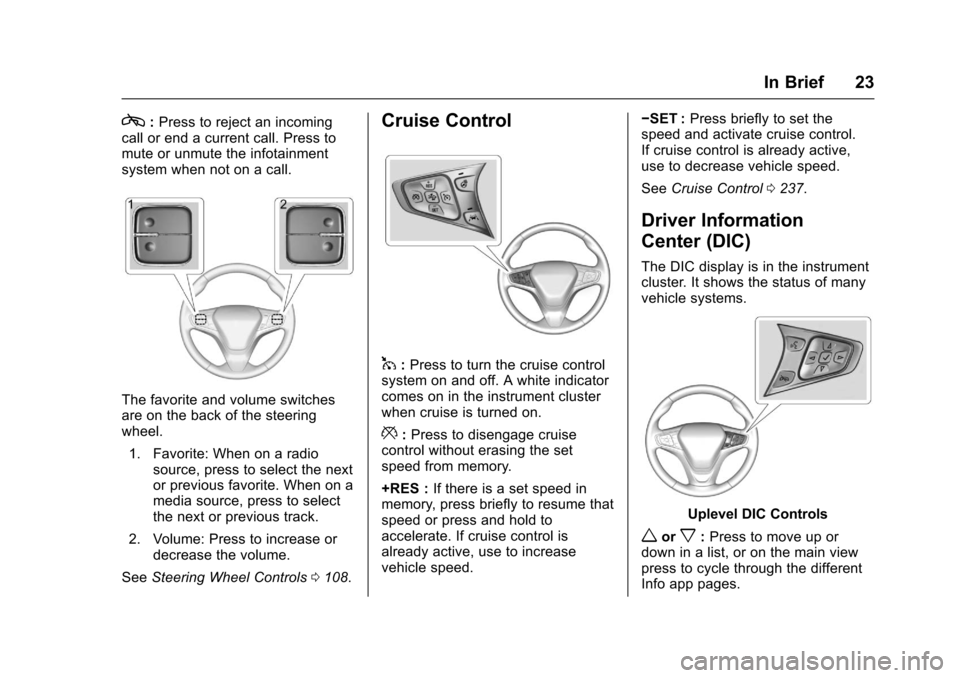
The favorite and volume switches
are on the back of the steering
wheel.
1. Favorite: When on a radio source, press to select the next
or previous favorite. When on a
media source, press to select
the next or previous track.
2. Volume: Press to increase or decrease the volume.
See Steering Wheel Controls 0108.
Cruise Control
1:Press to turn the cruise control
system on and off. A white indicator
comes on in the instrument cluster
when cruise is turned on.
*: Press to disengage cruise
control without erasing the set
speed from memory.
+RES : If there is a set speed in
memory, press briefly to resume that
speed or press and hold to
accelerate. If cruise control is
already active, use to increase
vehicle speed. −SET :
Press briefly to set the
speed and activate cruise control.
If cruise control is already active,
use to decrease vehicle speed.
See Cruise Control 0237.
Driver Information
Center (DIC)
The DIC display is in the instrument
cluster. It shows the status of many
vehicle systems.
Uplevel DIC Controls
worx:Press to move up or
down in a list, or on the main view
press to cycle through the different
Info app pages.
Page 52 of 405
Chevrolet Cruze Owner Manual (GMNA-Localizing-U.S./Canada/Mexico-
9803785) - 2017 - CRC - 4/13/16
Keys, Doors, and Windows 51
bypass the 30-second delay
and immediately arm the alarm
system.
The vehicle alarm system will not
arm if the doors are locked with
the key.
If the driver door is opened without
first unlocking with the RKE
transmitter, the horn will chirp and
the lights will flash to indicate
pre-alarm. If the vehicle is not
started, or the door is not unlocked
by pressing
Kon the RKE
transmitter during the 10-second
pre-alarm, the alarm will be
activated.
If a door, the hood, or the trunk is
opened without first disarming the
system, the turn signals will flash
and the horn will sound for about
30 seconds. The alarm system will
then re-arm to monitor for the next
unauthorized event.
Disarming the Alarm System
Do one of the following to disarm
the alarm system or turn off the
alarm if it has been activated:
. Press
Kon the RKE transmitter.
. Unlock the vehicle using the
Keyless Access system,
if equipped.
. Start the vehicle.
To avoid setting off the alarm by
accident:
. Lock the vehicle after all
occupants have left the vehicle
and all doors are closed.
. Always unlock a door with the
RKE transmitter or use the
Keyless Access system,
if equipped.
Unlocking the driver door with the
key will not disarm the system or
turn off the alarm.
How to Detect a Tamper
Condition
IfKis pressed on the RKE
transmitter and the horn chirps and
the lamps flash three times, an
alarm occurred previously while the
alarm system was armed.
If the alarm has been activated, a
message will appear on the DIC.
See Security Messages 0146.
Immobilizer
See Radio Frequency
Statement 0379.
Immobilizer Operation
(Key Access)
This vehicle has a passive
theft-deterrent system.
The system does not have to be
manually armed or disarmed.
The vehicle is automatically
immobilized when the key is
removed from the ignition.
Page 112 of 405
Chevrolet Cruze Owner Manual (GMNA-Localizing-U.S./Canada/Mexico-
9803785) - 2017 - CRC - 4/13/16
Instruments and Controls 111
open area where it can receive a
GPS signal. The compass system
will automatically determine when
the GPS signal is restored and
provide a heading again. See
Compass Messages0140 for more
information on the messages that
may be displayed for the compass.
Clock
Base Radio
The infotainment system controls
are used to access the time and
date settings through the menu
system. See Operation0169 on
how to use the menu system.
Setting the Time and Date
When Auto Set is enabled the time
cannot be manually set.
1. Press
{, then touch
SETTINGS.
2. Touch Time and Date, then Set Time or Set Date.
3. Touch + or −to adjust the
value. 4. Touch
RorQto adjust AM or
PM for 12 hour format.
5. Touch
0.
Using Auto Set
1. Press{, then touch
SETTINGS.
2. Touch Time and Date, then Auto Set.
3. Select from the available selections.
4. Touch
0.
Setting the 12/24 Hour Format
1. Press{, then touch
SETTINGS.
2. Touch Time and Date, then select 12h or 24h format.
3. Touch
0.
Setting the Month and Day
Format
1. Press{, then touch
SETTINGS. 2. Touch Time and Date, then Set
Date Format.
3. Select DD/MM/YYYY (day/ month/year), MM/DD/YYYY
(month/day/year), or YYYY/
MM/DD (year/month/day)
format.
4. Touch
0.
Uplevel Radio Using Faceplate
Controls
To set the time or date: 1. Select Home Page, then select SETTINGS.
2. Select Time and Date, then the desired function.
3. Turn the MENU knob to increase or decrease the value.
4. Press the MENU knob to go to the next value. After the last
value is selected, the system
will update and return to the
Settings menu. Press
oBACK
to go to the last menu and
save the changes.
Auto Set requires an OnStar
subscription.
Page 113 of 405
Chevrolet Cruze Owner Manual (GMNA-Localizing-U.S./Canada/Mexico-
9803785) - 2017 - CRC - 4/13/16
112 Instruments and Controls
If auto timing is set, the time
displayed on the clock may not
update immediately when driving
into a new time zone.
To set the clock display:1. Select SETTINGS from the Home Page, then select Time
and Date.
2. Select Clock Display.
3. Turn the MENU knob to Off or On.
4. Press the MENU knob to select.
Press
oBACK to go to the last
menu and save the changes.
Uplevel Radio Using
Touchscreen Controls
The infotainment system controls
are used to access the time and
date settings through the menu
system. See “Using the System”
under “Introduction” in the
infotainment manual. To set the time:
1. Touch SETTINGS from the Home Page, then touch Time
and Date.
2. Touch Set Time and touch
«
orªto increase or decrease
hours, minutes, and AM or PM.
Touch 12–24 Hr for 12 or
24 hour clock.
3. Touch
}to go back to the
previous menu.
Auto Set requires an OnStar
subscription.
If auto timing is set, the time
displayed on the clock may not
update immediately when driving
into a new time zone.
To set the date: 1. Touch SETTINGS from the Home Page, then touch Time
and Date.
2. Touch Set Date and touch
«
orªto increase or decrease
month, day, or year. 3. Touch
}to go back to the
previous menu.
To set the clock display: 1. Touch SETTINGS and touch Time and Date.
2. Touch Clock Display and touch OFF or ON to turn the clock
display off or on.
3. Touch
}to go back to the
previous menu.
The clock settings can also be
accessed by touching the time
display, then touching Set.
Power Outlets
Power Outlet 12-Volt Direct
Current
The accessory power outlet can be
used to plug in electrical equipment,
such as a cell phone or MP3 player.
There is an accessory power outlet
on the center floor console in front
of the shift lever. This outlet is
powered when the ignition is in the
ON/RUN or ACC/ACCESSORY
position, or until the driver door is
Page 121 of 405
Chevrolet Cruze Owner Manual (GMNA-Localizing-U.S./Canada/Mexico-
9803785) - 2017 - CRC - 4/13/16
120 Instruments and Controls
Cluster Menu
There is an interactive display area
in the center of the instrument
cluster.
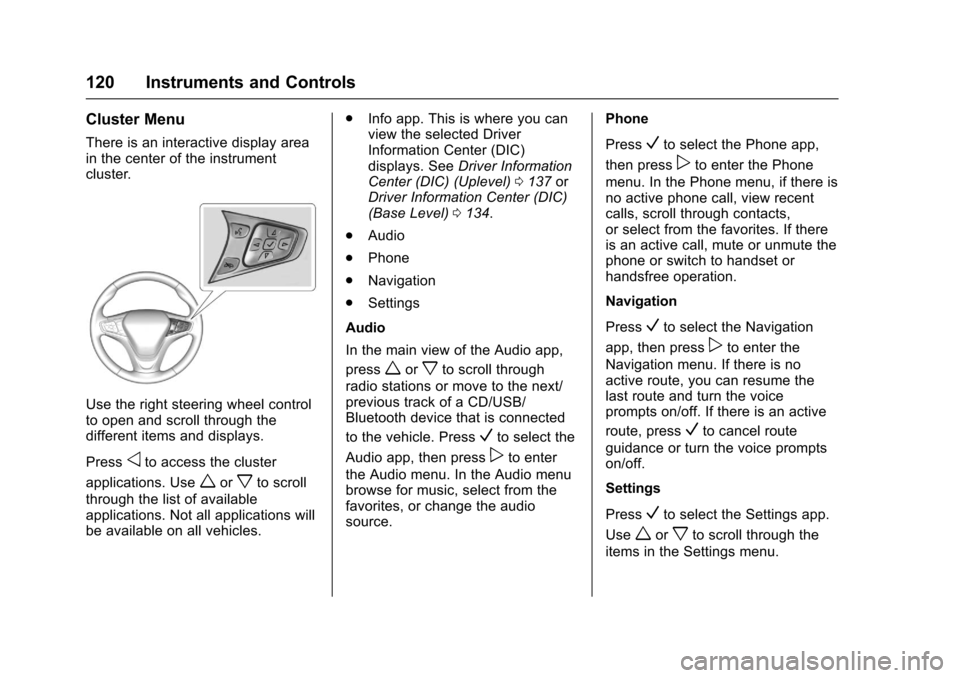
Use the right steering wheel control
to open and scroll through the
different items and displays.
Press
oto access the cluster
applications. Use
worxto scroll
through the list of available
applications. Not all applications will
be available on all vehicles. .
Info app. This is where you can
view the selected Driver
Information Center (DIC)
displays. See Driver Information
Center (DIC) (Uplevel) 0137 or
Driver Information Center (DIC)
(Base Level) 0134.
. Audio
. Phone
. Navigation
. Settings
Audio
In the main view of the Audio app,
press
worxto scroll through
radio stations or move to the next/
previous track of a CD/USB/
Bluetooth device that is connected
to the vehicle. Press
Vto select the
Audio app, then press
pto enter
the Audio menu. In the Audio menu
browse for music, select from the
favorites, or change the audio
source. Phone
Press
Vto select the Phone app,
then press
pto enter the Phone
menu. In the Phone menu, if there is
no active phone call, view recent
calls, scroll through contacts,
or select from the favorites. If there
is an active call, mute or unmute the
phone or switch to handset or
handsfree operation.
Navigation
Press
Vto select the Navigation
app, then press
pto enter the
Navigation menu. If there is no
active route, you can resume the
last route and turn the voice
prompts on/off. If there is an active
route, press
Vto cancel route
guidance or turn the voice prompts
on/off.
Settings
Press
Vto select the Settings app.
Use
worxto scroll through the
items in the Settings menu.
Page 151 of 405
Chevrolet Cruze Owner Manual (GMNA-Localizing-U.S./Canada/Mexico-
9803785) - 2017 - CRC - 4/13/16
150 Instruments and Controls
TRANSITIONING TO XX KM/H
(XX MPH) MAX SPEED
This message will be displayed
along with other messages. These
messages include EXHAUST FLUID
EMPTY REFILL NOW, EXHAUST
FLUID QUALITY POOR, SERVICE
EMISSION SYSTEM, or SERVICE
EXHAUST FLUID SYSTEM. When
this message is displayed, the end
of the countdown has been reached
and the vehicle speed is being
limited.
Vehicle
Personalization
Use the audio system controls to
access the personalization menus
for customizing vehicle features.
The following are all possible
personalization features. Depending
on the vehicle, some may not be
available.
Base Radio Audio System
Controls
{:Press to access the Home
Page Menu.
QorR: Touch to scroll through the
menus or setup items.
0: Touch to exit or return to the
previous screen or menu.
Uplevel Radio Audio System
Controls
1. Press the desired feature to display a list of available
options.
2. Press to select the desired feature setting. 3. Press
oBACK on the
faceplate or
0to return to the
previous menu or exit.
Turn the vehicle to ON/RUN to
access the Settings menu, then
select SETTINGS from the Home
Page on the infotainment display.
Personalization Menus
The following list of menu items may
be available:
. Time and Date
. Language (Language)
. Rear Seat Reminder
. Teen Driver
. Valet Mode
. Radio
. Vehicle
. Bluetooth
. Apple CarPlay
. Android Auto
. USB Auto Launch
. Voice
. Display
Page 152 of 405
Chevrolet Cruze Owner Manual (GMNA-Localizing-U.S./Canada/Mexico-
9803785) - 2017 - CRC - 4/13/16
Instruments and Controls 151
.Rear Camera
. Return to Factory Settings
. Software Information
Detailed information for each menu
follows.
Time and Date
Manually set the time and date. See
Clock 0111.
Language (Language)
Select Language, then select from
the available language(s).
The selected language will display
on the system, and voice
recognition will reflect the selected
language.
Rear Seat Reminder
This allows for a chime and a
message ‘Look in Rear Seat’ when
the rear door has been opened
before or during operation of the
vehicle.
Select Off or On.
Teen Driver
See “Teen Driver” under“Settings”
in the infotainment manual.
Valet Mode
This will lock the infotainment
system and steering wheel controls.
It may also limit access to vehicle
storage locations (if equipped).
To enable valet mode:
1. Enter a four-digit code on the keypad.
2. Select Enter to go to the confirmation screen.
3. Re-enter the four-digit code.
Press LOCK or UNLOCK to lock or
unlock the system. Press Back to go
back to the previous menu.
Radio
Press and the following may
display:
. Manage Favorites
. Number of Favorites Shown
. Audible Touch Feedback
. Text Scroll .
Tone Settings
. Auto Volume
. Maximum Startup Volume
. Audio Cue Volume
Manage Favorites
This allows favorites to be edited.
See “Storing a Station as a
Favorite” inAM-FM Radio 0170 or
“Manage Favorites” in“Settings”
under “Radio” in the infotainment
manual.
Number of Favorites Shown
Press to set the number of favorites
to display.
Select the desired number or select
Auto and the infotainment system
will automatically adjust the number
of favorites shown.
Audible Touch Feedback
This allows Audible Touch
Feedback to be turned on or off.
Select Off or On.
Page 153 of 405
Chevrolet Cruze Owner Manual (GMNA-Localizing-U.S./Canada/Mexico-
9803785) - 2017 - CRC - 4/13/16
152 Instruments and Controls
Text Scroll
Select to see text scroll on the
screen.
Select Off or On.
Tone Settings
Select to adjust the radio tone. See
Operation0169 or“Tone Settings”
under “AM-FM Radio” in the
infotainment manual.
Auto Volume
This feature adjusts the volume
based on vehicle speed and
ambient noise.
Select Off, Low, Medium-Low,
Medium, Medium-High, or High.
Maximum Startup Volume
This feature sets the maximum
startup volume. If the vehicle is
started and the volume is greater
than this level, the volume is
adjusted to this level. To set the
maximum startup volume, turn the
MENU knob or press + or −to
increase or decrease. Audio Cue Volume
This feature sets the volume of
audio files played at system startup
and shutdown.
Select On, then press + or
−to
increase or decrease the volume.
Vehicle
Select and the following may
display:
. Climate and Air Quality
. Collision/Detection Systems
. Comfort and Convenience
. Lighting
. Power Door Locks
. Remote Lock, Unlock, Start
Climate and Air Quality
Select and the following may
display:
. Auto Fan Speed
. Auto Defog
. Auto Rear Defog Auto Fan Speed
This feature will set the auto fan
speed.
Select Low, Medium, or High.
Auto Defog
When turned on and high humidity
is detected, the climate control
system may adjust to outside air
supply and turn on the air
conditioner or the heater. The fan
speed may slightly increase to help
prevent fogging. When high
humidity is no longer detected, the
system will return to its prior
operation.
Select Off or On.
Page 157 of 405
Chevrolet Cruze Owner Manual (GMNA-Localizing-U.S./Canada/Mexico-
9803785) - 2017 - CRC - 4/13/16
156 Instruments and Controls
USB Auto Launch
This allows Android and Apple
CarPlay devices to automatically
connect when plugged into the
USB port.
Select Off or On.
Voice
Select and the following may
display:
.Confidence Threshold
. Prompt Length
. Audio Feedback Speed
. Display “What Can I Say?” Tips
Confidence Threshold
This feature allows the adjustment
of the sensitivity of the speech
recognition system.
Select Confirm More or
Confirm Less.
Prompt Length
This feature adjusts the voice
prompt length.
Select Short or Long. Audio Feedback Speed
This feature adjusts the audio
feedback speed.
Select Slow, Medium, or Fast.
Display
“What Can I Say?” Tips
This feature gives voice
command tips.
Select Off or On.
Display
Select and the following may
display:
. Calibrate Touchscreen
. Turn Display Off
Calibrate Touchscreen
Select to calibrate the touchscreen,
then follow the prompts.
Turn Display Off
Select to turn the display off. Press
anywhere on the display area or any
faceplate button to turn the
display on.
Rear Camera
Select and the following may
display:
. Guidance Lines
. Rear Park Assist Symbols
Guidance Lines
Select to turn Off or On. See
Assistance Systems for Parking or
Backing 0240.
Rear Park Assist Symbols
Select to turn Off or On. See
Assistance Systems for Parking or
Backing 0240.
Return to Factory Settings
Select and the following may
display:
.
Restore Vehicle Settings
. Clear All Private Data
. Restore Radio Settings
Restore Vehicle Settings
This allows selection of restoring
vehicle settings.
Select Restore or Cancel.