key CHEVROLET CRUZE 2018 Workshop Manual
[x] Cancel search | Manufacturer: CHEVROLET, Model Year: 2018, Model line: CRUZE, Model: CHEVROLET CRUZE 2018Pages: 404, PDF Size: 4.64 MB
Page 209 of 404
Chevrolet Cruze Owner Manual (GMNA-Localizing-U.S./Canada/Mexico-
11348462) - 2018 - crc - 5/15/17
208 Driving and Operating
Ignition Positions
(Keyless Access)
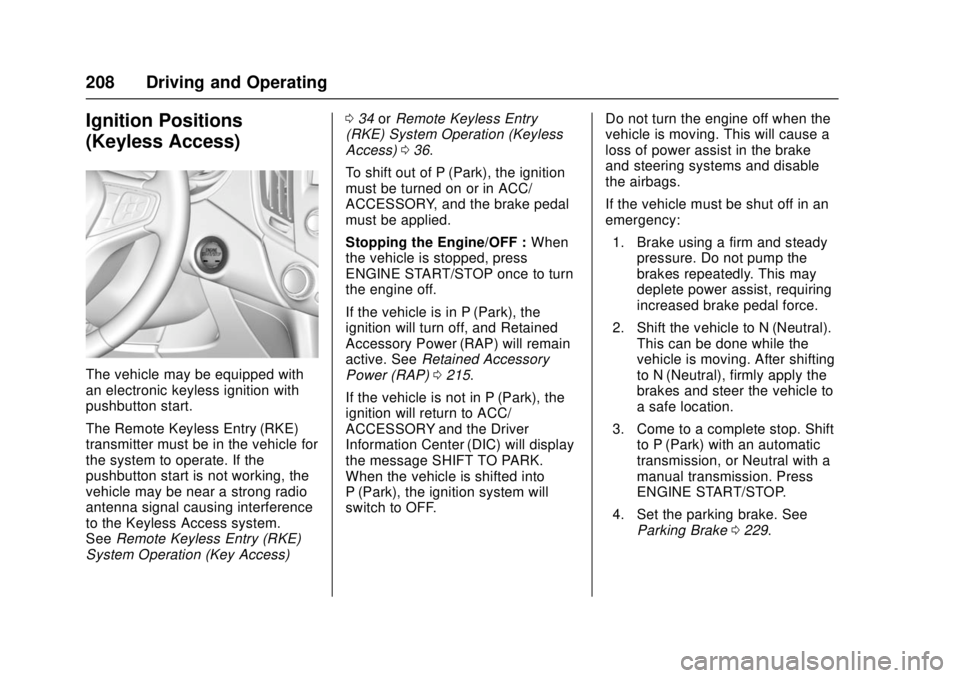
The vehicle may be equipped with
an electronic keyless ignition with
pushbutton start.
The Remote Keyless Entry (RKE)
transmitter must be in the vehicle for
the system to operate. If the
pushbutton start is not working, the
vehicle may be near a strong radio
antenna signal causing interference
to the Keyless Access system.
SeeRemote Keyless Entry (RKE)
System Operation (Key Access) 0
34 orRemote Keyless Entry
(RKE) System Operation (Keyless
Access) 036.
To shift out of P (Park), the ignition
must be turned on or in ACC/
ACCESSORY, and the brake pedal
must be applied.
Stopping the Engine/OFF : When
the vehicle is stopped, press
ENGINE START/STOP once to turn
the engine off.
If the vehicle is in P (Park), the
ignition will turn off, and Retained
Accessory Power (RAP) will remain
active. See Retained Accessory
Power (RAP) 0215.
If the vehicle is not in P (Park), the
ignition will return to ACC/
ACCESSORY and the Driver
Information Center (DIC) will display
the message SHIFT TO PARK.
When the vehicle is shifted into
P (Park), the ignition system will
switch to OFF. Do not turn the engine off when the
vehicle is moving. This will cause a
loss of power assist in the brake
and steering systems and disable
the airbags.
If the vehicle must be shut off in an
emergency:
1. Brake using a firm and steady pressure. Do not pump the
brakes repeatedly. This may
deplete power assist, requiring
increased brake pedal force.
2. Shift the vehicle to N (Neutral). This can be done while the
vehicle is moving. After shifting
to N (Neutral), firmly apply the
brakes and steer the vehicle to
a safe location.
3. Come to a complete stop. Shift to P (Park) with an automatic
transmission, or Neutral with a
manual transmission. Press
ENGINE START/STOP.
4. Set the parking brake. See Parking Brake 0229.
Page 211 of 404
Chevrolet Cruze Owner Manual (GMNA-Localizing-U.S./Canada/Mexico-
11348462) - 2018 - crc - 5/15/17
210 Driving and Operating
Manual Transmission
The shift lever should be in Neutral
and the parking brake engaged.
Hold the clutch pedal down to the
floor and start the engine.
Gasoline Engine Starting
Procedure (Key Access)1. With your foot off the accelerator pedal, turn the
ignition key to START. When
the engine starts, let go of the
key. The idle speed will go
down as the engine warms. Do
not race the engine
immediately after starting it.
Allow the oil to warm up and
lubricate all moving parts.
Caution
Cranking the engine for long
periods of time, by returning the
ignition to the START position
immediately after cranking has
ended, can overheat and damage
the cranking motor, and drain the
(Continued)
Caution (Continued)
battery. Wait at least 15 seconds
between each try, to let the
cranking motor cool down.
2. If the engine does not start after five to 10 seconds,
especially in very cold weather
(below −18 °C or 0 °F), it could
be flooded with too much
gasoline. Push the accelerator
pedal all the way to the floor
and hold it there as you hold
the key in START for a
maximum of 15 seconds. Wait
at least 15 seconds between
each try, to allow the cranking
motor to cool. When the engine
starts, let go of the key and
accelerator. If the vehicle starts
briefly but then stops again,
repeat the procedure. This
clears the extra gasoline from
the engine. Do not race the
engine immediately after starting it. Operate the engine
and transmission gently until
the oil warms up and lubricates
all moving parts.
Gasoline Engine Starting
Procedure (Keyless Access) 1. With the Keyless Access system, the RKE transmitter
must be in the vehicle. Press
ENGINE START/STOP with the
brake pedal applied. When the
engine begins cranking, let go
of the button.
The idle speed will go down as
the engine gets warm. Do not
race the engine immediately
after starting it. Operate the
engine and transmission gently
until the oil warms up and
lubricates all moving parts.
If the RKE transmitter is not in
the vehicle, if there is
interference, or if the RKE
battery is low, a Driver
Information Center (DIC)
message will display.
Page 212 of 404
Chevrolet Cruze Owner Manual (GMNA-Localizing-U.S./Canada/Mexico-
11348462) - 2018 - crc - 5/15/17
Driving and Operating 211
SeeDriver Information Center
(DIC) (Base) 0138 orDriver
Information Center (DIC)
(Uplevel) 0141 andRemote
Keyless Entry (RKE) System
Operation (Key Access) 034 or
Remote Keyless Entry (RKE)
System Operation (Keyless
Access) 036.
Caution
Cranking the engine for long
periods of time, by returning the
ignition to the START position
immediately after cranking has
ended, can overheat and damage
the cranking motor, and drain the
battery. Wait at least 15 seconds
between each try, to let the
cranking motor cool down.
2. If the engine does not start after five to 10 seconds,
especially in very cold weather
(below −18 °C or 0 °F), it could
be flooded with too much
gasoline. Try pushing the
accelerator pedal all the way to
the floor and holding it there as you press ENGINE START/
STOP, for up to a maximum of
15 seconds. Wait at least
15 seconds between each try,
to allow the cranking motor to
cool down. When the engine
starts, let go of the button and
the accelerator. If the vehicle
starts briefly but then stops
again, do the same thing. This
clears the extra gasoline from
the engine. Do not race the
engine immediately after
starting it. Operate the engine
and transmission gently until
the oil warms up and lubricates
all moving parts.
Stop/Start System
{Warning
Exiting the vehicle without first
shifting into P (Park) may cause
the vehicle to move. You or others
may be injured. Because the
vehicle may have an auto engine
Stop/Start feature, the vehicle's
engine might seem to be shut off;
(Continued)
Warning (Continued)
however, once the brake pedal is
released, the engine will start up
again. The engine may restart
even while the brake is applied.
Shift to P (Park) and turn the
ignition off before exiting the
vehicle.
The vehicle may have a fuel saving
Stop/Start system to shut off the
engine to help conserve fuel.
Auto Engine Stop/Start
When the brakes are applied and
the vehicle is at a complete stop,
the engine may turn off. When
stopped, the tachometer displays
AUTO STOP. See Tachometer
0 125. When the brake pedal is
released or the accelerator pedal is
pushed, the engine will restart.
Auto Stop may be deactivated if:
. A minimum vehicle speed is not
reached.
Page 213 of 404
Chevrolet Cruze Owner Manual (GMNA-Localizing-U.S./Canada/Mexico-
11348462) - 2018 - crc - 5/15/17
212 Driving and Operating
.The engine or transmission is
not at the required operating
temperature.
. The outside temperature is not
in the required operating range:
Above 50 °C (122 °F).
For diesel engines, below 5 °C
(41 °F).
For gasoline engines in US and
Canada, below −10 °C (14 °F).
For gasoline engines in Mexico,
below 5 °C (41 °F).
. The shift lever is in any gear
other than D (Drive).
. The battery has been recently
disconnected.
. The battery charge is low.
. The interior comfort level has not
reached the required level for
the climate control system or
defog settings. Use the eco
(green indicator on) air
conditioning mode for better
efficiency. See Automatic
Climate Control System 0190. .
The Auto Stop time is greater
than two minutes.
Diesel Engine Starting Procedure
The diesel engine starts differently
than a gasoline engine. 1. With the Keyless Access system, the RKE transmitter
must be in the vehicle.
Observe the wait-to-start light.
See Wait-to-Start Light 0135.
This light may not come on if
the engine is warm.
2. Press the ENGINE START/ STOP button with the brake
pedal or clutch pedal applied to
START. The start will be
delayed if the wait-to-start lamp
is illuminated.
The engine has a fast warm-up
glow plug system. The
wait-to-start light will illuminate
for a much shorter time than
most diesel engines, due to the
rapid heating of the glow plug
system.Caution
If the wait-to-start light stays on
after starting the vehicle, the
vehicle may not run properly.
Have the vehicle serviced
right away.
3. If the engine does not start after 15 seconds of cranking,
wait one minute for the starter
to cool, then try the same steps
again.
If you are trying to start the engine
after you have run out of fuel, follow
the steps in Running Out of Fuel
(Diesel) 0253.
When the engine is cold, let it run
for a few minutes before you move
the vehicle. This lets oil pressure
build up. The engine will sound
louder when it's cold.
Cold Weather Starting (Diesel
Engine)
The following tips will help with cold
weather starting.
Page 217 of 404
Chevrolet Cruze Owner Manual (GMNA-Localizing-U.S./Canada/Mexico-
11348462) - 2018 - crc - 5/15/17
216 Driving and Operating
.Prevent ignition key removal
unless the shift lever is in
P (Park) with the shift lever
button fully released.
. Prevent movement of the shift
lever out of P (Park) unless the
ignition on and the brake pedal
is applied.
The shift lock release is always
functional except in the case of an
uncharged or low voltage (less than
9-volt) battery.
If the vehicle has an uncharged
battery or a battery with low voltage,
try charging or jump starting the
battery. See Jump Starting - North
America 0333.
To shift out of P (Park): 1. Apply the brake pedal.
2. Turn the ignition on.
3. Press the shift lever button.
4. Move the shift lever to the desired position.
If still unable to shift out of P (Park):
1. Fully release the shift lever button. 2. Hold the brake pedal down and
press the shift lever button
again.
3. Move the shift lever to the desired position.
If the shift lever still cannot be
moved from P (Park), see your
dealer.
This vehicle may have the Seat Belt
Assurance System, which may
prevent the vehicle from shifting out
of P (Park). See Seat Belts069.
Parking (Manual
Transmission)
If the vehicle has a manual
transmission, before getting out of
the vehicle, move the shift lever into
R (Reverse) if parking on a downhill
slope. On a level surface or an
uphill slope, use 1 (First) gear.
Firmly apply the parking brake. See
Parking Brake 0229. Turn the
wheels toward the curb for a
downhill slope, or away from the
curb for an uphill slope. Once the
shift lever has been placed into gear with the clutch pedal pressed in,
turn the ignition off, and release the
clutch.
Parking over Things
That Burn
{Warning
Things that can burn could touch
hot exhaust parts under the
vehicle and ignite. Do not park
over papers, leaves, dry grass,
or other things that can burn.
Extended Parking
It is better not to park with the
vehicle running. If the vehicle is left
while running, follow the proper
steps to be sure the vehicle will not
move and there is adequate
ventilation.
See
Shifting Into Park (Automatic
Transmission) 0215 andEngine
Exhaust 0217.
For vehicles with pushbutton start,
if the vehicle is left parked while
running and the Remote Keyless
Page 251 of 404
Chevrolet Cruze Owner Manual (GMNA-Localizing-U.S./Canada/Mexico-
11348462) - 2018 - crc - 5/15/17
250 Driving and Operating
refueling provides the best
opportunity to have a supply of fresh
fuel. Storage at hot ambient
temperatures will accelerate
biodiesel degradation.
Owners who use very little fuel,
or who have vehicles stored for
extended periods of time, should
avoid the use of biodiesel blended
fuels above 5% by volume. When
vehicles are stored for longer than
one month, they should be run out
of biodiesel to below one-quarter
tank, refueled with Ultra Low Sulfur
Diesel fuel, and driven at least
32 km (20 mi) before storage.
At temperatures below 0 °C (32 °F),
it is recommended to switch to Ultra
Low Sulfur Diesel fuel with no
biodiesel content, or to blends with
biodiesel containing less than 5% by
volume. At these extreme cold
temperatures, biodiesel blends
higher than 5% by volume may
cause fuel filter plugging and
system gelling, which can lead to
vehicle operability problems.Fuels improperly blended for cold
temperature operation may result in
restricted fuel filters and degraded
vehicle performance. GM diesel
vehicles are equipped with a fuel
heating system to provide an extra
level of protection against filter
plugging from gelling or waxing of
conventional diesel fuel and
biodiesel blends. If the operating
temperature is far below the
temperature at which gelling or
waxing of the fuel occurs, the
system cannot prevent all cases of
filter plugging.
If the vehicle experiences a fuel
filter restriction, the on-board
monitoring system will alert the
driver that the fuel filter requires
service. The fuel filter, however, will
not prevent all damage caused by
poor quality biodiesel.
Cold Weather Operation
(Diesel)
In cold weather, the fuel filter may
become clogged by wax naturally
present in the fuel. To unclog it,
move the vehicle to a warm garagearea and allow the filter to warm up.
The fuel filter may need to be
replaced. See
Fuel Filter
Replacement (Diesel) 0254.
At temperatures below 0 °C (32 °F),
it is recommended to avoid using
biodiesel blends above 5% blend.
This blend may cause fuel filter
plugging, system gelling, and
freezing that may affect vehicle
starting. You may need to place the
ignition in Service Mode and off a
few times before the vehicle will
start.
See Ignition Positions (Key Access)
0 206 orIgnition Positions (Keyless
Access) 0208. Also, idle the vehicle
for a couple of minutes before
accelerating.
For additional information for better
cold weather operation, see Engine
Heater 0213.
Water in Fuel (Diesel)
Improper fuel tank inspection or
cleaning, or contaminated fuel from
suppliers, can cause water to be
pumped into the fuel tank along with
the diesel fuel. If a WATER IN FUEL
Page 261 of 404
Chevrolet Cruze Owner Manual (GMNA-Localizing-U.S./Canada/Mexico-
11348462) - 2018 - crc - 5/15/17
260 Vehicle Care
California Perchlorate
Materials Requirements
Certain types of automotive
applications, such as airbag
initiators, seat belt pretensioners,
and lithium batteries contained in
Remote Keyless Entry transmitters,
may contain perchlorate materials.
Special handling may be necessary.
For additional information, see
www.dtsc.ca.gov/hazardouswaste/
perchlorate.
Accessories and
Modifications
Adding non-dealer accessories or
making modifications to the vehicle
can affect vehicle performance and
safety, including such things as
airbags, braking, stability, ride and
handling, emissions systems,
aerodynamics, durability, and
electronic systems like antilock
brakes, traction control, and stability
control. These accessories or
modifications could even cause
malfunction or damage not covered
by the vehicle warranty.Damage to suspension components
caused by modifying vehicle height
outside of factory settings will not be
covered by the vehicle warranty.
Damage to vehicle components
resulting from modifications or the
installation or use of non-GM
certified parts, including control
module or software modifications, is
not covered under the terms of the
vehicle warranty and may affect
remaining warranty coverage for
affected parts.
GM Accessories are designed to
complement and function with other
systems on the vehicle. See your
dealer to accessorize the vehicle
using genuine GM Accessories
installed by a dealer technician.
Also, see
Adding Equipment to the
Airbag-Equipped Vehicle 086.
Vehicle Checks
Doing Your Own
Service Work
{Warning
It can be dangerous to work on
your vehicle if you do not have
the proper knowledge, service
manual, tools, or parts. Always
follow owner ’s manual procedures
and consult the service manual
for your vehicle before doing any
service work.
If doing some of your own service
work, use the proper service
manual. It tells you much more
about how to service the vehicle
than this manual can. To order the
proper service manual, see Service
Publications Ordering Information
0 376.
This vehicle has an airbag system.
Before attempting to do your own
service work, see Servicing the
Airbag-Equipped Vehicle 085.
Page 270 of 404
Chevrolet Cruze Owner Manual (GMNA-Localizing-U.S./Canada/Mexico-
11348462) - 2018 - crc - 5/15/17
Vehicle Care 269
change is not necessary for up to a
year. The engine oil and filter must
be changed at least once a year
and, at this time, the system must
be reset. Your dealer has trained
service people who will perform this
work and reset the system. It is also
important to check the oil regularly
over the course of an oil drain
interval and keep it at the proper
level.
If the system is ever reset
accidentally, the oil must be
changed at 5 000 km (3,000 mi)
since the last oil change.
Remember to reset the oil life
system whenever the oil is changed.
How to Reset the Engine Oil
Life System
Reset the system whenever the
engine oil is changed so that the
system can calculate the next
engine oil change. To reset the
system:Resetting the Oil Life System
(Base Level Cluster)
1. Display the REMAINING OIL LIFE on the DIC.
See Driver Information Center
(DIC) (Base) 0138 orDriver
Information Center (DIC)
(Uplevel) 0141.
2. Press and hold SET/CLR on the turn signal lever while the
Oil Life display is active. The
oil life will change to 100%.
Resetting the Oil Life System
(Uplevel Cluster) 1. Display the REMAINING OIL LIFE on the DIC.
See Driver Information Center
(DIC) (Base) 0138 orDriver
Information Center (DIC)
(Uplevel) 0141.
2. Press and hold
Von the DIC
while the Oil Life display is
active. The oil life will change
to 100%. The oil life system can also be reset
as follows:
1. Turn the ignition on with the engine off.
See Ignition Positions (Key
Access) 0206 orIgnition
Positions (Keyless Access)
0 208.
2. Fully press and release the accelerator pedal three times
within five seconds.
The system is reset when the
CHANGE ENGINE OIL SOON
message goes off.
If the CHANGE ENGINE OIL SOON
message comes back on when the
vehicle is started, the engine oil life
system has not been reset. Repeat
the procedure.Automatic Transmission
Fluid
How to Check Automatic
Transmission Fluid
It is not necessary to check the
transmission fluid level.
A transmission fluid leak is the only
Page 282 of 404
Chevrolet Cruze Owner Manual (GMNA-Localizing-U.S./Canada/Mexico-
11348462) - 2018 - crc - 5/15/17
Vehicle Care 281
For manual transmission
vehicles, put the shift lever in
Neutral, push the clutch pedal
down halfway, and try to start
the engine. The vehicle should
start only when the clutch
pedal is pushed down all the
way to the floor. If the vehicle
starts when the clutch pedal is
not pushed all the way down,
contact your dealer for service.
Automatic Transmission
Shift Lock Control
Function Check
{Warning
When you are doing this
inspection, the vehicle could
move suddenly. If the vehicle
moves, you or others could be
injured.
1. Before starting this check, be sure there is enough room
around the vehicle. It should be
parked on a level surface. 2. Apply the parking brake. Be
ready to apply the regular
brake immediately if the vehicle
begins to move.
3. With the engine off, turn the ignition on, but do not start the
engine. Without applying the
regular brake, try to move the
shift lever out of P (Park) with
normal effort. If the shift lever
moves out of P (Park), contact
your dealer for service.
Ignition Transmission
Lock Check
If equipped with a Key Access
ignition, while parked and with the
parking brake set, try to turn the
ignition off in each shift lever
position.
.The ignition should turn off only
when the shift lever is in
P (Park).
. The key should come out only
when the ignition is off.
Contact your dealer if service is
required.
Park Brake and P (Park)
Mechanism Check
{Warning
When you are doing this check,
the vehicle could begin to move.
You or others could be injured
and property could be damaged.
Make sure there is room in front
of the vehicle in case it begins to
roll. Be ready to apply the regular
brake at once should the vehicle
begin to move.
Park on a fairly steep hill, with the
vehicle facing downhill. Keeping
your foot on the regular brake, set
the parking brake.
. To check the parking brake's
holding ability: With the engine
running and the transmission in
N (Neutral), slowly remove foot
pressure from the regular brake
pedal. Do this until the vehicle is
held by the parking brake only.
Page 311 of 404
Chevrolet Cruze Owner Manual (GMNA-Localizing-U.S./Canada/Mexico-
11348462) - 2018 - crc - 5/15/17
310 Vehicle Care
matched to the tire/wheel positions,
using a TPMS relearn tool, in the
following order: driver side front tire,
passenger side front tire, passenger
side rear tire, and driver side rear.
See your dealer for service or to
purchase a relearn tool. A TPMS
relearn tool can also be purchased.
See Tire Pressure Monitor Sensor
Activation Tool at
www.gmtoolsandequipment.com or
call 1-800-GM TOOLS
(1-800-468-6657).
There are two minutes to match the
first tire/wheel position, and
five minutes overall to match all four
tire/wheel positions. If it takes
longer, the matching process stops
and must be restarted.
The TPMS sensor matching
process is:1. Set the parking brake.
2. Turn the ignition on without starting the vehicle or place the
vehicle in Service Mode.
See Ignition Positions (Key
Access) 0206 orIgnition
Positions (Keyless Access)
0 208. 3. Uplevel DIC Only: Make sure
the Tire Pressure info page
option is turned on. The info
pages on the DIC can be
turned on and off through the
Options menu.
See Driver Information Center
(DIC) (Base) 0138 orDriver
Information Center (DIC)
(Uplevel) 0141.
4. If the vehicle has an uplevel DIC, use the DIC controls on
the right side of the steering
wheel to scroll to the Tire
Pressure screen under the DIC
info page.
If the vehicle has a base level
DIC, press MENU to select the
Vehicle Information Menu in
the DIC. Use the thumbwheel
to scroll to the Tire Pressure
Menu item screen.
5. If the vehicle has an uplevel DIC, press and hold the
V
(Set/Reset) button in the center
of the DIC controls.
If the vehicle has a base level
DIC, press SET/CLR to begin
the sensor matching process. A message requesting
acceptance of the process may
display.
If the vehicle has a base level
DIC, press SET/CLR again to
confirm the selection.
The horn sounds twice to
signal the receiver is in relearn
mode and the TIRE
LEARNING ACTIVE message
displays on the DIC screen.
6. Start with the driver side front tire.
7. Place the relearn tool against the tire sidewall, near the valve
stem. Then press the button to
activate the TPMS sensor.
A horn chirp confirms that the
sensor identification code has
been matched to this tire and
wheel position.
8. Proceed to the passenger side front tire, and repeat the
procedure in Step 7.
9. Proceed to the passenger side rear tire, and repeat the
procedure in Step 7.