brake CHEVROLET DURAMAX 2006 Owners Manual
[x] Cancel search | Manufacturer: CHEVROLET, Model Year: 2006, Model line: DURAMAX, Model: CHEVROLET DURAMAX 2006Pages: 100, PDF Size: 0.71 MB
Page 6 of 100
Be sure you are using the proper fuel for existing
weather conditions. SeeDiesel Fuel Requirements
and Fuel System on page 5-2.
If the engine starts, runs a short time, then stops, your
vehicle needs service.
{CAUTION:
Do not use gasoline or starting aids, such as
ether, in the air intake. They could damage
your engine. There could also be a �re, which
could cause serious personal injury.
Elevated Idle/Exhaust Restrictor
The engine has a cold temperature high idle and exhaust
restrictor feature which elevates the engines idle speed
from 680 to 1200 rpms, and restricts the exhaust gas
flow, when outside temperatures are below 32°F (0°C),
and the engine coolant temperature is below 150°F
(65°C.) This feature enhances heater performance
by raising the engine coolant temperature faster.For pickup models, this feature can be turned off and
on using the DIC steering wheel control buttons. If your
vehicle is not equipped with the DIC steering wheel
control buttons, do the following to turn on this feature:
1. Turn the ignition to RUN, with the vehicle off.
2. Press the accelerator pedal to the floor and hold
while quickly pressing the brake pedal three times
in less than eight seconds.
3. Release the accelerator pedal and start the engine.
When the engine is started, it will slowly ramp up to the
high idle speed after a delay of a few seconds up to
approximately two minutes. For this method to work
properly there must be no throttle or brake pedal faults.
The engine idle speed will return to normal once the
following conditions are met:•Once engine coolant temperature reaches
150°F (65°C).
•Air intake temperature reaches 32°F (0°C).
2-4
ProCarManuals.com
Page 7 of 100
The high idle speed will be temporarily interrupted
and the engine speed will return to normal if any of
the following conditions occur:
•The brake pedal is applied.
•The accelerator pedal is pressed.
•The automatic transmission is shifted out of
PARK (P) or NEUTRAL (N).
•The clutch pedal on the manual transmission is
pressed (pickup models).
•Vehicle speed is detected.
Once these inputs are removed, the engine idle speed
will slowly ramp back up to high idle after the normal
delay, if the conditions for engine coolant temperature
and air intake temperature are still met.
Manual High Idle System
(Van Models Only)
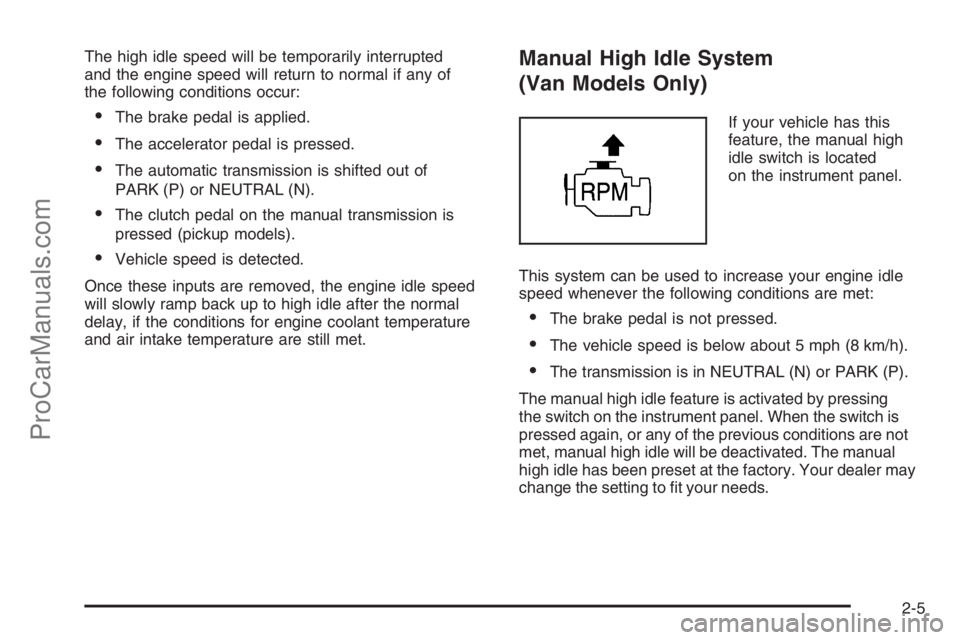
If your vehicle has this
feature, the manual high
idle switch is located
on the instrument panel.
This system can be used to increase your engine idle
speed whenever the following conditions are met:
•The brake pedal is not pressed.
•The vehicle speed is below about 5 mph (8 km/h).
•The transmission is in NEUTRAL (N) or PARK (P).
The manual high idle feature is activated by pressing
the switch on the instrument panel. When the switch is
pressed again, or any of the previous conditions are not
met, manual high idle will be deactivated. The manual
high idle has been preset at the factory. Your dealer may
change the setting to fit your needs.
2-5
ProCarManuals.com
Page 22 of 100
FUEL FILTER LIFE ###%
This feature is available on vehicles with steering wheel
controls. When the fuel button is pressed and FUEL
FILTER LIFE appears on the display, this information
will give the percentage of fuel filter life remaining.
FUEL FILTER LIFE RESET
This message will appear when a reset is performed
either by using the steering wheel controls or the
following manual procedure.
For vehicles with steering wheel controls, press and
hold the select button for five seconds while the
FUEL FILTER LIFE message is displayed. This
message will appear on the DIC for ten seconds.For vehicles without steering wheel controls, do the
following:
1. Without pressing the pedals, turn the ignition key to
the on position without starting the engine.
2. Wait five seconds.
3. Completely press the brake and the accelerator
pedals simultaneously and hold for ten seconds.
The system is now reset.
4. Turn the ignition key off.
The next time the engine is started, the message will
no longer be displayed. Always reset the FUEL FILTER
LIFE system after a fuel filter change.
CHANGE FUEL FILTER
This message will appear on the DIC for ten seconds
when a fuel filter change is required. SeeFuel Filter
Replacement on page 5-12for more information.
3-10
ProCarManuals.com
Page 24 of 100
Towing
Towing a Trailer
When towing at high altitude on steep uphill grades,
consider the following:
Engine coolant will boil at a lower temperature than sea
level. If you turn your engine off immediately after towing
at high altitude on steep uphill grades, your vehicle may
show signs similar to engine overheating.To avoid this, let the engine run while parked (preferably
on level ground) with automatic transmission equipped
vehicles in PARK (P) or manual transmission equipped
vehicles in NEUTRAL with the park brake applied for at
least five minutes before turning the engine off. If you do
get the overheat warning, seeEngine Overheating on
page 5-39.
4-2
ProCarManuals.com
Page 31 of 100
Water In Fuel Light/Message Chart
(cont’d)
Problem Recommended Action
•Immediately after
refueling, large
amount of water
possibly pumped
into fuel tank.Fuel tank purging
required. See your
dealer for assistance.
Notice:If you drive when this warning indicator is
on, you can damage your fuel injection system and
your engine. If the indicator comes on right after you
refuel, it means water was pumped into your fuel
tank. Turn off your engine immediately. Then, have
the water drained at once.
Hard starting, hesitation or flat performance at high speed
or during hard acceleration may be an indication of
premature fuel filter plugging due to dirty or contaminated
fuel. The filter element may need to be changed if this
happens. SeeFuel Filter Replacement on page 5-12.To drain water, do the following:
1. Stop and park the vehicle in a safe place.
Turn off the engine and apply the parking brake.
2. Remove the fuel cap.
3. Place a fuel-resistant container under the fuel
filter(s). For pickup models, the filter drain valve
is located in the engine compartment, on the
passenger’s side of the vehicle, on the bottom of the
fuel filter. For van models, the filter drain valves for
the primary and secondary fuel filters are located in
the chassis (inside frame rail) compartment. They
are on the driver’s side of the vehicle, below the
fuel filters.
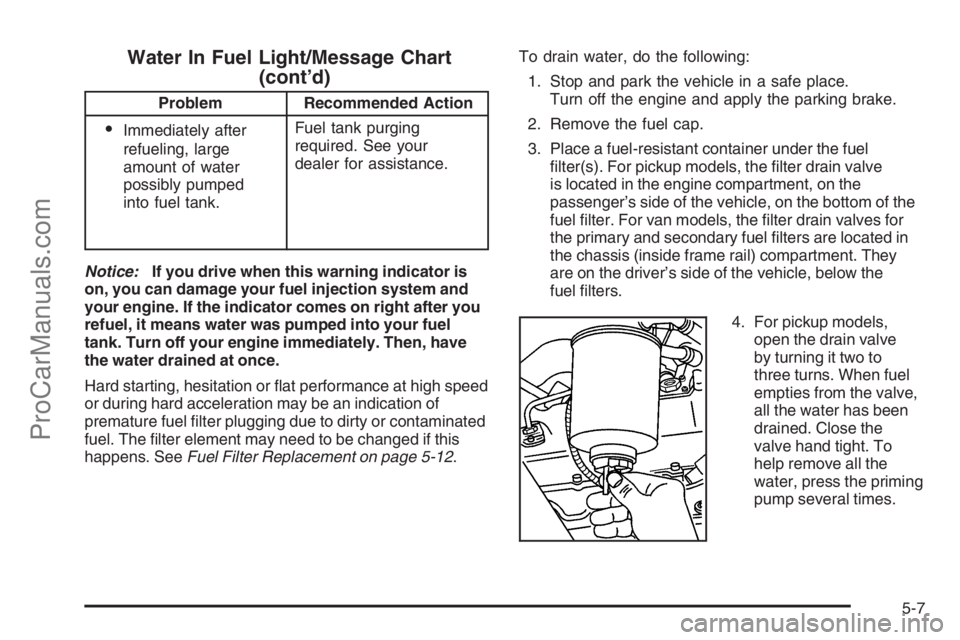
4. For pickup models,
open the drain valve
by turning it two to
three turns. When fuel
empties from the valve,
all the water has been
drained. Close the
valve hand tight. To
help remove all the
water, press the priming
pump several times.
5-7
ProCarManuals.com
Page 36 of 100
Van Models
If the engine stalls and you think that you may have run
out of fuel, do this to restart your engine:
1. If you are parked on a level surface, add at least
one gallon of fuel. However, if you are parked on a
slope, you may need to add up to five gallons of fuel.
2. Follow the vehicle fuel system priming procedure
earlier in this section to re-prime the system and
re-start the engine.
Your check engine light may come on if the vehicle has
run out of fuel. This light may stay on for a few drive
cycles after the condition is corrected, but will eventually
clear itself.
Fuel Filter Replacement
Pickup Models
If you want to change the fuel filter yourself, here’s how
to do it:
{CAUTION:
Diesel fuel is �ammable. It could start a �re if
something ignites it, and you could be burned.
Do not let it get on hot engine parts, and keep
matches or other ignition sources away.
First, drain any water from the filter following the
procedure for draining water listed previously.
Your vehicle’s engine should be off until the end of this
procedure.
The fuel filter is located in the engine compartment on
the passenger’s side of the vehicle, or on the driver’s
side frame rail in front of the fuel tank.
1. Apply the parking brake.
5-12
ProCarManuals.com
Page 38 of 100
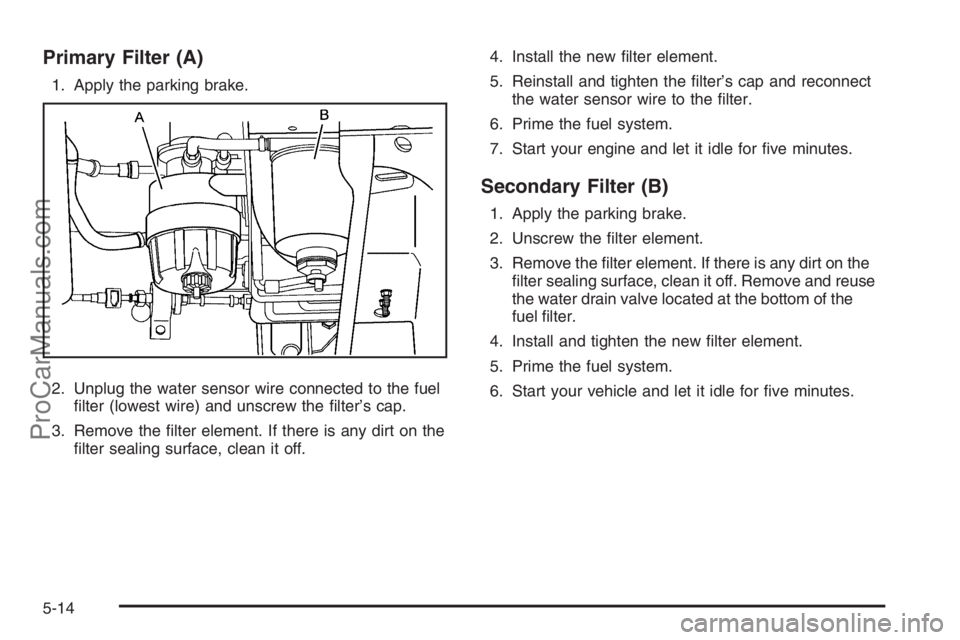
Primary Filter (A)
1. Apply the parking brake.
2. Unplug the water sensor wire connected to the fuel
filter (lowest wire) and unscrew the filter’s cap.
3. Remove the filter element. If there is any dirt on the
filter sealing surface, clean it off.4. Install the new filter element.
5. Reinstall and tighten the filter’s cap and reconnect
the water sensor wire to the filter.
6. Prime the fuel system.
7. Start your engine and let it idle for five minutes.
Secondary Filter (B)
1. Apply the parking brake.
2. Unscrew the filter element.
3. Remove the filter element. If there is any dirt on the
filter sealing surface, clean it off. Remove and reuse
the water drain valve located at the bottom of the
fuel filter.
4. Install and tighten the new filter element.
5. Prime the fuel system.
6. Start your vehicle and let it idle for five minutes.
5-14
ProCarManuals.com
Page 43 of 100
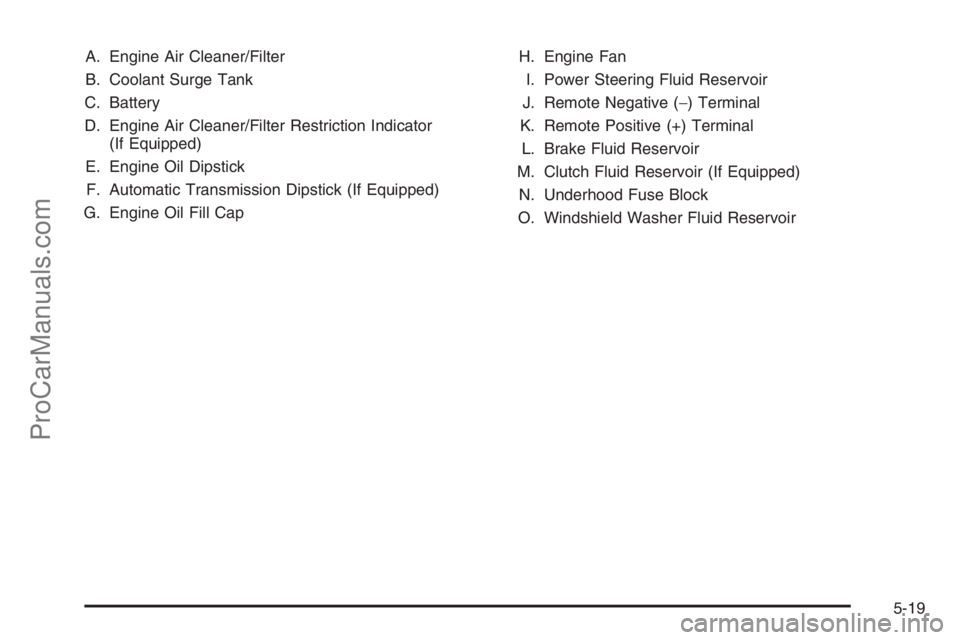
A. Engine Air Cleaner/Filter
B. Coolant Surge Tank
C. Battery
D. Engine Air Cleaner/Filter Restriction Indicator
(If Equipped)
E. Engine Oil Dipstick
F. Automatic Transmission Dipstick (If Equipped)
G. Engine Oil Fill CapH. Engine Fan
I. Power Steering Fluid Reservoir
J. Remote Negative (−) Terminal
K. Remote Positive (+) Terminal
L. Brake Fluid Reservoir
M. Clutch Fluid Reservoir (If Equipped)
N. Underhood Fuse Block
O. Windshield Washer Fluid Reservoir
5-19
ProCarManuals.com
Page 45 of 100
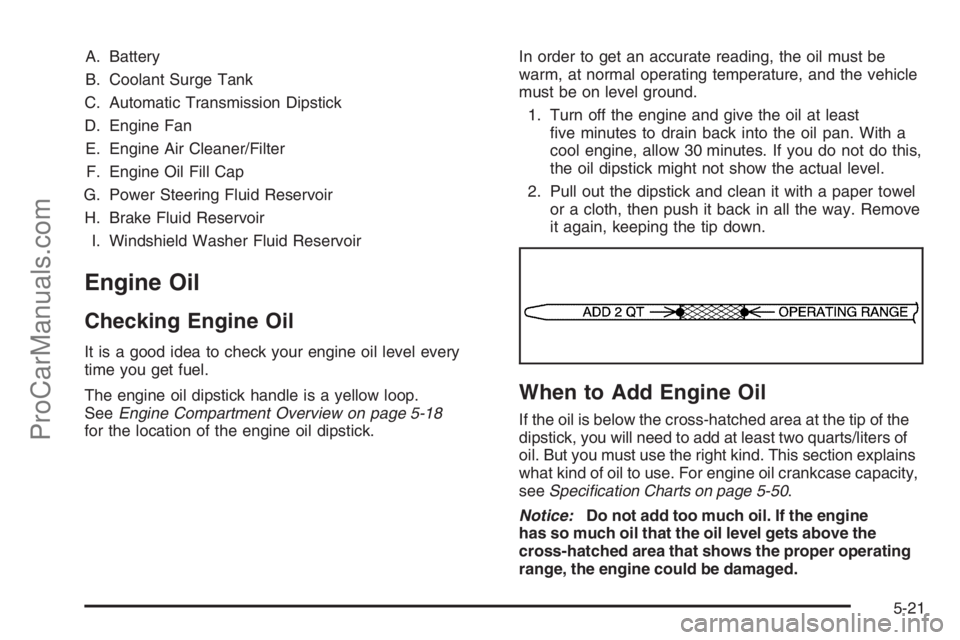
A. Battery
B. Coolant Surge Tank
C. Automatic Transmission Dipstick
D. Engine Fan
E. Engine Air Cleaner/Filter
F. Engine Oil Fill Cap
G. Power Steering Fluid Reservoir
H. Brake Fluid Reservoir
I. Windshield Washer Fluid Reservoir
Engine Oil
Checking Engine Oil
It is a good idea to check your engine oil level every
time you get fuel.
The engine oil dipstick handle is a yellow loop.
SeeEngine Compartment Overview on page 5-18
for the location of the engine oil dipstick.In order to get an accurate reading, the oil must be
warm, at normal operating temperature, and the vehicle
must be on level ground.
1. Turn off the engine and give the oil at least
five minutes to drain back into the oil pan. With a
cool engine, allow 30 minutes. If you do not do this,
the oil dipstick might not show the actual level.
2. Pull out the dipstick and clean it with a paper towel
or a cloth, then push it back in all the way. Remove
it again, keeping the tip down.
When to Add Engine Oil
If the oil is below the cross-hatched area at the tip of the
dipstick, you will need to add at least two quarts/liters of
oil. But you must use the right kind. This section explains
what kind of oil to use. For engine oil crankcase capacity,
seeSpeci�cation Charts on page 5-50.
Notice:Do not add too much oil. If the engine
has so much oil that the oil level gets above the
cross-hatched area that shows the proper operating
range, the engine could be damaged.
5-21
ProCarManuals.com
Page 54 of 100
Checking the Fluid Level
Prepare your vehicle as follows:
•Park your vehicle on a level place. Keep the
engine running.
•With the parking brake applied, place the shift lever
in PARK (P).
•With your foot on the brake pedal, run the engine
for at least one minute and shift to DRIVE (D).
Then shift to NEUTRAL (N) and then REVERSE (R)
to fill the hydraulic system. Then, put the shift
lever in PARK (P).
•Allow the engine to run at idle (500 – 800 rpm).
Slowly release the brake pedal.Then, without shutting off the engine, follow these steps:
Cold Check Procedure
The purpose of the cold check is to determine if the
transmission has enough fluid to be operated safely until
a hot check can be made. The fluid level rises as fluid
temperature increases. DO NOT fill above the COLD
CHECK band if the transmission fluid is below normal
operating temperatures.
1. Pull out the dipstick and wipe it with a clean rag or
paper towel. The transmission dipstick is located
near the center of the engine compartment. See
Engine Compartment Overview on page 5-18for
more information on location.
2. Push it back in all the way, wait three seconds and
then pull it back out again.
3. Check the fluid level reading. Repeat the check
procedure to verify the reading.
4. If the fluid level is within the COLD CHECK band, the
transmission may be operated until the fluid is hot
enough to perform a hot check. If the fluid level is not
within the COLD CHECK band, add or drain fluid as
necessary to bring the level into the middle of the
COLD CHECK band.
5-30
ProCarManuals.com