parking brake CHEVROLET DURAMAX 2006 Owners Manual
[x] Cancel search | Manufacturer: CHEVROLET, Model Year: 2006, Model line: DURAMAX, Model: CHEVROLET DURAMAX 2006Pages: 100, PDF Size: 0.71 MB
Page 31 of 100
Water In Fuel Light/Message Chart
(cont’d)
Problem Recommended Action
•Immediately after
refueling, large
amount of water
possibly pumped
into fuel tank.Fuel tank purging
required. See your
dealer for assistance.
Notice:If you drive when this warning indicator is
on, you can damage your fuel injection system and
your engine. If the indicator comes on right after you
refuel, it means water was pumped into your fuel
tank. Turn off your engine immediately. Then, have
the water drained at once.
Hard starting, hesitation or flat performance at high speed
or during hard acceleration may be an indication of
premature fuel filter plugging due to dirty or contaminated
fuel. The filter element may need to be changed if this
happens. SeeFuel Filter Replacement on page 5-12.To drain water, do the following:
1. Stop and park the vehicle in a safe place.
Turn off the engine and apply the parking brake.
2. Remove the fuel cap.
3. Place a fuel-resistant container under the fuel
filter(s). For pickup models, the filter drain valve
is located in the engine compartment, on the
passenger’s side of the vehicle, on the bottom of the
fuel filter. For van models, the filter drain valves for
the primary and secondary fuel filters are located in
the chassis (inside frame rail) compartment. They
are on the driver’s side of the vehicle, below the
fuel filters.
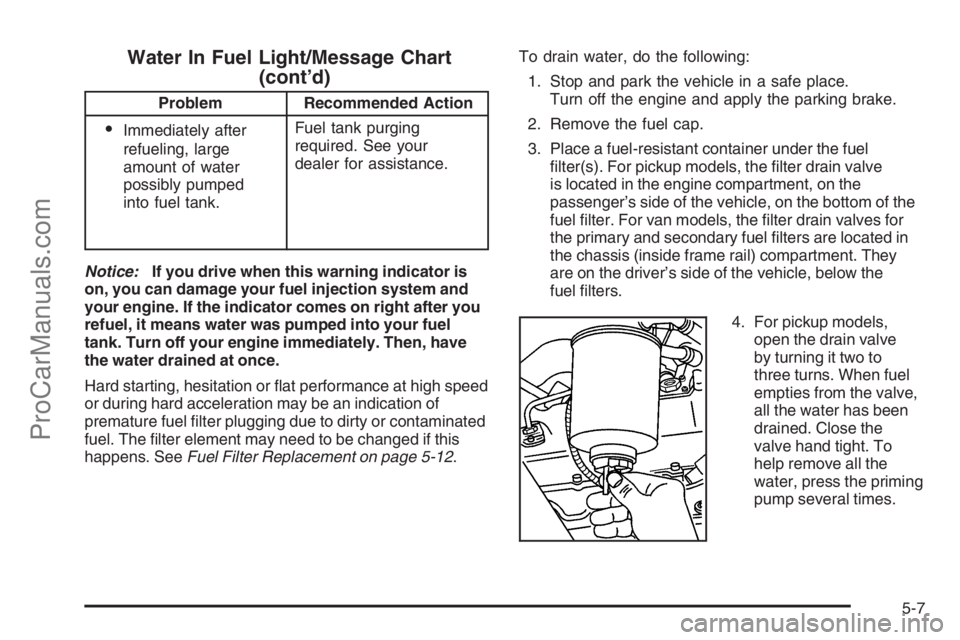
4. For pickup models,
open the drain valve
by turning it two to
three turns. When fuel
empties from the valve,
all the water has been
drained. Close the
valve hand tight. To
help remove all the
water, press the priming
pump several times.
5-7
ProCarManuals.com
Page 36 of 100
Van Models
If the engine stalls and you think that you may have run
out of fuel, do this to restart your engine:
1. If you are parked on a level surface, add at least
one gallon of fuel. However, if you are parked on a
slope, you may need to add up to five gallons of fuel.
2. Follow the vehicle fuel system priming procedure
earlier in this section to re-prime the system and
re-start the engine.
Your check engine light may come on if the vehicle has
run out of fuel. This light may stay on for a few drive
cycles after the condition is corrected, but will eventually
clear itself.
Fuel Filter Replacement
Pickup Models
If you want to change the fuel filter yourself, here’s how
to do it:
{CAUTION:
Diesel fuel is �ammable. It could start a �re if
something ignites it, and you could be burned.
Do not let it get on hot engine parts, and keep
matches or other ignition sources away.
First, drain any water from the filter following the
procedure for draining water listed previously.
Your vehicle’s engine should be off until the end of this
procedure.
The fuel filter is located in the engine compartment on
the passenger’s side of the vehicle, or on the driver’s
side frame rail in front of the fuel tank.
1. Apply the parking brake.
5-12
ProCarManuals.com
Page 38 of 100
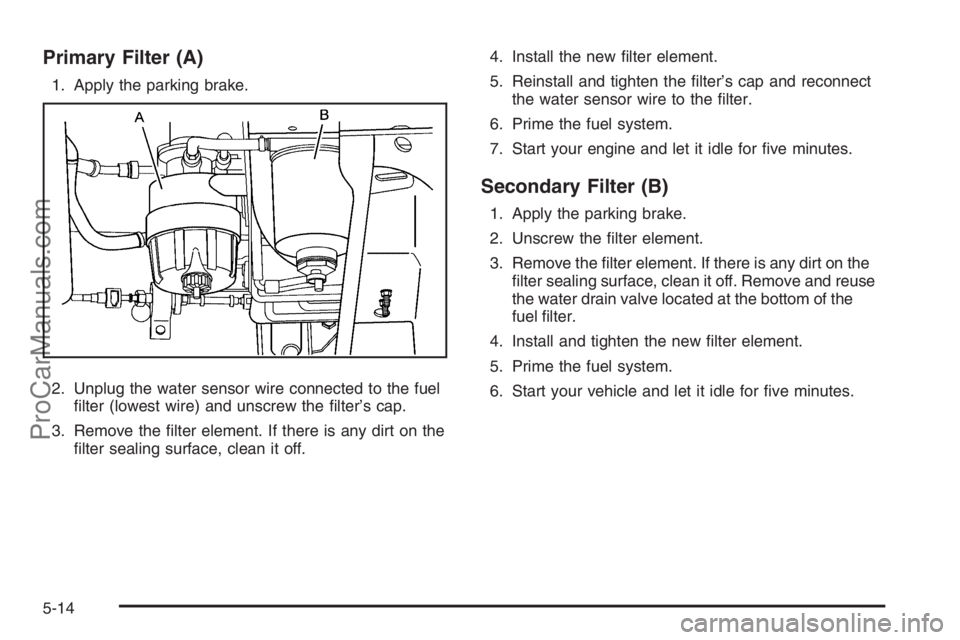
Primary Filter (A)
1. Apply the parking brake.
2. Unplug the water sensor wire connected to the fuel
filter (lowest wire) and unscrew the filter’s cap.
3. Remove the filter element. If there is any dirt on the
filter sealing surface, clean it off.4. Install the new filter element.
5. Reinstall and tighten the filter’s cap and reconnect
the water sensor wire to the filter.
6. Prime the fuel system.
7. Start your engine and let it idle for five minutes.
Secondary Filter (B)
1. Apply the parking brake.
2. Unscrew the filter element.
3. Remove the filter element. If there is any dirt on the
filter sealing surface, clean it off. Remove and reuse
the water drain valve located at the bottom of the
fuel filter.
4. Install and tighten the new filter element.
5. Prime the fuel system.
6. Start your vehicle and let it idle for five minutes.
5-14
ProCarManuals.com
Page 54 of 100
Checking the Fluid Level
Prepare your vehicle as follows:
•Park your vehicle on a level place. Keep the
engine running.
•With the parking brake applied, place the shift lever
in PARK (P).
•With your foot on the brake pedal, run the engine
for at least one minute and shift to DRIVE (D).
Then shift to NEUTRAL (N) and then REVERSE (R)
to fill the hydraulic system. Then, put the shift
lever in PARK (P).
•Allow the engine to run at idle (500 – 800 rpm).
Slowly release the brake pedal.Then, without shutting off the engine, follow these steps:
Cold Check Procedure
The purpose of the cold check is to determine if the
transmission has enough fluid to be operated safely until
a hot check can be made. The fluid level rises as fluid
temperature increases. DO NOT fill above the COLD
CHECK band if the transmission fluid is below normal
operating temperatures.
1. Pull out the dipstick and wipe it with a clean rag or
paper towel. The transmission dipstick is located
near the center of the engine compartment. See
Engine Compartment Overview on page 5-18for
more information on location.
2. Push it back in all the way, wait three seconds and
then pull it back out again.
3. Check the fluid level reading. Repeat the check
procedure to verify the reading.
4. If the fluid level is within the COLD CHECK band, the
transmission may be operated until the fluid is hot
enough to perform a hot check. If the fluid level is not
within the COLD CHECK band, add or drain fluid as
necessary to bring the level into the middle of the
COLD CHECK band.
5-30
ProCarManuals.com
Page 57 of 100
Checking the Fluid Level
Prepare your vehicle as follows:
•Park your vehicle on a level place. Keep the engine
running.
•With the parking brake applied, place the shift lever
in PARK (P).
•With your foot on the brake pedal, move the shift
lever through each gear range, pausing for about
three seconds in each range. Then, position the shift
lever in PARK (P).
•Let the engine run at idle for three minutes or more.
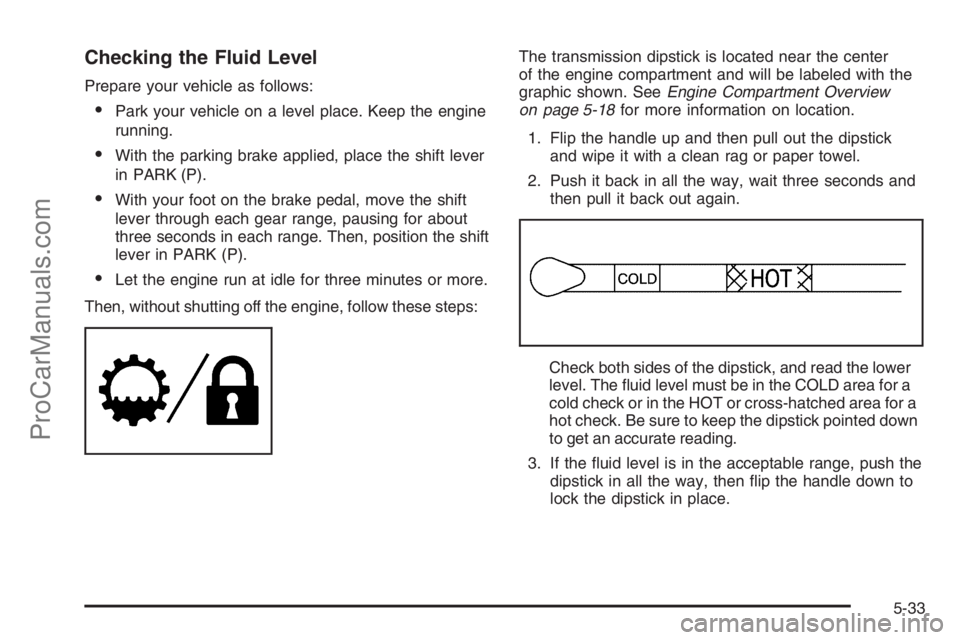
Then, without shutting off the engine, follow these steps:The transmission dipstick is located near the center
of the engine compartment and will be labeled with the
graphic shown. SeeEngine Compartment Overview
on page 5-18for more information on location.
1. Flip the handle up and then pull out the dipstick
and wipe it with a clean rag or paper towel.
2. Push it back in all the way, wait three seconds and
then pull it back out again.
Check both sides of the dipstick, and read the lower
level. The fluid level must be in the COLD area for a
cold check or in the HOT or cross-hatched area for a
hot check. Be sure to keep the dipstick pointed down
to get an accurate reading.
3. If the fluid level is in the acceptable range, push the
dipstick in all the way, then flip the handle down to
lock the dipstick in place.
5-33
ProCarManuals.com
Page 83 of 100
Maintenance Footnotes
†The U.S. Environmental Protection Agency or the
California Air Resources Board has determined that the
failure to perform this maintenance item will not nullify
the emission warranty or limit recall liability prior to the
completion of the vehicle’s useful life. We, however,
urge that all recommended maintenance services be
performed at the indicated intervals and the maintenance
be recorded.
#Lubricate the front suspension, steering linkage,
transmission shift linkage (pickup models), rear driveline
center splines (van models), and parking brake cable
guides. Pickup models only: Control arm ball joints
require lubrication but should not be lubricated unless
their temperature is 10°F (-12°C) or higher, or they could
be damaged. Vehicles used under severe commercial
operating conditions require lubrication on a regular basis
every 3,000 miles (5 000 km).
(a)A �uid loss in any vehicle system could indicate a
problem. Have the system inspected and repaired
and the �uid level checked. Add �uid if needed.
(b)If you drive regularly under dusty conditions, inspect
the �lter or change indicator, if equipped, at each engine
oil change.(c)Visually inspect brake lines and hoses for proper
hook-up, binding, leaks, cracks, cha�ng, etc. Inspect disc
brake pads for wear and rotors for surface condition.
Inspect drum brake linings/shoes for wear or cracks.
Inspect other brake parts, including drums, wheel
cylinders, calipers, parking brake, etc.
(d)Visually inspect front and rear suspension and
steering system for damaged, loose, or missing parts,
signs of wear or lack of lubrication. Inspect power
steering lines and hoses for proper hook-up, binding,
leaks, cracks, cha�ng, etc. Pickup models: Visually
check constant velocity joints, rubber boots, and axle
seals for leaks.
(e)Visually inspect hoses and have them replaced if they
are cracked, swollen, or deteriorated. Inspect all pipes,
�ttings, and clamps; replace with genuine GM parts as
needed. To help ensure proper operation, a pressure test
of the cooling system and pressure cap and cleaning the
outside of the radiator and air conditioning condenser is
recommended at least once a year.
(f)Visually inspect wiper blades for wear or cracking.
Replace wiper blades that appear worn or damaged
or that streak or miss areas of the windshield.
6-9
ProCarManuals.com
Page 86 of 100
Engine Coolant Level Check
Check the engine coolant level and add
DEX-COOL®coolant mixture if necessary.
SeeEngine Coolant on page 5-34for further details.
Windshield Washer Fluid Level Check
Check the windshield washer fluid level in the windshield
washer fluid reservoir and add the proper fluid if
necessary.
At Least Once a Month
Tire In�ation Check
Visually inspect your vehicle’s tires and make sure they
are inflated to the correct pressures. Do not forget to
check the spare tire. See “Tires” in your owner manual
for further details. Check to make sure the spare tire
is stored securely. See “Changing a Flat Tire” in
your owner manual.
Tire Wear Inspection
Tire rotation may be required for high mileage highway
drivers prior to the Engine Oil Life System service
notification. Check the tires for wear and, if necessary,
rotate the tires. See “Tire Inspection and Rotation” in
your owner manual.
At Least Once a Year
Starter Switch Check
{CAUTION:
When you are doing this inspection, the
vehicle could move suddenly. If the vehicle
moves, you or others could be injured.
1. Before you start, be sure you have enough room
around the vehicle.
2. Firmly apply both the parking brake and the regular
brake. See “Parking Brake” in your owner manual.
Do not use the accelerator pedal, and be ready
to turn off the engine immediately if it starts.
3. Try to start the engine in each gear. The vehicle
should start only in PARK (P) or NEUTRAL (N).
If the vehicle starts in any other position, contact
your GM Goodwrench
®dealer for service.
6-12
ProCarManuals.com
Page 87 of 100
Automatic Transmission Shift Lock
Control System Check
{CAUTION:
When you are doing this inspection, the
vehicle could move suddenly. If the vehicle
moves, you or others could be injured.
1. Before you start, be sure you have enough room
around the vehicle. It should be parked on a level
surface.
2. Firmly apply the parking brake. See “Parking Brake”
in your owner manual.
Be ready to apply the regular brake immediately if
the vehicle begins to move.3. With the engine off, turn the ignition to RUN, but do
not start the engine. Without applying the regular
brake, try to move the shift lever out of PARK (P)
with normal effort. If the shift lever moves out
of PARK (P), contact your GM Goodwrench
®
dealer for service.
Ignition Transmission Lock Check
While parked, and with the parking brake set, try to turn
the ignition to LOCK in each shift lever position.
•The ignition should turn to LOCK only when the
shift lever is in PARK (P).
•The key should come out only in LOCK.
Contact your GM Goodwrench
®dealer if service is
required.
6-13
ProCarManuals.com
Page 88 of 100
Parking Brake and Automatic
Transmission Park (P) Mechanism Check
{CAUTION:
When you are doing this check, your vehicle
could begin to move. You or others could be
injured and property could be damaged. Make
sure there is room in front of your vehicle in
case it begins to roll. Be ready to apply the
regular brake at once should the vehicle begin
to move.Park on a fairly steep hill, with the vehicle facing
downhill. Keeping your foot on the regular brake,
set the parking brake.
•To check the parking brake’s holding ability: With the
engine running and transmission in NEUTRAL (N),
slowly remove foot pressure from the regular brake
pedal. Do this until the vehicle is held by the parking
brake only.
•To check the PARK (P) mechanism’s holding
ability: With the engine running, shift to PARK (P).
Then release the parking brake followed by the
regular brake.
Contact your GM Goodwrench
®dealer if service is
required.
Underbody Flushing Service
At least every spring, use plain water to flush any
corrosive materials from the underbody. Take care to
clean thoroughly any areas where mud and other
debris can collect.
6-14
ProCarManuals.com
Page 89 of 100
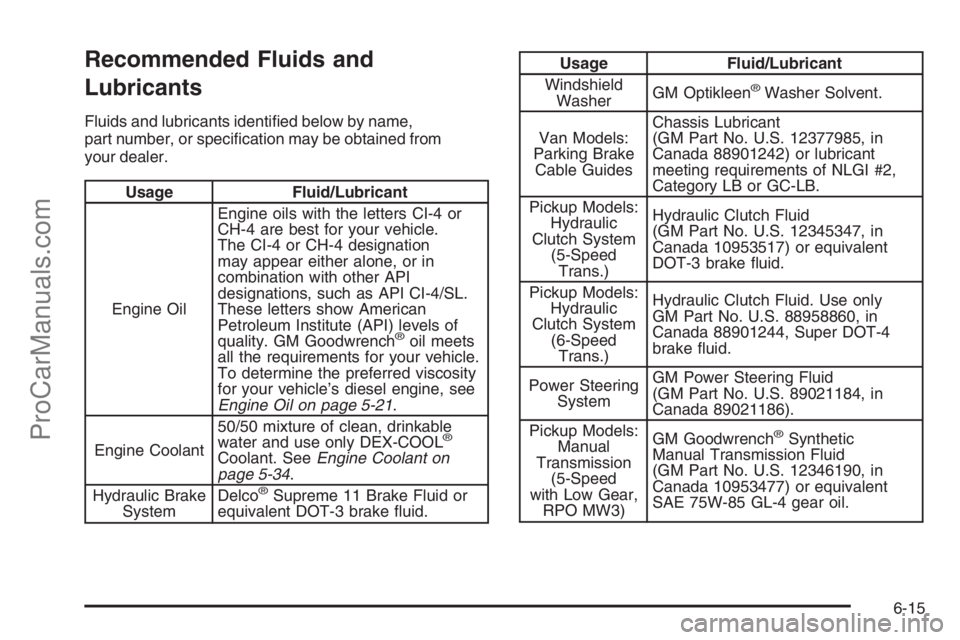
Recommended Fluids and
Lubricants
Fluids and lubricants identified below by name,
part number, or specification may be obtained from
your dealer.
Usage Fluid/Lubricant
Engine OilEngine oils with the letters CI-4 or
CH-4 are best for your vehicle.
The CI-4 or CH-4 designation
may appear either alone, or in
combination with other API
designations, such as API CI-4/SL.
These letters show American
Petroleum Institute (API) levels of
quality. GM Goodwrench
®oil meets
all the requirements for your vehicle.
To determine the preferred viscosity
for your vehicle’s diesel engine, see
Engine Oil on page 5-21.
Engine Coolant50/50 mixture of clean, drinkable
water and use only DEX-COOL
®
Coolant. SeeEngine Coolant on
page 5-34.
Hydraulic Brake
SystemDelco
®Supreme 11 Brake Fluid or
equivalent DOT-3 brake fluid.
Usage Fluid/Lubricant
Windshield
WasherGM Optikleen
®Washer Solvent.
Van Models:
Parking Brake
Cable GuidesChassis Lubricant
(GM Part No. U.S. 12377985, in
Canada 88901242) or lubricant
meeting requirements of NLGI #2,
Category LB or GC-LB.
Pickup Models:
Hydraulic
Clutch System
(5-Speed
Trans.)Hydraulic Clutch Fluid
(GM Part No. U.S. 12345347, in
Canada 10953517) or equivalent
DOT-3 brake fluid.
Pickup Models:
Hydraulic
Clutch System
(6-Speed
Trans.)Hydraulic Clutch Fluid. Use only
GM Part No. U.S. 88958860, in
Canada 88901244, Super DOT-4
brake fluid.
Power Steering
SystemGM Power Steering Fluid
(GM Part No. U.S. 89021184, in
Canada 89021186).
Pickup Models:
Manual
Transmission
(5-Speed
with Low Gear,
RPO MW3)GM Goodwrench
®Synthetic
Manual Transmission Fluid
(GM Part No. U.S. 12346190, in
Canada 10953477) or equivalent
SAE 75W-85 GL-4 gear oil.
6-15
ProCarManuals.com