change time CHEVROLET EPICA 2005 1.G Owners Manual
[x] Cancel search | Manufacturer: CHEVROLET, Model Year: 2005, Model line: EPICA, Model: CHEVROLET EPICA 2005 1.GPages: 340, PDF Size: 2.19 MB
Page 2 of 340
GENERAL MOTORS, GM, the GM Emblem,
CHEVROLET, and the CHEVROLET Emblem are
registered trademarks; and the name EPICA is a
trademark of General Motors Corporation.
This manual includes the latest information at the time it
was printed. We reserve the right to make changes
after that time without further notice. For vehicles first
sold in Canada, substitute the name “General Motors of
Canada Limited” for Chevrolet Motor Division whenever
it appears in this manual.
Keep this manual in the vehicle, so it will be there if it is
needed while you are on the road. If the vehicle is
sold, leave this manual in the vehicle.
Canadian Owners
A French language copy of this manual can be obtained
from your dealer or from:
Helm, Incorporated
P.O. Box 07130
Detroit, MI 48207
How to Use This Manual
Many people read the owner manual from beginning to
end when they first receive their new vehicle. If this
is done, it can help you learn about the features
and controls for the vehicle. Pictures and words work
together in the owner manual to explain things.
Index
A good place to quickly locate information about the
vehicle is the Index in the back of the manual. It is an
alphabetical list of what is in the manual and the
page number where it can be found.
Litho in U.S.A.
Part No. 05EPICA A First Edition
©2004 General Motors Corporation. All Rights Reserved.
ii
Page 36 of 340
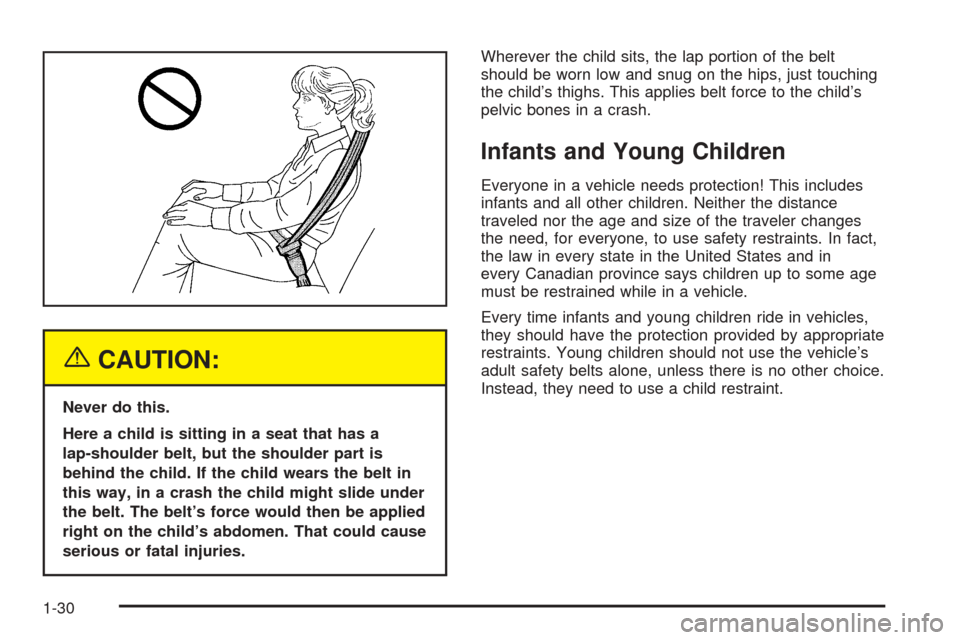
{CAUTION:
Never do this.
Here a child is sitting in a seat that has a
lap-shoulder belt, but the shoulder part is
behind the child. If the child wears the belt in
this way, in a crash the child might slide under
the belt. The belt’s force would then be applied
right on the child’s abdomen. That could cause
serious or fatal injuries.Wherever the child sits, the lap portion of the belt
should be worn low and snug on the hips, just touching
the child’s thighs. This applies belt force to the child’s
pelvic bones in a crash.
Infants and Young Children
Everyone in a vehicle needs protection! This includes
infants and all other children. Neither the distance
traveled nor the age and size of the traveler changes
the need, for everyone, to use safety restraints. In fact,
the law in every state in the United States and in
every Canadian province says children up to some age
must be restrained while in a vehicle.
Every time infants and young children ride in vehicles,
they should have the protection provided by appropriate
restraints. Young children should not use the vehicle’s
adult safety belts alone, unless there is no other choice.
Instead, they need to use a child restraint.
1-30
Page 74 of 340
Remote Keyless Entry System
The keyless entry system operates on a radio frequency
subject to Federal Communications Commission (FCC)
Rules and with Industry Canada.
This device complies with Part 15 of the FCC Rules.
Operation is subject to the following two conditions:
1. This device may not cause interference.
2. This device must accept any interference received,
including interference that may cause undesired
operation of the device.
This device complies with RSS-210 of Industry Canada.
Operation is subject to the following two conditions:
1. This device may not cause interference.
2. This device must accept any interference received,
including interference that may cause undesired
operation of the device.
Changes or modifications to this system by other than
an authorized service facility could void authorization to
use this equipment.At times you may notice a decrease in range. This is
normal for any remote keyless entry system. If the
transmitter does not work or if you have to stand closer
to your vehicle for the transmitter to work, try this:
•Check the distance. You may be too far from your
vehicle. You may need to stand closer during
rainy or snowy weather.
•Check the location. Other vehicles or objects may
be blocking the signal. Take a few steps to the
left or right, hold the transmitter higher, and
try again.
•Check to determine if battery replacement is
necessary. See “Battery Replacement” under
Remote Keyless Entry System Operation on
page 2-5.
•If you are still having trouble, see your dealer or a
qualified technician for service.
2-4
Page 76 of 340
Battery Replacement
Under normal use, the battery in your remote keyless
entry transmitter should last about two years.
You can tell the battery is weak if the LED light fails to
light or if the transmitter will not work at the normal
range in any location. If you have to get close to your
vehicle before the transmitter works, it is probably
time to change the battery.
Notice:When replacing the battery, use care not to
touch any of the circuitry. Static from your body
transferred to these surfaces may damage the
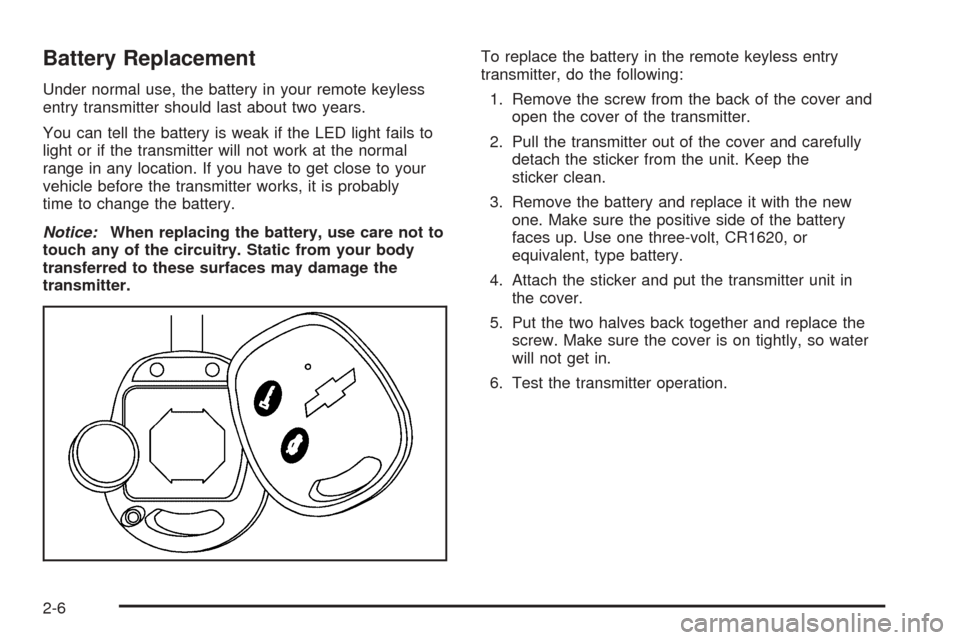
transmitter.To replace the battery in the remote keyless entry
transmitter, do the following:
1. Remove the screw from the back of the cover and
open the cover of the transmitter.
2. Pull the transmitter out of the cover and carefully
detach the sticker from the unit. Keep the
sticker clean.
3. Remove the battery and replace it with the new
one. Make sure the positive side of the battery
faces up. Use one three-volt, CR1620, or
equivalent, type battery.
4. Attach the sticker and put the transmitter unit in
the cover.
5. Put the two halves back together and replace the
screw. Make sure the cover is on tightly, so water
will not get in.
6. Test the transmitter operation.
2-6
Page 99 of 340
Mirrors
Manual Rearview Mirror
While sitting in a comfortable driving position, adjust the
mirror so you can see clearly behind your vehicle. Grip
the mirror in the center to move it up or down and side to
side. The control at the bottom of the mirror is the
day/night feature that allows adjustment to the mirror so
that the glare of headlamps from behind is reduced. Push
the control for daytime use; pull it for night use.
Automatic Dimming Rearview Mirror
Your vehicle may have an automatic dimming
rearview mirror.
When the automatic dimming feature is turned on, the
mirror automatically changes to reduce glare from
the headlamps behind you. A photocell on the mirror
senses when it is becoming dark outside. Another
photocell built into the mirror face senses when
headlamps are behind you.
At night, when the glare is too high, the mirror will
gradually darken to reduce glare. This change may take
a few seconds. The mirror will return to its clear
daytime state when the glare is reduced.
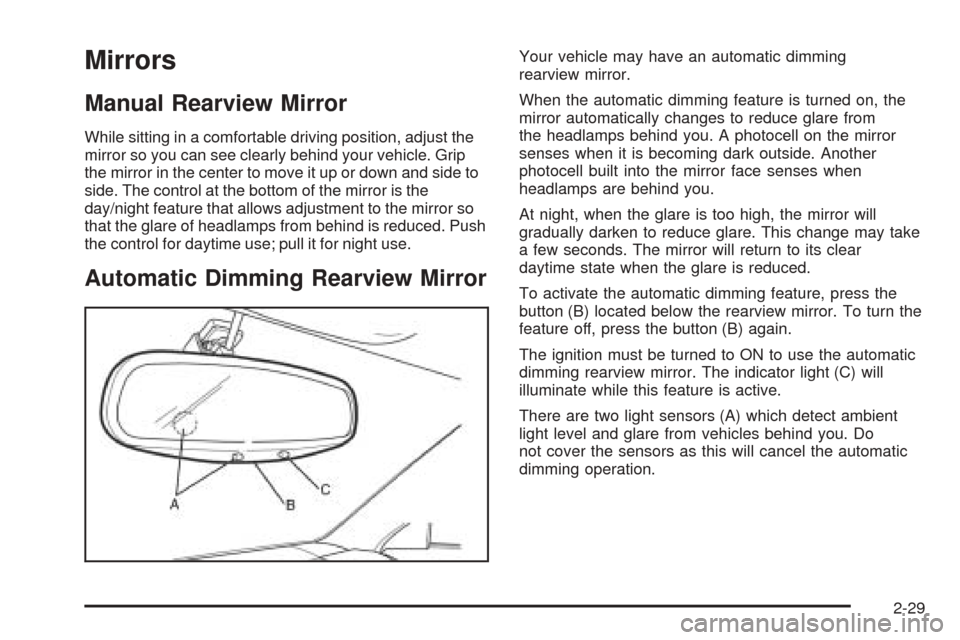
To activate the automatic dimming feature, press the
button (B) located below the rearview mirror. To turn the
feature off, press the button (B) again.
The ignition must be turned to ON to use the automatic
dimming rearview mirror. The indicator light (C) will
illuminate while this feature is active.
There are two light sensors (A) which detect ambient
light level and glare from vehicles behind you. Do
not cover the sensors as this will cancel the automatic
dimming operation.
2-29
Page 105 of 340
Instrument Panel Overview...............................3-4
Hazard Warning Flashers................................3-5
Other Warning Devices...................................3-5
Horn.............................................................3-6
Tilt Wheel.....................................................3-6
Turn Signal/Multifunction Lever.........................3-6
Turn and Lane-Change Signals........................3-7
Headlamp High/Low-Beam Changer..................3-7
Flash-to-Pass.................................................3-7
Windshield Wipers..........................................3-8
Windshield Washer.........................................3-9
Cruise Control..............................................3-10
Exterior Lamps.............................................3-13
Headlamps on Reminder................................3-13
Daytime Running Lamps (DRL).......................3-14
Fog Lamps..................................................3-15
Exterior Lighting Battery Saver........................3-15
Instrument Panel Brightness...........................3-15
Dome Lamp.................................................3-16
Entry Lighting...............................................3-16
Map Lamps.................................................3-16
Accessory Power Outlets...............................3-17
Ashtrays and Cigarette Lighter........................3-18
Clock..........................................................3-18Climate Controls............................................3-19
Climate Control System.................................3-19
Automatic Climate Control System...................3-22
Outlet Adjustment.........................................3-28
Passenger Compartment Air Filter...................3-29
Warning Lights, Gages, and Indicators............3-30
Instrument Panel Cluster................................3-30
Speedometer and Odometer...........................3-32
Trip Odometer..............................................3-32
Tachometer.................................................3-32
Safety Belt Reminder Light.............................3-32
Safety Belt Reminder Tone............................3-33
Airbag Readiness Light..................................3-33
Passenger Airbag Status Indicator...................3-34
Charging System Light..................................3-35
Brake System Warning Light..........................3-36
Anti-Lock Brake System Warning Light.............3-37
Speed Sensitive Power Steering (SSPS)
Warning Light...........................................3-37
Traction Control System (TCS)
Warning Light...........................................3-38
Traction Control System Active Light...............3-38
Traction Off Light..........................................3-39
Section 3 Instrument Panel
3-1
Page 106 of 340
Hold Mode Light...........................................3-39
Engine Coolant Temperature Gage..................3-40
Tire Pressure Light.......................................3-40
Malfunction Indicator Lamp.............................3-41
Oil Pressure Light.........................................3-44
Cruise Control Light......................................3-45
Highbeam On Light.......................................3-45
Daytime Running Lamps (DRL)
Indicator Light...........................................3-45
Door Ajar Light.............................................3-45
Trunk Ajar Light (Sedan)................................3-46
Fuel Gage...................................................3-46
Low Fuel Warning Light.................................3-47Audio System(s).............................................3-47
Radio with CD (Base Level)...........................3-48
Radio with CD (MP3)....................................3-51
Trunk-Mounted CD Changer...........................3-58
Audio Steering Wheel Controls.......................3-61
Radio Reception...........................................3-61
Care of Your CDs.........................................3-61
Care of Your CD Player................................3-62
Backglass Antenna.......................................3-62
Section 3 Instrument Panel
3-2
Page 124 of 340
0 (Off):To turn the fan off, turn the knob all the way
counterclockwise to the off position.
TEMP (Temperature):Turn the middle knob clockwise
or counterclockwise to manually increase or decrease
the temperature inside your vehicle. Turn the knob to the
blue area to get cool air and to the red area to get
warm air.
To change the current mode, select one of the following
from the right knob:
E(Vent):This mode directs air to the instrument
panel outlets.
((Bi-Level):This mode directs about half of the air
to the instrument panel outlets, and then directs the
remaining air to the floor outlets.
5(Floor):This mode directs most of the air to the
floor outlets. If your vehicle has rear outlets, some of the
air will also be directed to them. Be sure to keep the
area under the front seats clear to allow the flow of air to
the rear compartment.
The right knob can also be used to select the defog and
defrost modes. Information on defogging and defrosting
can be found later in this section.
?(Recirculation):This mode keeps outside air
from coming in the vehicle. It can be used to prevent
outside air and odors from entering your vehicle or
to help heat or cool the air inside your vehicle more
quickly. Press this button to turn the recirculation mode
on or off. When the button is pressed, an indicator
light in the button will come on. Using the recirculation
mode for extended periods may cause your windows
to fog. If this happens, select the defrost mode.
A/C (Air Conditioning):Press this button to turn the
air conditioning compressor on and off. When A/C
is pressed, an indicator light in the button will come on
to let you know that air conditioning is activated.
On hot days, open the windows to let hot inside air
escape; then close them. This helps to reduce the time
it takes for your vehicle to cool down. It also helps
the system to operate more efficiently.
For quick cool down on hot days, do the following:
1. Select the vent mode.
2. Select the highest fan speed.
3. Press the A/C button.
4. Select the recirculation mode.
5. Select the coolest temperature.
3-20
Page 149 of 340
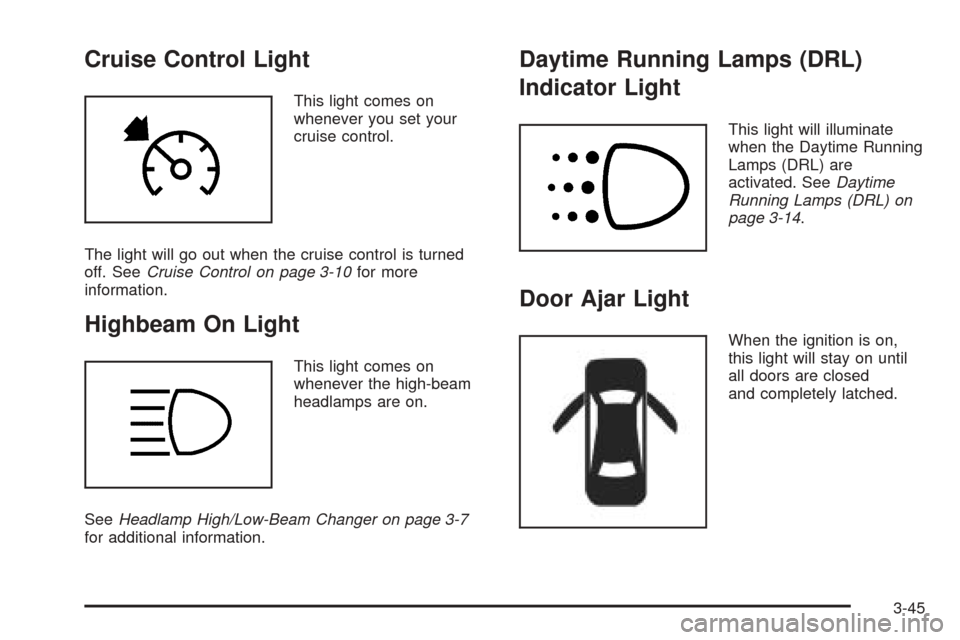
Cruise Control Light
This light comes on
whenever you set your
cruise control.
The light will go out when the cruise control is turned
off. SeeCruise Control on page 3-10for more
information.
Highbeam On Light
This light comes on
whenever the high-beam
headlamps are on.
SeeHeadlamp High/Low-Beam Changer on page 3-7
for additional information.
Daytime Running Lamps (DRL)
Indicator Light
This light will illuminate
when the Daytime Running
Lamps (DRL) are
activated. SeeDaytime
Running Lamps (DRL) on
page 3-14.
Door Ajar Light
When the ignition is on,
this light will stay on until
all doors are closed
and completely latched.
3-45
Page 164 of 340
Playing a CD
If an error appears on the display, see “CD Messages”
later in this section.
TRACK (Reverse/Fast Forward):Turn this knob to
select the previous or next track on the current CD.
Push and turn this knob to quickly reverse or advance
within a track. As the CD advances, the elapsed time of
the track will appear on the display.
5 DN (Previous):Press and hold this pushbutton to
select the previous CD in the magazine.
6 UP (Next):Press and hold this pushbutton to select
the next CD in the magazine.
2 RPT (Repeat):Press this pushbutton to repeat the
current track. RPT will appear on the display. Press this
pushbutton again to turn off repeat play.
3 INT (Scan):To scan the tracks on the current CD,
press this pushbutton until INTRO appears on the
display. The first ten seconds of each track on the CD
will play. To stop scanning, press this pushbutton again.4 RDM (Random):Press this pushbutton to listen to
the tracks on the current CD in random, rather than
sequential, order. RDM will appear on the display.
Press this pushbutton again to turn off random play.
While in random, you can turn the tune knob to select
another track.
AM/FM:Press this button to listen to the radio when
playing a CD. The inactive CD(s) will remain safely
inside the player for future listening.
CD:Press this button to play a CD when listening to
the radio. CDC will appear on the display when the CD
changer has been selected.
Press this button while a CD is playing to pause the
CD. Press this button again to resume play.
CD Messages
No Maga:An empty magazine is inserted in the CD
changer. Try the magazine again with a CD loaded
in one of the trays.
If the CD is not playing correctly, for any other reason,
try a known good CD.
If any error occurs repeatedly or if an error cannot be
corrected, contact your dealer. If the radio displays
an error message, write it down and provide it to your
dealer when reporting the problem.
3-60