maintenance schedule CHEVROLET EPICA 2005 1.G Owners Manual
[x] Cancel search | Manufacturer: CHEVROLET, Model Year: 2005, Model line: EPICA, Model: CHEVROLET EPICA 2005 1.GPages: 340, PDF Size: 2.19 MB
Page 1 of 340
Seats and Restraint Systems........................... 1-1
Front Seats
............................................... 1-2
Rear Seats
............................................... 1-8
Safety Belts
.............................................1-10
Child Restraints
.......................................1-28
Airbag System
.........................................1-49
Restraint System Check
............................1-63
Features and Controls..................................... 2-1
Keys
........................................................ 2-2
Doors and Locks
....................................... 2-7
Windows
.................................................2-12
Theft-Deterrent Systems
............................2-14
Starting and Operating Your Vehicle
...........2-17
Mirrors
....................................................2-29
Storage Areas
.........................................2-31
Sunroof
..................................................2-33
Instrument Panel............................................. 3-1
Instrument Panel Overview
.......................... 3-4
Climate Controls
......................................3-19
Warning Lights, Gages, and Indicators
........3-30
Audio System(s)
.......................................3-47Driving Your Vehicle....................................... 4-1
Your Driving, the Road, and Your Vehicle
..... 4-2
Towing
...................................................4-33
Service and Appearance Care.......................... 5-1
Service
..................................................... 5-3
Fuel
......................................................... 5-5
Checking Things Under the Hood
...............5-11
Headlamp Aiming
.....................................5-39
Bulb Replacement
....................................5-39
Windshield Wiper Blade Replacement
.........5-45
Tires
......................................................5-46
Appearance Care
.....................................5-68
Vehicle Identification
.................................5-75
Electrical System
......................................5-76
Capacities and Specifications
.....................5-83
Normal Maintenance Replacement Parts
......5-84
Maintenance Schedule..................................... 6-1
Maintenance Schedule
................................ 6-2
Customer Assistance and Information.............. 7-1
Customer Assistance and Information
........... 7-2
Reporting Safety Defects
...........................7-10
Index................................................................ 1
2005 Chevrolet Epica Owner ManualM
Page 148 of 340
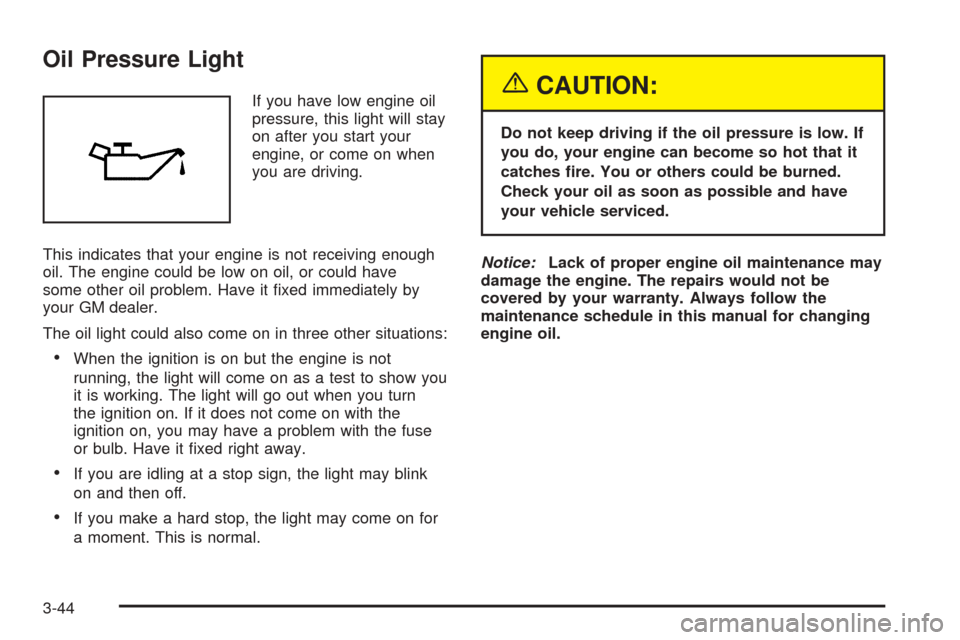
Oil Pressure Light
If you have low engine oil
pressure, this light will stay
on after you start your
engine, or come on when
you are driving.
This indicates that your engine is not receiving enough
oil. The engine could be low on oil, or could have
some other oil problem. Have it fixed immediately by
your GM dealer.
The oil light could also come on in three other situations:
•When the ignition is on but the engine is not
running, the light will come on as a test to show you
it is working. The light will go out when you turn
the ignition on. If it does not come on with the
ignition on, you may have a problem with the fuse
or bulb. Have it fixed right away.
•If you are idling at a stop sign, the light may blink
on and then off.
•If you make a hard stop, the light may come on for
a moment. This is normal.
{CAUTION:
Do not keep driving if the oil pressure is low. If
you do, your engine can become so hot that it
catches �re. You or others could be burned.
Check your oil as soon as possible and have
your vehicle serviced.
Notice:Lack of proper engine oil maintenance may
damage the engine. The repairs would not be
covered by your warranty. Always follow the
maintenance schedule in this manual for changing
engine oil.
3-44
Page 218 of 340
If you are in an area of extreme cold, where the
temperature falls below−20°F (−29°C), it is
recommended that you use either an SAE 5W-30
synthetic oil or an SAE 0W-30 oil. Both will provide
easier cold starting and better protection for your engine
at extremely low temperatures.
Engine Oil Additives
Do not add anything to your oil. The recommended oils
with the starburst symbol that meet GM Standard
GM6094M are all you will need for good performance
and engine protection.
When to Change Engine Oil
If any one of these is true for you, use the short trip/city
maintenance schedule:
•Most trips are less than 5 miles (8 km). This is
particularly important when outside temperatures
are below freezing.
•Most trips include extensive idling, such as frequent
driving in stop-and-go traffic.
•You frequently tow a trailer or use a carrier on top
of your vehicle.
•The vehicle is used for delivery service, police, taxi,
or other commercial application.Driving under these conditions causes engine oil to
break down sooner. If any one of these is true for your
vehicle, then you need to change your oil and filter
every 3,000 miles (5 000 km) or 3 months — whichever
occurs first.
If none of them is true, use the long trip/highway
maintenance schedule. Change oil and filter every
7,500 miles (12 500 km) or 12 months — whichever
occurs first. Driving a vehicle with a fully warmed engine
under highway conditions will cause engine oil to
break down slower.
What to Do with Used Oil
Used engine oil contains certain elements that may be
unhealthy for your skin and could even cause cancer.
Do not let used oil stay on your skin for very long. Clean
your skin and nails with soap and water, or a good
hand cleaner. Wash or properly dispose of clothing or
rags containing used engine oil. See the manufacturer’s
warnings about the use and disposal of oil products.
Used oil can be a threat to the environment. If you
change your own oil, be sure to drain all the oil from the
filter before disposal. Never dispose of oil by putting it
in the trash, pouring it on the ground, into sewers, or into
streams or bodies of water. Instead, recycle it by
taking it to a place that collects used oil. If you have a
problem properly disposing of your used oil, ask
your dealer, a service station or a local recycling center
for help.
5-16
Page 220 of 340
How to Inspect the Engine Air
Cleaner/Filter
To inspect the engine air cleaner/filter, remove the filter
from the vehicle and lightly shake the filter to release
loose dust and dirt. If the filter remains caked with dirt, a
new filter is required.
To inspect or replace the filter, do the following:
1. Open the latches that hold the cover on.
2. Lift off the cover.
3. Inspect or replace the engine air cleaner/filter.
4. Put the cover back on tightly and close the latches.
SeeUsing Your Maintenance Schedule on page 6-4
for replacement intervals.
{CAUTION:
Operating the engine with the air cleaner/�lter
off can cause you or others to be burned.
The air cleaner not only cleans the air; it helps
to stop �ame if the engine back�res. If it is
not there and the engine back�res, you could
be burned. Do not drive with it off, and be
careful working on the engine with the air
cleaner/�lter off.
Notice:If the air cleaner/�lter is off, a back�re can
cause a damaging engine �re. And, dirt can
easily get into your engine, which will damage it.
Always have the air cleaner/�lter in place when you
are driving.
5-18
Page 256 of 340
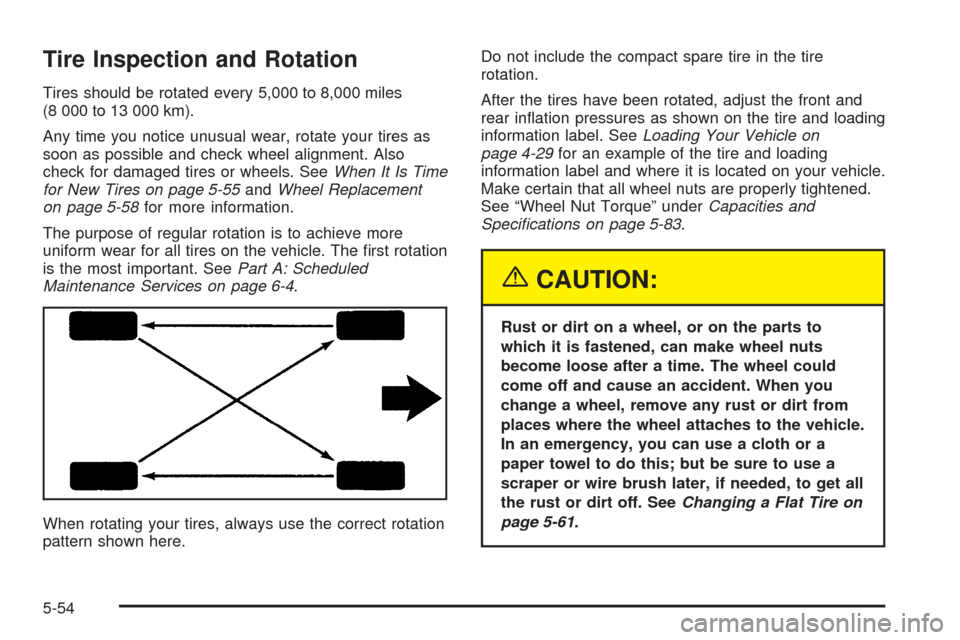
Tire Inspection and Rotation
Tires should be rotated every 5,000 to 8,000 miles
(8 000 to 13 000 km).
Any time you notice unusual wear, rotate your tires as
soon as possible and check wheel alignment. Also
check for damaged tires or wheels. SeeWhen It Is Time
for New Tires on page 5-55andWheel Replacement
on page 5-58for more information.
The purpose of regular rotation is to achieve more
uniform wear for all tires on the vehicle. The first rotation
is the most important. SeePart A: Scheduled
Maintenance Services on page 6-4.
When rotating your tires, always use the correct rotation
pattern shown here.Do not include the compact spare tire in the tire
rotation.
After the tires have been rotated, adjust the front and
rear inflation pressures as shown on the tire and loading
information label. SeeLoading Your Vehicle on
page 4-29for an example of the tire and loading
information label and where it is located on your vehicle.
Make certain that all wheel nuts are properly tightened.
See “Wheel Nut Torque” underCapacities and
Specifications on page 5-83.
{CAUTION:
Rust or dirt on a wheel, or on the parts to
which it is fastened, can make wheel nuts
become loose after a time. The wheel could
come off and cause an accident. When you
change a wheel, remove any rust or dirt from
places where the wheel attaches to the vehicle.
In an emergency, you can use a cloth or a
paper towel to do this; but be sure to use a
scraper or wire brush later, if needed, to get all
the rust or dirt off. SeeChanging a Flat Tire on
page 5-61.
5-54
Page 287 of 340
Maintenance Schedule......................................6-2
Introduction...................................................6-2
Maintenance Requirements..............................6-2
Your Vehicle and the Environment....................6-2
How This Section is Organized.........................6-3
Part A: Scheduled Maintenance Services...........6-4
Using Your Maintenance Schedule....................6-4
Selecting the Right Schedule...........................6-5
Short Trip/City Scheduled Maintenance..............6-7
Long Trip/Highway Scheduled Maintenance......6-14
Part B: Owner Checks and Services................6-19
At Each Fuel Fill..........................................6-19At Least Once a Month.................................6-19
At Least Twice a Year...................................6-20
At Least Once a Year...................................6-20
Part C: Periodic Maintenance Inspections.........6-23
Steering, Suspension and Front Drive Axle
Boot and Seal Inspection............................6-23
Exhaust System Inspection............................6-23
Fuel System Inspection..................................6-23
Engine Cooling System Inspection...................6-23
Throttle System Inspection.............................6-24
Brake System Inspection................................6-24
Part D: Recommended Fluids and Lubricants. . . .6-25
Part E: Maintenance Record...........................6-27
Section 6 Maintenance Schedule
6-1
Page 288 of 340
Maintenance Schedule
Introduction
Important: Keep engine oil at the proper level and
change as recommended.
Have you purchased the GM Protection Plan? The Plan
supplements your new vehicle warranties. See your
Warranty and Owner Assistance booklet or your dealer
for details.
Maintenance Requirements
Maintenance intervals, checks, inspections and
recommended fluids and lubricants as prescribed in this
manual are necessary to keep your vehicle in good
working condition. Any damage caused by failure
to follow scheduled maintenance may not be covered
by warranty.
Your Vehicle and the Environment
Proper vehicle maintenance not only helps to keep your
vehicle in good working condition, but also helps the
environment. Improper vehicle maintenance can
even affect the quality of the air we breathe. Improper
fluid levels or the wrong tire inflation can increase
the level of emissions from your vehicle. To help protect
our environment, and to keep your vehicle in good
condition, be sure to maintain your vehicle properly.
6-2
Page 289 of 340
How This Section is Organized
This maintenance schedule is divided into five parts:
“Part A: Scheduled Maintenance Services”explains
what to have done and how often. Some of these
services can be complex, so unless you are technically
qualified and have the necessary equipment, you
should let your GM dealer’s service department do
these jobs.
Your GM dealer has GM-trained and supported
service people that will perform the work using genuine
GM parts.
{CAUTION:
Performing maintenance work on a vehicle can
be dangerous. In trying to do some jobs, you
can be seriously injured. Do your own
maintenance work only if you have the
required know-how and the proper tools and
equipment for the job. If you have any doubt,
have a quali�ed technician do the work.
If you want to purchase service information, seeService
Publications Ordering Information on page 7-11.“Part B: Owner Checks and Services”tells you what
should be checked and when. It also explains what
you can easily do to help keep your vehicle in good
condition.
“Part C: Periodic Maintenance Inspections”explains
important inspections that your dealer’s service
department can perform for you.
“Part D: Recommended Fluids and Lubricants”lists
some recommended products necessary to help
keep your vehicle properly maintained. These products,
or their equivalents, should be used whether you do
the work yourself or have it done.
“Part E: Maintenance Record”is a place for you to
record and keep track of the maintenance performed
on your vehicle. Keep your maintenance receipts.
They may be needed to qualify your vehicle for
warranty repairs.
6-3
Page 290 of 340
Part A: Scheduled Maintenance
Services
In this part are scheduled maintenance services which
are to be performed at the mileage intervals specified.
Using Your Maintenance Schedule
We at General Motors want to keep your vehicle in good
working condition. But we do not know exactly how
you will drive it. You may drive short distances only a
few times a week. Or you may drive long distances
all the time in very hot, dusty weather. You may
use your vehicle in making deliveries. Or you may drive
it to work, to do errands or in many other ways.
Because of the different ways people use their vehicles,
maintenance needs may vary. You may need more
frequent checks and replacements. So please read the
following and note how you drive. If you have
questions on how to keep your vehicle in good condition,
see your dealer.This part tells you the maintenance services you should
have done and when to schedule them.
When you go to your dealer for your service needs, you
will know that GM-trained and supported service
people will perform the work using genuine GM parts.
The proper fluids and lubricants to use are listed in
Part D. Make sure whoever services your vehicle uses
these. All parts should be replaced and all necessary
repairs done before you or anyone else drives the
vehicle.
These schedules are for vehicles that:
•carry passengers and cargo within recommended
limits. You will find these on the tire and loading
information label. SeeLoading Your Vehicle
on page 4-29.
•are driven on reasonable road surfaces within legal
driving limits.
•use the recommended fuel. SeeGasoline Octane
on page 5-5.
6-4
Page 291 of 340
Selecting the Right Schedule
First you will need to decide which of the two schedules
is right for your vehicle. Here is how to decide which
schedule to follow:
Short Trip/City De�nition
Follow the Short Trip/City Scheduled Maintenance if any
one of these conditions is true for your vehicle:
•Most trips are less than 5 miles (8 km). This is
particularly important when outside temperatures
are below freezing.
•Most trips include extensive idling, such as frequent
driving in stop-and-go traffic.
•If the vehicle is used for delivery service, police,
taxi or other commercial application.
One of the reasons you should follow this schedule if
you operate your vehicle under any of these conditions
is that these conditions cause engine oil to break
down sooner.
Short Trip/City Intervals
Every 3,000 Miles (5 000 km):Engine Oil and Filter
Change (or 3 months, whichever occurs first).
Every 6,000 Miles (10 000 km):Tire Rotation.
Every 15,000 Miles (25 000 km):Engine Air Cleaner
Filter Inspection. Passenger Compartment Air Filter
Replacement. Drive Belts Inspection.
Every 30,000 Miles (50 000 km):Engine Air Cleaner
Filter Replacement. Fuel Filter Replacement. Cooling
System Service. EVAP System Service. PCV System
Service. Brake Fluid Change (or 24 months, whichever
occurs first).
Every 50,000 Miles (83 000 km):Automatic Transaxle
Service (severe conditions only).
Every 60,000 Miles (100 000 km):EVAP System
Solenoid Valve Filter Replacement.
Every 100,000 Miles (166 000 km):Spark Plug
Replacement.
These intervals only summarize maintenance services.
Be sure to follow the complete scheduled maintenance
on the following pages.
6-5