wiring CHEVROLET EPICA 2005 1.G Owners Manual
[x] Cancel search | Manufacturer: CHEVROLET, Model Year: 2005, Model line: EPICA, Model: CHEVROLET EPICA 2005 1.GPages: 340, PDF Size: 2.19 MB
Page 80 of 340
Canceling the Rear Door Security Lock
1. Unlock the door from the inside and open the
door from the outside.
2. Move the lever downward to unlock.
3. Do the same for the other rear door.
The rear door locks will now work normally.
Lockout Protection
This feature helps prevent locking your key in the car.
The driver’s door can only be locked with the door
closed. From the outside of the vehicle, close the
driver’s door and lock it using the key or the remote
keyless entry transmitter.
This feature cannot guarantee that you will never be
locked out of your vehicle. Always remember to
take your key with you.
Trunk
To unlock the trunk from the outside, use the key or the
remote keyless entry transmitter.
When closing the trunk, close from the center to ensure
it fully latches.
{CAUTION:
It can be dangerous to drive with the trunk lid
open because carbon monoxide (CO) gas can
come into your vehicle. You cannot see or
smell CO. It can cause unconsciousness and
even death. If you must drive with the trunk lid
open or if electrical wiring or other cable
connections must pass through the seal
between the body and the trunk lid:
Make sure all other windows are shut.
Turn the fan on your heating or cooling
system to its highest speed and select the
control setting that will force outside air
into your vehicle. See Climate Control
System in the Index.
If you have air outlets on or under the
instrument panel, open them all the way.
SeeEngine Exhaust on page 2-27.
2-10
Page 137 of 340
Safety Belt Reminder Tone
If your vehicle has this feature, a tone will sound for
several seconds when the ignition is turned to ON
to remind people to fasten their safety belts. The tone
will not sound if the driver’s safety belt is already
buckled.
Airbag Readiness Light
There is an airbag readiness light on the instrument
panel, which shows the airbag symbol. The system
checks the airbag’s electrical system for malfunctions.
The light tells you if there is an electrical problem.
The system check includes the airbag sensors, the
airbag modules, the wiring and the diagnostic module.
For more information on the airbag system, see
Airbag System on page 1-49.
This light will come on for
about seven seconds
when you start your
vehicle. Then the light
should go out. This means
the system is ready.If the airbag readiness light stays on after you start the
vehicle or comes on when you are driving, your
airbag system may not work properly. Have your vehicle
serviced right away.
{CAUTION:
If the airbag readiness light stays on or keeps
�ashing after you start your vehicle, it means
the airbag system and safety belt pretension
system may not be working properly. The
airbags in your vehicle may not in�ate in a
crash, or they could even in�ate without a
crash. To help avoid injury to yourself or
others, have your vehicle serviced right away if
the airbag readiness light stays on after you
start your vehicle.
The airbag readiness light should come on for about
seven seconds when you turn the ignition key to ON. If
the light doesn’t come on then, have it fixed so it will
be ready to warn you if there is a problem.
3-33
Page 204 of 340
Tires..............................................................5-46
Tire Sidewall Labelling...................................5-47
Tire Terminology and Definitions.....................5-49
Inflation - Tire Pressure.................................5-52
Tire Inspection and Rotation...........................5-54
When It Is Time for New Tires.......................5-55
Buying New Tires.........................................5-56
Uniform Tire Quality Grading..........................5-56
Wheel Alignment and Tire Balance..................5-58
Wheel Replacement......................................5-58
Tire Chains..................................................5-59
If a Tire Goes Flat........................................5-60
Changing a Flat Tire.....................................5-61
Removing the Spare Tire and Tools................5-62
Removing the Flat Tire and Installing the
Spare Tire................................................5-63
Storing a Flat or Spare Tire and Tools............5-67
Compact Spare Tire......................................5-67
Appearance Care............................................5-68
Fabric/Carpet...............................................5-68
Vinyl...........................................................5-70
Leather.......................................................5-70
Instrument Panel..........................................5-70
Interior Plastic Components............................5-70
Glass Surfaces.............................................5-70
Weatherstrips...............................................5-71Washing Your Vehicle...................................5-71
Cleaning Exterior Lamps/Lenses.....................5-71
Finish Care..................................................5-71
Windshield and Wiper Blades.........................5-72
Aluminum Wheels.........................................5-72
Tires...........................................................5-73
Sheet Metal Damage.....................................5-73
Finish Damage.............................................5-73
Underbody Maintenance................................5-73
Chemical Paint Spotting.................................5-74
Vehicle Care/Appearance Materials..................5-74
Vehicle Identi�cation......................................5-75
Vehicle Identification Number (VIN).................5-75
Service Parts Identification Label.....................5-76
Electrical System............................................5-76
Add-On Electrical Equipment..........................5-76
Headlamp Wiring..........................................5-76
Windshield Wiper Fuses................................5-76
Power Windows and Other Power Options.......5-76
Fuses and Circuit Breakers............................5-77
Instrument Panel Fuse Block..........................5-77
Engine Compartment Fuse Block....................5-79
Capacities and Speci�cations..........................5-83
Normal Maintenance Replacement Parts..........5-84
Section 5 Service and Appearance Care
5-2
Page 242 of 340
Headlamps
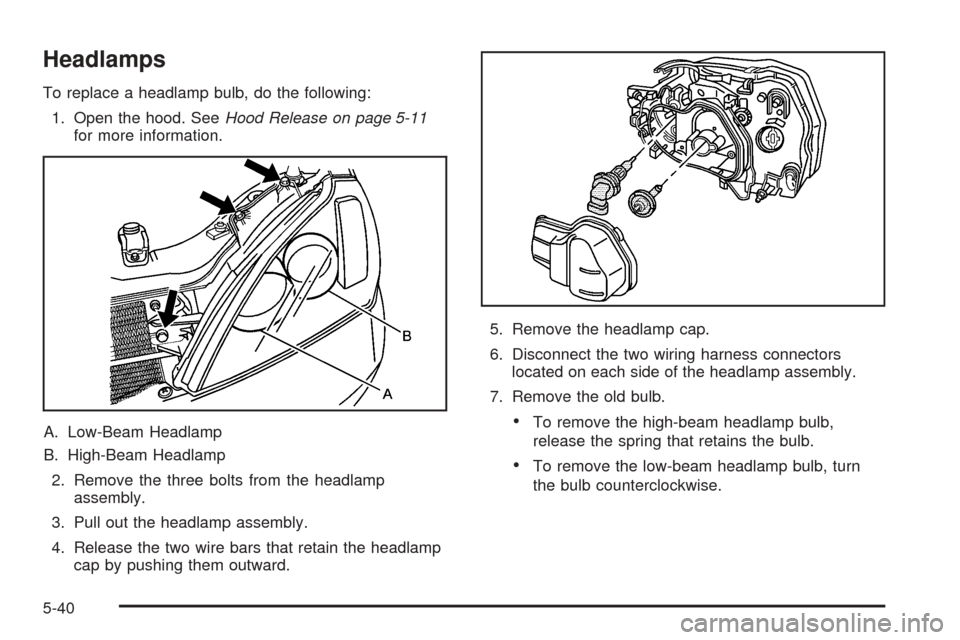
To replace a headlamp bulb, do the following:
1. Open the hood. SeeHood Release on page 5-11
for more information.
A. Low-Beam Headlamp
B. High-Beam Headlamp
2. Remove the three bolts from the headlamp
assembly.
3. Pull out the headlamp assembly.
4. Release the two wire bars that retain the headlamp
cap by pushing them outward.5. Remove the headlamp cap.
6. Disconnect the two wiring harness connectors
located on each side of the headlamp assembly.
7. Remove the old bulb.
•To remove the high-beam headlamp bulb,
release the spring that retains the bulb.
•To remove the low-beam headlamp bulb, turn
the bulb counterclockwise.
5-40
Page 243 of 340
8. Install the new bulb.
•To replace the high-beam headlamp bulb, install
the bulb retaining spring.
•To replace the low-beam headlamp bulb, turn
the bulb clockwise.
9. Connect the wiring harness connector to the bulb
and replace the headlamp cap.
10. Reverse Steps 1 through 6 to reinstall the headlamp
assembly.
Front Turn Signal Lamps
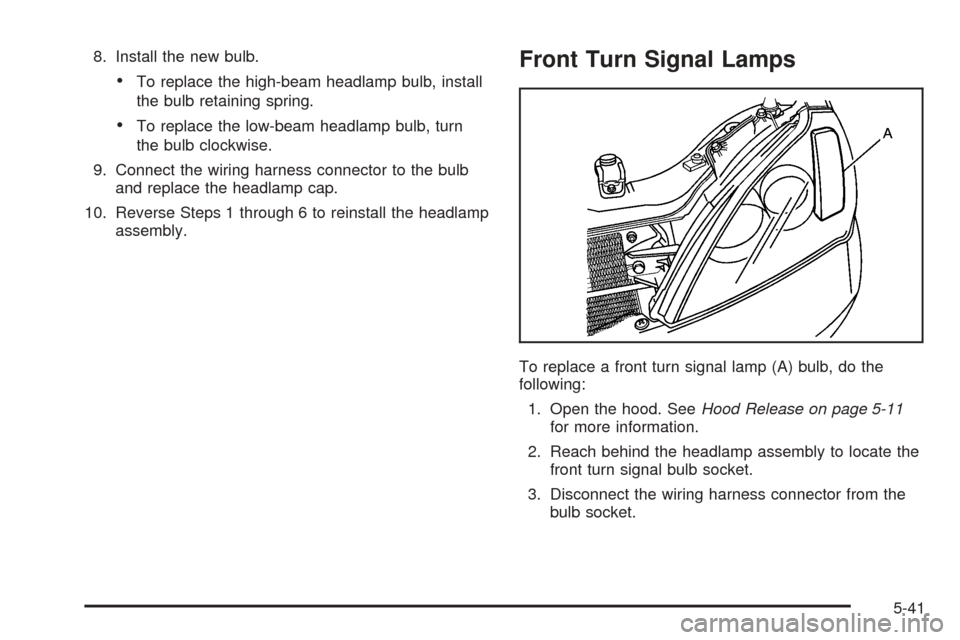
To replace a front turn signal lamp (A) bulb, do the
following:
1. Open the hood. SeeHood Release on page 5-11
for more information.
2. Reach behind the headlamp assembly to locate the
front turn signal bulb socket.
3. Disconnect the wiring harness connector from the
bulb socket.
5-41
Page 278 of 340
Service Parts Identi�cation Label
You will find this label on the inside of the glove box. It
is very helpful if you ever need to order parts. On
this label, you will find the following:
•VIN
•Model designation
•Paint information
•Production options and special equipment
Be sure that this label is not removed from the vehicle.
Electrical System
Add-On Electrical Equipment
Notice:Don’t add anything electrical to your vehicle
unless you check with your dealer �rst. Some
electrical equipment can damage your vehicle and
the damage wouldn’t be covered by your warranty.
Some add-on electrical equipment can keep other
components from working as they should.
Your vehicle has an airbag system. Before attempting to
add anything electrical to your vehicle, seeServicing
Your Airbag-Equipped Vehicle on page 1-62.
Headlamp Wiring
The headlamp wiring is protected by fuses, one for each
headlamp, in the fuse block. An electrical overload
will cause the lamps to turn off. If this happens, have
your headlamp wiring checked right away.
Windshield Wiper Fuses
The windshield wiper motor is protected by an internal
circuit breaker and a fuse. If the motor overheats due to
heavy snow, etc., the wiper will stop until the motor
cools. If the overload is caused by some electrical
problem and not snow, etc., be sure to get it fixed.
Power Windows and Other Power
Options
Circuit breakers in the fuse block protect the power
windows and other power accessories. When the current
load is too heavy, the circuit breaker opens and
closes, protecting the circuit until the problem is fixed or
goes away.
5-76
Page 279 of 340
Fuses and Circuit Breakers
The wiring circuits in your vehicle are protected from
short circuits by a combination of fuses, circuit breakers
and fusible thermal links in the wiring itself.
Look at the silver-colored band inside the fuse. If the
band is broken or melted, replace the fuse. Be sure you
replace a bad fuse with a new one of the identical
size and rating.
Five spare fuses are provided in the engine
compartment fuse block. If you ever have a problem
on the road and do not have a spare fuse, you
can borrow one that has the same amperage. Just pick
a feature of your vehicle that you can get along
without — like the radio or cigarette lighter — and use
its fuse, if it is the correct amperage. Replace it as soon
as you can.
There are two fuse blocks in your vehicle: the
instrument panel fuse block and the engine compartment
fuse block.
There is a fuse puller located on the engine
compartment fuse block. It can be used to easily
remove fuses from the fuse block.
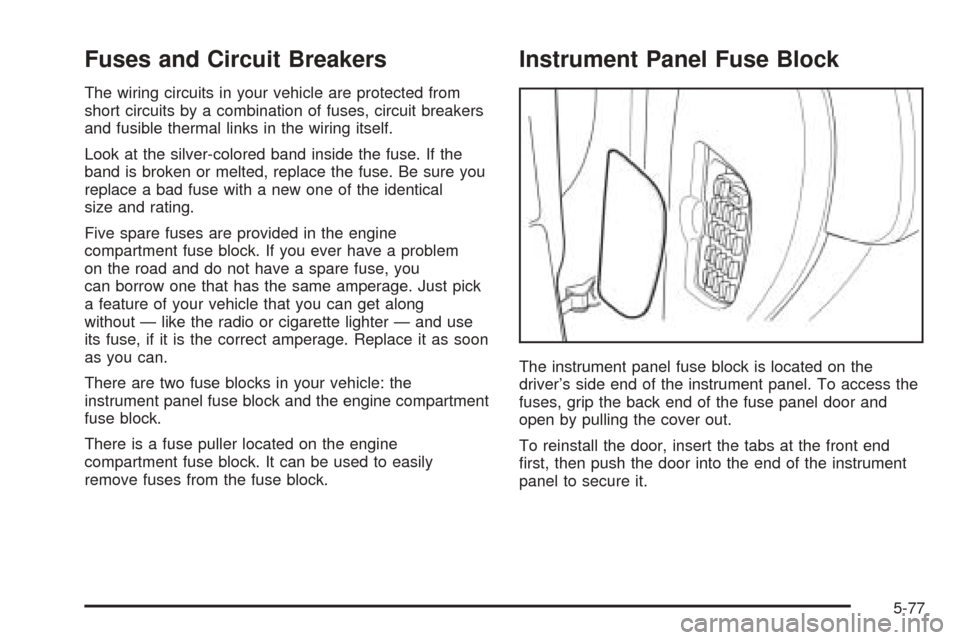
Instrument Panel Fuse Block
The instrument panel fuse block is located on the
driver’s side end of the instrument panel. To access the
fuses, grip the back end of the fuse panel door and
open by pulling the cover out.
To reinstall the door, insert the tabs at the front end
first, then push the door into the end of the instrument
panel to secure it.
5-77
Page 332 of 340
D
Daytime Running Lamps..................................3-14
Daytime Running Lamps Indicator Light.............3-45
Defensive Driving............................................. 4-2
Doing Your Own Service Work........................... 5-4
Dome Lamp...................................................3-16
Door
Ajar Light...................................................3-45
Central Door Unlocking System....................... 2-8
Door Ajar Reminder....................................... 2-9
Locks.......................................................... 2-7
Power Door Locks......................................... 2-8
Rear Door Security Locks............................... 2-9
Driver
Position, Safety Belt.....................................1-16
Seat Tilt Adjuster........................................... 1-3
Driving
At Night.....................................................4-15
City...........................................................4-19
Defensive..................................................... 4-2
Drunken....................................................... 4-2
Freeway.....................................................4-20
Hill and Mountain Roads..............................4-22
In Rain and on Wet Roads...........................4-16
Rocking Your Vehicle to Get it Out.................4-28
Winter........................................................4-24
E
Electrical System
Add-On Equipment......................................5-76
Engine Compartment Fuse Block...................5-79
Fuses and Circuit Breakers...........................5-77
Headlamp Wiring.........................................5-76
Instrument Panel Fuse Block.........................5-77
Power Windows and Other Power Options......5-76
Windshield Wiper Fuses...............................5-76
Engine
Air Cleaner/Filter.........................................5-17
Battery.......................................................5-34
Check and Service Engine Soon Light............3-41
Coolant......................................................5-19
Coolant Heater............................................2-19
Coolant Temperature Gage...........................3-40
Cooling System Inspection............................6-23
Engine Compartment Overview......................5-12
Exhaust.....................................................2-27
Oil .............................................................5-13
Overheating................................................5-22
Starting......................................................2-18
Entry Lighting.................................................3-16
Event Data Recorders (EDR)............................. 7-9
Extender, Safety Belt.......................................1-27
Exterior Lamps...............................................3-13
Exterior Lighting Battery Saver..........................3-15
4
Page 333 of 340
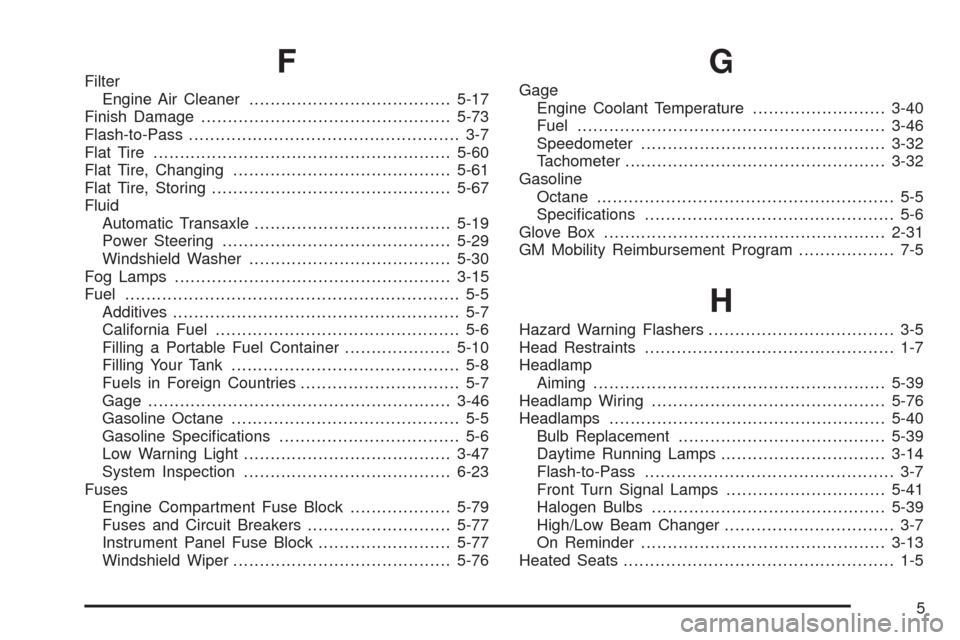
FFilter
Engine Air Cleaner......................................5-17
Finish Damage...............................................5-73
Flash-to-Pass................................................... 3-7
Flat Tire........................................................5-60
Flat Tire, Changing.........................................5-61
Flat Tire, Storing.............................................5-67
Fluid
Automatic Transaxle.....................................5-19
Power Steering...........................................5-29
Windshield Washer......................................5-30
Fog Lamps....................................................3-15
Fuel............................................................... 5-5
Additives...................................................... 5-7
California Fuel.............................................. 5-6
Filling a Portable Fuel Container....................5-10
Filling Your Tank........................................... 5-8
Fuels in Foreign Countries.............................. 5-7
Gage.........................................................3-46
Gasoline Octane........................................... 5-5
Gasoline Specifications.................................. 5-6
Low Warning Light.......................................3-47
System Inspection.......................................6-23
Fuses
Engine Compartment Fuse Block...................5-79
Fuses and Circuit Breakers...........................5-77
Instrument Panel Fuse Block.........................5-77
Windshield Wiper.........................................5-76G
Gage
Engine Coolant Temperature.........................3-40
Fuel..........................................................3-46
Speedometer..............................................3-32
Tachometer.................................................3-32
Gasoline
Octane........................................................ 5-5
Specifications............................................... 5-6
Glove Box.....................................................2-31
GM Mobility Reimbursement Program.................. 7-5
H
Hazard Warning Flashers................................... 3-5
Head Restraints............................................... 1-7
Headlamp
Aiming.......................................................5-39
Headlamp Wiring............................................5-76
Headlamps....................................................5-40
Bulb Replacement.......................................5-39
Daytime Running Lamps...............................3-14
Flash-to-Pass............................................... 3-7
Front Turn Signal Lamps..............................5-41
Halogen Bulbs............................................5-39
High/Low Beam Changer................................ 3-7
On Reminder..............................................3-13
Heated Seats................................................... 1-5
5