headlamp CHEVROLET EQUINOX 2005 1.G User Guide
[x] Cancel search | Manufacturer: CHEVROLET, Model Year: 2005, Model line: EQUINOX, Model: CHEVROLET EQUINOX 2005 1.GPages: 364, PDF Size: 2.32 MB
Page 208 of 364
Driving Through Deep Standing Water
Notice:If you drive too quickly through deep
puddles or standing water, water can come in
through your engine’s air intake and badly damage
your engine. Never drive through water that is
slightly lower than the underbody of your vehicle. If
you cannot avoid deep puddles or standing water,
drive through them very slowly.
Driving Through Flowing Water
{CAUTION:
Flowing or rushing water creates strong
forces. If you try to drive through owing
water, as you might at a low water crossing,
your vehicle can be carried away. As little as
six inches of owing water can carry away a
smaller vehicle. If this happens, you and other
vehicle occupants could drown. Do not ignore
police warning signs, and otherwise be very
cautious about trying to drive through
owing water.
Some Other Rainy Weather Tips
Turn on your low-beam headlamps — not just your
parking lamps — to help make you more visible
to others.
Besides slowing down, allow some extra following
distance. And be especially careful when you
pass another vehicle. Allow yourself more clear
room ahead, and be prepared to have your
view restricted by road spray.
Have good tires with proper tread depth. SeeTires
on page 5-49.
4-18
Page 217 of 364
{CAUTION:
Snow can trap exhaust gases under your
vehicle. This can cause deadly CO (carbon
monoxide) gas to get inside. CO could
overcome you and kill you. You cannot see it
or smell it, so you might not know it is in your
vehicle. Clear away snow from around the
base of your vehicle, especially any that is
blocking your exhaust pipe. And check around
again from time to time to be sure snow does
not collect there.
Open a window just a little on the side of the
vehicle that is away from the wind. This will
help keep CO out.Run your engine only as long as you must. This saves
fuel. When you run the engine, make it go a little
faster than just idle. That is, push the accelerator
slightly. This uses less fuel for the heat that you get and
it keeps the battery charged. You will need a
well-charged battery to restart the vehicle, and possibly
for signaling later on with your headlamps. Let the
heater run for a while.
Then, shut the engine off and close the window almost
all the way to preserve the heat. Start the engine
again and repeat this only when you feel really
uncomfortable from the cold. But do it as little as
possible. Preserve the fuel as long as you can. To help
keep warm, you can get out of the vehicle and do
some fairly vigorous exercises every half hour or so until
help comes.
4-27
Page 235 of 364
Service............................................................5-3
Doing Your Own Service Work.........................5-4
Adding Equipment to the Outside of Your
Vehicle......................................................5-5
Fuel................................................................5-5
Gasoline Octane............................................5-5
Gasoline Specications....................................5-5
California Fuel...............................................5-6
Additives.......................................................5-6
Fuels in Foreign Countries...............................5-7
Filling the Tank..............................................5-8
Filling a Portable Fuel Container.....................5-10
Checking Things Under the Hood....................5-10
Hood Release..............................................5-10
Engine Compartment Overview.......................5-12
Engine Oil...................................................5-13
Engine Oil Life System..................................5-16
Engine Air Cleaner/Filter................................5-17
Automatic Transaxle Fluid..............................5-21
Engine Coolant.............................................5-21
Engine Overheating.......................................5-24
Overheated Engine Protection
Operating Mode........................................5-26
Cooling System............................................5-26
Windshield Washer Fluid................................5-31
Brakes........................................................5-33Battery........................................................5-35
Jump Starting...............................................5-36
All-Wheel Drive..............................................5-41
Bulb Replacement..........................................5-43
Halogen Bulbs..............................................5-43
Headlamps, Front Turn Signal, Sidemarker,
and Parking Lamps....................................5-43
Taillamps, Turn Signal, Stoplamps and
Back-up Lamps.........................................5-46
Replacement Bulbs.......................................5-47
Windshield Wiper Blade Replacement..............5-48
Tires..............................................................5-49
Tire Sidewall Labelling...................................5-50
Tire Terminology and Denitions.....................5-52
Ination - Tire Pressure.................................5-55
Tire Inspection and Rotation...........................5-56
When It Is Time for New Tires.......................5-57
Buying New Tires.........................................5-58
Uniform Tire Quality Grading..........................5-59
Wheel Alignment and Tire Balance..................5-60
Wheel Replacement......................................5-61
Tire Chains..................................................5-62
If a Tire Goes Flat........................................5-63
Changing a Flat Tire.....................................5-64
Removing the Spare Tire and Tools................5-65
Section 5 Service and Appearance Care
5-1
Page 277 of 364
Bulb Replacement
For the proper type of replacement bulbs, see
Replacement Bulbs on page 5-47.
For any bulb changing procedure not listed in this
section, contact your dealer.
Halogen Bulbs
{CAUTION:
Halogen bulbs have pressurized gas inside
and can burst if you drop or scratch the bulb.
You or others could be injured. Be sure to read
and follow the instructions on the bulb
package.
Headlamps, Front Turn Signal,
Sidemarker, and Parking Lamps
To replace one of these bulbs, do the following:
1. Open the hood. SeeHood Release on page 5-10
for more information.
2. Remove the fastener plugs from the top of the
radiator cover/front grill.
5-43
Page 278 of 364
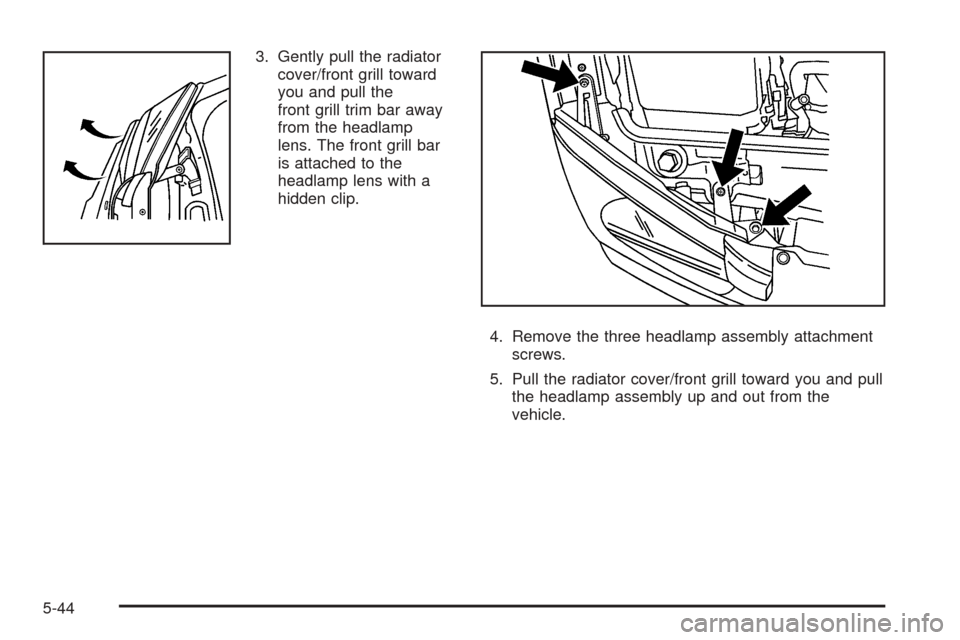
3. Gently pull the radiator
cover/front grill toward
you and pull the
front grill trim bar away
from the headlamp
lens. The front grill bar
is attached to the
headlamp lens with a
hidden clip.
4. Remove the three headlamp assembly attachment
screws.
5. Pull the radiator cover/front grill toward you and pull
the headlamp assembly up and out from the
vehicle.
5-44
Page 279 of 364
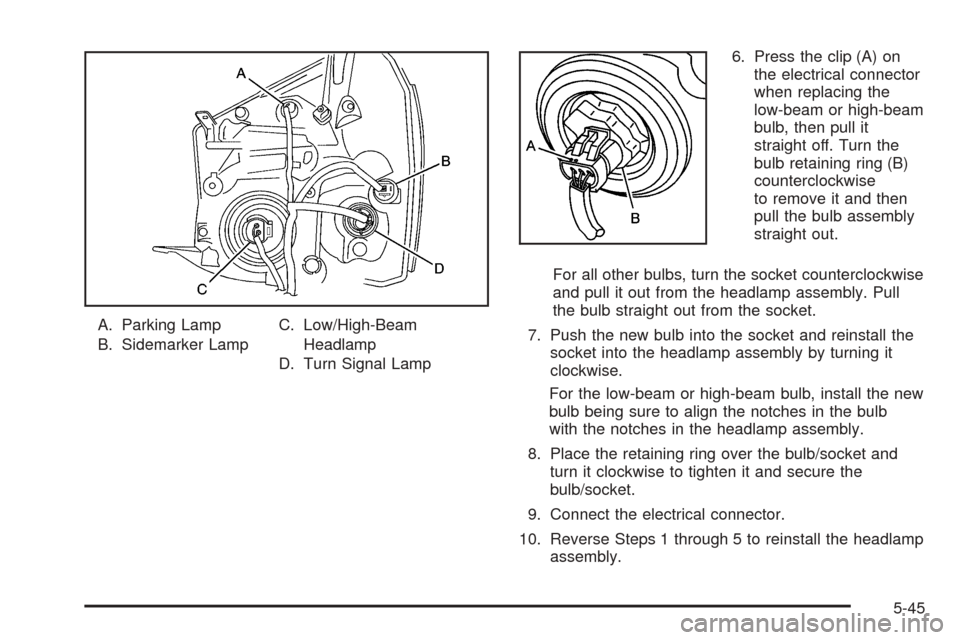
A. Parking Lamp
B. Sidemarker LampC. Low/High-Beam
Headlamp
D. Turn Signal Lamp6. Press the clip (A) on
the electrical connector
when replacing the
low-beam or high-beam
bulb, then pull it
straight off. Turn the
bulb retaining ring (B)
counterclockwise
to remove it and then
pull the bulb assembly
straight out.
For all other bulbs, turn the socket counterclockwise
and pull it out from the headlamp assembly. Pull
the bulb straight out from the socket.
7. Push the new bulb into the socket and reinstall the
socket into the headlamp assembly by turning it
clockwise.
For the low-beam or high-beam bulb, install the new
bulb being sure to align the notches in the bulb
with the notches in the headlamp assembly.
8. Place the retaining ring over the bulb/socket and
turn it clockwise to tighten it and secure the
bulb/socket.
9. Connect the electrical connector.
10. Reverse Steps 1 through 5 to reinstall the headlamp
assembly.
5-45
Page 295 of 364
Wheel Replacement
Replace any wheel that is bent, cracked or badly rusted
or corroded. If wheel nuts keep coming loose, the
wheel, wheel bolts and wheel nuts should be replaced.
If the wheel leaks air, replace it (except some
aluminum wheels, which can sometimes be repaired).
See your dealer if any of these conditions exist.
Your dealer will know the kind of wheel you need.
Each new wheel should have the same load-carrying
capacity, diameter, width, offset and be mounted
the same way as the one it replaces.
If you need to replace any of your wheels, wheel bolts
or wheel nuts, replace them only with new GM
original equipment parts. This way, you will be sure to
have the right wheel, wheel bolts and wheel nuts
for your vehicle.{CAUTION:
Using the wrong replacement wheels, wheel
bolts or wheel nuts on your vehicle can be
dangerous. It could affect the braking and
handling of your vehicle, make your tires lose
air and make you lose control. You could have
a collision in which you or others could be
injured. Always use the correct wheel, wheel
bolts and wheel nuts for replacement.
Notice:The wrong wheel can also cause problems
with bearing life, brake cooling, speedometer or
odometer calibration, headlamp aim, bumper height,
vehicle ground clearance and tire or tire chain
clearance to the body and chassis.
SeeChanging a Flat Tire on page 5-64for more
information.
5-61
Page 320 of 364
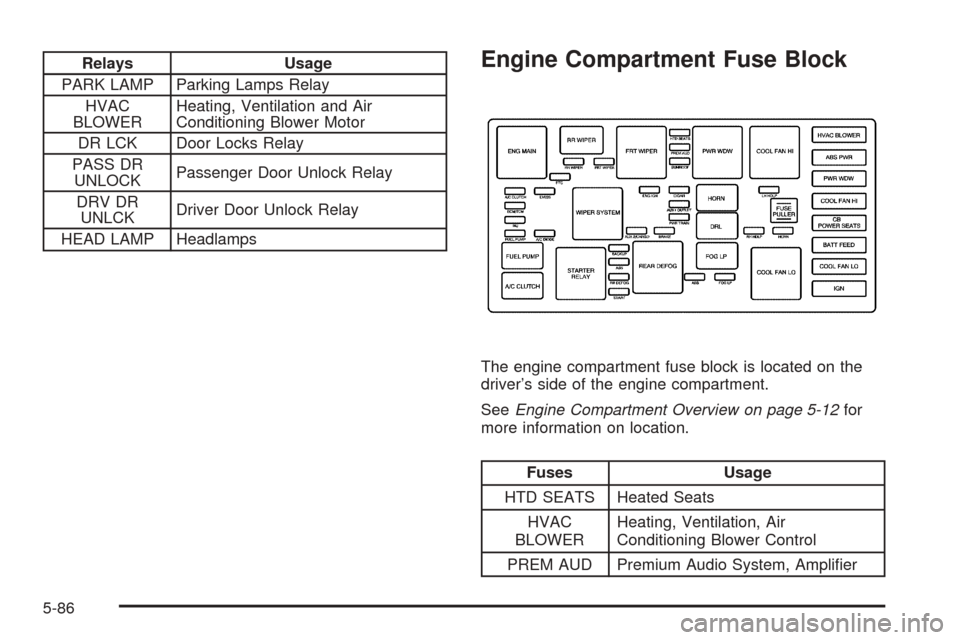
Relays Usage
PARK LAMP Parking Lamps Relay
HVAC
BLOWERHeating, Ventilation and Air
Conditioning Blower Motor
DR LCK Door Locks Relay
PASS DR
UNLOCKPassenger Door Unlock Relay
DRV DR
UNLCKDriver Door Unlock Relay
HEAD LAMP HeadlampsEngine Compartment Fuse Block
The engine compartment fuse block is located on the
driver’s side of the engine compartment.
SeeEngine Compartment Overview on page 5-12for
more information on location.
Fuses Usage
HTD SEATS Heated Seats
HVAC
BLOWERHeating, Ventilation, Air
Conditioning Blower Control
PREM AUD Premium Audio System, Amplier
5-86
Page 321 of 364
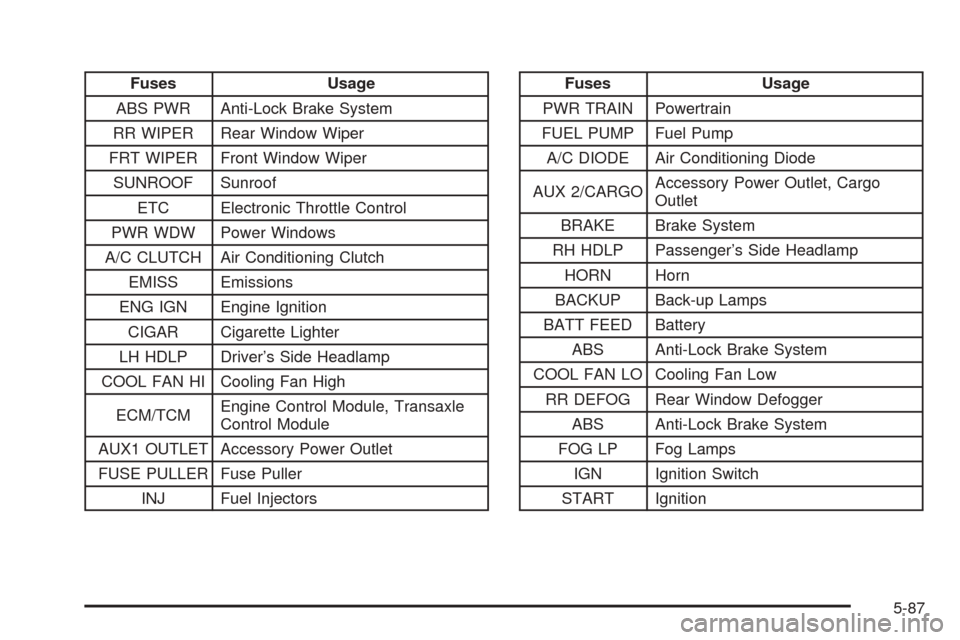
Fuses Usage
ABS PWR Anti-Lock Brake System
RR WIPER Rear Window Wiper
FRT WIPER Front Window Wiper
SUNROOF Sunroof
ETC Electronic Throttle Control
PWR WDW Power Windows
A/C CLUTCH Air Conditioning Clutch
EMISS Emissions
ENG IGN Engine Ignition
CIGAR Cigarette Lighter
LH HDLP Driver’s Side Headlamp
COOL FAN HI Cooling Fan High
ECM/TCMEngine Control Module, Transaxle
Control Module
AUX1 OUTLET Accessory Power Outlet
FUSE PULLER Fuse Puller
INJ Fuel InjectorsFuses Usage
PWR TRAIN Powertrain
FUEL PUMP Fuel Pump
A/C DIODE Air Conditioning Diode
AUX 2/CARGOAccessory Power Outlet, Cargo
Outlet
BRAKE Brake System
RH HDLP Passenger’s Side Headlamp
HORN Horn
BACKUP Back-up Lamps
BATT FEED Battery
ABS Anti-Lock Brake System
COOL FAN LO Cooling Fan Low
RR DEFOG Rear Window Defogger
ABS Anti-Lock Brake System
FOG LP Fog Lamps
IGN Ignition Switch
START Ignition
5-87
Page 353 of 364
A
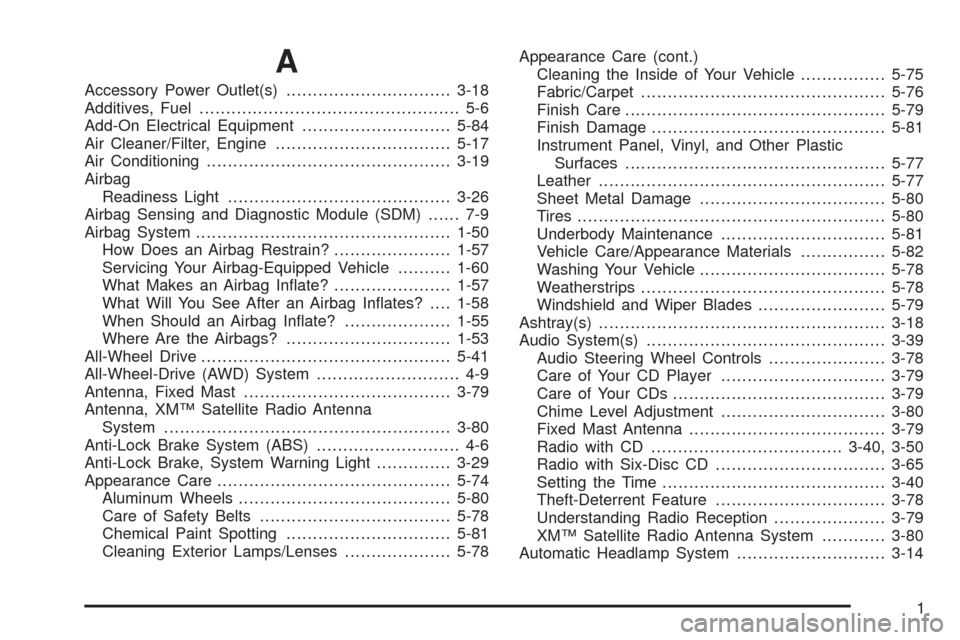
Accessory Power Outlet(s)...............................3-18
Additives, Fuel................................................. 5-6
Add-On Electrical Equipment............................5-84
Air Cleaner/Filter, Engine.................................5-17
Air Conditioning..............................................3-19
Airbag
Readiness Light..........................................3-26
Airbag Sensing and Diagnostic Module (SDM)...... 7-9
Airbag System................................................1-50
How Does an Airbag Restrain?......................1-57
Servicing Your Airbag-Equipped Vehicle..........1-60
What Makes an Airbag Inate?......................1-57
What Will You See After an Airbag Inates?....1-58
When Should an Airbag Inate?....................1-55
Where Are the Airbags?...............................1-53
All-Wheel Drive...............................................5-41
All-Wheel-Drive (AWD) System........................... 4-9
Antenna, Fixed Mast.......................................3-79
Antenna, XM™ Satellite Radio Antenna
System......................................................3-80
Anti-Lock Brake System (ABS)........................... 4-6
Anti-Lock Brake, System Warning Light..............3-29
Appearance Care............................................5-74
Aluminum Wheels........................................5-80
Care of Safety Belts....................................5-78
Chemical Paint Spotting...............................5-81
Cleaning Exterior Lamps/Lenses....................5-78Appearance Care (cont.)
Cleaning the Inside of Your Vehicle................5-75
Fabric/Carpet..............................................5-76
Finish Care.................................................5-79
Finish Damage............................................5-81
Instrument Panel, Vinyl, and Other Plastic
Surfaces.................................................5-77
Leather......................................................5-77
Sheet Metal Damage...................................5-80
Tires..........................................................5-80
Underbody Maintenance...............................5-81
Vehicle Care/Appearance Materials................5-82
Washing Your Vehicle...................................5-78
Weatherstrips..............................................5-78
Windshield and Wiper Blades........................5-79
Ashtray(s)......................................................3-18
Audio System(s).............................................3-39
Audio Steering Wheel Controls......................3-78
Care of Your CD Player...............................3-79
Care of Your CDs........................................3-79
Chime Level Adjustment...............................3-80
Fixed Mast Antenna.....................................3-79
Radio with CD....................................3-40, 3-50
Radio with Six-Disc CD................................3-65
Setting the Time..........................................3-40
Theft-Deterrent Feature................................3-78
Understanding Radio Reception.....................3-79
XM™ Satellite Radio Antenna System............3-80
Automatic Headlamp System............................3-14
1