fuses CHEVROLET EQUINOX 2007 1.G Owners Manual
[x] Cancel search | Manufacturer: CHEVROLET, Model Year: 2007, Model line: EQUINOX, Model: CHEVROLET EQUINOX 2007 1.GPages: 492, PDF Size: 2.62 MB
Page 113 of 492
PASS-Key®III+ Operation
Your vehicle has PASS-Key®III+ (Personalized
Automotive Security System) theft-deterrent
system. PASS-Key
®III+ is a passive
theft-deterrent system. This means you do not
have to do anything special to arm or disarm the
system. It works when you transition the key
to RUN, ACC or START from the LOCK position.
When the PASS-Key
®III+ system senses that
someone is using the wrong key, it prevents
the vehicle from starting. Anyone using a
trial-and-error method to start the vehicle will be
discouraged because of the high number of
electrical key codes.
If the engine does not start and the security light
on the instrument panel comes on when trying
to start the vehicle, the key may have a damaged
transponder. Turn the ignition off and try again.
If the engine still does not start, and the key
appears to be undamaged, try another ignition key.
At this time, you may also want to check the fuse,
seeFuses and Circuit Breakers on page 429.If the engine still does not start with the other key,
your vehicle needs service. If your vehicle does
start, the �rst key may be faulty. See your dealer
who can service the PASS-Key
®III+ to have a new
key made. In an emergency, contact Roadside
Assistance.
It is possible for the PASS-Key
®III+ decoder
to “learn” the transponder value of a new
or replacement key. Up to nine additional keys
may be programmed for the vehicle. The following
procedure is for programming additional keys
only. If all the currently programmed keys are
lost or do not operate, you must see your dealer
or a locksmith who can service PASS-Key
®III+
to have keys made and programmed to the
system.
See your dealer or a locksmith who can service
PASS-Key
®III+ to get a new key blank that is cut
exactly as the ignition key that operates the system.
113
Page 152 of 492
Turn and Lane-Change Signals
The turn signal has two upward (for right) and
two downward (for left) positions. These positions
allow you to signal a turn or a lane change.
To signal a turn, move the lever all the way up or
down. When the turn is �nished, the lever will
return automatically.
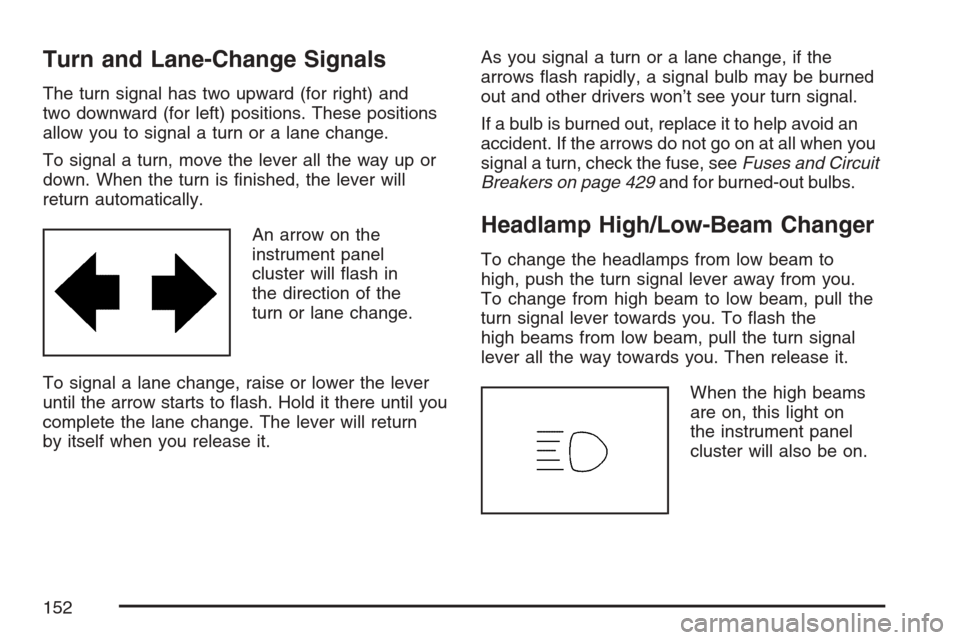
An arrow on the
instrument panel
cluster will �ash in
the direction of the
turn or lane change.
To signal a lane change, raise or lower the lever
until the arrow starts to �ash. Hold it there until you
complete the lane change. The lever will return
by itself when you release it.As you signal a turn or a lane change, if the
arrows �ash rapidly, a signal bulb may be burned
out and other drivers won’t see your turn signal.
If a bulb is burned out, replace it to help avoid an
accident. If the arrows do not go on at all when you
signal a turn, check the fuse, seeFuses and Circuit
Breakers on page 429and for burned-out bulbs.
Headlamp High/Low-Beam Changer
To change the headlamps from low beam to
high, push the turn signal lever away from you.
To change from high beam to low beam, pull the
turn signal lever towards you. To �ash the
high beams from low beam, pull the turn signal
lever all the way towards you. Then release it.
When the high beams
are on, this light on
the instrument panel
cluster will also be on.
152
Page 164 of 492
Accessory Power Outlet(s)
The accessory power outlets can be used to
connect electrical equipment such as a cellular
phone or CB radio.
The accessory power outlets located in front of
the center console storage area, at the rear of
the center console, and the vehicle may have
one located in the rear cargo area.
To use the outlets, remove the cover. When not in
use, always cover the outlet with the protective cap.
Notice:If electrical devices are left plugged
into a power outlet, the battery may drain
causing your vehicle not to start or damage
to the battery. This would not be covered
by the warranty. Always unplug all electrical
devices when turning off your vehicle.
Certain electrical accessories may not be
compatible with the accessory power outlets and
could result in blown vehicle or adapter fuses.
If you experience a problem, see your dealer
for additional information on the accessory
power outlet.Notice:Adding any electrical equipment to
your vehicle may damage it or keep other
components from working as they should. The
repairs would not be covered by your warranty.
Do not use equipment exceeding maximum
amperage rating of 20 amperes. Check with
your dealer before adding electrical equipment.
When adding electrical equipment, be sure to
follow the installation instructions included with
the equipment.
Notice:Improper use of the power outlet can
cause damage not covered by your warranty.
Do not hang any type of accessory or
accessory bracket from the plug because the
power outlets are designed for accessory
power plugs only.
164
Page 332 of 492
Tire Inspection and Rotation...................... 396
When It Is Time for New Tires.................. 397
Buying New Tires...................................... 398
Different Size Tires and Wheels................ 400
Uniform Tire Quality Grading..................... 400
Wheel Alignment and Tire Balance............ 402
Wheel Replacement.................................. 402
Tire Chains............................................... 403
If a Tire Goes Flat.................................... 404
Changing a Flat Tire................................. 404
Removing the Spare Tire and Tools.......... 406
Removing the Flat Tire and Installing
the Spare Tire....................................... 407
Storing a Flat or Spare Tire and Tools...... 414
Compact Spare Tire.................................. 416
Appearance Care........................................ 417
Cleaning the Inside of Your Vehicle.......... 417
Fabric/Carpet............................................. 418
Leather...................................................... 420
Instrument Panel, Vinyl, and Other
Plastic Surfaces..................................... 421
Care of Safety Belts.................................. 421
Weatherstrips............................................ 421Washing Your Vehicle............................... 422
Cleaning Exterior Lamps/Lenses................ 422
Finish Care............................................... 422
Windshield and Wiper Blades.................... 423
Aluminum or Chrome-Plated Wheels......... 424
Tires......................................................... 425
Sheet Metal Damage................................. 425
Finish Damage.......................................... 425
Underbody Maintenance............................ 425
Chemical Paint Spotting............................ 426
Vehicle Care/Appearance Materials............ 426
Vehicle Identi�cation.................................. 427
Vehicle Identi�cation Number (VIN)........... 427
Service Parts Identi�cation Label............... 428
Electrical System........................................ 428
Add-On Electrical Equipment..................... 428
Windshield Wiper Fuses............................ 429
Fuses and Circuit Breakers....................... 429
Instrument Panel Fuse Block..................... 429
Engine Compartment Fuse Block............... 431
Capacities and Speci�cations.................... 434
Section 5 Service and Appearance Care
332
Page 343 of 492
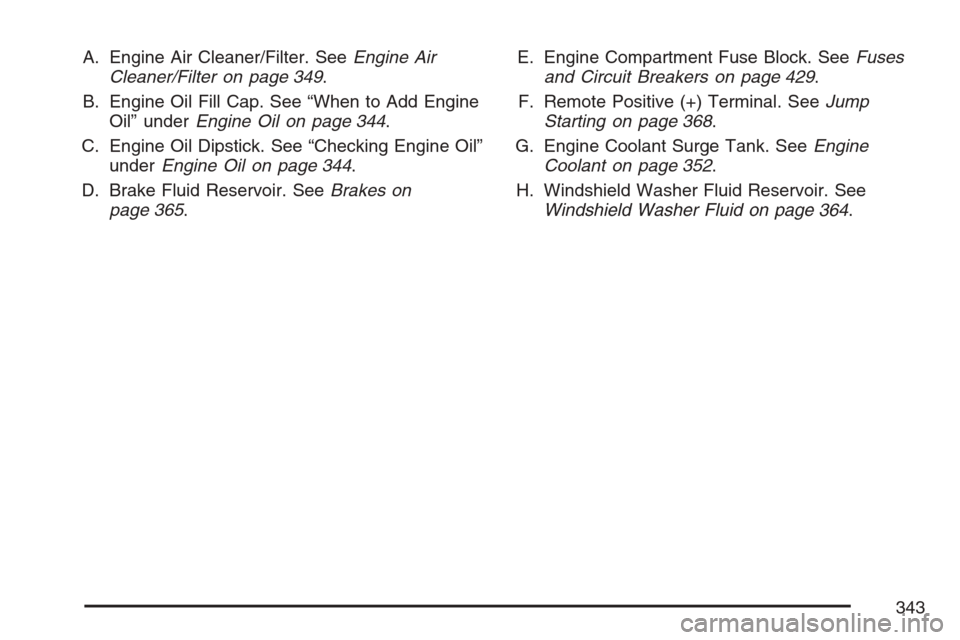
A. Engine Air Cleaner/Filter. SeeEngine Air
Cleaner/Filter on page 349.
B. Engine Oil Fill Cap. See “When to Add Engine
Oil” underEngine Oil on page 344.
C. Engine Oil Dipstick. See “Checking Engine Oil”
underEngine Oil on page 344.
D. Brake Fluid Reservoir. SeeBrakes on
page 365.E. Engine Compartment Fuse Block. SeeFuses
and Circuit Breakers on page 429.
F. Remote Positive (+) Terminal. SeeJump
Starting on page 368.
G. Engine Coolant Surge Tank. SeeEngine
Coolant on page 352.
H. Windshield Washer Fluid Reservoir. See
Windshield Washer Fluid on page 364.
343
Page 429 of 492
Windshield Wiper Fuses
The windshield wiper motor is protected by a
circuit breaker and a fuse. If the motor overheats
due to heavy snow or ice, the wiper will stop
until the motor cools. If the overload is caused by
some electrical problem, have it �xed.
Fuses and Circuit Breakers
The wiring circuits in your vehicle are protected
from short circuits by fuses and circuit breakers.
This greatly reduces the chance of circuit overload
and �re caused by electrical problems.
Your vehicle has an underhood fuse block and an
instrument panel fuse block.
To identify and check fuses, circuit breakers, and
relays, refer to the Fuse Usage Chart on the
inside surface of the fuse panel door.
Instrument Panel Fuse Block
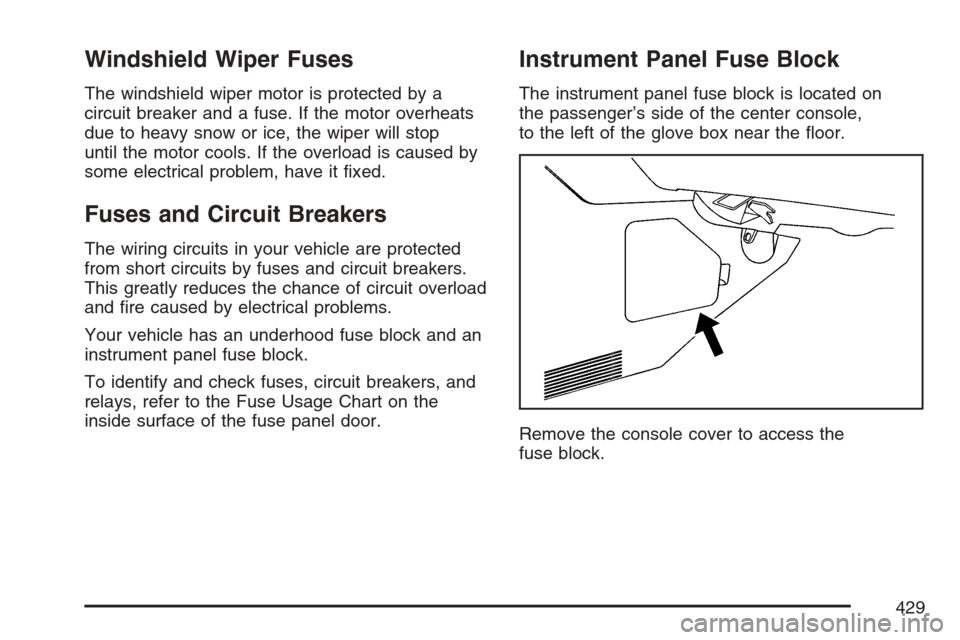
The instrument panel fuse block is located on
the passenger’s side of the center console,
to the left of the glove box near the �oor.
Remove the console cover to access the
fuse block.
429
Page 430 of 492
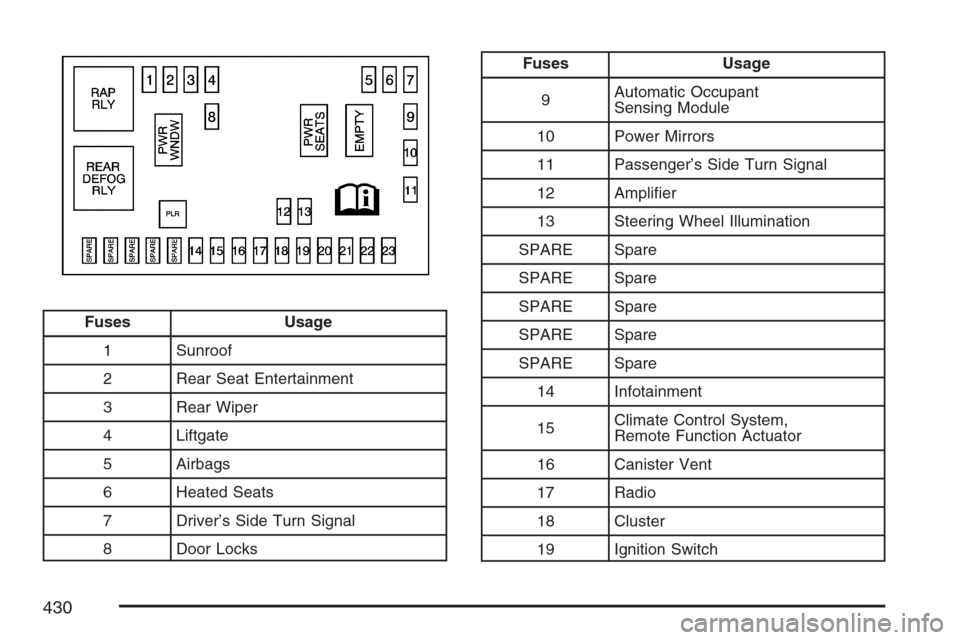
Fuses Usage
1 Sunroof
2 Rear Seat Entertainment
3 Rear Wiper
4 Liftgate
5 Airbags
6 Heated Seats
7 Driver’s Side Turn Signal
8 Door Locks
Fuses Usage
9Automatic Occupant
Sensing Module
10 Power Mirrors
11 Passenger’s Side Turn Signal
12 Ampli�er
13 Steering Wheel Illumination
SPARE Spare
SPARE Spare
SPARE Spare
SPARE Spare
SPARE Spare
14 Infotainment
15Climate Control System,
Remote Function Actuator
16 Canister Vent
17 Radio
18 Cluster
19 Ignition Switch
430
Page 431 of 492
Fuses Usage
20 Body Control Module
21 OnStar
®
22Center High-Mounted Stoplamp,
Dimmer
23 Interior Lights
Relays Usage
RAP RLY Retained Accessory Power Relay
REAR
DEFOG RLYRear Defogger Relay
Circuit
Breakers Usage
PWR WNDW Power Windows
PWR SEATS Power Seats
EMPTY Empty
Misc. Usage
PLR Fuse Puller
Engine Compartment Fuse Block
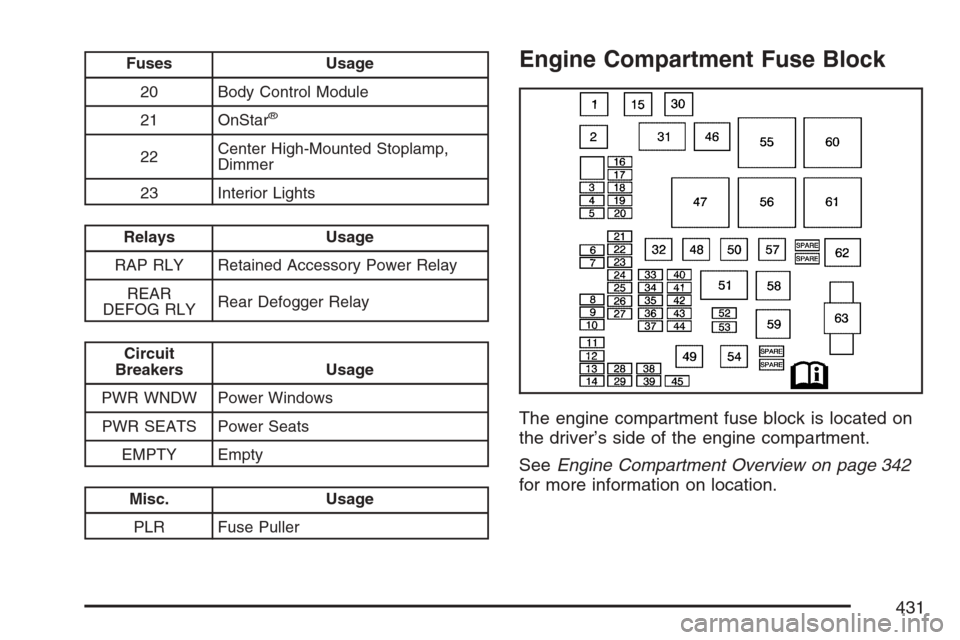
The engine compartment fuse block is located on
the driver’s side of the engine compartment.
SeeEngine Compartment Overview on page 342
for more information on location.
431
Page 432 of 492
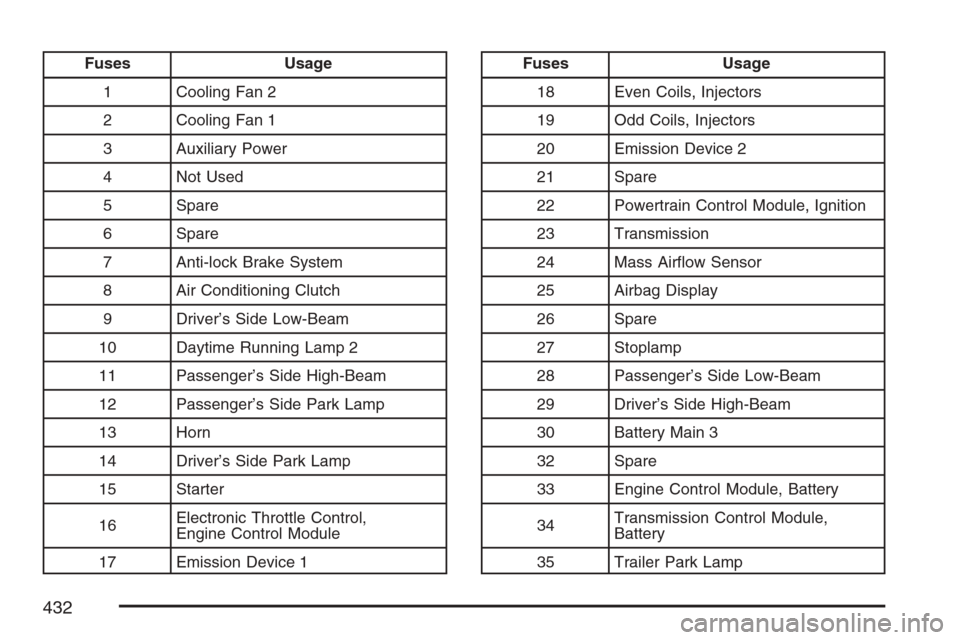
Fuses Usage
1 Cooling Fan 2
2 Cooling Fan 1
3 Auxiliary Power
4 Not Used
5 Spare
6 Spare
7 Anti-lock Brake System
8 Air Conditioning Clutch
9 Driver’s Side Low-Beam
10 Daytime Running Lamp 2
11 Passenger’s Side High-Beam
12 Passenger’s Side Park Lamp
13 Horn
14 Driver’s Side Park Lamp
15 Starter
16Electronic Throttle Control,
Engine Control Module
17 Emission Device 1Fuses Usage
18 Even Coils, Injectors
19 Odd Coils, Injectors
20 Emission Device 2
21 Spare
22 Powertrain Control Module, Ignition
23 Transmission
24 Mass Air�ow Sensor
25 Airbag Display
26 Spare
27 Stoplamp
28 Passenger’s Side Low-Beam
29 Driver’s Side High-Beam
30 Battery Main 3
32 Spare
33 Engine Control Module, Battery
34Transmission Control Module,
Battery
35 Trailer Park Lamp
432
Page 433 of 492
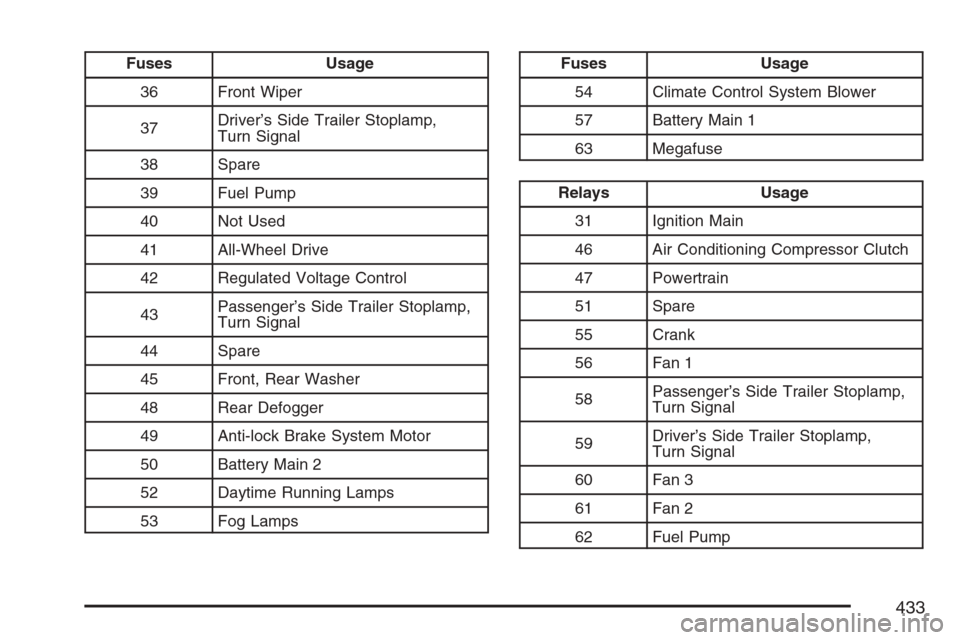
Fuses Usage
36 Front Wiper
37Driver’s Side Trailer Stoplamp,
Turn Signal
38 Spare
39 Fuel Pump
40 Not Used
41 All-Wheel Drive
42 Regulated Voltage Control
43Passenger’s Side Trailer Stoplamp,
Turn Signal
44 Spare
45 Front, Rear Washer
48 Rear Defogger
49 Anti-lock Brake System Motor
50 Battery Main 2
52 Daytime Running Lamps
53 Fog LampsFuses Usage
54 Climate Control System Blower
57 Battery Main 1
63 Megafuse
Relays Usage
31 Ignition Main
46 Air Conditioning Compressor Clutch
47 Powertrain
51 Spare
55 Crank
56 Fan 1
58Passenger’s Side Trailer Stoplamp,
Turn Signal
59Driver’s Side Trailer Stoplamp,
Turn Signal
60 Fan 3
61 Fan 2
62 Fuel Pump
433