stop start CHEVROLET EQUINOX 2008 1.G User Guide
[x] Cancel search | Manufacturer: CHEVROLET, Model Year: 2008, Model line: EQUINOX, Model: CHEVROLET EQUINOX 2008 1.GPages: 436, PDF Size: 2.42 MB
Page 167 of 436
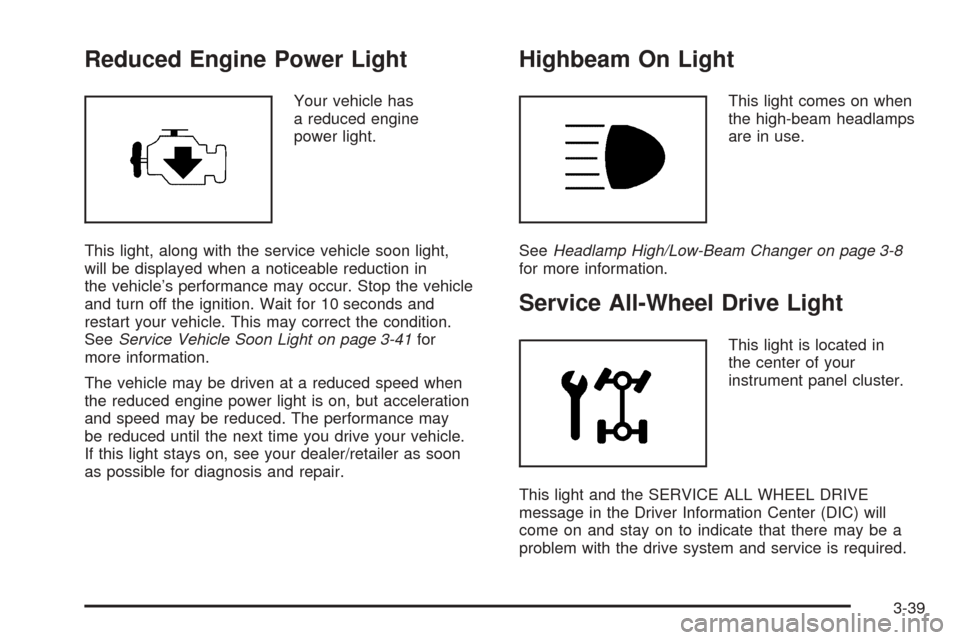
Reduced Engine Power Light
Your vehicle has
a reduced engine
power light.
This light, along with the service vehicle soon light,
will be displayed when a noticeable reduction in
the vehicle’s performance may occur. Stop the vehicle
and turn off the ignition. Wait for 10 seconds and
restart your vehicle. This may correct the condition.
SeeService Vehicle Soon Light on page 3-41for
more information.
The vehicle may be driven at a reduced speed when
the reduced engine power light is on, but acceleration
and speed may be reduced. The performance may
be reduced until the next time you drive your vehicle.
If this light stays on, see your dealer/retailer as soon
as possible for diagnosis and repair.
Highbeam On Light
This light comes on when
the high-beam headlamps
are in use.
SeeHeadlamp High/Low-Beam Changer on page 3-8
for more information.
Service All-Wheel Drive Light
This light is located in
the center of your
instrument panel cluster.
This light and the SERVICE ALL WHEEL DRIVE
message in the Driver Information Center (DIC) will
come on and stay on to indicate that there may be a
problem with the drive system and service is required.
3-39
Page 182 of 436
SERVICE ALL WHEEL DRIVE
If your vehicle has the All-Wheel Drive (AWD) system,
this message displays along with the service all-wheel
drive light if a problem occurs with this system. See
Service All-Wheel Drive Light on page 3-39. If this
message appears, stop as soon as possible and turn
off the vehicle. Restart the vehicle and check for
the message on the DIC display. If the message is still
displayed or appears again when you begin driving,
the AWD system needs service. See your dealer/retailer.
SERVICE BATTERY CHARGING
SYSTEM
This message displays when there is a problem with the
generator and battery charging systems. Driving with
this problem could drain the vehicle’s battery. Turn off all
unnecessary accessories. Stop and turn off the vehicle
as soon as it is safe to do so. Have the electrical
system checked by your dealer/retailer immediately.Connecting a battery charger to your vehicle while the
ignition is in any position other than LOCK/OFF may
cause this message to appear. If you need to charge
your vehicle, make sure that the key is in LOCK/OFF or
out of the ignition during charging.
SERVICE BRAKE SYSTEM
This message displays and a chime sounds when the
brake �uid level is low. The brake system warning
light also appears on the instrument panel cluster when
this message appears on the DIC. SeeBrake System
Warning Light on page 3-31. Have the brake system
serviced by your dealer/retailer as soon as possible.
SERVICE POWER STEERING
On some vehicles, this message displays when a
problem is detected with the power steering system.
When this message is displayed, you may notice
that the effort required to steer the vehicle increases
or feels heavier, but you will still be able to steer
the vehicle. Have your vehicle serviced by your
dealer/retailer immediately.
3-54
Page 183 of 436
SERVICE STABILITRAK
This message displays if there has been a problem
detected with the StabiliTrak®System. A warning light
also appears on the instrument panel cluster. See
Traction Control System (TCS) Warning Light on
page 3-32. SeeStabiliTrak
®System on page 4-7for
more information.
If this message turns on while you are driving, pull
off the road as soon as possible and stop carefully.
Try resetting the system by turning the ignition off and
then back on. If this message still stays on or turns
back on again while you are driving, your vehicle needs
service. Have the StabiliTrak
®System inspected by
your dealer/retailer as soon as possible.
SERVICE THEFT DETERRENT SYSTEM
This message displays when there is a problem with
the theft-deterrent system. A fault has been detected in
the system which means that the system is disabled
and it is not protecting the vehicle. The vehicle usually
restarts; however, you may want to take the vehicle
to your dealer/retailer before turning off the engine.
SeePASS-Key
®III+ Operation on page 2-18for
more information.
SERVICE TIRE MONITOR SYSTEM
This message displays if a part on the Tire Pressure
Monitor System (TPMS) is not working properly. The tire
pressure light also �ashes and then remains on during
the same ignition cycle. SeeTire Pressure Light on
page 3-34. Several conditions may cause this message
to appear. SeeTire Pressure Monitor Operation on
page 5-63for more information. If the warning comes on
and stays on, there may be a problem with the TPMS.
See your dealer/retailer.
SERVICE TRACTION CONTROL
This message displays when the Traction Control
System (TCS) is not functioning properly. A warning
light also appears on the instrument panel cluster.
SeeTraction Control System (TCS) Warning Light
on page 3-32andTraction Control System (TCS)
on page 4-6for more information. Have the TCS
serviced by your dealer/retailer as soon as possible.
SERVICE VEHICLE SOON
This message displays when a non-emissions
related malfunction occurs. Have the vehicle serviced
by your dealer/retailer as soon as possible.
3-55
Page 203 of 436
Radio Messages for XM™ Only
SeeXM Radio Messages on page 3-97later in
this section for further detail.
Playing a CD (Single CD Player)
Insert a CD partway into the slot, label side up.
The player pulls it in and the CD should begin playing.
Playing a CD(s) (Six-Disc CD Player)
LOAD^:Press to load CDs into the CD player.
This CD player holds up to six CDs.
To insert one CD, do the following:
1. Press and release the
^button.
2. Wait for the message to insert the disc.
3. Load a CD. Insert the CD partway into the slot,
label side up. The player pulls the CD in.
To insert multiple CDs, do the following:
1. Press and hold the
^button for two seconds.
A beep sounds and Load All Discs displays.
2. Follow the displayed instruction on when to insert
the discs. The CD player takes up to six CDs.
3. Press the
^button again to cancel loading
more CDs.If the ignition or radio is turned off, with a CD in the
player, it stays in the player. When the ignition or radio
is turned on, the CD starts playing where it stopped,
if it was the last selected audio source.
When a CD is inserted, the CD symbol appears on
the CD. As each new track starts to play, the track
number displays.
The CD player can play the smaller 3 inch (8 cm)
single CDs with an adapter ring. Full-size CDs and
the smaller CDs are loaded in the same manner.
Care of Your CDs
If playing a CD, the sound quality can be reduced
due to CD quality, the method of recording, the quality
of the music that has been recorded, and the way
the CD has been handled. Handle them carefully.
Store CD(s) in their original cases or other protective
cases and away from direct sunlight and dust.
The CD and DVD player scans the bottom surface
of the disc. If the surface of a CD is damaged, such as
cracked, broken, or scratched, the CD does not play
properly or not at all. Do not touch the bottom side of
a CD while handling it; this could damage the surface.
Pick up CDs by grasping the outer edges or the edge
of the hole and the outer edge.
3-75
Page 206 of 436
Playing a CD (In Either the DVD
or CD Slot)
Insert a CD partway into the slot, label side up. The
player pulls it in and the CD should begin playing
(loading a disc into the system, depending on media
type and format ranges from 5 to 20 seconds for a CD,
and up to 30 seconds for a DVD to begin playing).
If the ignition or radio is turned off, with a CD in
the player, it stays in the player. When the ignition or
radio is turned on, the CD starts playing where it
stopped, if it was the last selected audio source. The
CD is controlled by the buttons on the radio faceplate.
The DVD/CD decks, (upper slot is the DVD deck and the
lower slot is the CD deck) of the radio are compatible
with most audio CDs, CD-R, CD-RW, and MP3s/WMAs.
When a CD is inserted, the text label DVD or CD
symbol appears on the left side of the radio display.
As each new track starts to play, the track number
displays.
ZCD (Eject):Press and release to eject the CD that
is currently playing in the bottom slot. A beep sounds
and Ejecting Disc displays. Once the disc is ejected,
Remove Disc displays. The CD can be removed.
If the CD is not removed, after several seconds,
the CD automatically pulls back into the player.If loading and reading of a CD cannot be completed,
such as unknown format, etc., and the disc fails to eject,
press and hold for more than �ve seconds to force
the disc to eject.
ZDVD (Eject):Press and release to eject the CD
that is currently playing in the top slot. A beep sounds
and Ejecting Disc displays. Once the disc is ejected,
Remove Disc displays. The CD can be removed.
If the CD is not removed, after several seconds,
the CD automatically pulls back into the player.
If loading and reading of a CD cannot be completed,
such as unknown format, etc., and the disc fails to
eject, press and hold for more than �ve seconds to
force the disc to eject.
f(Tune):Turn to select tracks on the CD currently
playing.
©SEEK¨:Press the left arrow to go to the start of
the current track, if more than �ve seconds have played.
If less than �ve seconds have played, the previous
track plays. Press the right arrow to go to the next track.
If either arrow is held, or pressed multiple times, the
player continues moving backward or forward through
the tracks on the CD.
3-78
Page 210 of 436
Playing a DVD
DVD/CD AUX (Auxiliary):Press to cycle through
DVD, CD, or Auxiliary when listening to the radio. The
DVD/CD text label and a message showing track or
chapter number displays when a disc is in either
slot. Press again and the system automatically searches
for an auxiliary input device, such as a portable audio
player. If a portable audio player is not connected,
“No Aux Input Device” displays. If a disc is in both the
DVD slot and the CD slot the DVD/CD AUX button
cycles between the two sources and does not indicate
“No Aux Input Device”. If a front auxiliary device is
connected, the DVD/CD AUX button cycles through all
available options, such as: DVD slot, CD slot, Front
AUX, and Rear AUX (if available). See “Using the
Auxiliary Input Jack(s)” later in this section, orRear
Seat Entertainment (RSE) System on page 3-99,
“Audio/Video (A/V) Jacks” for more information.
O(Power):Press to turn the radio on or off. Turn
clockwise or counterclockwise to increase or decrease
the volume. Press and hold for more than two seconds
turns off the entire radio and Rear Seat Entertainment
(RSE) system and starts the parental control feature
which prevents the rear seat occupant from operating
the Rear Seat Audio (RSA) system or remote control.A lock symbol appears next to the clock display. The
parental control feature remains on until a subsequent
press and hold of the power button is performed
(more than two seconds), or until the driver turns
the ignition off and exits the vehicle.
f(Tune):Turn to change tracks on a CD or DVD,
to manually tune a radio station, or to change clock
or date settings, while in the clock or date setting
mode. See the information given earlier in this section
speci�c to the radio, CD, and the DVD. Also, seeSetting
the Time on page 3-65, for setting the clock and date.
©SEEK (Previous Track/Chapter):Press to return
to the start of the current track or chapter. Press again
to go to the previous track or chapter. This button
might not work when the DVD is playing the copyright
information or the previews.
SEEK
¨(Next Track/Chapter):Press this button
to go to the next track or chapter. This button might not
work when the DVD is playing the copyright information
or the previews.
sREV (Fast Reverse):Press to fast reverse the
CD or DVD, �ve times the normal speed. The radio
displays the elapsed time while in fast reverse.
To stop fast reversing, press again. This button
might not work when the DVD is playing the copyright
information or the previews.
3-82
Page 211 of 436
\FWD (Fast Forward):Press to fast forward the
CD or DVD. The radio displays the elapsed time and
fast forwards �ve times the normal speed. To stop fast
forwarding, press again. This button might not work
when the DVD is playing the copyright information or
the previews.
Z(Eject):Press to eject a CD or DVD. If a CD
or DVD is ejected, but not removed, the player
automatically pulls it back in after 15 seconds.
If loading and reading of a CD cannot be completed,
such as unknown format, etc., and the disc fails to eject,
press and hold for more than �ve seconds to force
the disc to eject.
DVD-V (Video) Display Buttons
Once a DVD-V is inserted, the radio display menu
shows several tag options for DVD playing. Press the
pushbuttons located under any desired tag option during
DVD playback. See the tag options listed below for
more information.
The rear seat passenger navigates the DVD-V menus
and controls through the remote control. See “Remote
Control”, underRear Seat Entertainment (RSE)
System on page 3-99for more information. The Video
Screen automatically turns on when the DVD-V is
inserted into the DVD slot.
r/j(Play/Pause):Press either play or pause
displayed on the radio system, to toggle between
pausing or restarting playback of a DVD. If the forward
arrow is showing on the display, the system is in
pause mode. If the pause icon is showing on the display,
the system is in playback mode. If the DVD screen is
off, press this button to turn the screen on.
Some DVDs begin playing after the previews have
�nished, although there might be a delay of up to
30 seconds. If the DVD does not begin playing the
movie automatically, press the pushbutton located
under the play/pause symbol tag displayed on the radio.
If the DVD still does not play, refer to the on-screen
instructions, if available.
c(Stop):Press to stop playing, rewinding, or fast
forwarding a DVD.
r(Enter):Press to select the choices that are
highlighted in any menu.
y(Menu):Press to access the DVD menu. The DVD
menu is different on every DVD. Use the pushbuttons
located under the navigation arrows to navigate
the cursor through the DVD menu. After making a
selection press the enter button. This button only
operates when using a DVD.
3-83
Page 218 of 436
If the ignition or radio is turned off with a CD-R or
CD-RW in the player, it stays in the player. When the
ignition or radio is turned on, the CD-R or CD-RW starts
to play where it stopped, if it was the last selected
audio source.
As each new track starts to play, the track number and
song title displays.
ZEJECT:Press this button to eject CD-R(s) or
CD-RW(s). To eject the CD-R or CD-RW that is currently
playing, press and release this button. A beep sounds
and Ejecting Disc displays. Once the disc is ejected,
Remove Disc displays. The CD-R or CD-RW can
be removed. If the CD-R is not removed, after several
seconds, the CD-R or CD-RW automatically pulls
back into the player and begins playing.
For the Six-Disc CD player, press and hold this button
for two seconds to eject all discs.
f(Tune):Turn this knob to select MP3/WMA �les
on the CD-R or CD-RW currently playing.
©SEEK¨:Press the left SEEK arrow to go to
the start of the current MP3/WMA �le, if more than
ten seconds have played. Press the right SEEK arrow
to go to the next MP3/WMA �le. If either SEEK arrow
is held or pressed multiple times, the player continues
moving backward or forward through MP3/WMA �les
on the CD.
Sc(Previous Folder):Press the pushbutton
positioned under the Folder label to go to the �rst
track in the previous folder.
cT(Next Folder):Press the pushbutton positioned
under the Folder label to go to the �rst track in the
next folder.
sREV (Reverse):Press and hold this button to
reverse playback quickly within an MP3/WMA �le.
Sound is heard at a reduced volume. Release this
button to resume playing the �le. The elapsed time
of the �le displays.
\FWD (Fast Forward):Press and hold this button
to advance playback quickly within an MP3/WMA
�le. Sound is heard at a reduced volume. Release
this button to resume playing the �le. The elapsed
time of the �le displays.
3-90
Page 222 of 436
When play enters a new folder, the display does not
automatically show the new folder name unless
you have chosen the folder mode as the default
display. The new track name displays.
File System and Naming
The song name that displays is the song name that is
contained in the ID3 tag. If the song name is not present
in the ID3 tag, then the radio displays the �le name
without the extension (such as .mp3) as the track name.
Track names longer than 32 characters or four pages
are shortened. Parts of words on the last page of
text and the extension of the �lename does not display.
Preprogrammed Playlists
Preprogrammed playlists that were created using
WinAmp™, MusicMatch™, or Real Jukebox™ software
can be accessed, however, they cannot be edited
using the radio. These playlists are treated as special
folders containing compressed audio song �les.
Playing an MP3 (In Either the DVD
or CD Slot)
Insert a CD-R or CD-RW partway into either the top or
bottom slot, label side up. The player pulls it in, and
the CD-R or CD-RW should begin playing.
Depending on the format of the disc, a softkey menu
appears and allow navigation of the disc. The menu
reads left to right as RDM (Randomize song play order),
a Folder icon with left and right arrows (to move up or
down through available folders), a PL tag if the disc has
a Playlist available, and a Music Navigator tag. If a
Playlist tag is shown, toggling this key brings up a Folder
softkey only or the menu as previously described.
If the ignition or radio is turned off with a CD-R or
CD-RW in the player, it stays in the player. When the
ignition or radio is turned on, the CD-R or CD-RW starts
to play where it stopped, if it was the last selected
audio source.
As each new track starts to play, the track number and
song title displays.
3-94
Page 232 of 436
v(Title):Press this button to return the DVD to
the main menu of the DVD. This function varies for
each disc.
y(Main Menu):Press this button to access the DVD
menu. The DVD menu is different on every DVD.
Use the navigation arrows to move the cursor around
the DVD menu. After making a selection press the enter
button. This button only operates when using a DVD.
n,q,p,o(Menu Navigation Arrows):Use
the navigation arrows to navigate through a menu.
r(Enter):Press this button to select the choice
that is highlighted in any menu.
z(Display Menu):Press this button to adjust the
brightness, screen display mode (normal, full, or zoom),
and display the language menu.
q(Return):Press this button to exit the current
active menu and return to the previous menu. This
button operates only when the display menu or a
DVD menu is active.
c(Stop):Press this button to stop playing, rewinding,
or fast forwarding a DVD. Press this button twice to
return to the beginning of the DVD.
s(Play/Pause):Press this button to start playing
a DVD. Press this button while a DVD is playing
to pause it. Press it again to continue playing the DVD.
When the DVD is playing, depending on the radio,
you might be able to do slow play by pressing the
play/pause button then pressing the fast forward button.
The DVD continues playing in a slow play mode.
You can also, depending on the radio, perform reverse
slow play by pressing the play/pause button and
then pressing the fast reverse button. To cancel slow
play mode, press this button.
t(Previous Track/Chapter):Press this button to
return to the start of the current track or chapter.
Press this button again to go to the previous track or
chapter. This button might not work when the DVD
is playing the copyright information or the previews.
u(Next Track/Chapter):Press this button to go to
the beginning of the next chapter or track. This
button might not work when the DVD is playing the
copyright information or the previews.
3-104