turn signal CHEVROLET EQUINOX 2008 1.G Owner's Manual
[x] Cancel search | Manufacturer: CHEVROLET, Model Year: 2008, Model line: EQUINOX, Model: CHEVROLET EQUINOX 2008 1.GPages: 436, PDF Size: 2.42 MB
Page 326 of 436
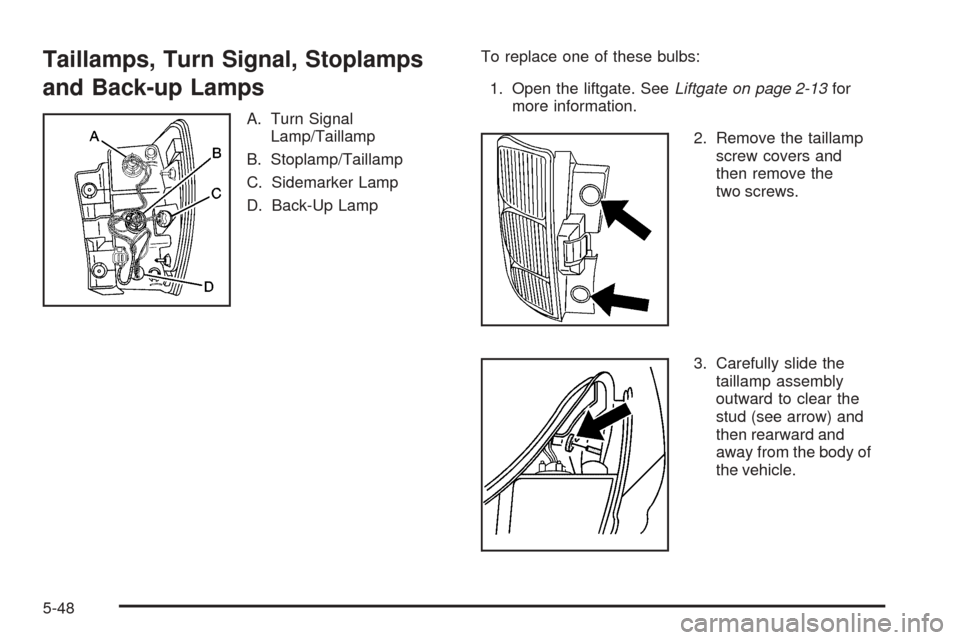
Taillamps, Turn Signal, Stoplamps
and Back-up Lamps
A. Turn Signal
Lamp/Taillamp
B. Stoplamp/Taillamp
C. Sidemarker Lamp
D. Back-Up LampTo replace one of these bulbs:
1. Open the liftgate. SeeLiftgate on page 2-13for
more information.
2. Remove the taillamp
screw covers and
then remove the
two screws.
3. Carefully slide the
taillamp assembly
outward to clear the
stud (see arrow) and
then rearward and
away from the body of
the vehicle.
5-48
Page 328 of 436
Replacement Bulbs
Exterior Lamp Bulb Number
Back-Up Lamp 921
Front Parking Lamp 194 N/A
Front Sidemarker Lamp 168
Front Turn Signal Lamp 1156 N/A
License Plate Lamp 9421330
Low/High-Beam Lamp 9007
Rear Sidemarker Lamp W5W
Rear Turn Signal Lamp/Taillamp 1157
Stoplamp/Taillamp 1157
For replacement bulbs not listed here, contact your
dealer/retailer.
Windshield Wiper Blade
Replacement
Windshield wiper blades should be inspected for wear
and cracking. SeeScheduled Maintenance on page 6-4
for more information.
Replacement blades come in different types and are
removed in different ways. For proper type and length,
seeMaintenance Replacement Parts on page 6-14.
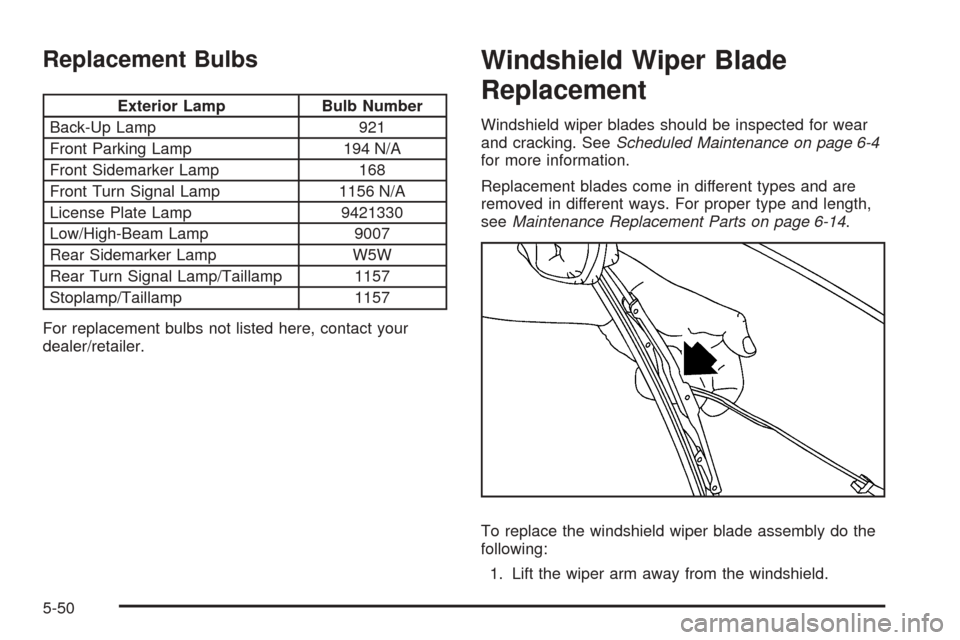
To replace the windshield wiper blade assembly do the
following:
1. Lift the wiper arm away from the windshield.
5-50
Page 344 of 436
The TPMS sensor matching process is outlined below:
1. Set the parking brake.
2. Turn the ignition switch to ON/RUN with the
engine off.
3. Press the Remote Keyless Entry (RKE) transmitter’s
LOCK and UNLOCK buttons at the same time for
approximately ve seconds. The horn sounds twice
to signal the receiver is in relearn mode and TIRE
LEARNING ACTIVE message displays on the DIC
screen.
4. Start with the driver side front tire.
5. Remove the valve cap from the valve cap stem.
Activate the TPMS sensor by increasing or
decreasing the tire’s air pressure for ve seconds,
or until a horn chirp sounds. The horn chirp, which
may take up to 30 seconds to sound, conrms that
the sensor identication code has been matched to
this tire and wheel position.6. Proceed to the passenger side front tire, and repeat
the procedure in Step 5.
7. Proceed to the passenger side rear tire, and repeat
the procedure in Step 5.
8. Proceed to the driver side rear tire, and repeat the
procedure in Step 5. The horn sounds two times to
indicate the sensor identication code has been
matched to the driver side rear tire, and the TPMS
sensor matching process is no longer active.
The TIRE LEARNING ACTIVE message on the DIC
display screen goes off.
9. Turn the ignition switch to LOCK/OFF.
10. Set all four tires to the recommended air pressure
level as indicated on the Tire and Loading
Information label.
11. Put the valve caps back on the valve stems.
5-66
Page 379 of 436
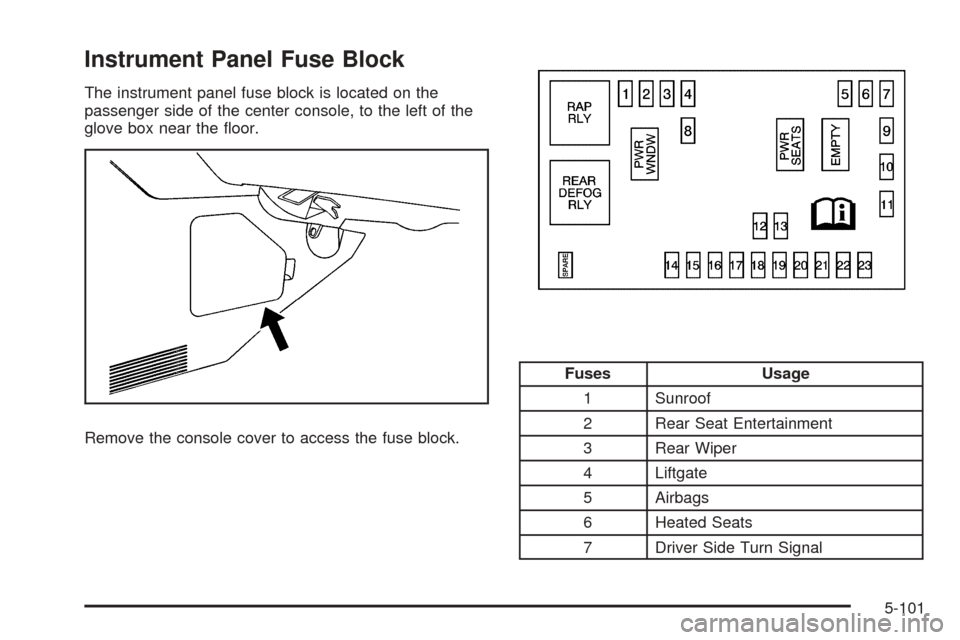
Instrument Panel Fuse Block
The instrument panel fuse block is located on the
passenger side of the center console, to the left of the
glove box near the oor.
Remove the console cover to access the fuse block.
Fuses Usage
1 Sunroof
2 Rear Seat Entertainment
3 Rear Wiper
4 Liftgate
5 Airbags
6 Heated Seats
7 Driver Side Turn Signal
5-101
Page 380 of 436
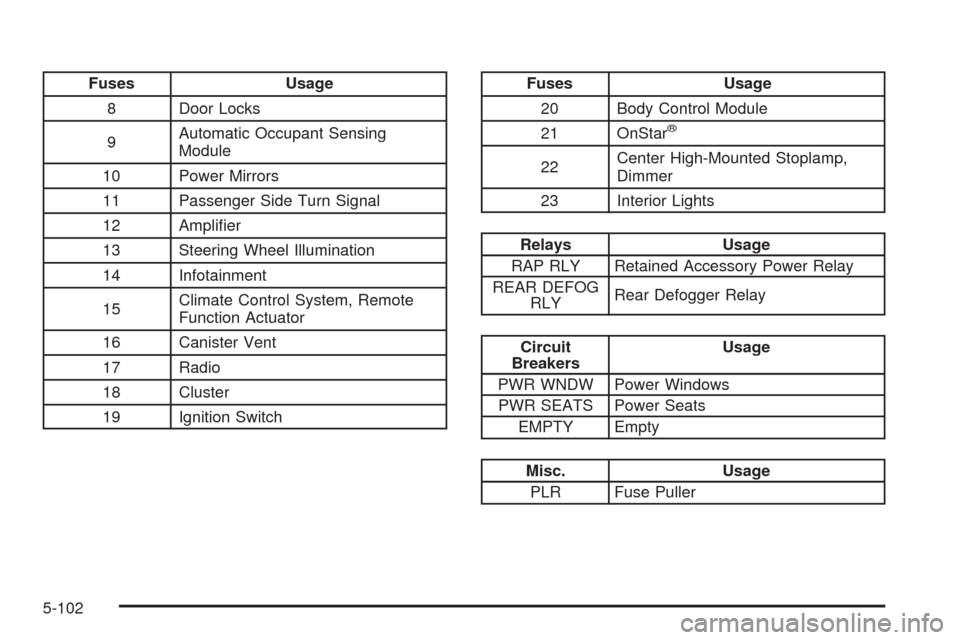
Fuses Usage
8 Door Locks
9Automatic Occupant Sensing
Module
10 Power Mirrors
11 Passenger Side Turn Signal
12 Amplier
13 Steering Wheel Illumination
14 Infotainment
15Climate Control System, Remote
Function Actuator
16 Canister Vent
17 Radio
18 Cluster
19 Ignition SwitchFuses Usage
20 Body Control Module
21 OnStar
®
22Center High-Mounted Stoplamp,
Dimmer
23 Interior Lights
Relays Usage
RAP RLY Retained Accessory Power Relay
REAR DEFOG
RLYRear Defogger Relay
Circuit
BreakersUsage
PWR WNDW Power Windows
PWR SEATS Power Seats
EMPTY Empty
Misc. Usage
PLR Fuse Puller
5-102
Page 383 of 436
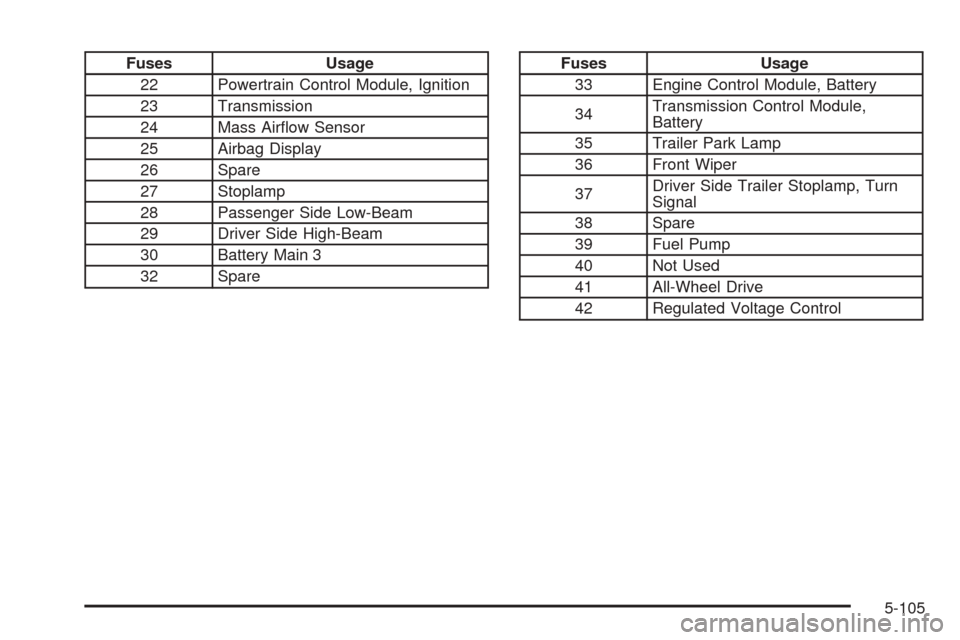
Fuses Usage
22 Powertrain Control Module, Ignition
23 Transmission
24 Mass Airow Sensor
25 Airbag Display
26 Spare
27 Stoplamp
28 Passenger Side Low-Beam
29 Driver Side High-Beam
30 Battery Main 3
32 SpareFuses Usage
33 Engine Control Module, Battery
34Transmission Control Module,
Battery
35 Trailer Park Lamp
36 Front Wiper
37Driver Side Trailer Stoplamp, Turn
Signal
38 Spare
39 Fuel Pump
40 Not Used
41 All-Wheel Drive
42 Regulated Voltage Control
5-105
Page 384 of 436
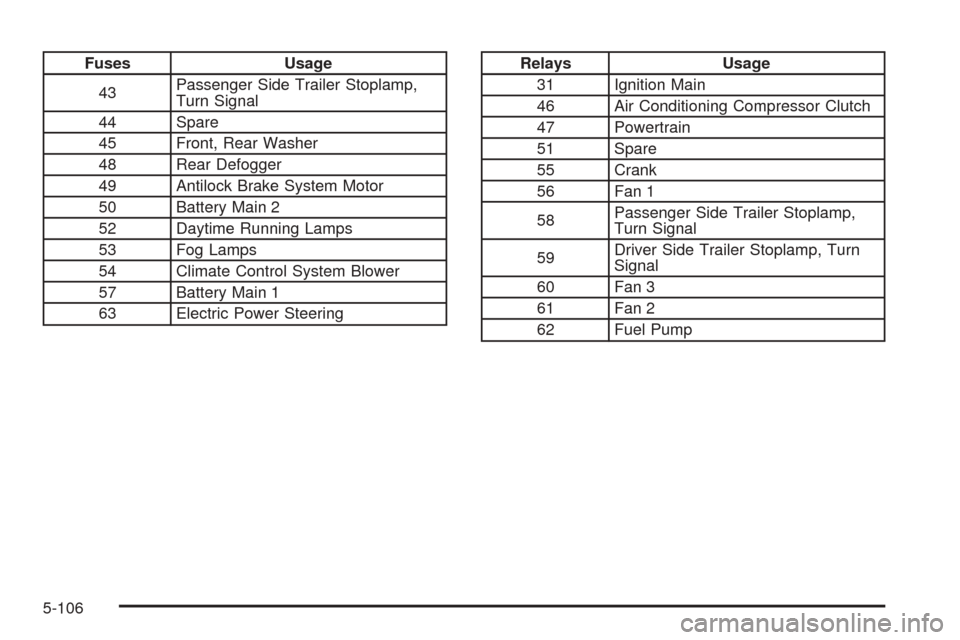
Fuses Usage
43Passenger Side Trailer Stoplamp,
Turn Signal
44 Spare
45 Front, Rear Washer
48 Rear Defogger
49 Antilock Brake System Motor
50 Battery Main 2
52 Daytime Running Lamps
53 Fog Lamps
54 Climate Control System Blower
57 Battery Main 1
63 Electric Power SteeringRelays Usage
31 Ignition Main
46 Air Conditioning Compressor Clutch
47 Powertrain
51 Spare
55 Crank
56 Fan 1
58Passenger Side Trailer Stoplamp,
Turn Signal
59Driver Side Trailer Stoplamp, Turn
Signal
60 Fan 3
61 Fan 2
62 Fuel Pump
5-106
Page 424 of 436
Audio System (cont.)
Radio Reception........................................3-110
Setting the Time..........................................3-65
Theft-Deterrent Feature...............................3-108
Audio System(s).............................................3-68
Automatic Headlamp System............................3-14
Automatic Transmission
Fluid..........................................................5-21
Operation...........................................2-24, 2-27
B
Battery..........................................................5-35
Electric Power Management..........................3-17
Run-Down Protection...................................3-17
Brake
Emergencies................................................ 4-6
Brakes..........................................................5-33
System Warning Light..................................3-31
Braking........................................................... 4-4
Braking in Emergencies..................................... 4-6
Break-In, New Vehicle.....................................2-20
Bulb Replacement...........................................5-44
Halogen Bulbs............................................5-44
Headlamp Aiming........................................5-44
Headlamps, Front Turn Signal, Sidemarker,
and Parking Lamps..................................5-45
License Plate Lamps....................................5-49Bulb Replacement (cont.)
Replacement Bulbs......................................5-50
Taillamps, Turn Signal, Stoplamps and
Back-up Lamps........................................5-48
Buying New Tires...........................................5-69
C
Calibration.....................................................3-46
California Fuel.................................................. 5-6
California Perchlorate Materials Requirements....... 5-4
California Proposition 65 Warning....................... 5-3
Canadian Owners................................................ ii
Capacities and Specications..........................5-107
Carbon Monoxide...........................2-35, 4-17, 4-33
Care of
Safety Belts................................................5-93
Cargo Lamp...................................................3-16
Cargo Tie Downs............................................2-49
CD, MP3 ...............................................3-87, 3-92
Center Console Storage Area...........................2-42
Chains, Tire...................................................5-74
Charging System Light....................................3-30
Check
Engine Light...............................................3-34
Checking Things Under the Hood......................5-10
Chemical Paint Spotting...................................5-97
2
Page 428 of 436
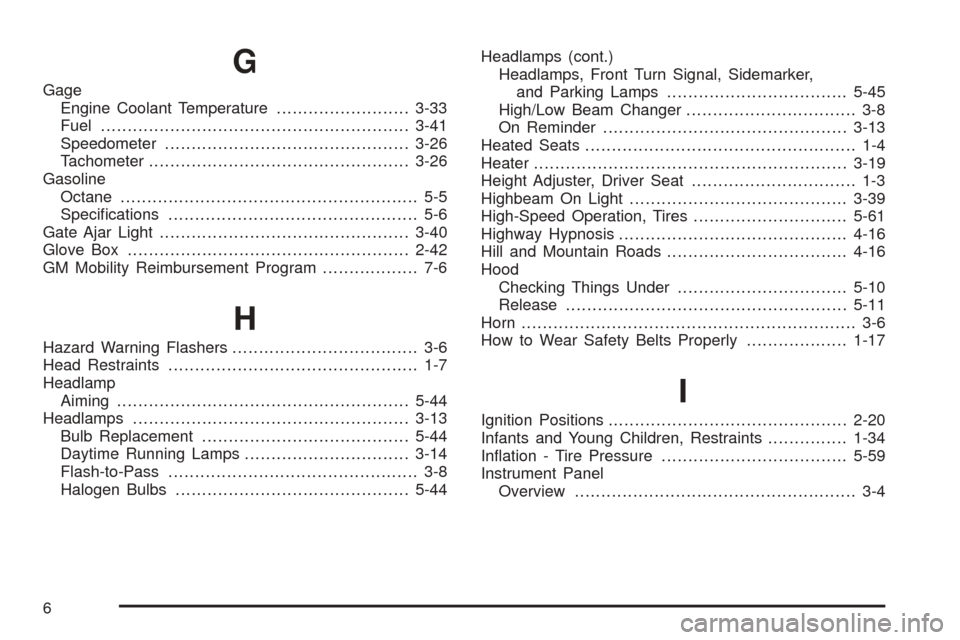
G
Gage
Engine Coolant Temperature.........................3-33
Fuel..........................................................3-41
Speedometer..............................................3-26
Tachometer.................................................3-26
Gasoline
Octane........................................................ 5-5
Specications............................................... 5-6
Gate Ajar Light...............................................3-40
Glove Box.....................................................2-42
GM Mobility Reimbursement Program.................. 7-6
H
Hazard Warning Flashers................................... 3-6
Head Restraints............................................... 1-7
Headlamp
Aiming.......................................................5-44
Headlamps....................................................3-13
Bulb Replacement.......................................5-44
Daytime Running Lamps...............................3-14
Flash-to-Pass............................................... 3-8
Halogen Bulbs............................................5-44Headlamps (cont.)
Headlamps, Front Turn Signal, Sidemarker,
and Parking Lamps..................................5-45
High/Low Beam Changer................................ 3-8
On Reminder..............................................3-13
Heated Seats................................................... 1-4
Heater...........................................................3-19
Height Adjuster, Driver Seat............................... 1-3
Highbeam On Light.........................................3-39
High-Speed Operation, Tires.............................5-61
Highway Hypnosis...........................................4-16
Hill and Mountain Roads..................................4-16
Hood
Checking Things Under................................5-10
Release.....................................................5-11
Horn............................................................... 3-6
How to Wear Safety Belts Properly...................1-17
I
Ignition Positions.............................................2-20
Infants and Young Children, Restraints...............1-34
Ination - Tire Pressure...................................5-59
Instrument Panel
Overview..................................................... 3-4
6
Page 433 of 436
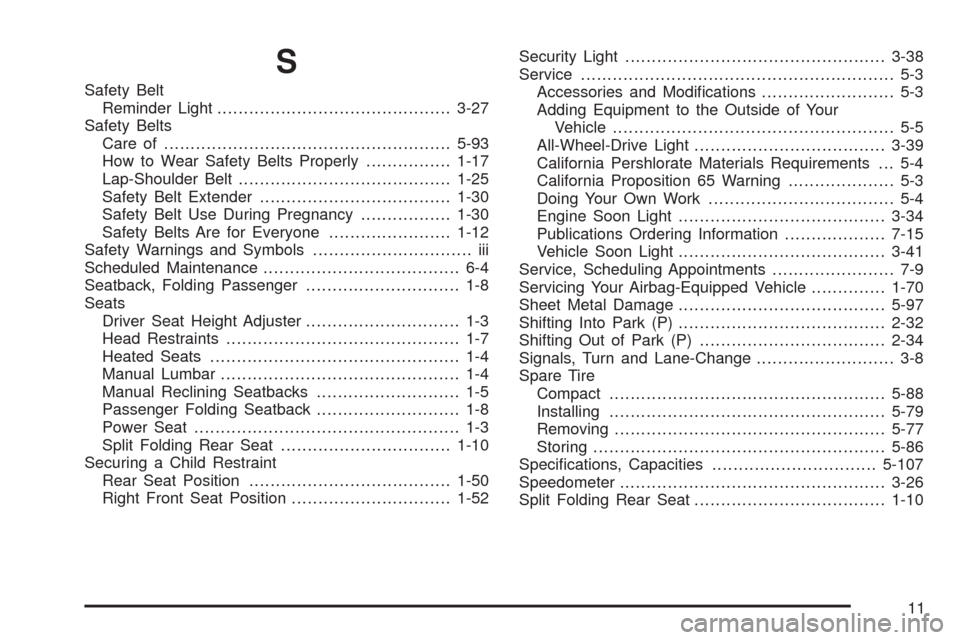
S
Safety Belt
Reminder Light............................................3-27
Safety Belts
Care of......................................................5-93
How to Wear Safety Belts Properly................1-17
Lap-Shoulder Belt........................................1-25
Safety Belt Extender....................................1-30
Safety Belt Use During Pregnancy.................1-30
Safety Belts Are for Everyone.......................1-12
Safety Warnings and Symbols.............................. iii
Scheduled Maintenance..................................... 6-4
Seatback, Folding Passenger............................. 1-8
Seats
Driver Seat Height Adjuster............................. 1-3
Head Restraints............................................ 1-7
Heated Seats............................................... 1-4
Manual Lumbar............................................. 1-4
Manual Reclining Seatbacks........................... 1-5
Passenger Folding Seatback........................... 1-8
Power Seat.................................................. 1-3
Split Folding Rear Seat................................1-10
Securing a Child Restraint
Rear Seat Position......................................1-50
Right Front Seat Position..............................1-52Security Light.................................................3-38
Service........................................................... 5-3
Accessories and Modications......................... 5-3
Adding Equipment to the Outside of Your
Vehicle..................................................... 5-5
All-Wheel-Drive Light....................................3-39
California Pershlorate Materials Requirements . . . 5-4
California Proposition 65 Warning.................... 5-3
Doing Your Own Work................................... 5-4
Engine Soon Light.......................................3-34
Publications Ordering Information...................7-15
Vehicle Soon Light.......................................3-41
Service, Scheduling Appointments....................... 7-9
Servicing Your Airbag-Equipped Vehicle..............1-70
Sheet Metal Damage.......................................5-97
Shifting Into Park (P).......................................2-32
Shifting Out of Park (P)...................................2-34
Signals, Turn and Lane-Change.......................... 3-8
Spare Tire
Compact....................................................5-88
Installing....................................................5-79
Removing...................................................5-77
Storing.......................................................5-86
Specications, Capacities...............................5-107
Speedometer..................................................3-26
Split Folding Rear Seat....................................1-10
11