spare wheel CHEVROLET EQUINOX 2016 2.G User Guide
[x] Cancel search | Manufacturer: CHEVROLET, Model Year: 2016, Model line: EQUINOX, Model: CHEVROLET EQUINOX 2016 2.GPages: 324, PDF Size: 5.7 MB
Page 244 of 324

Chevrolet Equinox Owner Manual (GMNA-Localizing-U.S./Canada/Mexico-
9234773) - 2016 - crc - 9/3/15
Vehicle Care 243
Check that all wheel nuts are
properly tightened. See“Wheel
Nut Torque” underCapacities
and Specifications 0286
ii.
{Warning
Rust or dirt on a wheel, or on the
parts to which it is fastened, can
make wheel nuts become loose
after time. The wheel could come
off and cause an accident. When
changing a wheel, remove any
rust or dirt from places where the
wheel attaches to the vehicle. In
an emergency, a cloth or a paper
towel can be used; however, use
a scraper or wire brush later to
remove all rust or dirt.
Lightly coat the center of the
wheel hub with wheel bearing
grease after a wheel change or
tire rotation to prevent corrosion
or rust build-up. Do not get
grease on the flat wheel
mounting surface or on the
wheel nuts or bolts.
When It Is Time for New
Tires
Factors such as maintenance,
temperatures, driving speeds,
vehicle loading, and road conditions
affect the wear rate of the tires.
Treadwear indicators are one way to
tell when it is time for new tires.
Treadwear indicators appear when
the tires have only 1.6 mm (1/16 in)
or less of tread remaining. See Tire
Inspection 0242
iiand Tire Rotation
0 242ii. The rubber in tires ages over time.
This also applies to the spare tire,
if the vehicle has one, even if it is
never used. Multiple factors
including temperatures, loading
conditions, and inflation pressure
maintenance affect how fast aging
takes place. GM recommends that
tires, including the spare if
equipped, be replaced after six
years, regardless of tread wear. The
tire manufacture date is the last four
digits of the DOT Tire Identification
Number (TIN) which is molded into
one side of the tire sidewall. The
first two digits represent the week
(01–52) and the last two digits, the
year. For example, the third week of
the year 2010 would have a
four-digit DOT date of 0310.
Vehicle Storage
Tires age when stored normally
mounted on a parked vehicle. Park
a vehicle that will be stored for at
least a month in a cool, dry, clean
area away from direct sunlight to
slow aging. This area should be free
Page 249 of 324
Chevrolet Equinox Owner Manual (GMNA-Localizing-U.S./Canada/Mexico-
9234773) - 2016 - crc - 9/3/15
248 Vehicle Care
Warning (Continued)
affect the braking and handling of
the vehicle. Tires can lose air,
and cause loss of control, causing
a crash. Always use the correct
wheel, wheel bolts, and wheel
nuts for replacement.
Caution
The wrong wheel can also cause
problems with bearing life, brake
cooling, speedometer or
odometer calibration, headlamp
aim, bumper height, vehicle
ground clearance, and tire or tire
chain clearance to the body and
chassis.
Used Replacement Wheels
{Warning
Replacing a wheel with a used
one is dangerous. How it has
been used or how far it has been
driven may be unknown. It could
fail suddenly and cause a crash.
When replacing wheels, use a
new GM original equipment
wheel.
Tire Chains
{Warning
Do not use tire chains. There is
not enough clearance. Tire chains
used on a vehicle without the
proper amount of clearance can
cause damage to the brakes,
suspension or other vehicle parts.
The area damaged by the tire
chains could cause you to lose
control of the vehicle and you or
others may be injured in a crash.(Continued)
Warning (Continued)
A Type S low-profile cable can be
used only if the cable
manufacturer recommends it for
use on the vehicle, the tire size
combination, and road conditions.
Follow the manufacturer's
instructions. To help avoid
damage to the vehicle, drive
slowly, readjust or remove the
cable if it is contacting the vehicle
and do not spin the vehicle's tires.
Install the cables on the front tires
only. Cables should not be
installed on the spare tire or on
the optional 19-inch tire.
Page 251 of 324

Chevrolet Equinox Owner Manual (GMNA-Localizing-U.S./Canada/Mexico-
9234773) - 2016 - crc - 9/3/15
250 Vehicle Care
Warning (Continued)
2. Put an automatictransmission in P (Park) or a
manual transmission in
1 (First) or R (Reverse).
3. Turn off the engine and do not restart while the vehicle
is raised.
4. Do not allow passengers to remain in the vehicle.
5. Place wheel blocks, if equipped, on both sides of
the tire at the opposite
corner of the tire being
changed.
When the vehicle has a flat tire (2),
use the following example as a
guide to assist in the placement of
the wheel blocks (1), if equipped.
1. Wheel Block (If Equipped)
2. Flat Tire
The following information explains
how to repair or change a tire.
Tire Changing
Removing the Spare Tire and
Tools
1. Extension
2. Wheel Wrench
3. Jack
To access the spare tire and tools: 1. Open the liftgate. See Liftgate
0 32
ii.
2. Lift the load floor up.
3. Remove the extension (1), wheel wrench (2) and jack (3).
Page 252 of 324

Chevrolet Equinox Owner Manual (GMNA-Localizing-U.S./Canada/Mexico-
9234773) - 2016 - crc - 9/3/15
Vehicle Care 251
Place the tools next to the tire
being changed.
4. Turn the retainer nutcounterclockwise and remove
the spare tire.
Place either end of the
extension into a retainer hole to
loosen the retainer nut if
unable to by hand.
5. Place the spare tire next to the tire being changed.
Removing the Flat Tire and
Installing the Spare Tire
1. Do a safety check beforeproceeding. See If a Tire Goes
Flat 0249
iifor more
information.
2. For vehicles with a wheel cover or center cap, pull the cover or
center cap away from the
wheel to remove it. Store the
wheel cover in the cargo area
until you have the flat tire
repaired or replaced.
3. Turn the wheel wrenchcounterclockwise to loosen all
the wheel nuts, but do not
remove them yet.
Caution
Make sure that the jack lift head
is in the correct position or you
may damage your vehicle. The
repairs would not be covered by
your warranty.
4. Position the jack lift head at the
jack location nearest the flat
tire. The location is indicated
by a mark on the bottom edge
Page 254 of 324

Chevrolet Equinox Owner Manual (GMNA-Localizing-U.S./Canada/Mexico-
9234773) - 2016 - crc - 9/3/15
Vehicle Care 253
9. Remove all of the wheel nuts.
10. Remove the flat tire.
{Warning
Rust or dirt on a wheel, or on the
parts to which it is fastened, can
make wheel nuts become loose
after time. The wheel could come
off and cause an accident. When
changing a wheel, remove any
rust or dirt from places where the
wheel attaches to the vehicle. In
an emergency, a cloth or a paper (Continued)
Warning (Continued)
towel can be used; however, use
a scraper or wire brush later to
remove all rust or dirt.
11. Remove any rust or dirt fromthe wheel bolts, mounting
surfaces, and spare wheel.
12. Place the compact spare tire on the wheel-mounting surface.
{Warning
Never use oil or grease on bolts
or nuts because the nuts might
come loose. The vehicle's wheel
could fall off, causing a crash.
13. Reinstall the wheel nuts. Tighten each nut by hand until
the wheel is held against
the hub.
14. Lower the vehicle by turning the jack handle
counterclockwise.
{Warning
Wheel nuts that are improperly or
incorrectly tightened can cause
the wheels to become loose or
come off. The wheel nuts should
be tightened with a torque wrench
to the proper torque specification
after replacing. Follow the torque
specification supplied by the
aftermarket manufacturer when
using accessory locking wheel
(Continued)
Page 255 of 324

Chevrolet Equinox Owner Manual (GMNA-Localizing-U.S./Canada/Mexico-
9234773) - 2016 - crc - 9/3/15
254 Vehicle Care
Warning (Continued)
nuts. SeeCapacities and
Specifications 0286
iifor original
equipment wheel nut torque
specifications.
Caution
Improperly tightened wheel nuts
can lead to brake pulsation and
rotor damage. To avoid expensive
brake repairs, evenly tighten the
wheel nuts in the proper
sequence and to the proper
torque specification. See
Capacities and Specifications
0 286
iifor the wheel nut torque
specification.
15. Tighten the wheel nuts firmly in a crisscross sequence, as
shown.
16. Lower the jack all the way and remove the jack from under the
vehicle.
17. Tighten the wheel nuts firmly with the wheel wrench.
When reinstalling the wheel cover or
center cap on the full-size tire,
tighten all five plastic caps hand
snug with the aid of the wheel
wrench and tighten them with the
wheel wrench an additional
one-quarter of a turn.
Caution
Wheel covers will not fit on the
vehicle's compact spare. If you try
to put a wheel cover on the
compact spare, the cover or the
spare could be damaged.
Storing a Flat or Spare Tire
and Tools
{Warning
Storing a jack, a tire, or other
equipment in the passenger
compartment of the vehicle could
cause injury. In a sudden stop or
collision, loose equipment could
strike someone. Store all these in
the proper place.
Page 256 of 324

Chevrolet Equinox Owner Manual (GMNA-Localizing-U.S./Canada/Mexico-
9234773) - 2016 - crc - 9/3/15
Vehicle Care 255
1. Cable
2. Liftgate Hinges
3. Center of the Wheel
4. Door Striker
To store the flat tire:
1. Remove the cable package.The cable is stored in a plastic
bag under the compact
spare tire.
2. Remove the small center cap by tapping the back of the cap
with the extension of the shaft,
if the vehicle has aluminum
wheels.
3. Put the flat tire in the rear storage area with the valve
stem pointing toward the rear
of the vehicle.
4. Pull the cable (1) through the door striker (4) then the center
of the wheel (3).5. Hook the cable onto theoutside portion of the liftgate
hinges (2).
6. Hook the other end of the cable onto the outside portion of the
liftgate hinge on the other side
of the vehicle.
7. Pull on the cable to make sure it is secure.
Page 257 of 324

Chevrolet Equinox Owner Manual (GMNA-Localizing-U.S./Canada/Mexico-
9234773) - 2016 - crc - 9/3/15
256 Vehicle Care
8. Make sure the metal tube iscentered at the striker. Push
the tube toward the front of the
vehicle.
9. Close the liftgate and make sure it is latched properly.
The compact spare is for temporary
use only. Replace the compact
spare tire with a full-size tire as
soon as you can.
Compact Spare Tire
{Warning
Driving with more than one
compact spare tire at a time could
result in loss of braking and
handling. This could lead to a
crash and you or others could be
injured. Use only one compact
spare tire at a time.
If this vehicle has a compact spare
tire, it was fully inflated when new;
however, it can lose air over time.
Check the inflation pressure
regularly. It should be 420 kPa
(60 psi).
Stop as soon as possible and check
that the spare tire is correctly
inflated after being installed on the
vehicle. The compact spare tire is
designed for temporary use only.
The vehicle will perform differently
with the spare tire installed and it is
recommended that the vehicle
speed be limited to 80 km/h
(50 mph). To conserve the tread of
the spare tire, have the standard tire repaired or replaced as soon as
convenient and return the spare tire
to the storage area.
When using a compact spare tire,
the AWD (if equipped), ABS, and
Traction Control systems may
engage until the spare tire is
recognized by the vehicle,
especially on slippery roads. Adjust
driving to reduce possible
wheel slip.
Caution
When the compact spare is
installed, do not take the vehicle
through an automatic car wash
with guide rails. The compact
spare can get caught on the rails
which can damage the tire, wheel,
and other parts of the vehicle.
Do not use the compact spare on
other vehicles.
Do not mix the compact spare tire or
wheel with other wheels or tires.
They will not fit. Keep the spare tire
and its wheel together.
Page 263 of 324
Chevrolet Equinox Owner Manual (GMNA-Localizing-U.S./Canada/Mexico-
9234773) - 2016 - crc - 9/3/15
262 Vehicle Care
4. Install fuse 32, the DiscreteLogic Ignition Switch fuse. See
Instrument Panel Fuse Block
0227
ii.
5. Start the engine and let it idle for more than three minutes
before driving the vehicle.
Caution
Do not tow a vehicle with the front
drive wheels on the ground if one
of the front tires is a compact
spare tire. Towing with two
different tire sizes on the front of
the vehicle can cause severe
damage to the transmission.
Caution
Use of a shield mounted in front
of the vehicle grille could restrict
airflow and cause damage to the
transmission. The repairs would
not be covered by the vehicle
warranty. If using a shield, only
use one that attaches to the
towing vehicle.
Dolly Towing (All-Wheel-Drive
Vehicles)
All-wheel-drive vehicles should not
be towed with two wheels on the
ground. To properly tow these
vehicles, they should be placed on
a platform trailer with all four wheels
off of the ground or dinghy towed
from the front.
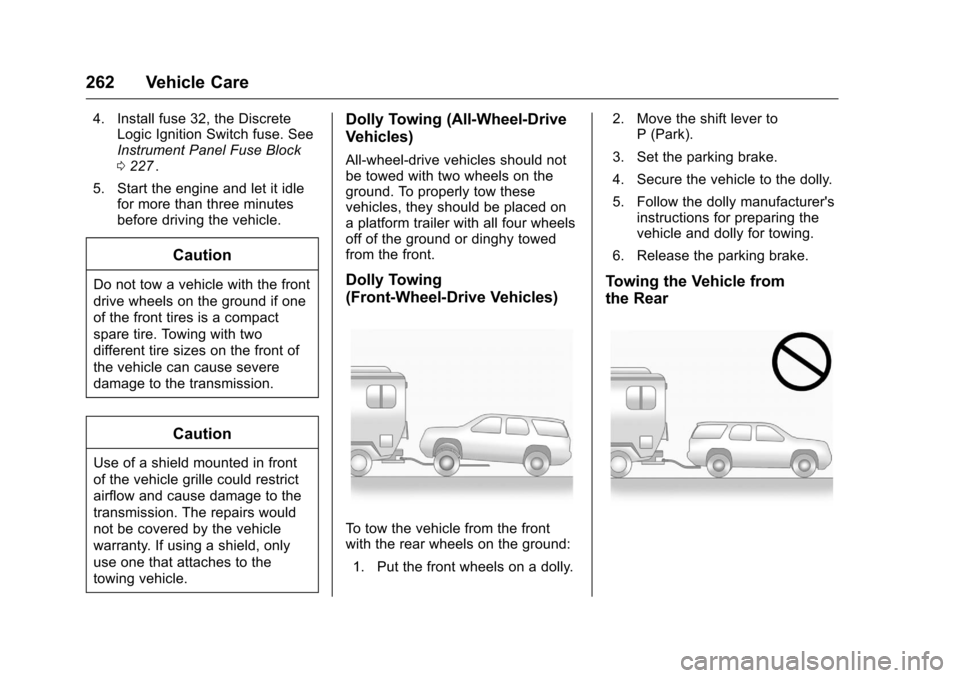
Dolly Towing
(Front-Wheel-Drive Vehicles)
To tow the vehicle from the front
with the rear wheels on the ground:
1. Put the front wheels on a dolly. 2. Move the shift lever to
P (Park).
3. Set the parking brake.
4. Secure the vehicle to the dolly.
5. Follow the dolly manufacturer's instructions for preparing the
vehicle and dolly for towing.
6. Release the parking brake.
Towing the Vehicle from
the Rear
Page 322 of 324

Chevrolet Equinox Owner Manual (GMNA-Localizing-U.S./Canada/Mexico-
9234773) - 2016 - crc - 9/3/15
Index 321
Service (cont'd)Scheduling Appointments . . . . . 295
Vehicle Messages . . . . . . . . . . . . .118
Services
Special Application . . . . . . . . . . . 279
Servicing the Airbag . . . . . . . . . . . . . 69
Shift Lock Control Function Check, Automatic
Transmission . . . . . . . . . . . . . . . . . . 219
Shifting Into Park . . . . . . . . . . . . . . . . . . . . . . 164
Out of Park . . . . . . . . . . . . . . . . . . . 165
Side Blind Zone Alert (SBZA) . . . 182
Sidemarker Bulb Replacement . . . . . . . . . . . . 222
Signals, Turn and Lane-Change . . . . . . . . . . . . . . . . . 132
Spare Tire
Compact . . . . . . . . . . . . . . . . . . . . . . 256
Special Application Services . . . . 279
Specifications and Capacities . . . . . . . . . . . . . . . . . . . . . 286
Speedometer . . . . . . . . . . . . . . . . . . . . 99
StabiliTrak
OFF Light . . . . . . . . . . . . . . . . . . . . . 107
Start Assist, Hills . . . . . . . . . . . . . . . 172
Start Vehicle, Remote . . . . . . . . . . . 28
Starter Switch Check . . . . . . . . . . . 219 Starting the Engine . . . . . . . . . . . . . 161
Steering . . . . . . . . . . . . . . . . . . . . . . . . 146
Fluid, Power . . . . . . . . . . . . . . . . . . 215
Wheel Adjustment . . . . . . . . . . . . . . 93
Wheel Controls . . . . . . . . . . . . . . . . . 93
Stoplamps and Back-Up Lamps Bulb Replacement . . . . . . . . . . . . 222
Storage Areas Cargo Cover . . . . . . . . . . . . . . . . . . . . 90
Center Console . . . . . . . . . . . . . . . . . 89
Convenience Net . . . . . . . . . . . . . . . 90
Glove Box . . . . . . . . . . . . . . . . . . . . . . 89
Roof Rack System . . . . . . . . . . . . . . 90
Storage Compartments . . . . . . . . . . 89
Stuck Vehicle . . . . . . . . . . . . . . . . . . . 155
Summer Tires . . . . . . . . . . . . . . . . . . 231
Sun Visors . . . . . . . . . . . . . . . . . . . . . . . 41
Sunroof . . . . . . . . . . . . . . . . . . . . . . . . . . 41
Symbols . . . . . . . . . . . . . . . . . . . . . . . . . . 3
System Forward Collision
Alert (FCA) . . . . . . . . . . . . . . . . . . 180
Infotainment . . . . . . . . . . . . . 136, 302
Roof Rack . . . . . . . . . . . . . . . . . . . . . . 90T
Tachometer . . . . . . . . . . . . . . . . . . . . . . 99
Taillamps Bulb Replacement . . . . . . . . . . . . 222
Text Telephone (TTY) Users . . . . 292
Theft-Deterrent Systems . . . . . . . . . 37
Immobilizer . . . . . . . . . . . . . . . . . . . . . 37
Time . . . . . . . . . . . . . . . . . . . . . . . . . . . . . 95
Tires . . . . . . . . . . . . . . . . . . . . . . . . . . . . 229 All-Season . . . . . . . . . . . . . . . . . . . . 230
Buying New Tires . . . . . . . . . . . . . 244
Chains . . . . . . . . . . . . . . . . . . . . . . . . 248
Changing . . . . . . . . . . . . . . . . . . . . . 250
Compact Spare . . . . . . . . . . . . . . . 256
Designations . . . . . . . . . . . . . . . . . 233
Different Size . . . . . . . . . . . . . . . . . 245
If a Tire Goes Flat . . . . . . . . . . . . 249
Inspection . . . . . . . . . . . . . . . . . . . . 242
Messages . . . . . . . . . . . . . . . . . . . . .118
Pressure Light . . . . . . . . . . . . . . . . 107
Pressure Monitor Operation . . 239
Pressure Monitor System . . . . . 238
Rotation . . . . . . . . . . . . . . . . . . . . . . 242
Sidewall Labeling . . . . . . . . . . . . . 231
Terminology and Definitions . . 234
Uniform Tire Quality
Grading . . . . . . . . . . . . . . . . . . . . . 246