warning light CHEVROLET EXPRESS 2010 User Guide
[x] Cancel search | Manufacturer: CHEVROLET, Model Year: 2010, Model line: EXPRESS, Model: CHEVROLET EXPRESS 2010Pages: 440, PDF Size: 2.42 MB
Page 129 of 440
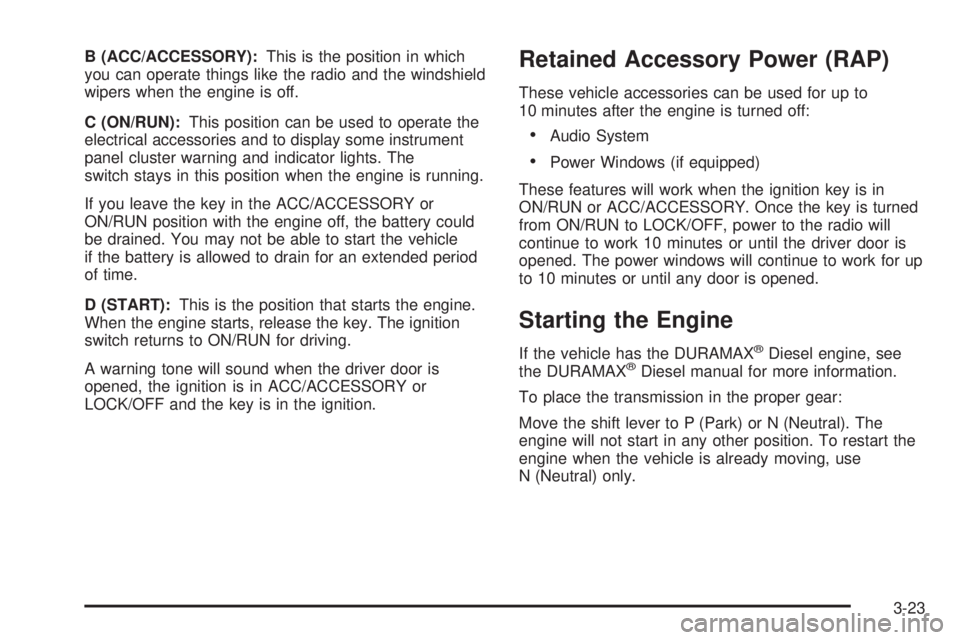
B (ACC/ACCESSORY):This is the position in which
you can operate things like the radio and the windshield
wipers when the engine is off.
C (ON/RUN):This position can be used to operate the
electrical accessories and to display some instrument
panel cluster warning and indicator lights. The
switch stays in this position when the engine is running.
If you leave the key in the ACC/ACCESSORY or
ON/RUN position with the engine off, the battery could
be drained. You may not be able to start the vehicle
if the battery is allowed to drain for an extended period
of time.
D (START):This is the position that starts the engine.
When the engine starts, release the key. The ignition
switch returns to ON/RUN for driving.
A warning tone will sound when the driver door is
opened, the ignition is in ACC/ACCESSORY or
LOCK/OFF and the key is in the ignition.Retained Accessory Power (RAP)
These vehicle accessories can be used for up to
10 minutes after the engine is turned off:
•Audio System
•Power Windows (if equipped)
These features will work when the ignition key is in
ON/RUN or ACC/ACCESSORY. Once the key is turned
from ON/RUN to LOCK/OFF, power to the radio will
continue to work 10 minutes or until the driver door is
opened. The power windows will continue to work for up
to 10 minutes or until any door is opened.
Starting the Engine
If the vehicle has the DURAMAX®Diesel engine, see
the DURAMAX®Diesel manual for more information.
To place the transmission in the proper gear:
Move the shift lever to P (Park) or N (Neutral). The
engine will not start in any other position. To restart the
engine when the vehicle is already moving, use
N (Neutral) only.
3-23
Page 142 of 440
Cruise Grade Braking (Six Speed
Automatic Transmission)
Cruise Grade Braking operates only while cruise control
is engaged in Tow/Haul mode. Cruise Grade Braking
assists in maintaining desired vehicle speeds when
driving on downhill grades in cruise control by
automatically shifting to lower gears when the cruise set
speed is exceeded.
While in the Range Selection Mode (RSM) mode, cruise
grade braking is not available.
SeeAutomatic Transmission Operation (Six Speed
Automatic Transmission) on page 3-27orAutomatic
Transmission Operation (Four Speed Automatic
Transmission) on page 3-32.
Parking Brake
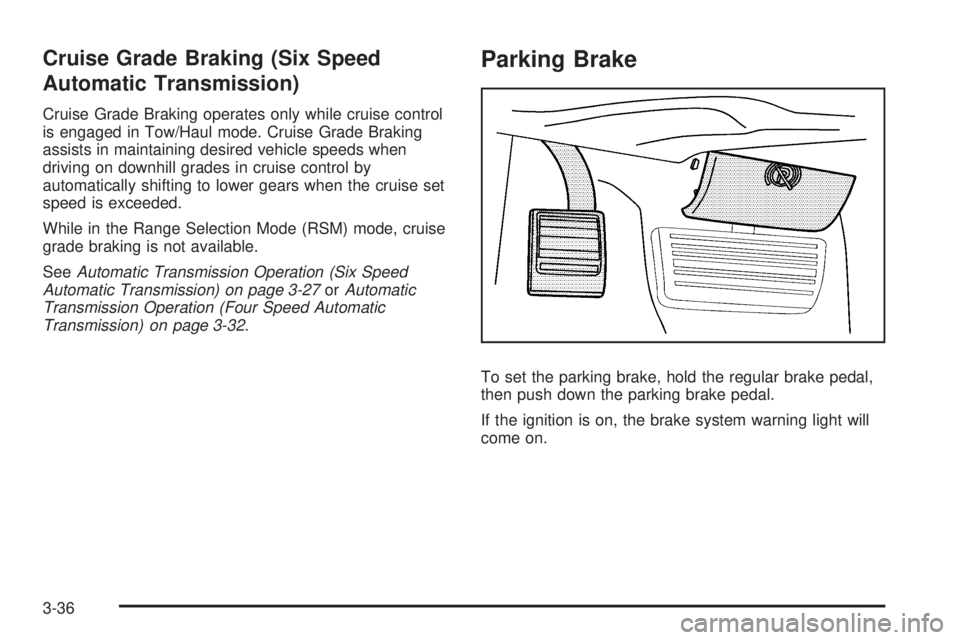
To set the parking brake, hold the regular brake pedal,
then push down the parking brake pedal.
If the ignition is on, the brake system warning light will
come on.
3-36
Page 143 of 440

To release the parking brake, hold the regular brake
pedal down. Pull the handle, located just above
the parking brake pedal, with the parking brake symbol,
to release the parking brake.
If the ignition is on when the parking brake is released,
the brake system warning light will go off.
Notice:Driving with the parking brake on can
overheat the brake system and cause premature
wear or damage to brake system parts. Verify that
the parking brake is fully released and the brake
warning light is off before driving.
If you are towing a trailer and are parking on a hill, see
Towing a Trailer on page 5-30.Shifting Into Park
{WARNING:
It can be dangerous to get out of the vehicle if the
shift lever is not fully in P (Park) with the parking
brake firmly set. The vehicle can roll. If you have
left the engine running, the vehicle can move
suddenly. You or others could be injured. To be
sure the vehicle will not move, even when you are
on fairly level ground, use the steps that follow.
If you are pulling a trailer, seeTowing a Trailer on
page 5-30.
1. Hold the brake pedal down and set the parking
brake. SeeParking Brake on page 3-36
2. Move the shift lever into P (Park) by pulling the shift
lever toward you and moving it up as far as it will go.
3. Turn the ignition key to LOCK/OFF.
4. Remove the key and take it with you. If you can
leave the vehicle with the ignition key in your
hand, the vehicle is in P (Park).
3-37
Page 151 of 440
Instrument Panel Overview...............................4-3
Hazard Warning Flashers................................4-3
Horn .............................................................4-3
Tilt Wheel.....................................................4-3
Turn Signal/Multifunction Lever.........................4-4
Turn and Lane-Change Signals........................4-4
Headlamp High/Low-Beam Changer..................4-5
Flash-to-Pass.................................................4-5
Windshield Wipers..........................................4-5
Windshield Washer.........................................4-6
Cruise Control................................................4-6
Exterior Lamps...............................................4-9
Headlamps on Reminder................................4-10
Daytime Running Lamps (DRL).......................4-10
Automatic Headlamp System..........................4-11
Instrument Panel Brightness...........................4-11
Dome Lamps ...............................................4-12
Dome Lamp Override....................................4-12
Entry/Exit Lighting.........................................4-13
Reading Lamps............................................4-13
Electric Power Management...........................4-13
Battery Run-Down Protection..........................4-14
Accessory Power Outlet(s).............................4-14
Ashtray(s) and Cigarette Lighter......................4-15Climate Controls............................................4-15
Climate Control System.................................4-15
Outlet Adjustment.........................................4-17
Rear Heating System....................................4-18
Rear Air Conditioning and Heating System.......4-18
Warning Lights, Gages, and Indicators............4-20
Instrument Panel Cluster................................4-21
Speedometer and Odometer...........................4-22
Trip Odometer..............................................4-22
Safety Belt Reminders...................................4-22
Airbag Readiness Light
..................................4-23
Airbag Off Light............................................4-24
Passenger Airbag Status Indicator...................4-25
Charging System Light..................................4-26
Voltmeter Gage............................................4-27
Brake System Warning Light..........................4-27
Antilock Brake System (ABS) Warning Light.....4-28
StabiliTrak
®Indicator Light.............................4-29
Engine Coolant Temperature Gage..................4-29
Tire Pressure Light.......................................4-30
Malfunction Indicator Lamp.............................4-30
Oil Pressure Gage........................................4-33
Oil Pressure Light.........................................4-34
Section 4 Instrument Panel
4-1
Page 152 of 440

Security Light...............................................4-34
Cruise Control Light......................................4-35
Highbeam On Light.......................................4-35
Tow/Haul Mode Light....................................4-35
Fuel Gage...................................................4-35
Driver Information Center (DIC).......................4-36
DIC Operation and Displays...........................4-37
DIC Compass..............................................4-42
DIC Warnings and Messages.........................4-44
DIC Vehicle Customization.............................4-52Audio System(s).............................................4-59
Setting the Clock..........................................4-60
Radio(s)......................................................4-62
Using an MP3..............................................4-72
Theft-Deterrent Feature..................................4-77
Audio Steering Wheel Controls.......................4-77
Radio Reception...........................................4-78
Fixed Mast Antenna......................................4-78
Section 4 Instrument Panel
4-2
Page 157 of 440
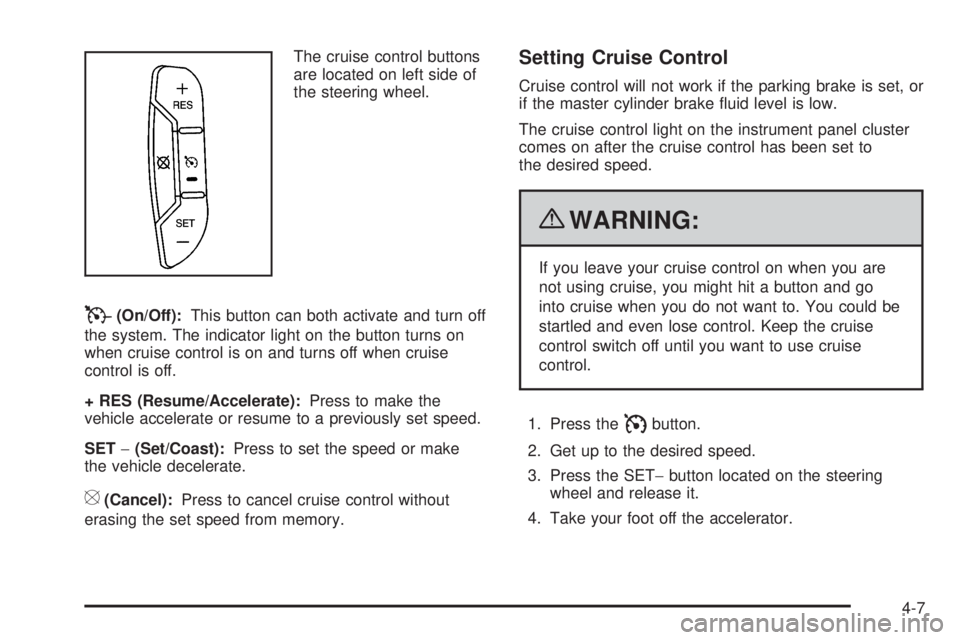
The cruise control buttons
are located on left side of
the steering wheel.
T(On/Off):This button can both activate and turn off
the system. The indicator light on the button turns on
when cruise control is on and turns off when cruise
control is off.
+ RES (Resume/Accelerate):Press to make the
vehicle accelerate or resume to a previously set speed.
SET−(Set/Coast):Press to set the speed or make
the vehicle decelerate.
[(Cancel):Press to cancel cruise control without
erasing the set speed from memory.
Setting Cruise Control
Cruise control will not work if the parking brake is set, or
if the master cylinder brake fluid level is low.
The cruise control light on the instrument panel cluster
comes on after the cruise control has been set to
the desired speed.
{WARNING:
If you leave your cruise control on when you are
not using cruise, you might hit a button and go
into cruise when you do not want to. You could be
startled and even lose control. Keep the cruise
control switch off until you want to use cruise
control.
1. Press the
Ibutton.
2. Get up to the desired speed.
3. Press the SET−button located on the steering
wheel and release it.
4. Take your foot off the accelerator.
4-7
Page 160 of 440
;(Parking Lamps):Turns on the parking lamps
together with the following:
•Instrument Panel Lights
•Taillamps
•License Plate Lamps
2(Headlamps):Turns on the headlamps together
with the following lamps listed below.
•Parking Lamps
•Instrument Panel Lights
•Taillamps
•License Plate Lamps
If the headlamps are turned on while the vehicle is on,
the headlamps turn off automatically 10 minutes
after the ignition is turned off. If the headlamps are
turned on while the vehicle is off, the headlamps will
continue to stay on. To prevent the battery from
being drained, turn the control to the
9position.
A warning chime sounds if the driver door is opened
while the ignition switch is off and the headlamps are on.
To change the headlamps from low beam to high
beam, push the turn signal/multifunction lever toward
the instrument panel.
Headlamps on Reminder
If a door is open, a reminder chime sounds when the
headlamps or parking lamps are manually turned on and
the key is out of the ignition. To turn off the chime,
turn the headlamp switch to off or auto and then back
on, or close and re-open the door. In the auto mode, the
headlamps turn off once the ignition is in LOCK/OFF
or may remain on until the headlamp delay ends,
if enabled in the Driver Information Center (DIC). See
“Exit Lighting” underDIC Vehicle Customization on
page 4-52.
Daytime Running Lamps (DRL)
Daytime Running Lamps (DRL) can make it easier for
others to see the front of your vehicle during the
day. Fully functional daytime running lamps are required
on all vehicles first sold in Canada.
The DRL system comes on in daylight when the
following conditions are met:
•The ignition is on.
•The exterior lamps control is in the AUTO position.
•The shift lever is not in P (Park).
•The light sensor determines it is daytime.
When the DRL are on, the taillamps, sidemarker,
instrument panel and other lamps will not be on.
4-10
Page 163 of 440
Entry/Exit Lighting
The vehicle has an illuminated entry/exit feature.
The dome lamps come on if the dome override button is
in the out position, when a door is opened or the key
is removed from the ignition.
Reading Lamps
For vehicles with reading lamps, press the button
located next to each lamp to turn it on or off.
The vehicle may also have reading lamps in other
locations. The lamps cannot be adjusted.
Electric Power Management
The vehicle has Electric Power Management (EPM) that
estimates the battery’s temperature and state of charge.
It then adjusts the voltage for best performance and
extended life of the battery.
When the battery’s state of charge is low, the voltage is
raised slightly to quickly bring the charge back up. When
the state of charge is high, the voltage is lowered slightly
to prevent overcharging. If the vehicle has a voltmeter
gage or a voltage display on the Driver Information
Center (DIC), you may see the voltage move up or down.
This is normal. If there is a problem, an alert will be
displayed.The battery can be discharged at idle if the electrical
loads are very high. This is true for all vehicles. This is
because the generator (alternator) may not be spinning
fast enough at idle to produce all the power that is
needed for very high electrical loads.
A high electrical load occurs when several of the
following are on, such as: headlamps, high beams, fog
lamps, rear window defogger, climate control fan at
high speed, heated seats, engine cooling fans, trailer
loads, and loads plugged into accessory power outlets.
EPM works to prevent excessive discharge of the
battery. It does this by balancing the generator’s output
and the vehicle’s electrical needs. It can increase
engine idle speed to generate more power, whenever
needed. It can temporarily reduce the power demands of
some accessories.
Normally, these actions occur in steps or levels, without
being noticeable. In rare cases at the highest levels of
corrective action, this action may be noticeable to the
driver. If so, a Driver Information Center (DIC) message
might be displayed, such as BATTERY SAVER ACTIVE,
BATTERY VOLTAGE LOW, or LOW BATTERY. If this
message is displayed, it is recommended that the driver
reduce the electrical loads as much as possible. SeeDIC
Warnings and Messages on page 4-44.
4-13
Page 170 of 440
Air Delivery Mode Control:Turn clockwise or
counterclockwise to change the direction of the airflow
in the rear seating area.
To change the current mode, select one of the following:
H(Vent):Air is directed to the upper outlets, with
some directed to the floor outlets.
2(Floor):Air is directed to the floor outlets.
Be sure to keep the area under the front seats clear of
any objects so that the air inside of the vehicle can
circulate effectively.
For information on how to use the main climate control
system, seeClimate Control System on page 4-15.
For information on ventilation, seeOutlet Adjustment on
page 4-17.
Warning Lights, Gages, and
Indicators
Warning lights and gages can signal that something is
wrong before it becomes serious enough to cause
an expensive repair or replacement. Paying attention to
the warning lights and gages could prevent injury.
Warning lights come on when there might be or there is
a problem with one of the vehicle’s functions. Some
warning lights come on briefly when the engine is started
to indicate they are working.
Gages can indicate when there might be or there is a
problem with one of the vehicle’s functions. Often gages
and warning lights work together to indicate a problem
with the vehicle.
When one of the warning lights comes on and stays on
while driving, or when one of the gages shows there
could be a problem, check the section that explains what
to do. Follow this manual’s advice. Waiting to do
repairs can be costly and even dangerous.
4-20
Page 173 of 440

This chime and light are
repeated if the passenger
remains unbuckled and
the vehicle is in motion.
If the passenger safety belt is buckled, neither the
chime nor the light comes on.
The front passenger safety belt warning light and chime
may turn on if an object is put on the seat such as a
briefcase, handbag, grocery bag, laptop or other
electronic device. To turn off the warning light and or
chime, remove the object from the seat or buckle
the safety belt.
Airbag Readiness Light
The system checks the airbag’s electrical system for
possible malfunctions. If the light stays on it indicates
there is an electrical problem. The system check
includes the airbag sensor, the pretensioners, the airbag
modules, the wiring and the crash sensing and
diagnostic module. For more information on the airbag
system, seeAirbag System on page 2-60.The airbag readiness light
flashes for a few seconds
when the engine is
started. If the light does
not come on then, have it
fixed immediately.
{WARNING:
If the airbag readiness light stays on after the
vehicle is started or comes on while driving, it
means the airbag system might not be working
properly. The airbags in the vehicle might not
inflate in a crash, or they could even inflate
without a crash. To help avoid injury, have the
vehicle serviced right away.
For vehicles with a remote start, the airbag readiness
light will stay on until the driver places the ignition switch
to the ON/RUN position.
If there is a problem with the airbag system, an airbag
Driver Information Center (DIC) message can also come
on. SeeDIC Warnings and Messages on page 4-44
for more information.
4-23