CD player CHEVROLET EXPRESS 2010 Owner's Manual
[x] Cancel search | Manufacturer: CHEVROLET, Model Year: 2010, Model line: EXPRESS, Model: CHEVROLET EXPRESS 2010Pages: 440, PDF Size: 2.42 MB
Page 21 of 440
Setting the Clock
To set the time and date for the Radio with CD (MP3):
1. Press
Hand the HR, MIN, MM, DD, YYYY
(hour, minute, month, day, and year) displays.
2. Press the pushbutton located below any one of the
tabs that you want to change.
3. Increase or decrease the time or date depending
on the radio, by pressing
©SEEK¨arrows,
s\REV/FWD buttons or by turningfclockwise
or counterclockwise.
For detailed instructions on setting the clock for your
specific audio system, seeSetting the Clock on
page 4-60.
Portable Audio Devices
This vehicle may have an auxiliary input jack, located
on the audio faceplate. External devices such as iPod®,
MP3 players, etc. can be connected to the auxiliary
input jack using a 3.5 mm (1/8 in) input jack cable.
See “Using the Auxiliary Input Jack” underRadio(s) on
page 4-62.
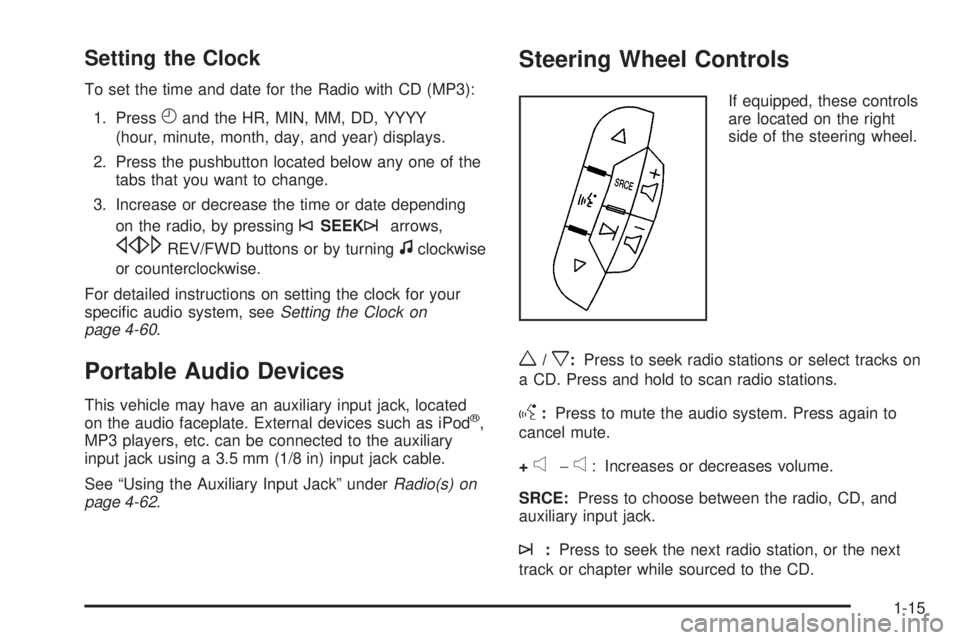
Steering Wheel Controls
If equipped, these controls
are located on the right
side of the steering wheel.
w/x:Press to seek radio stations or select tracks on
a CD. Press and hold to scan radio stations.
g:Press to mute the audio system. Press again to
cancel mute.
+
e−e: Increases or decreases volume.
SRCE:Press to choose between the radio, CD, and
auxiliary input jack.
¨:Press to seek the next radio station, or the next
track or chapter while sourced to the CD.
1-15
Page 210 of 440
Setting the Clock
AM/FM Radio with Optional CD Player
If your vehicle has an AM/FM radio with an optional
CD player, it has a
Hbutton for setting the time. With
these types of radios, the clock can be set with
either the radio turned on or off.
Set the time by following these steps:
1. Press
Huntil the hour begins flashing on display.
Press this button a second time and the minutes
begin flashing on display.
Press
Ha third time and the 12HR or 24HR time
format begins flashing.
2. While either the hour or the minutes are flashing, turn
the
fknob, located on the upper right side of the
radio, clockwise or counterclockwise to increase or
decrease the time. While the 12HR or 24HR time
format is flashing, turn the
fknob clockwise or
counterclockwise to select the default time settings.
3. Press
Hagain until the clock display stops flashing
to set the currently displayed time; otherwise, the
flashing stops after five seconds and the current
time displayed is automatically set.
MP3 Radio with a Single CD Player
If your vehicle has a radio with a single CD (MP3)
player, the radio has a
Hbutton for setting the time
and date.
To set the time and date, follow the instructions:
1. Press the
Hbutton and the HR, MIN, MM, DD,
YYYY (hour, minute, month, day, and year)
displays.
2. Press the pushbutton located under any one of the
labels that you want to change. Every time the
pushbutton is pressed again, the time or the date if
selected, increases by one.
•Another way to increase the time or date,
is to press the right
¨SEEK arrow or
the
\FWD (forward) button.
3. To decrease, press the left
©SEEK arrow or the
sREV button. You can also turn thefknob,
located on the upper right side of the radio, to adjust
the selected setting.
4-60
Page 211 of 440
Changing the Time and Date Default
Settings
You can change the time default setting from 12 hours
to 24 hours or change the date default setting from
month/day/year to day/month/year.
To change the time or date default settings, follow these
instructions:
1. Press
Hand then the pushbutton located under the
forward arrow that is currently displayed on the radio
screen until the time 12H (hour) and 24H (hour), and
the date MM/DD (month and day) and DD/MM (day
and month) are displayed.
2. Press the pushbutton located under the desired
option.
3. Press the
Hbutton again to apply the selected
default, or let the screen time out.
MP3 Radio with a Six-Disc CD Player
If your vehicle has a radio with a six-disc CD player, the
radio has a MENU button instead of the
Hbutton to
set the time and date.
To set the time and date, follow these instructions:
1. Press the MENU button. Once the
Hoption
displays, press the pushbutton located under
that label. The HR, MIN, MM, DD, YYYY (hour,
minute, month, day, and year) displays.
2. Press the pushbutton located under any one of the
labels to change. Every time the pushbutton is
pressed again, the time or the date if selected,
increases by one.
•Another way to increase the time or date,
is to press the right
¨SEEK arrow or the
\FWD (forward) button.
3. To decrease, press the left
©SEEK arrow or the
sREV button, or turn thefknob, located on the
upper right side of the radio, to adjust the selected
setting.
4-61
Page 217 of 440
Adjusting the Speakers (Balance/Fade)
(AM-FM Radio and Radio
with CD (Base))
`
(Balance/Fade):To adjust the balance or fade,
press the
`button or thefknob until the desired
speaker control label displays. Turn the
fknob
clockwise or counterclockwise to adjust the setting.
Adjusting the Speakers (Balance/Fade)
BAL/FADE (Balance/Fade):To adjust balance or
fade, press the
fknob until the speaker control labels
display. Continue pressing to highlight the desired
label, or press the pushbutton positioned under
the desired label. Turn the
fknob clockwise or
counterclockwise to adjust the highlighted setting.
To quickly adjust balance or fade to the middle position,
press the pushbutton positioned under the BAL or
FADE label for more than two seconds. A beep sounds
and the level adjusts to the middle position.
To quickly adjust all speaker and tone controls to the
middle position, press the
fknob for more than
two seconds until a beep sounds.
Finding a Category (CAT) Station
CAT (Category):The CAT button is used to find
XM™ stations while the radio is in the XM™ mode.
XM™ is a satellite radio service that is based in
the United States and Canada only.
For this vehicle, the XM™ function is not available.
Radio Messages
Calibration Error:The audio system has been
calibrated for the vehicle from the factory. If Calibration
Error displays, it means that the radio has not been
configured properly for the vehicle and it must be
returned to your dealer/retailer for service.
Locked or Loc:One of these messages will display
when the THEFTLOCK
®system has locked up the
radio. Take the vehicle to your dealer/retailer for service.
If any error occurs repeatedly or if an error cannot be
corrected, contact your dealer/retailer.
Playing a CD (Single CD Player)
Insert a CD partway into the slot, label side up. The
player pulls it in and the CD should begin playing.
4-67
Page 218 of 440
Playing a CD(s) (Six-Disc CD Player)
LOAD^:Press to load CDs into the CD player.
This CD player holds up to six CDs.
To insert one CD, do the following:
1. Press and release the
^button.
2. Wait for the message to insert the disc.
3. Load a CD. Insert the CD partway into the slot,
label side up. The player pulls the CD in.
To insert multiple CDs, do the following:
1. Press and hold the
^button for two seconds.
A beep sounds and Load All Discs displays.
2. Follow the displayed instruction on when to insert
the discs. The CD player takes up to six CDs.
3. Press the
^button again to cancel loading
more CDs.
Insert a CD partway into the slot, label side up. The
player pulls it in and the CD should begin playing. If you
want to insert a CD with the ignition off, first press
the
Zbutton or the DISP knob.
If the ignition or radio is turned off with a CD in the
player it stays in the player. When the ignition or radio
is turned on, the CD starts to play where it stopped, if it
was the last selected audio source.When the CD is inserted, the CD symbol displays. As
each new track starts to play, the track number displays.
The CD player can play the smaller 3 inch (8 cm)
single CDs with an adapter ring. Full-size CDs and the
smaller CDs are loaded in the same manner.
Care of Your CDs and DVDs
If playing a CD-R, the sound quality can be reduced due
to CD-R or CD-RW quality, the method of recording, the
quality of the music that has been recorded, and the way
the CD-R or CD-RW has been handled. Handle them
carefully. Store CD-R(s) or CD-RW(s) in their original
cases or other protective cases and away from direct
sunlight and dust. The CD or DVD player scans the
bottom surface of the disc. If the surface of a CD is
damaged, such as cracked, broken, or scratched, the CD
does not play properly or not at all. Do not touch the
bottom side of a CD while handling it; this could damage
the surface. Pick up CDs by grasping the outer edges or
the edge of the hole and the outer edge.
If the surface of a CD is soiled, take a soft, lint free cloth
or dampen a clean, soft cloth in a mild, neutral detergent
solution mixed with water, and clean it. Make sure the
wiping process starts from the center to the edge.
4-68
Page 219 of 440
Care of Your CD and DVD Player
Do not add any label to a CD, it could get caught in the
CD or DVD player. If a CD is recorded on a personal
computer and a description label is needed, try labeling
the top of the recorded CD with a marking pen.
The use of CD lens cleaners for CDs is not advised,
due to the risk of contaminating the lens of the CD optics
with lubricants internal to the CD and DVD player
mechanism.
Notice:If a label is added to a CD, or more than
one CD is inserted into the slot at a time, or an
attempt is made to play scratched or damaged CDs,
the CD player could be damaged. While using the
CD player, use only CDs in good condition without
any label, load one CD at a time, and keep the
CD player and the loading slot free of foreign
materials, liquids, and debris.
If an error displays, see “CD Messages” later in this
section.
ZEJECT:Press to eject the CD. If the CD is not
removed, after several seconds, the CD automatically
pulls back into the player.
For the Six-Disc CD player, press and hold for
two seconds to eject all discs.
f(Tune):Turn to select tracks on the CD currently
playing.
©SEEK¨:Press the left arrow to go to the start of
the current track, if more than ten seconds have played.
Press the right arrow to go to the next track. If either
arrow is held or pressed multiple times, the player
continues moving backward or forward through the CD.
sREV (Fast Reverse):Press and hold to reverse
playback quickly within a track. Sound is heard at
a reduced volume. Release to resume playing the track.
The elapsed time of the track displays.
\FWD (Fast Forward):Press and hold to advance
playback quickly within a track. Sound is heard at a
reduced volume. Release to resume playing the track.
The elapsed time of the track displays.
RDM (Random):Tracks can be listened to in random,
rather than sequential order, on one CD or all CDs
in a six-disc CD player.
To use random on the Base Radio with Single CD
player, do the following:
•Press the RDM button to play tracks from a CD in
random order. The random icon displays. Press
again to turn off random play. The random
icon disappears from the display.
4-69
Page 220 of 440
To use random on an Uplevel Radio with a Single CD
player, do the following:
1. Press the CD/AUX button, insert a disc partway into
the slot of the CD player. A RDM label displays.
2. To play the tracks in random order, press the
pushbutton positioned under the RDM label
until Random Current Disc displays. Press the
pushbutton again to turn off random play.
To use random on a Radio with a Six-Disc CD player,
do the following:
1. Press the CD/AUX button, press and hold
^.
A beep sounds and Load All Discs displays.
Insert one or more discs partway into the slot of the
CD player.
2. To play tracks from all CDs loaded in random order,
press the pushbutton positioned under the RDM
label until Randomize All Discs displays. Press the
same pushbutton again to turn off random play.
RPT (Repeat (Base Radio with CD):With the repeat
setting, one track can be repeated. To repeat the
track you are listening to, press and release the
RPT button. An arrow symbol displays. Press RPT
again to turn off repeat play.
4(Information) (Base Radio with CD):Press to switch
the display between the track number, elapsed time
of the track, and the time. When the ignition is off, press
to display the time.
BAND:Press to listen to the radio when a CD is
playing. The CD remains inside the radio for future
listening.
CD/AUX (CD/Auxiliary):Press to play a CD when
listening to the radio. The CD icon and a message
showing the disc and/or track number displays when a
CD is in the player. Press again and the system
automatically searches for an auxiliary input device,
such as a portable audio player. If a portable audio
player is not connected, “No Input Device Found” may
display.
Playing an MP3 CD-R or CD-RW Disc
The radio with a Single CD player or a Six-Disc CD
player has the capability of playing an MP3 CD-R or
CD-RW disc. For more information on how to play
an MP3 CD-R or CD-RW disc, see “Using an MP3” in
the index.
4-70
Page 221 of 440
CD Messages
REMOVE/CHECK DISC:Radios with a Single CD player
or radios with a Six-Disc player displays CHECK DISC
and/or ejects the CD if an error occurs.
ERR (Error):If this message displays and/or the CD
comes out, it could be for one of the following reasons:
•It is very hot. When the temperature returns to
normal, the CD should play.
•You are driving on a very rough road. When the
road becomes smoother, the CD should play.
•The CD is dirty, scratched, wet, or upside down.
•The air is very humid. If so, wait about an hour and
try again.
•There could have been a problem while burning the
CD-R or CD-RW.
•The label could be caught in the CD player.NO:This message displays if the EJECT or CD/AUX
buttons are pressed and a CD has not been inserted into
the player.
If the CD is not playing correctly, for any other reason,
try a known good CD.
If any error occurs repeatedly or if an error cannot be
corrected, contact your dealer/retailer. If the radio
displays an error message, write it down and provide it
to your dealer/retailer while reporting the problem.
Using the Auxiliary Input Jack
Your radio system has an auxiliary input jack located
on the lower right side of the faceplate. This is not an
audio output; do not plug the headphone set into the front
auxiliary input jack. An external audio device such as an
iPod, laptop computer, MP3 player, CD changer, etc. can
be connected to the auxiliary input jack for use as another
source for audio listening.
4-71
Page 222 of 440
Drivers are encouraged to set up any auxiliary device
while the vehicle is in P (Park). SeeDefensive
Driving on page 5-2for more information on driver
distraction.
To use a portable audio player, connect a 3.5 mm
(1/8 inch) cable to the radio’s front auxiliary input jack.
When a device is connected, press the radio CD/AUX
button to begin playing audio from the device over
the vehicle speakers.
O(Power/Volume):Turn clockwise or counterclockwise
to increase or decrease the volume of the portable
player. You might need to do additional volume
adjustments from the portable device if the volume
is not loud or soft enough.
BAND:Press to listen to the radio while a portable
audio device is playing. The portable audio device
continues playing, so you might want to stop it or turn
it off.
CD/AUX (CD/Auxiliary):Press to play a CD while a
portable audio device is playing. Press again and
the system begins playing audio from the connected
portable audio player. If a portable audio player is
not connected, the message No Aux Input Device
displays.
Using an MP3
MP3 CD-R or CD-RW Disc
The radio plays MP3 files that were recorded on a
CD-R or CD-RW disc. The files can be recorded with
the following fixed bit rates: 32 kbps, 40 kbps, 56 kbps,
64 kbps, 80 kbps, 96 kbps, 112 kbps, 128 kbps,
160 kbps, 192 kbps, 224 kbps, 256 kbps, and 320 kbps
or a variable bit rate. Song title, artist name, and
album are available for display by the radio when
recorded using ID3 tags version 1 and 2.
Compressed Audio
The radio also plays discs that contain both
uncompressed CD audio (.CDA files) and MP3 files.
By default the radio shows the MP3 label on the left side
of the screen but plays both file formats in the order
in which they were recorded to the disc.
MP3 Format
If you burn your own MP3 disc on a personal computer:
•Make sure the MP3 files are recorded on a CD-R
or CD-RW disc.
•Do not mix standard audio and MP3 files on
one disc.
4-72
Page 223 of 440
•The CD player is able to read and play a maximum
of 50 folders, 15 playlists, and 512 folders and files.
•Create a folder structure that makes it easy to find
songs while driving. Organize songs by albums
using one folder for each album. Each folder
or album should contain 18 songs or less.
•Avoid subfolders. The system can support up to
eight subfolders deep, however, keep the total
number of folders to a minimum in order to reduce
the complexity and confusion in trying to locate
a particular folder during playback.
•Make sure playlists have a .mp3 or .wpl extension
(other file extensions might not work).
•Minimize the length of the file, folder, or playlist
names. Long file, folder, or playlist names, or a
combination of a large number of files and folders,
or playlists could cause the player to be unable
to play up to the maximum number of files, folders,
playlists, or sessions. If you wish to play a large
number of files, folders, playlists or sessions,
minimize the length of the file, folder, or playlist
name. Long names also take up more space on
the display, potentially getting cut off.
•Finalize the audio disc before you burn it. Trying to
add music to an existing disc could cause the disc
not to function in the player.Playlists can be changed by using the
Sc(previous)
and
cT(next) folder buttons, thefknob, or the
©SEEK¨arrows. You can also play an MP3 CD-R
or CD-RW that was recorded using no file folders. If a
CD-R or CD-RW contains more than the maximum of
50 folders, 15 playlists, and 512 folders and files, the
player lets you access and navigate up to the maximum,
but all items over the maximum are not accessible.
Root Directory
The root directory of the CD-R or CD-RW is treated as a
folder. If the root directory has compressed audio files,
the directory displays as the CD label. All files contained
directly under the root directory are accessed prior to any
root directory folders. However, playlists (Px) are always
accessed before root folders or files.
If a disc contains both uncompressed CD audio (.CDA)
and MP3 files, a folder under the root directory called
CD accesses all of the CD audio tracks on the disc.
Empty Directory or Folder
If a root directory or a folder exists somewhere in the
file structure that contains only folders/subfolders and
no compressed files directly beneath them, the player
advances to the next folder in the file structure that
contains compressed audio files. The empty folder does
not display.
4-73