seats CHEVROLET EXPRESS 2010 Owner's Manual
[x] Cancel search | Manufacturer: CHEVROLET, Model Year: 2010, Model line: EXPRESS, Model: CHEVROLET EXPRESS 2010Pages: 440, PDF Size: 2.42 MB
Page 1 of 440
In Brief........................................................... 1-1
Instrument Panel
........................................ 1-2
Initial Drive Information
............................... 1-4
Vehicle Features
......................................1-14
Performance and Maintenance
...................1-16
Seats and Restraint System............................. 2-1
Head Restraints
......................................... 2-2
Front Seats
............................................... 2-2
Rear Seats
............................................... 2-6
Safety Belts
.............................................2-10
Child Restraints
.......................................2-30
Airbag System
.........................................2-60
Restraint System Check
............................2-80
Features and Controls..................................... 3-1
Keys
........................................................ 3-3
Doors and Locks
....................................... 3-9
Windows
.................................................3-16
Theft-Deterrent Systems
............................3-19
Starting and Operating Your Vehicle
...........3-22
Mirrors
....................................................3-42
Storage Areas
.........................................3-44Instrument Panel............................................. 4-1
Instrument Panel Overview
.......................... 4-3
Climate Controls
......................................4-15
Warning Lights, Gages, and Indicators
........4-20
Driver Information Center (DIC)
..................4-36
Audio System(s)
.......................................4-59
Driving Your Vehicle....................................... 5-1
Your Driving, the Road, and the Vehicle
....... 5-2
Towing
...................................................5-26
Service and Appearance Care.......................... 6-1
Service
..................................................... 6-3
Fuel
......................................................... 6-5
Checking Things Under the Hood
...............6-12
All-Wheel Drive
........................................6-49
Rear Axle
...............................................6-50
Front Axle
...............................................6-50
Noise Control System
...............................6-51
Bulb Replacement
....................................6-53
Windshield Wiper Blade Replacement
.........6-59
Tires
......................................................6-60
2010 Chevrolet Express Owner ManualM
Page 12 of 440
Windows
Manual Windows
Operate the manual windows by turning the hand crank
on each door to raise or lower the side door windows.
SeeManual Windows on page 3-16.
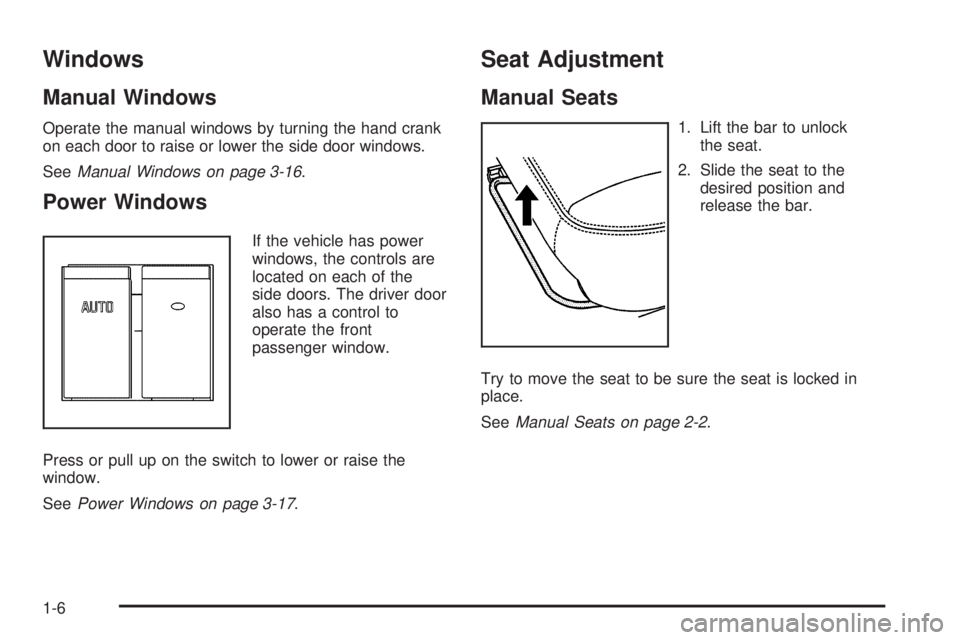
Power Windows
If the vehicle has power
windows, the controls are
located on each of the
side doors. The driver door
also has a control to
operate the front
passenger window.
Press or pull up on the switch to lower or raise the
window.
SeePower Windows on page 3-17.
Seat Adjustment
Manual Seats
1. Lift the bar to unlock
the seat.
2. Slide the seat to the
desired position and
release the bar.
Try to move the seat to be sure the seat is locked in
place.
SeeManual Seats on page 2-2.
1-6
Page 13 of 440
Power Seats
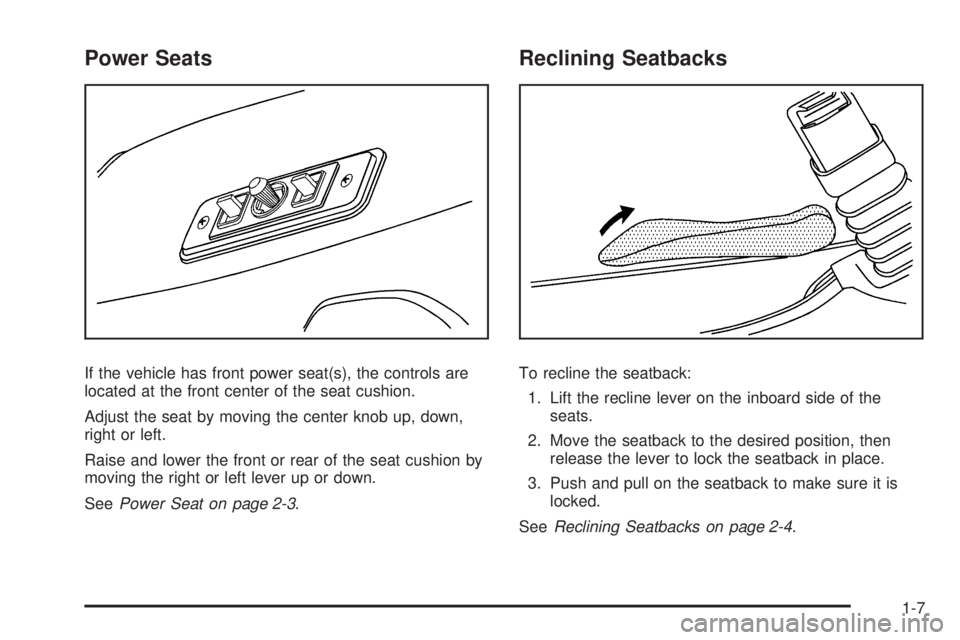
If the vehicle has front power seat(s), the controls are
located at the front center of the seat cushion.
Adjust the seat by moving the center knob up, down,
right or left.
Raise and lower the front or rear of the seat cushion by
moving the right or left lever up or down.
SeePower Seat on page 2-3.
Reclining Seatbacks
To recline the seatback:
1. Lift the recline lever on the inboard side of the
seats.
2. Move the seatback to the desired position, then
release the lever to lock the seatback in place.
3. Push and pull on the seatback to make sure it is
locked.
SeeReclining Seatbacks on page 2-4.
1-7
Page 25 of 440
Head Restraints...............................................2-2
Front Seats......................................................2-2
Manual Seats................................................2-2
Power Seat...................................................2-3
Reclining Seatbacks........................................2-4
Rear Seats.......................................................2-6
Rear Seat Operation.......................................2-6
Safety Belts...................................................2-10
Safety Belts: They Are for Everyone................2-10
How to Wear Safety Belts Properly.................2-15
Lap-Shoulder Belt.........................................2-23
Safety Belt Use During Pregnancy..................2-29
Safety Belt Extender.....................................2-29
Child Restraints.............................................2-30
Older Children..............................................2-30
Infants and Young Children............................2-33
Child Restraint Systems.................................2-37
Where to Put the Restraint.............................2-40
Lower Anchors and Tethers for
Children (LATCH)......................................2-42Securing a Child Restraint in a
Rear Seat Position....................................2-49
Securing a Child Restraint in the
Right Front Seat Position
(With Passenger Sensing System)...............2-52
Securing a Child Restraint in the Right Front
Seat Position (With Airbag On-Off Switch).....2-56
Airbag System...............................................2-60
Where Are the Airbags?................................2-63
When Should an Airbag Inflate?.....................2-65
What Makes an Airbag Inflate?.......................2-67
How Does an Airbag Restrain?.......................2-67
What Will You See After an Airbag Inflates?.....2-68
Airbag Off Switch..........................................2-70
Passenger Sensing System............................2-73
Servicing Your Airbag-Equipped Vehicle...........2-78
Adding Equipment to Your
Airbag-Equipped Vehicle.............................2-79
Restraint System Check..................................2-80
Checking the Restraint Systems......................2-80
Replacing Restraint System Parts
After a Crash............................................2-81
Section 2 Seats and Restraint System
2-1
Page 26 of 440
Head Restraints
On vehicles with factory installed seats, the front seats
have built-in head restraints that are not adjustable
in the outboard seating positions.
Front Seats
Manual Seats
{WARNING:
You can lose control of the vehicle if you try to
adjust a manual driver’s seat while the vehicle is
moving. The sudden movement could startle and
confuse you, or make you push a pedal when you
do not want to. Adjust the driver’s seat only when
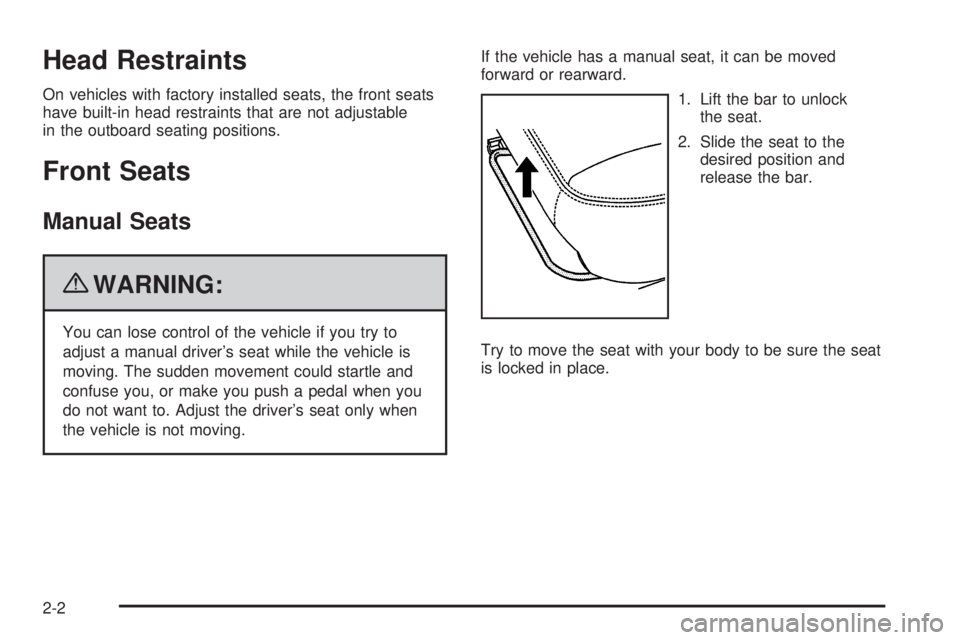
the vehicle is not moving.If the vehicle has a manual seat, it can be moved
forward or rearward.
1. Lift the bar to unlock
the seat.
2. Slide the seat to the
desired position and
release the bar.
Try to move the seat with your body to be sure the seat
is locked in place.
2-2
Page 28 of 440
Reclining Seatbacks
{WARNING:
You can lose control of the vehicle if you try to
adjust a manual driver’s seat while the vehicle is
moving. The sudden movement could startle and
confuse you, or make you push a pedal when you
do not want to. Adjust the driver’s seat only when
the vehicle is not moving.
{WARNING:
If either seatback is not locked, it could move
forward in a sudden stop or crash. That could
cause injury to the person sitting there. Always
push and pull on the seatbacks to be sure they
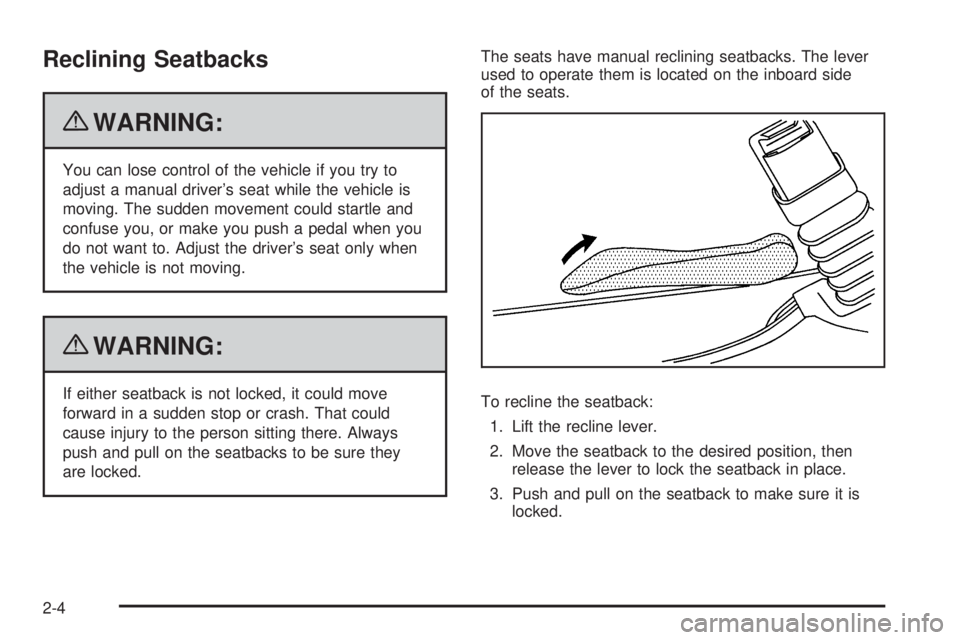
are locked.The seats have manual reclining seatbacks. The lever
used to operate them is located on the inboard side
of the seats.
To recline the seatback:
1. Lift the recline lever.
2. Move the seatback to the desired position, then
release the lever to lock the seatback in place.
3. Push and pull on the seatback to make sure it is
locked.
2-4
Page 30 of 440
Rear Seats
Rear Seat Operation
Removing the Rear Seat
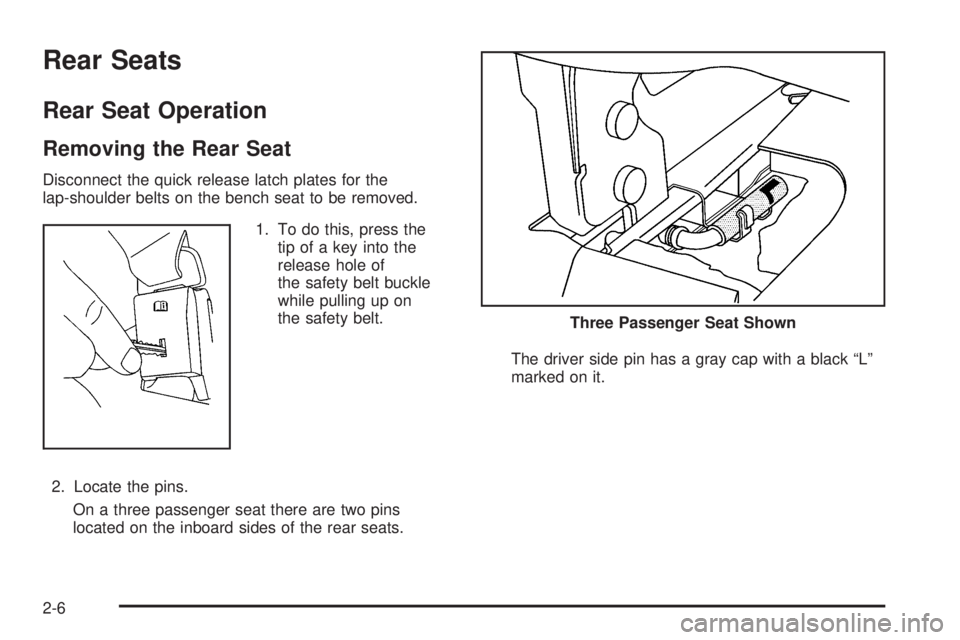
Disconnect the quick release latch plates for the
lap-shoulder belts on the bench seat to be removed.
1. To do this, press the
tip of a key into the
release hole of
the safety belt buckle
while pulling up on
the safety belt.
2. Locate the pins.
On a three passenger seat there are two pins
located on the inboard sides of the rear seats.The driver side pin has a gray cap with a black “L”
marked on it.
Three Passenger Seat Shown
2-6
Page 31 of 440
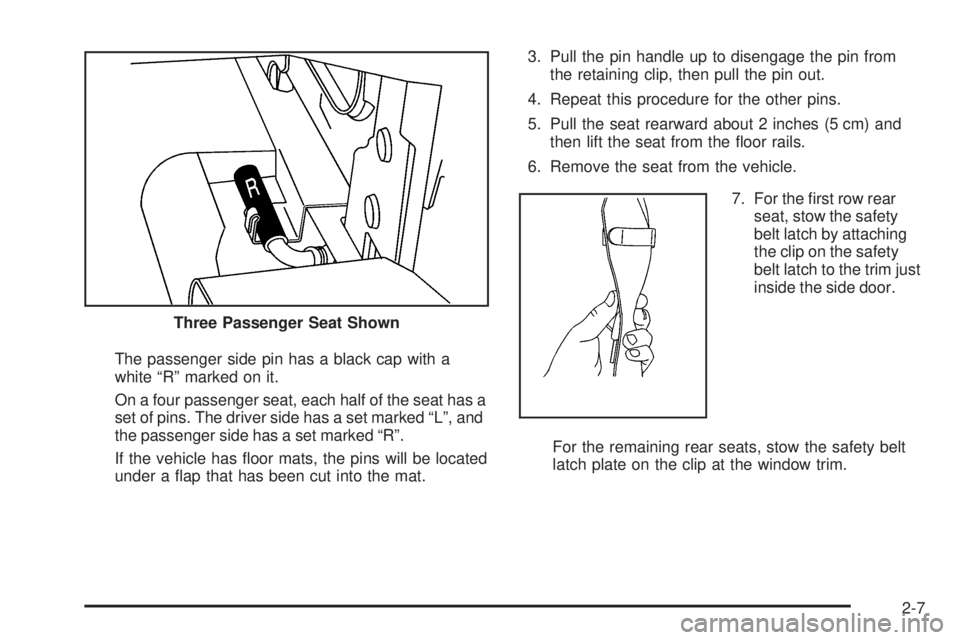
The passenger side pin has a black cap with a
white “R” marked on it.
On a four passenger seat, each half of the seat has a
set of pins. The driver side has a set marked “L”, and
the passenger side has a set marked “R”.
If the vehicle has floor mats, the pins will be located
under a flap that has been cut into the mat.3. Pull the pin handle up to disengage the pin from
the retaining clip, then pull the pin out.
4. Repeat this procedure for the other pins.
5. Pull the seat rearward about 2 inches (5 cm) and
then lift the seat from the floor rails.
6. Remove the seat from the vehicle.
7. For the first row rear
seat, stow the safety
belt latch by attaching
the clip on the safety
belt latch to the trim just
inside the side door.
For the remaining rear seats, stow the safety belt
latch plate on the clip at the window trim. Three Passenger Seat Shown
2-7
Page 32 of 440
Replacing the Rear Seats
{WARNING:
A seat that is not locked into place properly can
move around in a collision or sudden stop. People
in the vehicle could be injured. Be sure to lock the
seat into place properly when installing it.
{WARNING:
A safety belt that is improperly routed, not properly
attached, or twisted will not provide the protection
needed in a crash. The person wearing the belt
WARNING: (Continued)
WARNING: (Continued)
could be seriously injured. After raising the rear
seatback, always check to be sure that the safety
belts are properly routed and attached, and are
not twisted.
1. Position the seat into the open slots in both rails.
Push the seat forward in the rail, hooking both
seat bases onto the pins inside of the rails.
2. Locate the hole in the rail to install the locking pins at
the rear of the seat base. If the vehicle has floor
mats, pull the flap that has been cut into the mat.
3. Insert the locking pins into the seat base and push
the seat to line up the pins with the base.
On a three passenger seat, the pin with the black
cap marked “R” must be installed on the passenger
side and the pin with the gray cap marked “L” on
the driver side.
On a four passenger seat, the pins marked “R”
must be installed on the half of the seat on
the passenger side. The pins marked “L” must be
installed on the half of the seat on the driver side.
2-8
Page 34 of 440
Safety Belts
Safety Belts: They Are for Everyone
This section of the manual describes how to use
safety belts properly. It also describes some things not
to do with safety belts.
{WARNING:
Do not let anyone ride where a safety belt cannot
be worn properly. In a crash, if you or your
passenger(s) are not wearing safety belts, the
injuries can be much worse. You can hit things
inside the vehicle harder or be ejected from the
vehicle. You and your passenger(s) can be
seriously injured or killed. In the same crash, you
might not be, if you are buckled up. Always fasten
your safety belt, and check that your passenger(s)
are restrained properly too.
{WARNING:
It is extremely dangerous to ride in a cargo area,
inside or outside of a vehicle. In a collision, people
riding in these areas are more likely to be seriously
injured or killed. Do not allow people to ride in any
area of your vehicle that is not equipped with seats
and safety belts. Be sure everyone in your vehicle is
in a seat and using a safety belt properly.
This vehicle has indicators as a reminder to buckle the
safety belts. SeeSafety Belt Reminders on page 4-22
for additional information.
In most states and in all Canadian provinces, the law
requires wearing safety belts. Here is why:
You never know if you will be in a crash. If you do have
a crash, you do not know if it will be a serious one.
A few crashes are mild, and some crashes can be so
serious that even buckled up, a person would not survive.
But most crashes are in between. In many of them,
people who buckle up can survive and sometimes walk
away. Without safety belts, they could have been badly
hurt or killed.
After more than 40 years of safety belts in vehicles, the
facts are clear. In most crashes buckling up does
matter... a lot!
2-10