fuel pressure CHEVROLET EXPRESS 2016 Owners Manual
[x] Cancel search | Manufacturer: CHEVROLET, Model Year: 2016, Model line: EXPRESS, Model: CHEVROLET EXPRESS 2016Pages: 289, PDF Size: 11.46 MB
Page 67 of 289
Chevrolet Express Owner Manual (GMNA-Localizing-U.S./Canada/Mexico-
15555951) - 2022 - CRC - 1/27/22
66 Instruments and Controls
Instruments and Controls
Controls
Steering Wheel Adjustment . . . . . . . . . . . . 66
Steering Wheel Controls . . . . . . . . . . . . . . . . 67
Horn . . . . . . . . . . . . . . . . . . . . . . . . . . . . . . . . . . . 68
Windshield Wiper/Washer . . . . . . . . . . . . . 68
Compass . . . . . . . . . . . . . . . . . . . . . . . . . . . . . . . 68
Clock . . . . . . . . . . . . . . . . . . . . . . . . . . . . . . . . . . . 70
Power Outlets . . . . . . . . . . . . . . . . . . . . . . . . . . 70
Cigarette Lighter . . . . . . . . . . . . . . . . . . . . . . . . 71
Ashtrays . . . . . . . . . . . . . . . . . . . . . . . . . . . . . . . . 71
Warning Lights, Gauges, and Indicators
Warning Lights, Gauges, andIndicators . . . . . . . . . . . . . . . . . . . . . . . . . . . . . 71
Instrument Cluster . . . . . . . . . . . . . . . . . . . . . . 72
Speedometer . . . . . . . . . . . . . . . . . . . . . . . . . . . 72
Odometer . . . . . . . . . . . . . . . . . . . . . . . . . . . . . . 72
Trip Odometer . . . . . . . . . . . . . . . . . . . . . . . . . . 72
Fuel Gauge . . . . . . . . . . . . . . . . . . . . . . . . . . . . . 72
Engine Oil Pressure Gauge . . . . . . . . . . . . . . 73
Engine Coolant Temperature Gauge . . . . 74
Voltmeter Gauge . . . . . . . . . . . . . . . . . . . . . . . 74
Seat Belt Reminders . . . . . . . . . . . . . . . . . . . . 75
Airbag Readiness Light . . . . . . . . . . . . . . . . . . 75
Airbag On-Off Light . . . . . . . . . . . . . . . . . . . . . 76
Charging System Light . . . . . . . . . . . . . . . . . . 77
Malfunction Indicator Lamp (Check Engine Light) . . . . . . . . . . . . . . . . . . . . . . . . . . 77 Brake System Warning Light . . . . . . . . . . . 78
Antilock Brake System (ABS) Warning
Light . . . . . . . . . . . . . . . . . . . . . . . . . . . . . . . . . . 79
Tow/Haul Mode Light . . . . . . . . . . . . . . . . . . 79
Lane Departure Warning (LDW) Light . . . 79
Vehicle Ahead Indicator . . . . . . . . . . . . . . . . 80
StabiliTrak OFF Light . . . . . . . . . . . . . . . . . . . 80
Traction Control System (TCS)/StabiliTrak Light . . . . . . . . . . . . . . . . . . . . . . . . . . . . . . . . . 80
Tire Pressure Light . . . . . . . . . . . . . . . . . . . . . 80
Engine Oil Pressure Light . . . . . . . . . . . . . . . 81
Low Fuel Warning Light . . . . . . . . . . . . . . . . 81
Security Light . . . . . . . . . . . . . . . . . . . . . . . . . . 82
High-Beam On Light . . . . . . . . . . . . . . . . . . . . 82
Cruise Control Light . . . . . . . . . . . . . . . . . . . . 82
Information Displays
Driver Information Center (DIC) . . . . . . . . . 82
Vehicle Messages
Vehicle Messages . . . . . . . . . . . . . . . . . . . . . . 86
Engine Power Messages . . . . . . . . . . . . . . . . 86
Vehicle Speed Messages . . . . . . . . . . . . . . . . 87
Vehicle Personalization
Vehicle Personalization . . . . . . . . . . . . . . . . . 87
Controls
Steering Wheel Adjustment
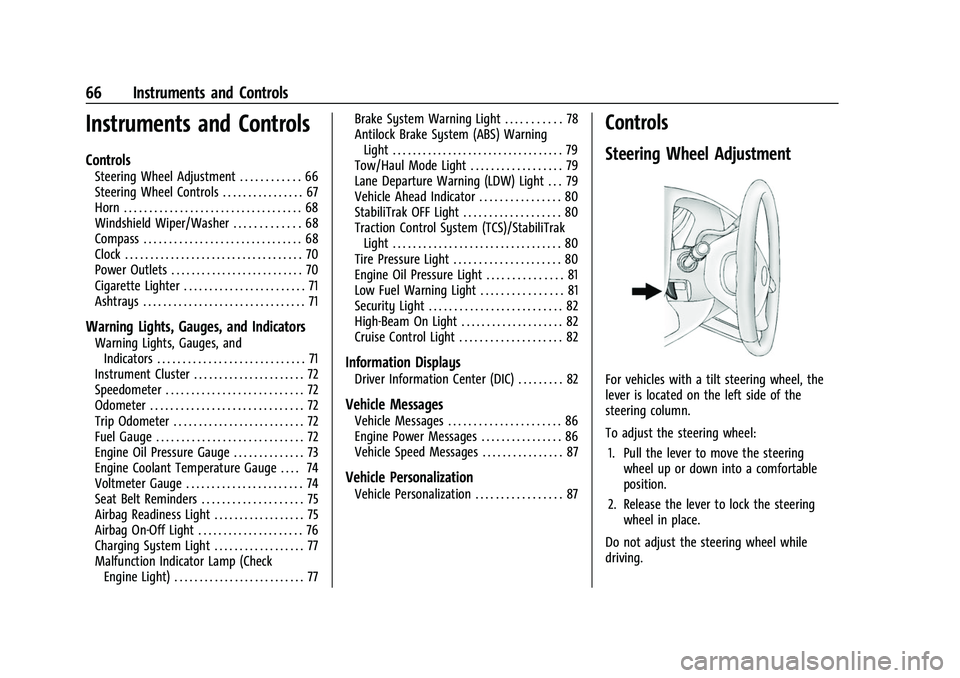
For vehicles with a tilt steering wheel, the
lever is located on the left side of the
steering column.
To adjust the steering wheel:
1. Pull the lever to move the steering wheel up or down into a comfortable
position.
2. Release the lever to lock the steering wheel in place.
Do not adjust the steering wheel while
driving.
Page 73 of 289
Chevrolet Express Owner Manual (GMNA-Localizing-U.S./Canada/Mexico-
15555951) - 2022 - CRC - 1/27/22
72 Instruments and Controls
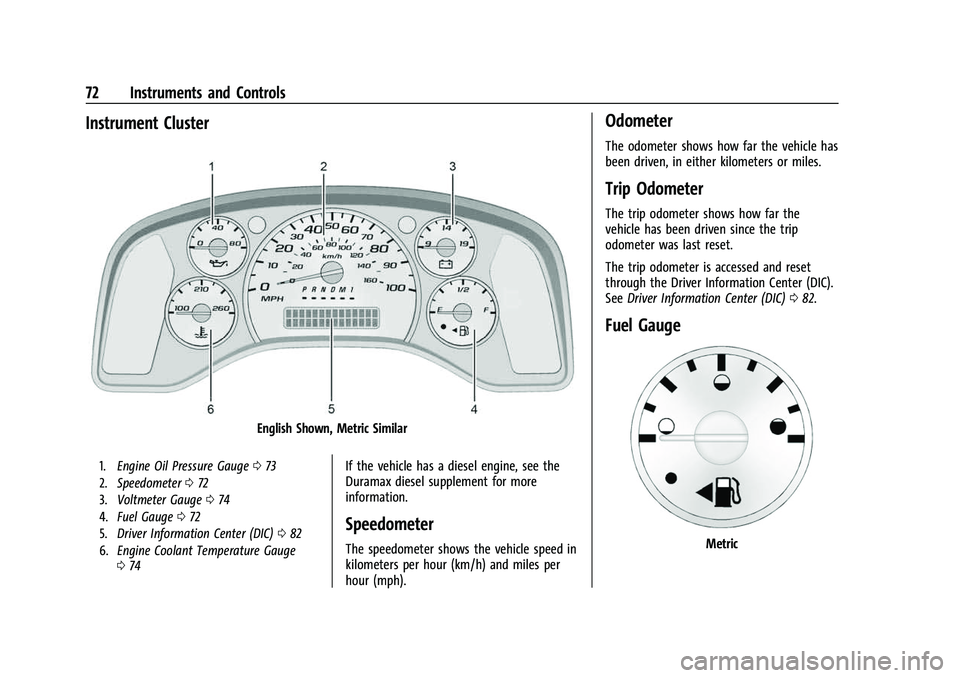
Instrument Cluster
English Shown, Metric Similar
1.Engine Oil Pressure Gauge 073
2. Speedometer 072
3. Voltmeter Gauge 074
4. Fuel Gauge 072
5. Driver Information Center (DIC) 082
6. Engine Coolant Temperature Gauge
074If the vehicle has a diesel engine, see the
Duramax diesel supplement for more
information.
Speedometer
The speedometer shows the vehicle speed in
kilometers per hour (km/h) and miles per
hour (mph).
Odometer
The odometer shows how far the vehicle has
been driven, in either kilometers or miles.
Trip Odometer
The trip odometer shows how far the
vehicle has been driven since the trip
odometer was last reset.
The trip odometer is accessed and reset
through the Driver Information Center (DIC).
See Driver Information Center (DIC) 082.
Fuel Gauge
Metric
Page 74 of 289

Chevrolet Express Owner Manual (GMNA-Localizing-U.S./Canada/Mexico-
15555951) - 2022 - CRC - 1/27/22
Instruments and Controls 73
English
When the ignition is on, the fuel gauge
indicates about how much fuel is left in
the tank.
There is an arrow near the fuel gauge
pointing to the side of the vehicle the fuel
door is on.
When the indicator nears empty, the low
fuel light comes on. There still is a little fuel
left, but the vehicle should be refueled soon.
Here are three things that some owners ask
about. None of these show a problem with
the fuel gauge:
.It takes a little more, or less fuel to fill up
than the gauge indicated. For example,
the gauge may have indicated the tank was half full, but it actually took a little
more, or less than half the tank's capacity
to fill the tank.
.The gauge moves a little while turning a
corner, speeding up or braking.
.The gauge takes a few seconds to
stabilize after the ignition is turned on
and goes back to empty when the
ignition is turned off.
Engine Oil Pressure Gauge
Metric
English
The oil pressure gauge shows the engine oil
pressure in psi (pounds per square inch)
or kPa (kilopascals) when the engine is
running.
Oil pressure may vary with engine speed,
outside temperature and oil viscosity, but
readings above the low pressure zone
indicate the normal operating range.
A reading in the low pressure zone may be
caused by a dangerously low oil level or
other problem causing low oil pressure.
Page 82 of 289
Chevrolet Express Owner Manual (GMNA-Localizing-U.S./Canada/Mexico-
15555951) - 2022 - CRC - 1/27/22
Instruments and Controls 81
For vehicles with the Tire Pressure Monitor
System (TPMS), this light comes on briefly
when the vehicle is started. It provides
information about tire pressures and
the TPMS.
When the Light Is On Steady
This indicates that one or more of the tires
are significantly underinflated.
A Driver Information Center (DIC) tire
pressure message may also display. Stop as
soon as possible, and inflate the tires to the
pressure value shown on the Tire and
Loading Information label. SeeTire Pressure
0 210.
When the Light Flashes First and Then Is On
Steady
If the light flashes for about a minute and
then stays on, there may be a problem with
the TPMS. If the problem is not corrected,
the light will come on at every ignition
cycle. See Tire Pressure Monitor Operation
0 212.Engine Oil Pressure Light
Caution
Lack of proper engine oil maintenance
can damage the engine. Driving with the
engine oil low can also damage the
engine. The repairs would not be covered
by the vehicle warranty. Check the oil
level as soon as possible. Add oil if
required, but if the oil level is within the
operating range and the oil pressure is
still low, have the vehicle serviced.
Always follow the maintenance schedule
for changing engine oil.
This light should come on briefly as the
engine is started. If it does not come on,
have the vehicle serviced by your dealer. If the light comes on and stays on, it means
that oil is not flowing through the engine
properly. The vehicle could be low on oil
and might have some other system
problem. See your dealer.
Low Fuel Warning Light
English Shown, Metric Similar
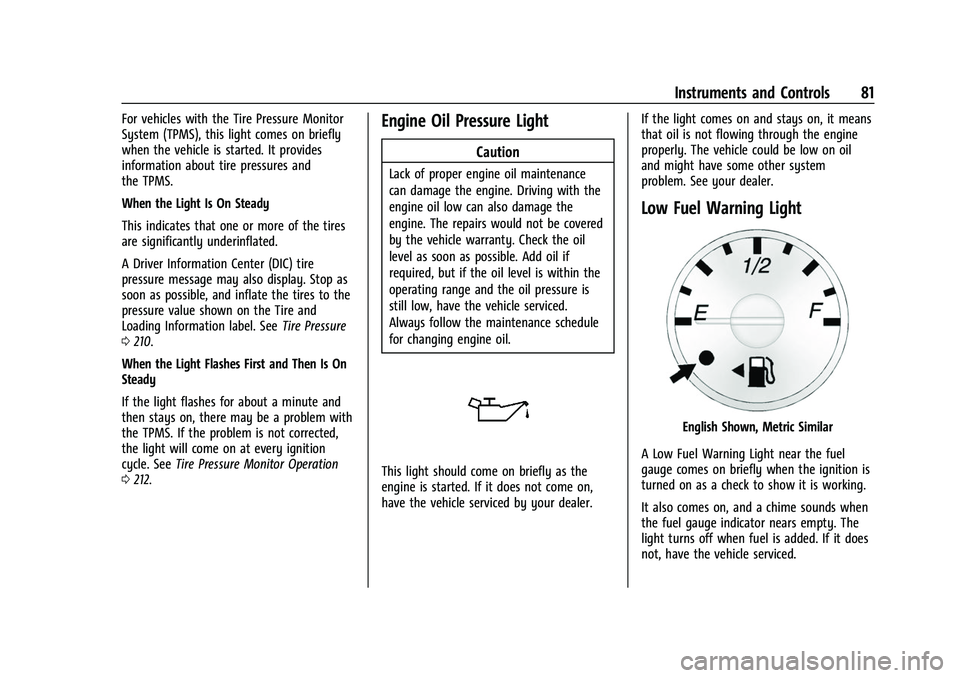
A Low Fuel Warning Light near the fuel
gauge comes on briefly when the ignition is
turned on as a check to show it is working.
It also comes on, and a chime sounds when
the fuel gauge indicator nears empty. The
light turns off when fuel is added. If it does
not, have the vehicle serviced.
Page 84 of 289
Chevrolet Express Owner Manual (GMNA-Localizing-U.S./Canada/Mexico-
15555951) - 2022 - CRC - 1/27/22
Instruments and Controls 83
DIC Buttons
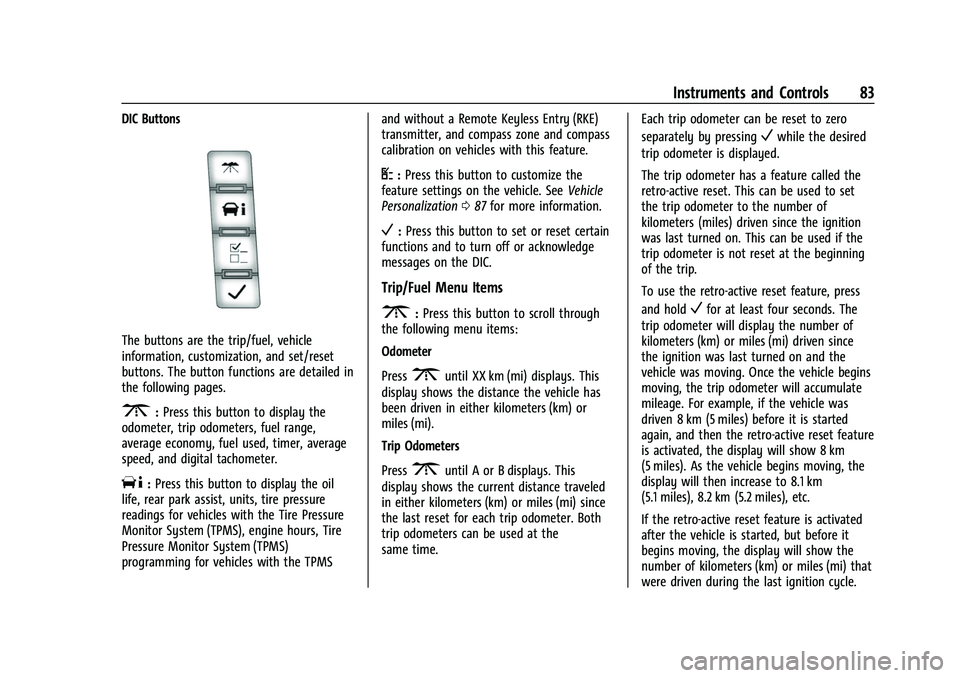
The buttons are the trip/fuel, vehicle
information, customization, and set/reset
buttons. The button functions are detailed in
the following pages.
3:Press this button to display the
odometer, trip odometers, fuel range,
average economy, fuel used, timer, average
speed, and digital tachometer.
T: Press this button to display the oil
life, rear park assist, units, tire pressure
readings for vehicles with the Tire Pressure
Monitor System (TPMS), engine hours, Tire
Pressure Monitor System (TPMS)
programming for vehicles with the TPMS and without a Remote Keyless Entry (RKE)
transmitter, and compass zone and compass
calibration on vehicles with this feature.
U:
Press this button to customize the
feature settings on the vehicle. See Vehicle
Personalization 087 for more information.
V:Press this button to set or reset certain
functions and to turn off or acknowledge
messages on the DIC.
Trip/Fuel Menu Items
3: Press this button to scroll through
the following menu items:
Odometer
Press
3until XX km (mi) displays. This
display shows the distance the vehicle has
been driven in either kilometers (km) or
miles (mi).
Trip Odometers
Press
3until A or B displays. This
display shows the current distance traveled
in either kilometers (km) or miles (mi) since
the last reset for each trip odometer. Both
trip odometers can be used at the
same time. Each trip odometer can be reset to zero
separately by pressing
Vwhile the desired
trip odometer is displayed.
The trip odometer has a feature called the
retro-active reset. This can be used to set
the trip odometer to the number of
kilometers (miles) driven since the ignition
was last turned on. This can be used if the
trip odometer is not reset at the beginning
of the trip.
To use the retro-active reset feature, press
and hold
Vfor at least four seconds. The
trip odometer will display the number of
kilometers (km) or miles (mi) driven since
the ignition was last turned on and the
vehicle was moving. Once the vehicle begins
moving, the trip odometer will accumulate
mileage. For example, if the vehicle was
driven 8 km (5 miles) before it is started
again, and then the retro-active reset feature
is activated, the display will show 8 km
(5 miles). As the vehicle begins moving, the
display will then increase to 8.1 km
(5.1 miles), 8.2 km (5.2 miles), etc.
If the retro-active reset feature is activated
after the vehicle is started, but before it
begins moving, the display will show the
number of kilometers (km) or miles (mi) that
were driven during the last ignition cycle.
Page 130 of 289
Chevrolet Express Owner Manual (GMNA-Localizing-U.S./Canada/Mexico-
15555951) - 2022 - CRC - 1/27/22
Driving and Operating 129
Certification/Tire Label
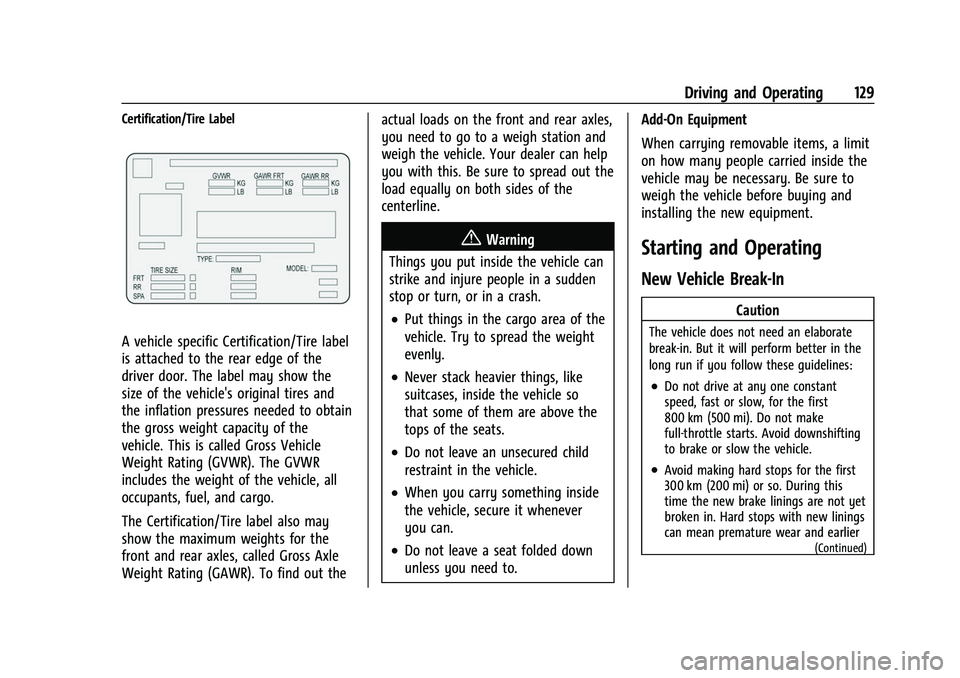
A vehicle specific Certification/Tire label
is attached to the rear edge of the
driver door. The label may show the
size of the vehicle's original tires and
the inflation pressures needed to obtain
the gross weight capacity of the
vehicle. This is called Gross Vehicle
Weight Rating (GVWR). The GVWR
includes the weight of the vehicle, all
occupants, fuel, and cargo.
The Certification/Tire label also may
show the maximum weights for the
front and rear axles, called Gross Axle
Weight Rating (GAWR). To find out theactual loads on the front and rear axles,
you need to go to a weigh station and
weigh the vehicle. Your dealer can help
you with this. Be sure to spread out the
load equally on both sides of the
centerline.
{Warning
Things you put inside the vehicle can
strike and injure people in a sudden
stop or turn, or in a crash.
.Put things in the cargo area of the
vehicle. Try to spread the weight
evenly.
.Never stack heavier things, like
suitcases, inside the vehicle so
that some of them are above the
tops of the seats.
.Do not leave an unsecured child
restraint in the vehicle.
.When you carry something inside
the vehicle, secure it whenever
you can.
.Do not leave a seat folded down
unless you need to. Add-On Equipment
When carrying removable items, a limit
on how many people carried inside the
vehicle may be necessary. Be sure to
weigh the vehicle before buying and
installing the new equipment.
Starting and Operating
New Vehicle Break-In
Caution
The vehicle does not need an elaborate
break-in. But it will perform better in the
long run if you follow these guidelines:
.Do not drive at any one constant
speed, fast or slow, for the first
800 km (500 mi). Do not make
full-throttle starts. Avoid downshifting
to brake or slow the vehicle.
.Avoid making hard stops for the first
300 km (200 mi) or so. During this
time the new brake linings are not yet
broken in. Hard stops with new linings
can mean premature wear and earlier
(Continued)
Page 171 of 289

Chevrolet Express Owner Manual (GMNA-Localizing-U.S./Canada/Mexico-
15555951) - 2022 - CRC - 1/27/22
170 Driving and Operating
Operating the vehicle in Tow/Haul Mode
when lightly loaded or not towing will not
cause damage; however, it is not
recommended and may result in unpleasant
engine and transmission driving
characteristics and reduced fuel economy.
Trailer Sway Control (TSC)
Vehicles with StabiliTrak/Electronic Stability
Control (ESC) have a Trailer Sway Control
(TSC) feature. Trailer sway is unintended
side-to-side motion of a trailer while towing.
If the vehicle is towing a trailer and the TSC
detects that sway is increasing, the vehicle
brakes are selectively applied at each wheel,
to help reduce excessive trailer sway.
If TSC is enabled, the Traction Control
System (TCS)/StabiliTrak/ESC warning light
will flash on the instrument cluster. Reduce
vehicle speed by gradually removing your
foot from the accelerator. If trailer sway
continues, StabiliTrak/ESC can reduce engine
torque to help slow the vehicle. TSC will notfunction if StabiliTrak/ESC is turned off. See
Traction Control/Electronic Stability Control
0
142.
{Warning
Trailer sway can result in a crash and in
serious injury or death, even if the
vehicle is equipped with TSC.
If the trailer begins to sway, reduce
vehicle speed by gradually removing your
foot from the accelerator. Then pull over
to check the trailer and vehicle to help
correct possible causes, including an
improperly or overloaded trailer,
unrestrained cargo, improper trailer hitch
configuration, or improperly inflated or
incorrect vehicle or trailer tires. See
Towing Equipment 0167 for trailer
ratings and hitch setup recommendations.
Trailer Tires
Special Trailer (ST) tires differ from vehicle
tires. Trailer tires are designed with stiff
sidewalls to help prevent sway and to
support heavy loads. These features can
make it difficult to determine if the trailer
tire pressures are low only based on a visual
inspection. Always check all trailer tire pressures before
each trip when the tires are cool. Low trailer
tire pressure is a leading cause of trailer tire
blow-outs.
Trailer tires deteriorate over time. The trailer
tire sidewall will show the week and year
the tire was manufactured. Many trailer tire
manufacturers recommend replacing tires
more than six years old.
Overloading is another leading cause of
trailer tire blow-outs. Never load your trailer
with more weight than the tires are
designed to support. The load rating is
located on the trailer tire sidewall.
Always know the maximum speed rating for
the trailer tires before driving. This may be
significantly lower than the vehicle tire
speed rating. The speed rating may be on
the trailer tire sidewall. If the speed rating is
not shown, the default trailer tire speed
rating is 105 km/h (65 mph).
Page 209 of 289

Chevrolet Express Owner Manual (GMNA-Localizing-U.S./Canada/Mexico-
15555951) - 2022 - CRC - 1/27/22
208 Vehicle Care
(1) Light Truck (LT-Metric) Tire:The
United States version of a metric tire
sizing system. The letters LT as the first
two characters in the tire size mean a
light truck tire engineered to standards
set by the U.S. Tire and Rim
Association.
(2) Tire Width
:The 3-digit number
indicates the tire section width in
millimeters from sidewall to sidewall.
(3) Aspect Ratio
:A 2-digit number that
indicates the tire height-to-width
measurements. For example, if the tire
size aspect ratio is 75, as shown in item
3 of the light truck (LT-Metric) tire
illustration, it would mean that the
tire's sidewall is 75 percent as high as it
is wide.
(4) Construction Code
:A letter code is
used to indicate the type of ply
construction in the tire. The letter R
means radial ply construction; the
letter D means diagonal or bias ply
construction.
(5) Rim Diameter
:Diameter of the
wheel in inches. (6) Load Range
:Load Range.
(7) Service Description
:The service
description indicates the load index and
speed rating of a tire. If two numbers
are given as in the example, 120/116,
then this represents the load index for
single versus dual wheel usage (single/
dual). The speed rating is the maximum
speed a tire is certified to carry a load.
Tire Terminology and Definitions
Air Pressure:The amount of air inside
the tire pressing outward on each
square inch of the tire. Air pressure is
expressed in kPa (kilopascal) or psi
(pounds per square inch).
Accessory Weight
:The combined
weight of optional accessories. Some
examples of optional accessories are
automatic transmission, power
windows, power seats, and air
conditioning.
Aspect Ratio
:The relationship of a
tire's height to its width. Belt
:A rubber coated layer of cords
between the plies and the tread. Cords
may be made from steel or other
reinforcing materials.
Bead
:The tire bead contains steel
wires wrapped by steel cords that hold
the tire onto the rim.
Bias Ply Tire
:A pneumatic tire in which
the plies are laid at alternate angles
less than 90 degrees to the centerline
of the tread.
Cold Tire Pressure
:The amount of air
pressure in a tire, measured in kPa
(kilopascal) or psi (pounds per square
inch) before a tire has built up heat
from driving. See Tire Pressure0210.
Curb Weight
:The weight of a motor
vehicle with standard and optional
equipment including the maximum
capacity of fuel, oil, and coolant, but
without passengers and cargo.
DOT Markings
:A code molded into the
sidewall of a tire signifying that the tire
is in compliance with the U.S.
Department of Transportation (DOT)
Page 211 of 289
Chevrolet Express Owner Manual (GMNA-Localizing-U.S./Canada/Mexico-
15555951) - 2022 - CRC - 1/27/22
210 Vehicle Care
Traction:The friction between the tire
and the road surface. The amount of
grip provided.
Tread
:The portion of a tire that comes
into contact with the road.
Treadwear Indicators
:Narrow bands,
sometimes called wear bars, that show
across the tread of a tire when only
1.6 mm (1/16 in) of tread remains. See
When It Is Time for New Tires 0216.
UTQGS (Uniform Tire Quality Grading
Standards)
:A tire information system
that provides consumers with ratings
for a tire's traction, temperature, and
treadwear. Ratings are determined by
tire manufacturers using government
testing procedures. The ratings are
molded into the sidewall of the tire.
See Uniform Tire Quality Grading 0218.
Vehicle Capacity Weight
:The number
of designated seating positions
multiplied by 68 kg (150 lb) plus the
rated cargo load. See Vehicle Load
Limits 0126. Vehicle Maximum Load on the Tire
:
Load on an individual tire due to curb
weight, accessory weight, occupant
weight, and cargo weight.
Vehicle Placard
:A label permanently
attached to a vehicle showing the
vehicle capacity weight and the original
equipment tire size and recommended
inflation pressure. See “Tire and Loading
Information Label” underVehicle Load
Limits 0126.
Tire Pressure
Tires need the correct amount of air
pressure to operate effectively.
{Warning
Neither tire underinflation nor
overinflation is good. Underinflated
tires, or tires that do not have
enough air, can result in:
.Tire overloading and overheating,
which could lead to a blowout.
.Premature or irregular wear.
.Poor handling.
(Continued)
Warning (Continued)
.Reduced fuel economy.
Overinflated tires, or tires that have
too much air, can result in:
.Unusual wear.
.Poor handling.
.Rough ride.
.Needless damage from road
hazards.
The Tire and Loading Information label
on the vehicle indicates the original
equipment tires and the correct cold
tire inflation pressures. The
recommended pressure is the minimum
air pressure needed to support the
vehicle's maximum load carrying
capacity.
For additional information regarding
how much weight the vehicle can carry,
and an example of the Tire and Loading
Information label, see Vehicle Load
Limits 0126. How the vehicle is loaded
affects vehicle handling and ride
Page 212 of 289

Chevrolet Express Owner Manual (GMNA-Localizing-U.S./Canada/Mexico-
15555951) - 2022 - CRC - 1/27/22
Vehicle Care 211
comfort. Never load the vehicle with
more weight than it was designed to
carry.
When to Check
Check the pressure of the tires once a
month or more.
Do not forget the spare tire, if the
vehicle has one. SeeFull-Size Spare Tire
0 230 for additional information.
How to Check
Use a good quality pocket-type gauge
to check tire pressure. Proper tire
inflation cannot be determined by
looking at the tire. Check the tire
inflation pressure when the tires are
cold, meaning the vehicle has not been
driven for at least three hours or no
more than 1.6 km (1 mi).
Remove the valve cap from the tire
valve stem. Press the tire gauge firmly
onto the valve to get a pressure
measurement. If the cold tire inflation
pressure matches the recommended
pressure on the Tire and Loading
Information label, no further adjustment is necessary. If the inflation pressure is
low, add air until the recommended
pressure is reached. If the inflation
pressure is high, press on the metal
stem in the center of the tire valve to
release air.
Re-check the tire pressure with the tire
gauge.
Put the valve caps back on the valve
stems to keep out dirt and moisture.
Use only valve caps designed for the
vehicle by GM. TPMS sensors could be
damaged and would not be covered by
the vehicle warranty.
Tire Pressure Monitor System
The Tire Pressure Monitor System (TPMS)
uses radio and sensor technology to check
tire pressure levels. The TPMS sensors
monitor the air pressure in your tires and
transmit tire pressure readings to a receiver
located in the vehicle.
Each tire, including the spare (if provided),
should be checked monthly when cold and
inflated to the inflation pressure
recommended by the vehicle manufacturer
on the vehicle placard or tire inflation pressure label. (If your vehicle has tires of a
different size than the size indicated on the
vehicle placard or tire inflation pressure
label, you should determine the proper tire
inflation pressure for those tires.)
As an added safety feature, your vehicle has
been equipped with a tire pressure
monitoring system (TPMS) that illuminates a
low tire pressure telltale when one or more
of your tires is significantly under-inflated.
Accordingly, when the low tire pressure
telltale illuminates, you should stop and
check your tires as soon as possible, and
inflate them to the proper pressure. Driving
on a significantly under-inflated tire causes
the tire to overheat and can lead to tire
failure. Under-inflation also reduces fuel
efficiency and tire tread life, and may affect
the vehicle's handling and stopping ability.
Please note that the TPMS is not a
substitute for proper tire maintenance, and
it is the driver's responsibility to maintain
correct tire pressure, even if under-inflation
has not reached the level to trigger
illumination of the TPMS low tire pressure
telltale.
Your vehicle has also been equipped with a
TPMS malfunction indicator to indicate when
the system is not operating properly. The