heating CHEVROLET EXPRESS 2016 Owners Manual
[x] Cancel search | Manufacturer: CHEVROLET, Model Year: 2016, Model line: EXPRESS, Model: CHEVROLET EXPRESS 2016Pages: 289, PDF Size: 11.46 MB
Page 6 of 289

Chevrolet Express Owner Manual (GMNA-Localizing-U.S./Canada/Mexico-
15555951) - 2022 - CRC - 1/27/22
Introduction 5
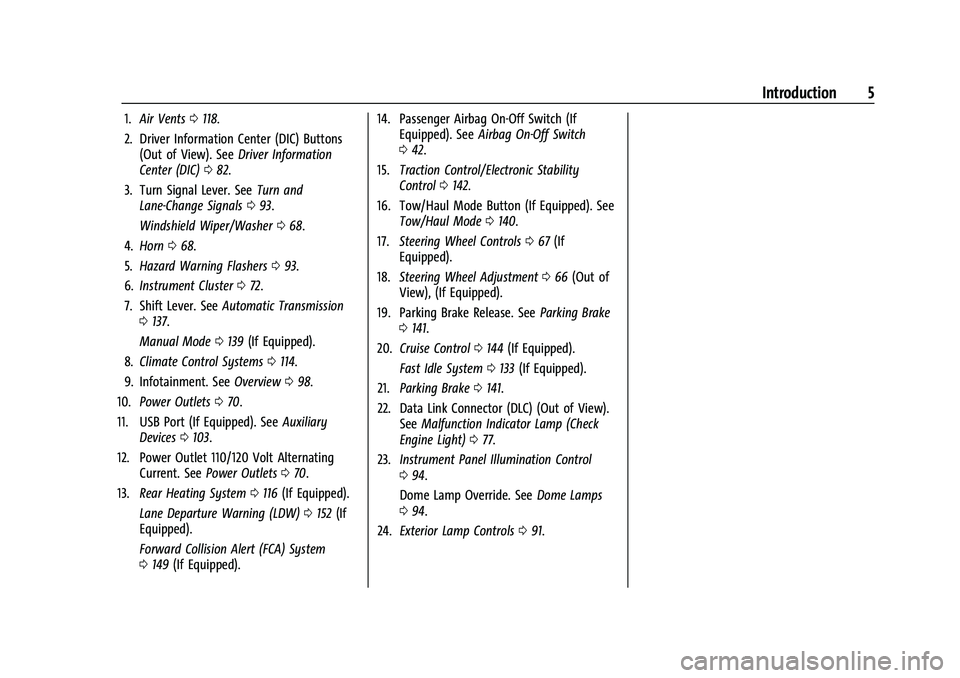
1.Air Vents 0118.
2. Driver Information Center (DIC) Buttons (Out of View). See Driver Information
Center (DIC) 082.
3. Turn Signal Lever. See Turn and
Lane-Change Signals 093.
Windshield Wiper/Washer 068.
4. Horn 068.
5. Hazard Warning Flashers 093.
6. Instrument Cluster 072.
7. Shift Lever. See Automatic Transmission
0 137.
Manual Mode 0139 (If Equipped).
8. Climate Control Systems 0114.
9. Infotainment. See Overview098.
10. Power Outlets 070.
11. USB Port (If Equipped). See Auxiliary
Devices 0103.
12. Power Outlet 110/120 Volt Alternating Current. See Power Outlets 070.
13. Rear Heating System 0116 (If Equipped).
Lane Departure Warning (LDW) 0152 (If
Equipped).
Forward Collision Alert (FCA) System
0 149 (If Equipped). 14. Passenger Airbag On-Off Switch (If
Equipped). See Airbag On-Off Switch
0 42.
15. Traction Control/Electronic Stability
Control 0142.
16. Tow/Haul Mode Button (If Equipped). See Tow/Haul Mode 0140.
17. Steering Wheel Controls 067 (If
Equipped).
18. Steering Wheel Adjustment 066 (Out of
View), (If Equipped).
19. Parking Brake Release. See Parking Brake
0 141.
20. Cruise Control 0144 (If Equipped).
Fast Idle System 0133 (If Equipped).
21. Parking Brake 0141.
22. Data Link Connector (DLC) (Out of View). SeeMalfunction Indicator Lamp (Check
Engine Light) 077.
23. Instrument Panel Illumination Control
094.
Dome Lamp Override. See Dome Lamps
0 94.
24. Exterior Lamp Controls 091.
Page 11 of 289

Chevrolet Express Owner Manual (GMNA-Localizing-U.S./Canada/Mexico-
15555951) - 2022 - CRC - 1/27/22
10 Keys, Doors, and Windows
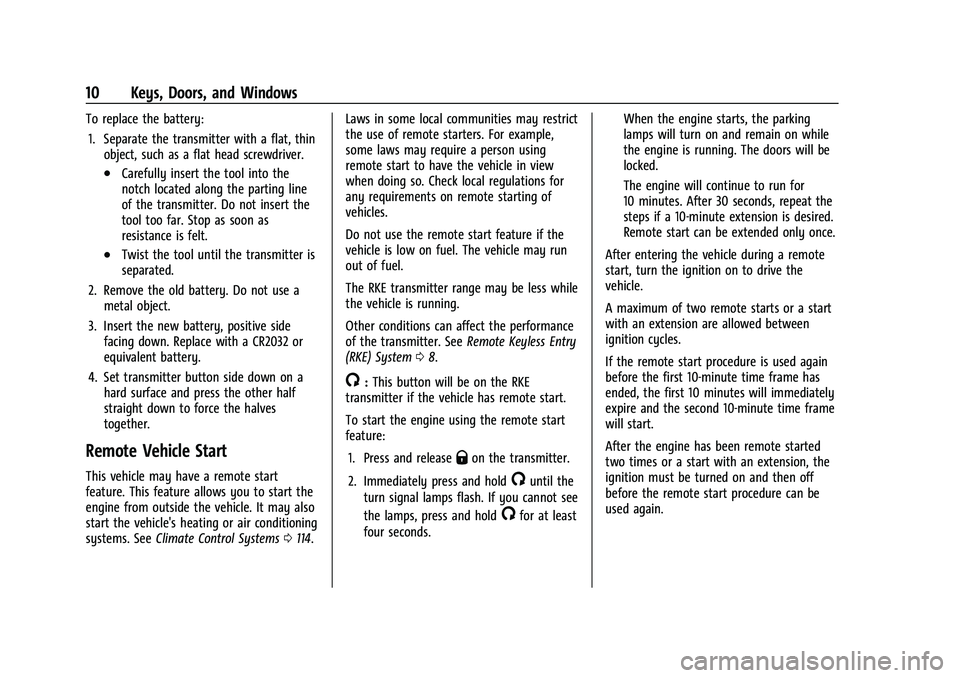
To replace the battery:1. Separate the transmitter with a flat, thin object, such as a flat head screwdriver.
.Carefully insert the tool into the
notch located along the parting line
of the transmitter. Do not insert the
tool too far. Stop as soon as
resistance is felt.
.Twist the tool until the transmitter is
separated.
2. Remove the old battery. Do not use a metal object.
3. Insert the new battery, positive side facing down. Replace with a CR2032 or
equivalent battery.
4. Set transmitter button side down on a hard surface and press the other half
straight down to force the halves
together.
Remote Vehicle Start
This vehicle may have a remote start
feature. This feature allows you to start the
engine from outside the vehicle. It may also
start the vehicle's heating or air conditioning
systems. See Climate Control Systems 0114. Laws in some local communities may restrict
the use of remote starters. For example,
some laws may require a person using
remote start to have the vehicle in view
when doing so. Check local regulations for
any requirements on remote starting of
vehicles.
Do not use the remote start feature if the
vehicle is low on fuel. The vehicle may run
out of fuel.
The RKE transmitter range may be less while
the vehicle is running.
Other conditions can affect the performance
of the transmitter. See
Remote Keyless Entry
(RKE) System 08.
/:This button will be on the RKE
transmitter if the vehicle has remote start.
To start the engine using the remote start
feature:
1. Press and release
Qon the transmitter.
2. Immediately press and hold
/until the
turn signal lamps flash. If you cannot see
the lamps, press and hold
/for at least
four seconds. When the engine starts, the parking
lamps will turn on and remain on while
the engine is running. The doors will be
locked.
The engine will continue to run for
10 minutes. After 30 seconds, repeat the
steps if a 10-minute extension is desired.
Remote start can be extended only once.
After entering the vehicle during a remote
start, turn the ignition on to drive the
vehicle.
A maximum of two remote starts or a start
with an extension are allowed between
ignition cycles.
If the remote start procedure is used again
before the first 10-minute time frame has
ended, the first 10 minutes will immediately
expire and the second 10-minute time frame
will start.
After the engine has been remote started
two times or a start with an extension, the
ignition must be turned on and then off
before the remote start procedure can be
used again.
Page 72 of 289

Chevrolet Express Owner Manual (GMNA-Localizing-U.S./Canada/Mexico-
15555951) - 2022 - CRC - 1/27/22
Instruments and Controls 71
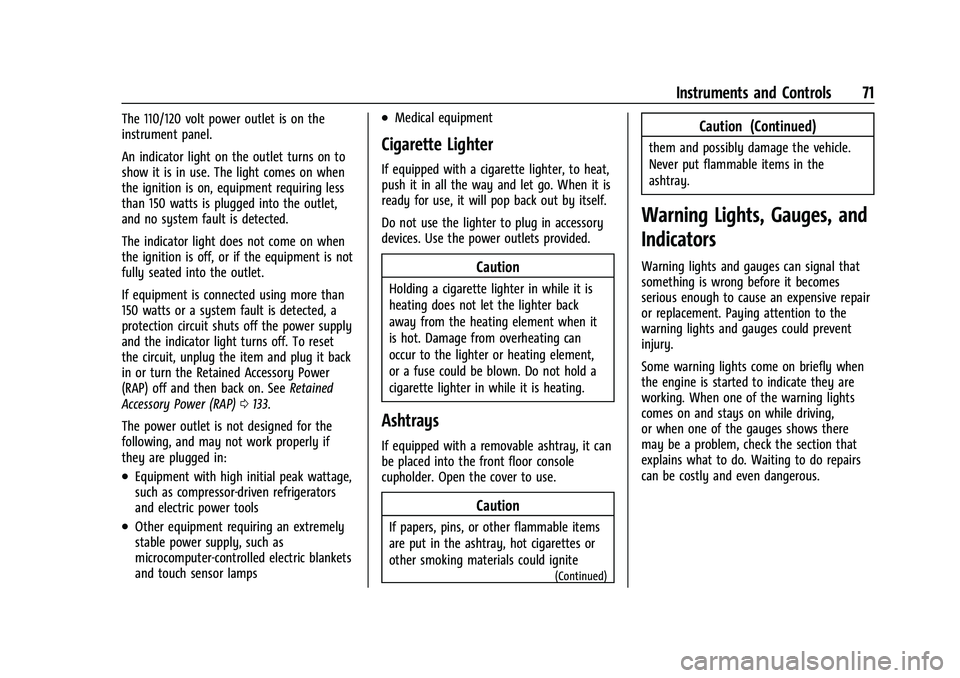
The 110/120 volt power outlet is on the
instrument panel.
An indicator light on the outlet turns on to
show it is in use. The light comes on when
the ignition is on, equipment requiring less
than 150 watts is plugged into the outlet,
and no system fault is detected.
The indicator light does not come on when
the ignition is off, or if the equipment is not
fully seated into the outlet.
If equipment is connected using more than
150 watts or a system fault is detected, a
protection circuit shuts off the power supply
and the indicator light turns off. To reset
the circuit, unplug the item and plug it back
in or turn the Retained Accessory Power
(RAP) off and then back on. SeeRetained
Accessory Power (RAP) 0133.
The power outlet is not designed for the
following, and may not work properly if
they are plugged in:
.Equipment with high initial peak wattage,
such as compressor-driven refrigerators
and electric power tools
.Other equipment requiring an extremely
stable power supply, such as
microcomputer-controlled electric blankets
and touch sensor lamps
.Medical equipment
Cigarette Lighter
If equipped with a cigarette lighter, to heat,
push it in all the way and let go. When it is
ready for use, it will pop back out by itself.
Do not use the lighter to plug in accessory
devices. Use the power outlets provided.
Caution
Holding a cigarette lighter in while it is
heating does not let the lighter back
away from the heating element when it
is hot. Damage from overheating can
occur to the lighter or heating element,
or a fuse could be blown. Do not hold a
cigarette lighter in while it is heating.
Ashtrays
If equipped with a removable ashtray, it can
be placed into the front floor console
cupholder. Open the cover to use.
Caution
If papers, pins, or other flammable items
are put in the ashtray, hot cigarettes or
other smoking materials could ignite
(Continued)
Caution (Continued)
them and possibly damage the vehicle.
Never put flammable items in the
ashtray.
Warning Lights, Gauges, and
Indicators
Warning lights and gauges can signal that
something is wrong before it becomes
serious enough to cause an expensive repair
or replacement. Paying attention to the
warning lights and gauges could prevent
injury.
Some warning lights come on briefly when
the engine is started to indicate they are
working. When one of the warning lights
comes on and stays on while driving,
or when one of the gauges shows there
may be a problem, check the section that
explains what to do. Waiting to do repairs
can be costly and even dangerous.
Page 75 of 289

Chevrolet Express Owner Manual (GMNA-Localizing-U.S./Canada/Mexico-
15555951) - 2022 - CRC - 1/27/22
74 Instruments and Controls
Caution
Lack of proper engine oil maintenance
can damage the engine. Driving with the
engine oil low can also damage the
engine. The repairs would not be covered
by the vehicle warranty. Check the oil
level as soon as possible. Add oil if
required, but if the oil level is within the
operating range and the oil pressure is
still low, have the vehicle serviced.
Always follow the maintenance schedule
for changing engine oil.
Engine Coolant Temperature
Gauge
Metric
EnglishThis gauge shows the engine coolant
temperature.
It also provides an indicator of how hard the
vehicle is working. During a majority of the
operation, the gauge will read 100 °C (210 °F)
or less. If the vehicle is pulling a load or
going up hills, it is normal for the
temperature to fluctuate and approach the
122 °C (250 °F) mark. If the gauge reaches
the 125 °C (260 °F) mark, it indicates that the
cooling system is working beyond its
capacity.
See
Engine Overheating 0187.
Voltmeter Gauge
Page 115 of 289

Chevrolet Express Owner Manual (GMNA-Localizing-U.S./Canada/Mexico-
15555951) - 2022 - CRC - 1/27/22
114 Climate Controls
Climate Controls
Climate Control Systems
Climate Control Systems . . . . . . . . . . . . . . . 114
Rear Heating System . . . . . . . . . . . . . . . . . . 116
Rear Climate Control System . . . . . . . . . . . 116
Air Vents
Air Vents . . . . . . . . . . . . . . . . . . . . . . . . . . . . . . 118
Maintenance
Service . . . . . . . . . . . . . . . . . . . . . . . . . . . . . . . . . 119
Climate Control Systems
The heating, cooling, and ventilation for the vehicle can be controlled with this system.
Vehicles without Air Conditioning
1. Fan Control
2. Temperature Control
3. Air Delivery Mode Control
9: Turn the knob clockwise or
counterclockwise to increase or decrease the
fan speed.
9: Turns the system off. Temperature Control :
Turn the knob
clockwise or counterclockwise to increase or
decrease the temperature inside the vehicle.
Air Delivery Mode Control : Turn the knob
clockwise or counterclockwise to change the
current airflow mode.H: Air is directed to the instrument panel
outlets.
Page 117 of 289

Chevrolet Express Owner Manual (GMNA-Localizing-U.S./Canada/Mexico-
15555951) - 2022 - CRC - 1/27/22
116 Climate Controls
Heated Mirrors: If equipped with heated
outside mirrors, the mirrors heat to help
clear fog or frost from the surface of the
mirror when
1is pressed. SeeHeated
Mirrors 018.
Do not drive the vehicle until all the
windows are clear.
Caution
Do not use a razor blade or sharp object
to clear the inside rear window. Do not
adhere anything to the defogger grid
lines in the rear glass. These actions may
damage the rear defogger. Repairs would
not be covered by the vehicle warranty.
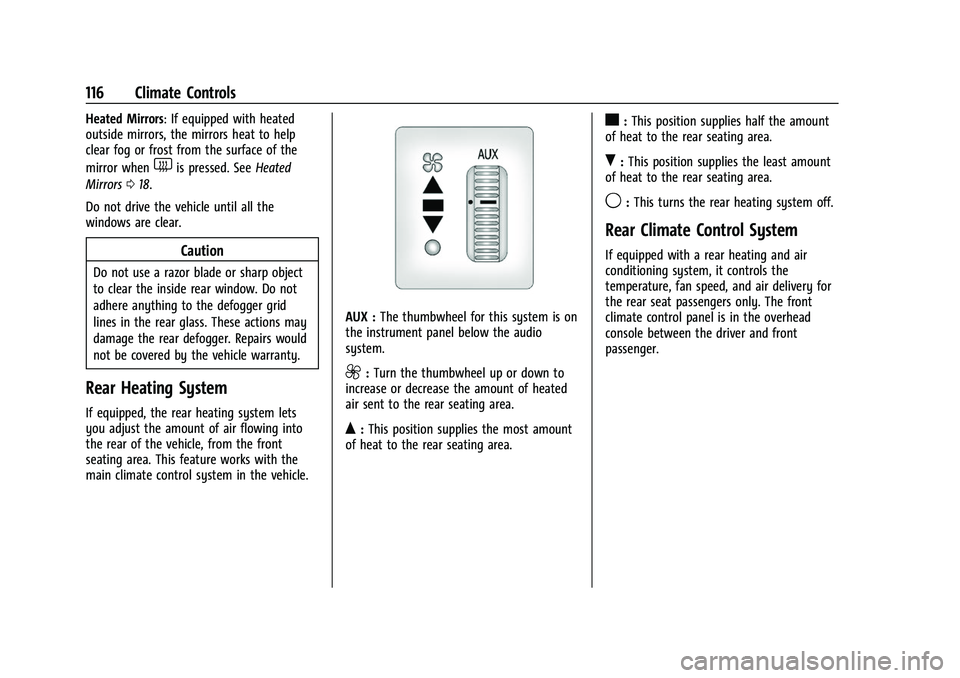
Rear Heating System
If equipped, the rear heating system lets
you adjust the amount of air flowing into
the rear of the vehicle, from the front
seating area. This feature works with the
main climate control system in the vehicle.
AUX : The thumbwheel for this system is on
the instrument panel below the audio
system.
9: Turn the thumbwheel up or down to
increase or decrease the amount of heated
air sent to the rear seating area.
Q: This position supplies the most amount
of heat to the rear seating area.
c: This position supplies half the amount
of heat to the rear seating area.
R: This position supplies the least amount
of heat to the rear seating area.
9: This turns the rear heating system off.
Rear Climate Control System
If equipped with a rear heating and air
conditioning system, it controls the
temperature, fan speed, and air delivery for
the rear seat passengers only. The front
climate control panel is in the overhead
console between the driver and front
passenger.
Page 126 of 289

Chevrolet Express Owner Manual (GMNA-Localizing-U.S./Canada/Mexico-
15555951) - 2022 - CRC - 1/27/22
Driving and Operating 125
{Warning
Using the brakes to slow the vehicle on a
long downhill slope can cause brake
overheating, can reduce brake
performance, and could result in a loss of
braking. Shift the transmission to a lower
gear to let the engine assist the brakes
on a steep downhill slope.
{Warning
Coasting downhill in N (Neutral) or with
the ignition off is dangerous. This can
cause overheating of the brakes and loss
of steering assist. Always have the engine
running and the vehicle in gear.
.Drive at speeds that keep the vehicle in
its own lane. Do not swing wide or cross
the center line.
.Be alert on top of hills; something could
be in your lane (e.g., stalled car, crash).
.Pay attention to special road signs (e.g.,
falling rocks area, winding roads, long
grades, passing or no-passing zones) and
take appropriate action.
Winter Driving
Driving on Snow or IceCaution
To avoid damage to the wheels and
brake components, always clear snow and
ice from inside the wheels and
underneath the vehicle before driving.
Snow or ice between the tires and the road
creates less traction or grip, so drive
carefully. Wet ice can occur at about 0 °C
(32 °F) when freezing rain begins to fall.
Avoid driving on wet ice or in freezing rain
until roads can be treated.
For Slippery Road Driving:
.Accelerate gently. Accelerating too quickly
causes the wheels to spin and makes the
surface under the tires slick.
.Turn on Traction Control. See Traction
Control/Electronic Stability Control 0142.
.The Antilock Brake System (ABS) improves
vehicle stability during hard stops, but
the brakes should be applied sooner than
when on dry pavement. See Antilock
Brake System (ABS) 0141.
.Allow greater following distance and
watch for slippery spots. Icy patches can
occur on otherwise clear roads in shaded
areas. The surface of a curve or an
overpass can remain icy when the
surrounding roads are clear. Avoid sudden
steering maneuvers and braking while
on ice.
.Turn off cruise control.
Blizzard Conditions
Stop the vehicle in a safe place and signal
for help. Stay with the vehicle unless there
is help nearby. To get help and keep
everyone in the vehicle safe:
.Turn on the hazard warning flashers.
.Tie a red cloth to an outside mirror.
{Warning
Snow can trap engine exhaust under the
vehicle. This may cause exhaust gases to
get inside. Engine exhaust contains
carbon monoxide (CO), which cannot be
seen or smelled. It can cause
unconsciousness and even death.
(Continued)
Page 135 of 289

Chevrolet Express Owner Manual (GMNA-Localizing-U.S./Canada/Mexico-
15555951) - 2022 - CRC - 1/27/22
134 Driving and Operating
Warning (Continued)
personal injury may result. Always park
the vehicle in a clear open area away
from buildings or structures.
The engine coolant heater can provide easier
starting and better fuel economy during
engine warm-up in cold weather conditions
at or below −18 °C (0 °F). Vehicles with an
engine coolant heater should be plugged in
at least four hours before starting.
An internal thermostat in the plug end of
the cord may exist which will prevent
engine coolant heater operation at
temperatures above −18 °C (0 °F).
To Use the Engine Coolant Heater
1. Turn off the engine.
2. Open the hood and unwrap the
electrical cord.
The cord for the engine coolant heater is
on the driver side of the engine
compartment.
Check the heater cord for damage. If it is
damaged, do not use it. See your dealer
for a replacement. Inspect the cord for
damage yearly.
3. Plug it into a normal, grounded 110-volt AC outlet.
{Warning
Improper use of the heater cord or an
extension cord can damage the cord and
may result in overheating and fire.
.Plug the cord into a three-prong
electrical utility receptacle that is
protected by a ground fault detection
function. An ungrounded outlet could
cause an electric shock.
.Use a weatherproof, heavy-duty,
15 amp-rated extension cord if needed.
Failure to use the recommended
extension cord in good operating
condition, or using a damaged heater
(Continued)
Page 159 of 289

Chevrolet Express Owner Manual (GMNA-Localizing-U.S./Canada/Mexico-
15555951) - 2022 - CRC - 1/27/22
158 Driving and Operating
Make wider turns than normal when towing,
so trailer will not go over soft shoulders,
over curbs, or strike road signs, trees,
or other objects. Always signal turns well in
advance. Do not steer or brake suddenly.
Driving on Grades
Reduce speed and shift to a lower gear
before starting down a long or steep
downhill grade. If the transmission is not
shifted down, the brakes may overheat and
result in reduced braking efficiency.
The vehicle can tow in D (Drive). Shift the
transmission to a lower gear if the
transmission shifts too often under heavy
loads and/or hilly conditions.
When towing at higher altitudes, engine
coolant will boil at a lower temperature
than at lower altitudes. If the engine is
turned off immediately after towing at high
altitude on steep uphill grades, the vehicle
could show signs similar to engine
overheating. To avoid this, let the engine
run, preferably on level ground, with the
transmission in P (Park) for a few minutes
before turning the engine off. If the
overheat warning comes on, seeEngine
Overheating 0187.
Parking on Hills
{Warning
To prevent serious injury or death,
always park your vehicle and trailer on a
level surface when possible.
When parking your vehicle and your trailer
on a hill: 1. Press the brake pedal, but do not shift into P (Park) yet. Turn the wheels into
the curb if facing downhill or into traffic
if facing uphill.
2. Have someone place chocks under the trailer wheels.
3. When the wheel chocks are in place, gradually release the brake pedal to
allow the chocks to absorb the load of
the trailer.
4. Reapply the brake pedal. Then apply the parking brake and shift into P (Park).
5. Release the brake pedal.
Leaving After Parking on a Hill
1. Apply and hold the brake pedal.
.Start the engine.
.Shift into a gear.
.Release the parking brake. 2. Let up on the brake pedal.
3. Drive slowly until the trailer is clear of
the chocks.
4. Stop and have someone pick up and store the chocks
Launching and Retrieving a Boat
Backing the Trailer into the Water
{Warning
.Have all passengers get out of the
vehicle before backing onto the sloped
part of the ramp. Lower the driver and
passenger side windows before
backing onto the ramp. This will
provide a means of escape in the
unlikely event the vehicle slides into
the water.
.If the boat launch surface is slippery,
have the driver remain in the vehicle
with the brake pedal applied while the
boat is being launched. The boat
launch can be especially slippery at
low tide when part of the ramp was
previously submerged at high tide. Do
not back onto the ramp to launch the
boat if you are not sure the vehicle
can maintain traction.
(Continued)
Page 160 of 289

Chevrolet Express Owner Manual (GMNA-Localizing-U.S./Canada/Mexico-
15555951) - 2022 - CRC - 1/27/22
Driving and Operating 159
Warning (Continued)
.Do not move the vehicle if someone is
in the path of the trailer. Some parts
of the trailer might be underwater and
not visible to people who are assisting
in launching the boat.
Disconnect the wiring to the trailer before
backing the trailer into the water to prevent
damage to the electrical circuits on the
trailer. Reconnect the wiring to the trailer
after removing the trailer from the water.
If the trailer has electric brakes that can
function when the trailer is submerged, it
might help to leave the electrical trailer
connector attached to maintain trailer brake
functionality while on the boat ramp.
To back the trailer into the water: 1. Slowly back down the boat ramp until the boat is floating, but no further than
necessary.
2. Press and hold the brake pedal, but do not shift into P (Park) yet.
3. Have someone place chocks under the front wheels of the vehicle.
4. Gradually release the brake pedal to allow the chocks to absorb the load of
the trailer. 5. Reapply the brake pedal. Then apply the
parking brake and shift into P (Park).
6. Release the brake pedal.
Pulling the Trailer from the Water
To pull the trailer from the water: 1. Press and hold the brake pedal.
2. Start the engine and shift into a gear.
3. Release the parking brake.
4. Let up on the brake pedal.
5. Drive slowly until the tires are clear of the chocks.
6. Stop and have someone pick up and store the chocks.
7. Slowly pull the trailer from the water.
Caution
If the vehicle tires begin to spin and the
vehicle begins to slide toward the water,
remove your foot from the accelerator
pedal and apply the brake pedal. Seek
help to have the vehicle towed up
the ramp.
Maintenance when Trailer Towing
The vehicle needs service more often when
used to tow trailers. See Maintenance
Schedule 0245. It is especially important to
check the automatic transmission fluid,
engine oil, axle lubricant, belts, cooling
system, and brake system before and during
each trip.
Check periodically that all nuts and bolts on
the trailer hitch are tight.
Engine Cooling when Trailer Towing
The cooling system may temporarily
overheat during severe operating conditions.
See Engine Overheating 0187.
Trailer Towing
If equipped with a diesel engine, see the
Duramax diesel supplement.
Caution
Towing a trailer improperly can damage
the vehicle and result in costly repairs
not covered by the vehicle warranty. To
tow a trailer correctly, follow the
directions in this section and see your
dealer for important information about
towing a trailer with the vehicle.