tire pressure CHEVROLET EXPRESS 2016 Owners Manual
[x] Cancel search | Manufacturer: CHEVROLET, Model Year: 2016, Model line: EXPRESS, Model: CHEVROLET EXPRESS 2016Pages: 289, PDF Size: 11.46 MB
Page 4 of 289
Chevrolet Express Owner Manual (GMNA-Localizing-U.S./Canada/Mexico-
15555951) - 2022 - CRC - 1/27/22
Introduction 3
Q:Keep Fuse Block Covers Properly
Installed
|: Lane Change Alert
@:Lane Departure Warning
A:Lane Keep Assist
*: Malfunction Indicator Lamp
::Oil Pressure
X:Park Assist
~:Pedestrian Ahead Indicator
O:Power
7:Rear Cross Traffic Alert
I:Registered Technician
/:Remote Vehicle Start
h:Risk of Electrical Fire
>:Seat Belt Reminders
I:Side Blind Zone Alert
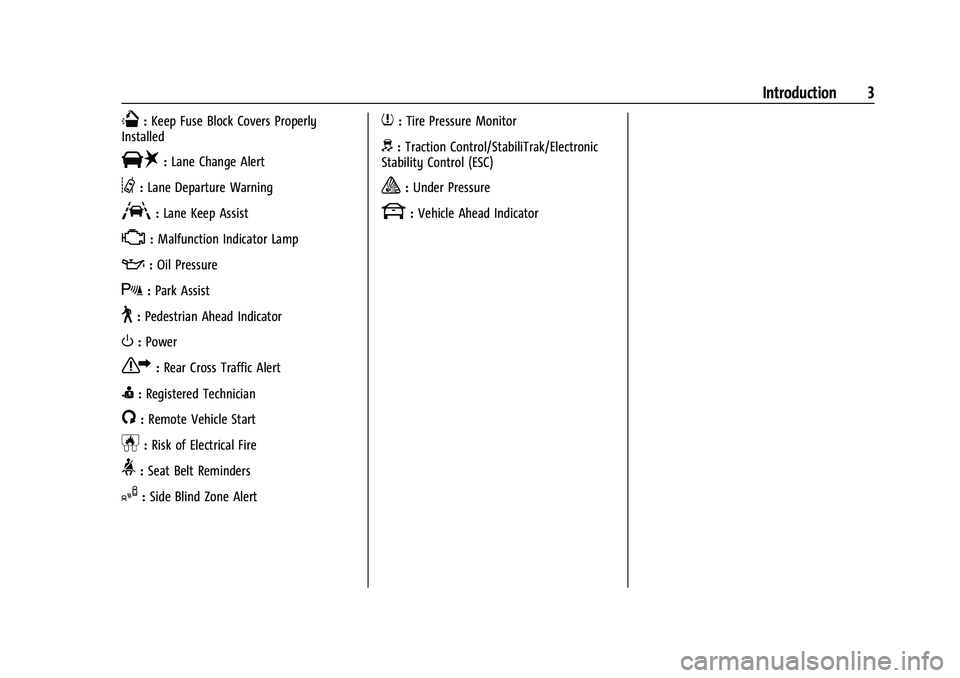
7:Tire Pressure Monitor
d:Traction Control/StabiliTrak/Electronic
Stability Control (ESC)
a: Under Pressure
k: Vehicle Ahead Indicator
Page 67 of 289
Chevrolet Express Owner Manual (GMNA-Localizing-U.S./Canada/Mexico-
15555951) - 2022 - CRC - 1/27/22
66 Instruments and Controls
Instruments and Controls
Controls
Steering Wheel Adjustment . . . . . . . . . . . . 66
Steering Wheel Controls . . . . . . . . . . . . . . . . 67
Horn . . . . . . . . . . . . . . . . . . . . . . . . . . . . . . . . . . . 68
Windshield Wiper/Washer . . . . . . . . . . . . . 68
Compass . . . . . . . . . . . . . . . . . . . . . . . . . . . . . . . 68
Clock . . . . . . . . . . . . . . . . . . . . . . . . . . . . . . . . . . . 70
Power Outlets . . . . . . . . . . . . . . . . . . . . . . . . . . 70
Cigarette Lighter . . . . . . . . . . . . . . . . . . . . . . . . 71
Ashtrays . . . . . . . . . . . . . . . . . . . . . . . . . . . . . . . . 71
Warning Lights, Gauges, and Indicators
Warning Lights, Gauges, andIndicators . . . . . . . . . . . . . . . . . . . . . . . . . . . . . 71
Instrument Cluster . . . . . . . . . . . . . . . . . . . . . . 72
Speedometer . . . . . . . . . . . . . . . . . . . . . . . . . . . 72
Odometer . . . . . . . . . . . . . . . . . . . . . . . . . . . . . . 72
Trip Odometer . . . . . . . . . . . . . . . . . . . . . . . . . . 72
Fuel Gauge . . . . . . . . . . . . . . . . . . . . . . . . . . . . . 72
Engine Oil Pressure Gauge . . . . . . . . . . . . . . 73
Engine Coolant Temperature Gauge . . . . 74
Voltmeter Gauge . . . . . . . . . . . . . . . . . . . . . . . 74
Seat Belt Reminders . . . . . . . . . . . . . . . . . . . . 75
Airbag Readiness Light . . . . . . . . . . . . . . . . . . 75
Airbag On-Off Light . . . . . . . . . . . . . . . . . . . . . 76
Charging System Light . . . . . . . . . . . . . . . . . . 77
Malfunction Indicator Lamp (Check Engine Light) . . . . . . . . . . . . . . . . . . . . . . . . . . 77 Brake System Warning Light . . . . . . . . . . . 78
Antilock Brake System (ABS) Warning
Light . . . . . . . . . . . . . . . . . . . . . . . . . . . . . . . . . . 79
Tow/Haul Mode Light . . . . . . . . . . . . . . . . . . 79
Lane Departure Warning (LDW) Light . . . 79
Vehicle Ahead Indicator . . . . . . . . . . . . . . . . 80
StabiliTrak OFF Light . . . . . . . . . . . . . . . . . . . 80
Traction Control System (TCS)/StabiliTrak Light . . . . . . . . . . . . . . . . . . . . . . . . . . . . . . . . . 80
Tire Pressure Light . . . . . . . . . . . . . . . . . . . . . 80
Engine Oil Pressure Light . . . . . . . . . . . . . . . 81
Low Fuel Warning Light . . . . . . . . . . . . . . . . 81
Security Light . . . . . . . . . . . . . . . . . . . . . . . . . . 82
High-Beam On Light . . . . . . . . . . . . . . . . . . . . 82
Cruise Control Light . . . . . . . . . . . . . . . . . . . . 82
Information Displays
Driver Information Center (DIC) . . . . . . . . . 82
Vehicle Messages
Vehicle Messages . . . . . . . . . . . . . . . . . . . . . . 86
Engine Power Messages . . . . . . . . . . . . . . . . 86
Vehicle Speed Messages . . . . . . . . . . . . . . . . 87
Vehicle Personalization
Vehicle Personalization . . . . . . . . . . . . . . . . . 87
Controls
Steering Wheel Adjustment
For vehicles with a tilt steering wheel, the
lever is located on the left side of the
steering column.
To adjust the steering wheel:
1. Pull the lever to move the steering wheel up or down into a comfortable
position.
2. Release the lever to lock the steering wheel in place.
Do not adjust the steering wheel while
driving.
Page 81 of 289
Chevrolet Express Owner Manual (GMNA-Localizing-U.S./Canada/Mexico-
15555951) - 2022 - CRC - 1/27/22
80 Instruments and Controls
This light changes to amber and flashes to
indicate that the lane marking has been
crossed without using a turn signal in that
direction.
SeeLane Departure Warning (LDW) 0152.
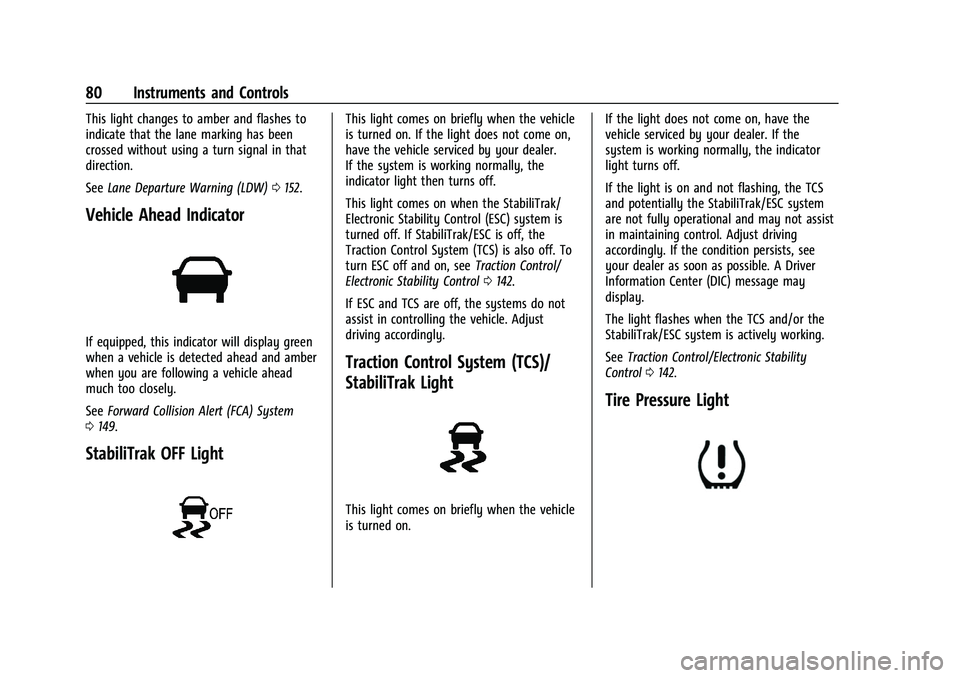
Vehicle Ahead Indicator
If equipped, this indicator will display green
when a vehicle is detected ahead and amber
when you are following a vehicle ahead
much too closely.
See Forward Collision Alert (FCA) System
0 149.
StabiliTrak OFF Light
This light comes on briefly when the vehicle
is turned on. If the light does not come on,
have the vehicle serviced by your dealer.
If the system is working normally, the
indicator light then turns off.
This light comes on when the StabiliTrak/
Electronic Stability Control (ESC) system is
turned off. If StabiliTrak/ESC is off, the
Traction Control System (TCS) is also off. To
turn ESC off and on, see Traction Control/
Electronic Stability Control 0142.
If ESC and TCS are off, the systems do not
assist in controlling the vehicle. Adjust
driving accordingly.
Traction Control System (TCS)/
StabiliTrak Light
This light comes on briefly when the vehicle
is turned on. If the light does not come on, have the
vehicle serviced by your dealer. If the
system is working normally, the indicator
light turns off.
If the light is on and not flashing, the TCS
and potentially the StabiliTrak/ESC system
are not fully operational and may not assist
in maintaining control. Adjust driving
accordingly. If the condition persists, see
your dealer as soon as possible. A Driver
Information Center (DIC) message may
display.
The light flashes when the TCS and/or the
StabiliTrak/ESC system is actively working.
See
Traction Control/Electronic Stability
Control 0142.
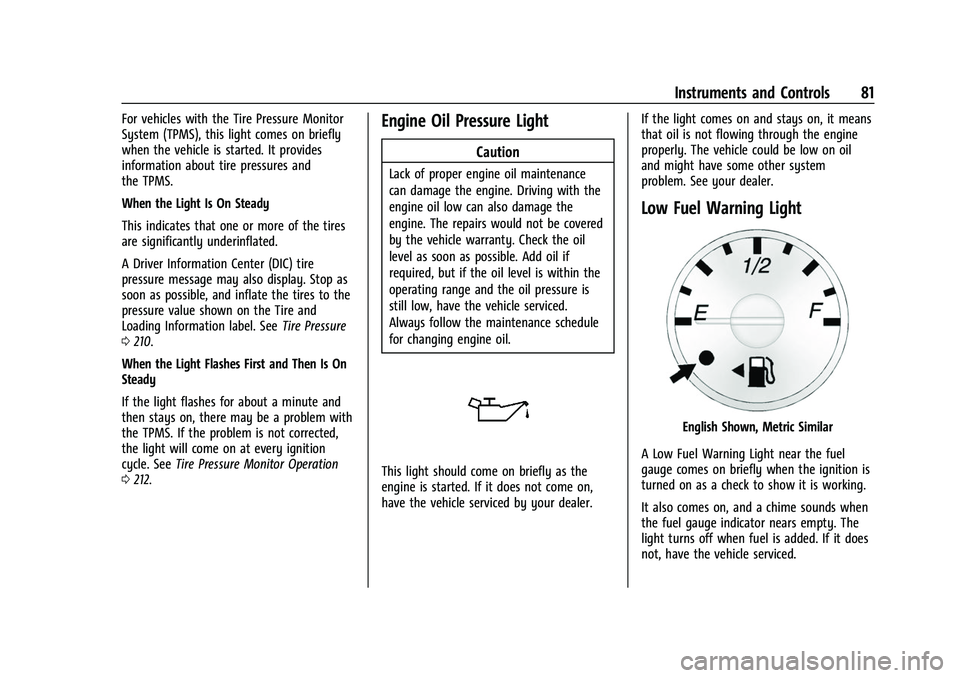
Tire Pressure Light
Page 82 of 289
Chevrolet Express Owner Manual (GMNA-Localizing-U.S./Canada/Mexico-
15555951) - 2022 - CRC - 1/27/22
Instruments and Controls 81
For vehicles with the Tire Pressure Monitor
System (TPMS), this light comes on briefly
when the vehicle is started. It provides
information about tire pressures and
the TPMS.
When the Light Is On Steady
This indicates that one or more of the tires
are significantly underinflated.
A Driver Information Center (DIC) tire
pressure message may also display. Stop as
soon as possible, and inflate the tires to the
pressure value shown on the Tire and
Loading Information label. SeeTire Pressure
0 210.
When the Light Flashes First and Then Is On
Steady
If the light flashes for about a minute and
then stays on, there may be a problem with
the TPMS. If the problem is not corrected,
the light will come on at every ignition
cycle. See Tire Pressure Monitor Operation
0 212.Engine Oil Pressure Light
Caution
Lack of proper engine oil maintenance
can damage the engine. Driving with the
engine oil low can also damage the
engine. The repairs would not be covered
by the vehicle warranty. Check the oil
level as soon as possible. Add oil if
required, but if the oil level is within the
operating range and the oil pressure is
still low, have the vehicle serviced.
Always follow the maintenance schedule
for changing engine oil.
This light should come on briefly as the
engine is started. If it does not come on,
have the vehicle serviced by your dealer. If the light comes on and stays on, it means
that oil is not flowing through the engine
properly. The vehicle could be low on oil
and might have some other system
problem. See your dealer.
Low Fuel Warning Light
English Shown, Metric Similar
A Low Fuel Warning Light near the fuel
gauge comes on briefly when the ignition is
turned on as a check to show it is working.
It also comes on, and a chime sounds when
the fuel gauge indicator nears empty. The
light turns off when fuel is added. If it does
not, have the vehicle serviced.
Page 84 of 289
Chevrolet Express Owner Manual (GMNA-Localizing-U.S./Canada/Mexico-
15555951) - 2022 - CRC - 1/27/22
Instruments and Controls 83
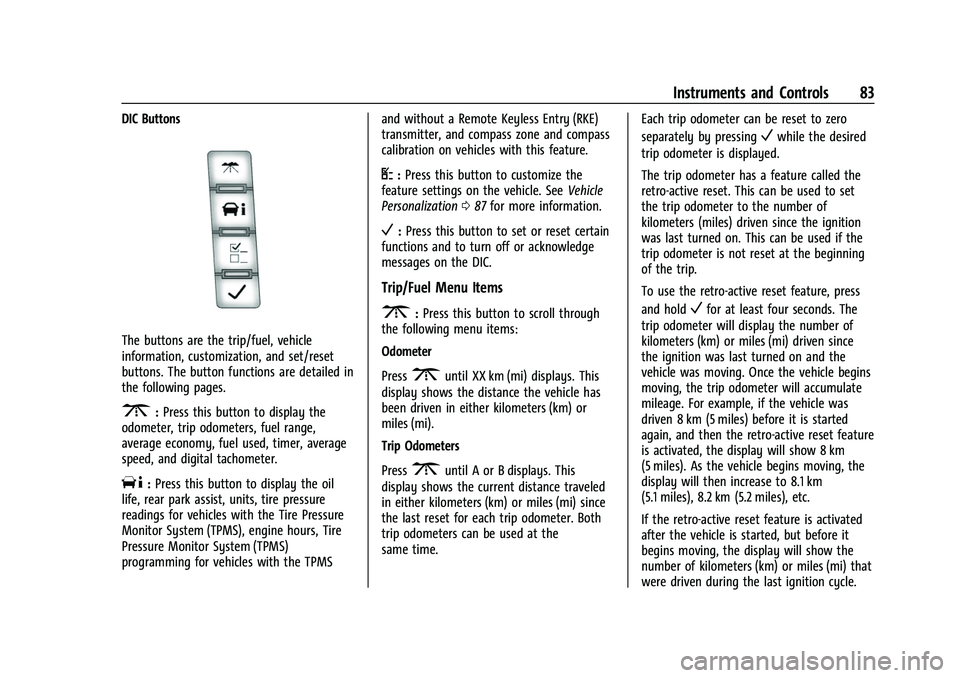
DIC Buttons
The buttons are the trip/fuel, vehicle
information, customization, and set/reset
buttons. The button functions are detailed in
the following pages.
3:Press this button to display the
odometer, trip odometers, fuel range,
average economy, fuel used, timer, average
speed, and digital tachometer.
T: Press this button to display the oil
life, rear park assist, units, tire pressure
readings for vehicles with the Tire Pressure
Monitor System (TPMS), engine hours, Tire
Pressure Monitor System (TPMS)
programming for vehicles with the TPMS and without a Remote Keyless Entry (RKE)
transmitter, and compass zone and compass
calibration on vehicles with this feature.
U:
Press this button to customize the
feature settings on the vehicle. See Vehicle
Personalization 087 for more information.
V:Press this button to set or reset certain
functions and to turn off or acknowledge
messages on the DIC.
Trip/Fuel Menu Items
3: Press this button to scroll through
the following menu items:
Odometer
Press
3until XX km (mi) displays. This
display shows the distance the vehicle has
been driven in either kilometers (km) or
miles (mi).
Trip Odometers
Press
3until A or B displays. This
display shows the current distance traveled
in either kilometers (km) or miles (mi) since
the last reset for each trip odometer. Both
trip odometers can be used at the
same time. Each trip odometer can be reset to zero
separately by pressing
Vwhile the desired
trip odometer is displayed.
The trip odometer has a feature called the
retro-active reset. This can be used to set
the trip odometer to the number of
kilometers (miles) driven since the ignition
was last turned on. This can be used if the
trip odometer is not reset at the beginning
of the trip.
To use the retro-active reset feature, press
and hold
Vfor at least four seconds. The
trip odometer will display the number of
kilometers (km) or miles (mi) driven since
the ignition was last turned on and the
vehicle was moving. Once the vehicle begins
moving, the trip odometer will accumulate
mileage. For example, if the vehicle was
driven 8 km (5 miles) before it is started
again, and then the retro-active reset feature
is activated, the display will show 8 km
(5 miles). As the vehicle begins moving, the
display will then increase to 8.1 km
(5.1 miles), 8.2 km (5.2 miles), etc.
If the retro-active reset feature is activated
after the vehicle is started, but before it
begins moving, the display will show the
number of kilometers (km) or miles (mi) that
were driven during the last ignition cycle.
Page 86 of 289
Chevrolet Express Owner Manual (GMNA-Localizing-U.S./Canada/Mexico-
15555951) - 2022 - CRC - 1/27/22
Instruments and Controls 85
of the current oil life remains. The engine oil
life system will alert you to change the oil
on a schedule consistent with your driving
conditions.
When the remaining oil life is low, the
CHANGE ENGINE OIL SOON message will
appear on the display. You should change
the oil as soon as possible. SeeEngine Oil
0 179. In addition to the engine oil life
system monitoring the oil life, additional
maintenance is recommended. See
Maintenance Schedule 0245.
Remember, you must reset the OIL LIFE
yourself after each oil change. It will not
reset itself. Also, be careful not to reset the
OIL LIFE accidentally at any time other than
when the oil has just been changed.
It cannot be reset accurately until the next
oil change. To reset the engine oil life
system, see Engine Oil Life System 0181.
Side Blind Zone Alert
If the vehicle has Side Blind Zone Alert
(SBZA), this display allows the system to be
turned on or off. Press
Tuntil SBZA
displays. Once in this display, press
Vto
select between ON or OFF. When the SBZA system is turned off, a DIC message will
display. See
Side Blind Zone Alert (SBZA)
0 150.
Park Assist
If the vehicle has the Rear Park Assist (RPA)
system, press
Tuntil PARK ASSIST
displays. This display allows the system to
be turned on or off. Once in this display,
press to select between ON or OFF. The RPA
system automatically turns back on after
each vehicle start. When the RPA system is
turned off and the vehicle is shifted out of
P (Park), the DIC will display the PARK
ASSIST OFF message as a reminder that the
system has been turned off. See Park Assist
0 148.
Units
Press
Tuntil UNITS displays. This display
allows you to select between metric or
English units of measurement. Once in this
display, press
Vto select between METRIC
or ENGLISH units. Tire Pressure
If the vehicle has the Tire Pressure Monitor
System (TPMS), the pressure for each tire
can be viewed in the DIC. The tire pressure
will be shown in either kilopascals (kPa) or
pounds per square inch (psi). Press
Tuntil
the DIC displays FRONT TIRES PSI (kPa)
LEFT ## RIGHT ##. Press
Tagain until the
DIC displays REAR TIRES PSI (kPa) LEFT ##
RIGHT ##.
If a low tire pressure condition is detected
by the system while driving, a message
advising you to check the pressure in a
specific tire will appear in the display. See
Tire Pressure 0210.
If the tire pressure display shows dashes
instead of a value, there may be a problem
with the vehicle. If this consistently occurs,
see your dealer for service.
Engine Hours
Press
Tuntil ENGINE HOURS displays. This
display shows the total number of hours the
engine has run.
Page 87 of 289
Chevrolet Express Owner Manual (GMNA-Localizing-U.S./Canada/Mexico-
15555951) - 2022 - CRC - 1/27/22
86 Instruments and Controls
Relearn Tire Positions
The vehicle may have this display. To access
this display, the vehicle must be in P (Park).
If the vehicle has the Tire Pressure Monitor
System (TPMS), after rotating the tires or
after replacing a tire or sensor, the system
must re-learn the tire positions. To re-learn
the tire positions, seeTire Pressure Monitor
System 0211. See Tire Inspection 0214 and
Tire Rotation 0214.
Change Compass Zone
The vehicle may have this feature. To
change the compass zone through the DIC,
see Compass 068.
Calibrate Compass
The vehicle may have this feature. The
compass can be manually calibrated. To
calibrate the compass through the DIC, see
Compass 068.
Blank Display
This display shows no information.Vehicle Messages
Messages displayed on the DIC indicate the
status of the vehicle or some action that
may be needed to correct a condition.
Multiple messages may appear one after
another.
The messages that do not require
immediate action can be acknowledged and
cleared by pressing
V. The messages that
require immediate action cannot be cleared
until that action is performed.
All messages should be taken seriously;
clearing the message does not correct the
problem.
If a SERVICE message appears, see your
dealer.
Follow the instructions given in the
messages. The system displays messages
regarding the following topics:
.Service Messages
.Fluid Levels
.Vehicle Security
.Brakes
.Steering
.Ride Control Systems
.Driver Assistance Systems
.Cruise Control
.Lighting and Bulb Replacement
.Wiper/Washer Systems
.Doors and Windows
.Seat Belts
.Airbag Systems
.Engine and Transmission
.Tire Pressure
.Battery
Engine Power Messages
ENGINE POWER IS REDUCED
This message displays when the vehicle's
propulsion power is reduced. A reduction in
propulsion power can affect the vehicle's
ability to accelerate. If this message is on,
but there is no observed reduction in
performance, proceed to your destination.
Under certain conditions the performance
may be reduced the next time the vehicle is
driven. The vehicle may be driven while this
message is on, but maximum acceleration
and speed may be reduced. Anytime this
message stays on, or displays repeatedly,
the vehicle should be taken to your dealer
for service as soon as possible.
Page 128 of 289
Chevrolet Express Owner Manual (GMNA-Localizing-U.S./Canada/Mexico-
15555951) - 2022 - CRC - 1/27/22
Driving and Operating 127
{Warning
Do not load the vehicle any heavier
than the Gross Vehicle Weight Rating
(GVWR), or either the maximum
front or rear Gross Axle Weight
Rating (GAWR). This can cause
systems to break and change the
way the vehicle handles. This could
cause loss of control and a crash.
Overloading can also reduce stopping
performance, damage the tires, and
shorten the life of the vehicle.
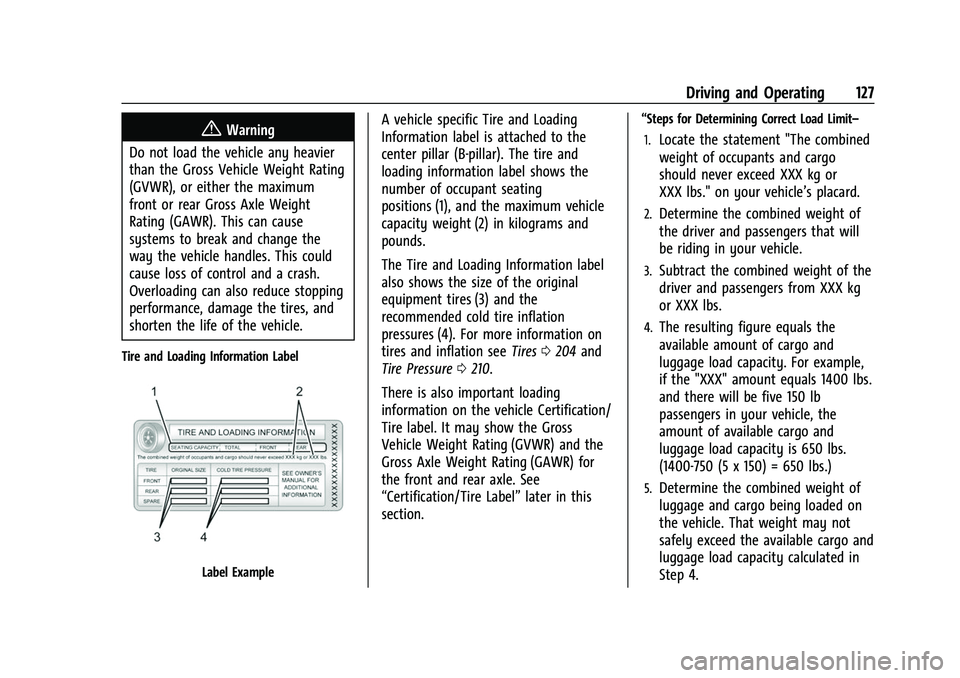
Tire and Loading Information Label
Label Example
A vehicle specific Tire and Loading
Information label is attached to the
center pillar (B-pillar). The tire and
loading information label shows the
number of occupant seating
positions (1), and the maximum vehicle
capacity weight (2) in kilograms and
pounds.
The Tire and Loading Information label
also shows the size of the original
equipment tires (3) and the
recommended cold tire inflation
pressures (4). For more information on
tires and inflation see Tires0204 and
Tire Pressure 0210.
There is also important loading
information on the vehicle Certification/
Tire label. It may show the Gross
Vehicle Weight Rating (GVWR) and the
Gross Axle Weight Rating (GAWR) for
the front and rear axle. See
“Certification/Tire Label” later in this
section.“Steps for Determining Correct Load Limit–
1.
Locate the statement "The combined
weight of occupants and cargo
should never exceed XXX kg or
XXX lbs." on your vehicle’s placard.
2.Determine the combined weight of
the driver and passengers that will
be riding in your vehicle.
3.Subtract the combined weight of the
driver and passengers from XXX kg
or XXX lbs.
4.The resulting figure equals the
available amount of cargo and
luggage load capacity. For example,
if the "XXX" amount equals 1400 lbs.
and there will be five 150 lb
passengers in your vehicle, the
amount of available cargo and
luggage load capacity is 650 lbs.
(1400-750 (5 x 150) = 650 lbs.)
5.Determine the combined weight of
luggage and cargo being loaded on
the vehicle. That weight may not
safely exceed the available cargo and
luggage load capacity calculated in
Step 4.
Page 130 of 289
Chevrolet Express Owner Manual (GMNA-Localizing-U.S./Canada/Mexico-
15555951) - 2022 - CRC - 1/27/22
Driving and Operating 129
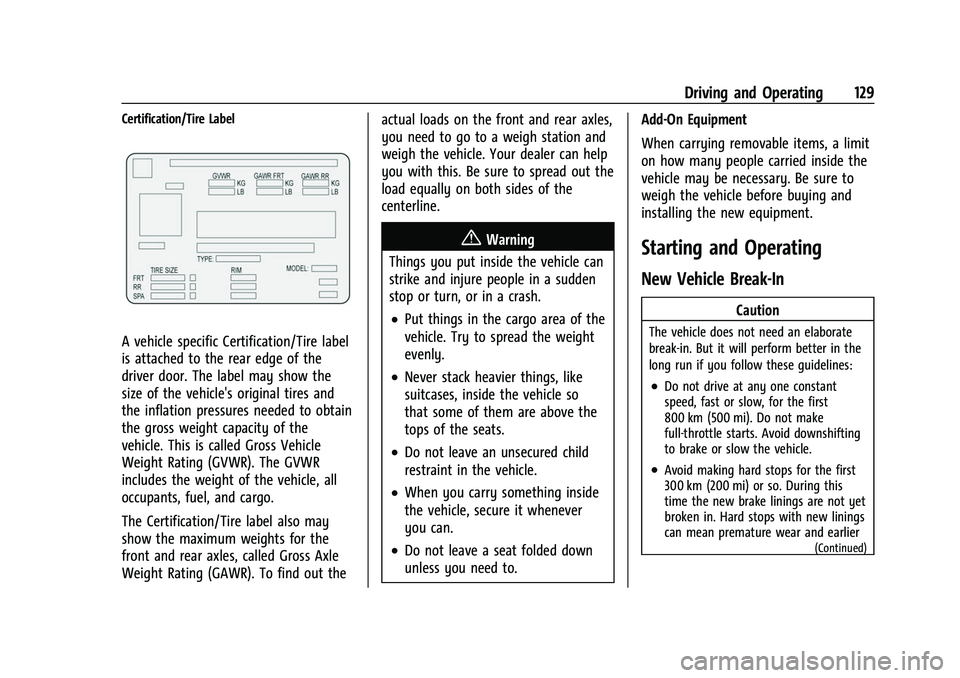
Certification/Tire Label
A vehicle specific Certification/Tire label
is attached to the rear edge of the
driver door. The label may show the
size of the vehicle's original tires and
the inflation pressures needed to obtain
the gross weight capacity of the
vehicle. This is called Gross Vehicle
Weight Rating (GVWR). The GVWR
includes the weight of the vehicle, all
occupants, fuel, and cargo.
The Certification/Tire label also may
show the maximum weights for the
front and rear axles, called Gross Axle
Weight Rating (GAWR). To find out theactual loads on the front and rear axles,
you need to go to a weigh station and
weigh the vehicle. Your dealer can help
you with this. Be sure to spread out the
load equally on both sides of the
centerline.
{Warning
Things you put inside the vehicle can
strike and injure people in a sudden
stop or turn, or in a crash.
.Put things in the cargo area of the
vehicle. Try to spread the weight
evenly.
.Never stack heavier things, like
suitcases, inside the vehicle so
that some of them are above the
tops of the seats.
.Do not leave an unsecured child
restraint in the vehicle.
.When you carry something inside
the vehicle, secure it whenever
you can.
.Do not leave a seat folded down
unless you need to. Add-On Equipment
When carrying removable items, a limit
on how many people carried inside the
vehicle may be necessary. Be sure to
weigh the vehicle before buying and
installing the new equipment.
Starting and Operating
New Vehicle Break-In
Caution
The vehicle does not need an elaborate
break-in. But it will perform better in the
long run if you follow these guidelines:
.Do not drive at any one constant
speed, fast or slow, for the first
800 km (500 mi). Do not make
full-throttle starts. Avoid downshifting
to brake or slow the vehicle.
.Avoid making hard stops for the first
300 km (200 mi) or so. During this
time the new brake linings are not yet
broken in. Hard stops with new linings
can mean premature wear and earlier
(Continued)
Page 171 of 289

Chevrolet Express Owner Manual (GMNA-Localizing-U.S./Canada/Mexico-
15555951) - 2022 - CRC - 1/27/22
170 Driving and Operating
Operating the vehicle in Tow/Haul Mode
when lightly loaded or not towing will not
cause damage; however, it is not
recommended and may result in unpleasant
engine and transmission driving
characteristics and reduced fuel economy.
Trailer Sway Control (TSC)
Vehicles with StabiliTrak/Electronic Stability
Control (ESC) have a Trailer Sway Control
(TSC) feature. Trailer sway is unintended
side-to-side motion of a trailer while towing.
If the vehicle is towing a trailer and the TSC
detects that sway is increasing, the vehicle
brakes are selectively applied at each wheel,
to help reduce excessive trailer sway.
If TSC is enabled, the Traction Control
System (TCS)/StabiliTrak/ESC warning light
will flash on the instrument cluster. Reduce
vehicle speed by gradually removing your
foot from the accelerator. If trailer sway
continues, StabiliTrak/ESC can reduce engine
torque to help slow the vehicle. TSC will notfunction if StabiliTrak/ESC is turned off. See
Traction Control/Electronic Stability Control
0
142.
{Warning
Trailer sway can result in a crash and in
serious injury or death, even if the
vehicle is equipped with TSC.
If the trailer begins to sway, reduce
vehicle speed by gradually removing your
foot from the accelerator. Then pull over
to check the trailer and vehicle to help
correct possible causes, including an
improperly or overloaded trailer,
unrestrained cargo, improper trailer hitch
configuration, or improperly inflated or
incorrect vehicle or trailer tires. See
Towing Equipment 0167 for trailer
ratings and hitch setup recommendations.
Trailer Tires
Special Trailer (ST) tires differ from vehicle
tires. Trailer tires are designed with stiff
sidewalls to help prevent sway and to
support heavy loads. These features can
make it difficult to determine if the trailer
tire pressures are low only based on a visual
inspection. Always check all trailer tire pressures before
each trip when the tires are cool. Low trailer
tire pressure is a leading cause of trailer tire
blow-outs.
Trailer tires deteriorate over time. The trailer
tire sidewall will show the week and year
the tire was manufactured. Many trailer tire
manufacturers recommend replacing tires
more than six years old.
Overloading is another leading cause of
trailer tire blow-outs. Never load your trailer
with more weight than the tires are
designed to support. The load rating is
located on the trailer tire sidewall.
Always know the maximum speed rating for
the trailer tires before driving. This may be
significantly lower than the vehicle tire
speed rating. The speed rating may be on
the trailer tire sidewall. If the speed rating is
not shown, the default trailer tire speed
rating is 105 km/h (65 mph).