change wheel CHEVROLET EXPRESS 2019 User Guide
[x] Cancel search | Manufacturer: CHEVROLET, Model Year: 2019, Model line: EXPRESS, Model: CHEVROLET EXPRESS 2019Pages: 373, PDF Size: 5.57 MB
Page 253 of 373
Chevrolet Express Owner Manual (GMNA-Localizing-U.S./Canada/Mexico-
12146162) - 2019 - crc - 11/26/18
252 Vehicle Care
Some driving conditions or climates
can cause a brake squeal when the
brakes are first applied or lightly
applied. This does not mean
something is wrong with the brakes.
Properly torqued wheel nuts are
necessary to help prevent brake
pulsation. When tires are rotated,
inspect brake pads for wear and
evenly tighten wheel nuts in the
proper sequence to torque
specifications. SeeCapacities and
Specifications 0332.
Brake pads should be replaced as
complete sets.
Brake Pedal Travel
See your dealer if the brake pedal
does not return to normal height,
or if there is a rapid increase in
pedal travel. This could be a sign
that brake service may be required.
Replacing Brake System Parts
Always replace brake system parts
with new, approved replacement
parts. If this is not done, the brakes
may not work properly. The braking
performance expected can change in many other ways if the wrong
replacement brake parts are
installed or if parts are improperly
installed.
Brake Fluid
The brake master cylinder reservoir
is filled with DOT 3 brake fluid. See
Engine Compartment Overview
0
232 for the location of the
reservoir.
There are only two reasons why the
brake fluid level in the reservoir may
go down:
. Normal brake lining wear. When
new linings are installed, the
fluid level goes back up. .
A fluid leak in the brake
hydraulic system. Have the
brake hydraulic system fixed.
With a leak, the brakes will not
work well.
Always clean the brake fluid
reservoir cap and the area around
the cap before removing it.
Do not top off the brake fluid.
Adding fluid does not correct a leak.
If fluid is added when the linings are
worn, there will be too much fluid
when new brake linings are
installed. Add or remove fluid, as
necessary, only when work is done
on the brake hydraulic system.
{Warning
If too much brake fluid is added, it
can spill on the engine and burn,
if the engine is hot enough. You
or others could be burned, and
the vehicle could be damaged.
Add brake fluid only when work is
done on the brake hydraulic
system.
Page 272 of 373
Chevrolet Express Owner Manual (GMNA-Localizing-U.S./Canada/Mexico-
12146162) - 2019 - crc - 11/26/18
Vehicle Care 271
Warning (Continued)
.Replace any tires that
have been damaged by
impacts with potholes,
curbs, etc.
.Improperly repaired tires
can cause a crash. Only
the dealer or an
authorized tire service
center should repair,
replace, dismount, and
mount the tires.
.Do not spin the tires in
excess of 56 km/h
(35 mph) on slippery
surfaces such as snow,
mud, ice, etc. Excessive
spinning may cause the
tires to explode.
All-Season Tires
This vehicle may come with
all-season tires. These tires are
designed to provide good overallperformance on most road surfaces
and weather conditions. Original
equipment tires designed to GM's
specific tire performance criteria
have a TPC specification code
molded onto the sidewall. Original
equipment all-season tires can be
identified by the last two characters
of this TPC code, which will
be
“MS.”
Consider installing winter tires on
the vehicle if frequent driving on
snow or ice-covered roads is
expected. All-season tires provide
adequate performance for most
winter driving conditions, but they
may not offer the same level of
traction or performance as winter
tires on snow or ice-covered roads.
See Winter Tires 0271.
Winter Tires
This vehicle was not originally
equipped with winter tires. Winter
tires are designed for increased
traction on snow and ice-covered
roads. Consider installing winter
tires on the vehicle if frequent
driving on ice or snow covered roads is expected. See your dealer
for details regarding winter tire
availability and proper tire selection.
Also, see
Buying New Tires 0286.
With winter tires, there may be
decreased dry road traction,
increased road noise, and shorter
tread life. After changing to winter
tires, be alert for changes in vehicle
handling and braking.
If using winter tires:
. Use tires of the same brand and
tread type on all four wheel
positions.
. Use only radial ply tires of the
same size, load range, and
speed rating as the original
equipment tires.
Winter tires with the same speed
rating as the original equipment tires
may not be available for H, V, W, Y,
and ZR speed rated tires. If winter
tires with a lower speed rating are
chosen, never exceed the tire's
maximum speed capability.
Page 285 of 373
Chevrolet Express Owner Manual (GMNA-Localizing-U.S./Canada/Mexico-
12146162) - 2019 - crc - 11/26/18
284 Vehicle Care
If the full-size spare tire is part of
the tire rotation, make sure the
tire rotated into the spare
position is stored securely.
Push, pull, and then try to rotate
or turn the tire. If it moves, use
the wheel wrench/hoist shaft to
tighten the cable. SeeTire
Changing 0292.
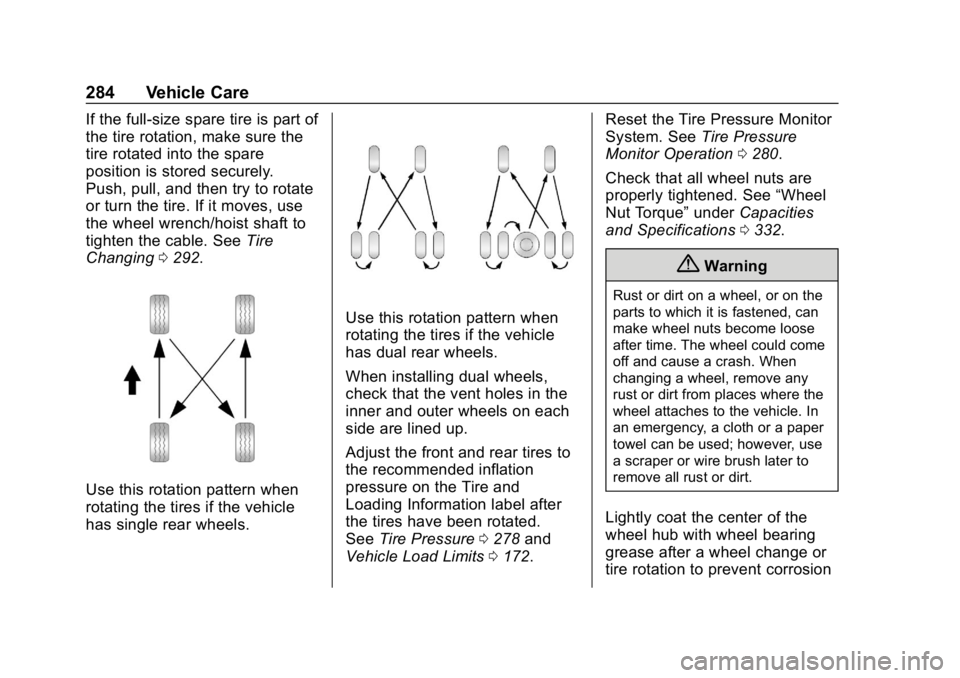
Use this rotation pattern when
rotating the tires if the vehicle
has single rear wheels.
Use this rotation pattern when
rotating the tires if the vehicle
has dual rear wheels.
When installing dual wheels,
check that the vent holes in the
inner and outer wheels on each
side are lined up.
Adjust the front and rear tires to
the recommended inflation
pressure on the Tire and
Loading Information label after
the tires have been rotated.
See Tire Pressure 0278 and
Vehicle Load Limits 0172. Reset the Tire Pressure Monitor
System. See
Tire Pressure
Monitor Operation 0280.
Check that all wheel nuts are
properly tightened. See “Wheel
Nut Torque” underCapacities
and Specifications 0332.
{Warning
Rust or dirt on a wheel, or on the
parts to which it is fastened, can
make wheel nuts become loose
after time. The wheel could come
off and cause a crash. When
changing a wheel, remove any
rust or dirt from places where the
wheel attaches to the vehicle. In
an emergency, a cloth or a paper
towel can be used; however, use
a scraper or wire brush later to
remove all rust or dirt.
Lightly coat the center of the
wheel hub with wheel bearing
grease after a wheel change or
tire rotation to prevent corrosion
Page 293 of 373
Chevrolet Express Owner Manual (GMNA-Localizing-U.S./Canada/Mexico-
12146162) - 2019 - crc - 11/26/18
292 Vehicle Care
If a tire goes flat, avoid further tire
and wheel damage by driving slowly
to a level place, well off the road,
if possible. Turn on the hazard
warning flashers. SeeHazard
Warning Flashers 0128.
{Warning
Changing a tire can be
dangerous. The vehicle can slip
off the jack and roll over or fall
causing injury or death. Find a
level place to change the tire. To
help prevent the vehicle from
moving:
1. Set the parking brake firmly.
2. Put an automatictransmission in P (Park) or a
manual transmission in
1 (First) or R (Reverse).
3. Turn off the engine and do not restart while the vehicle
is raised.
4. Do not allow passengers to remain in the vehicle.
(Continued)
Warning (Continued)
5. Place wheel blocks,if equipped, on both sides of
the tire at the opposite
corner of the tire being
changed.
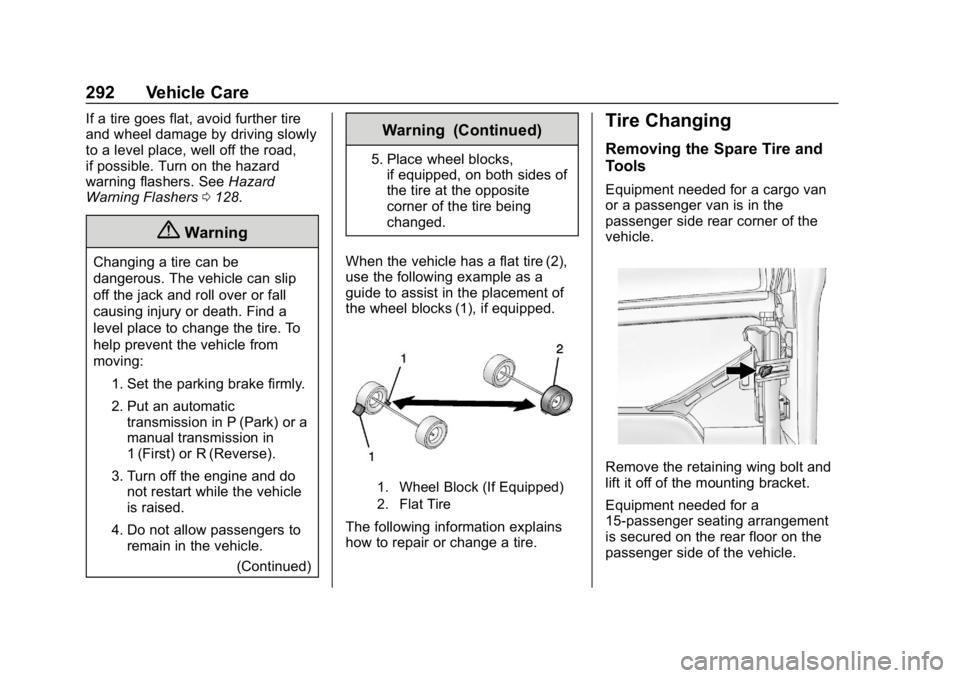
When the vehicle has a flat tire (2),
use the following example as a
guide to assist in the placement of
the wheel blocks (1), if equipped.
1. Wheel Block (If Equipped)
2. Flat Tire
The following information explains
how to repair or change a tire.
Tire Changing
Removing the Spare Tire and
Tools
Equipment needed for a cargo van
or a passenger van is in the
passenger side rear corner of the
vehicle.
Remove the retaining wing bolt and
lift it off of the mounting bracket.
Equipment needed for a
15-passenger seating arrangement
is secured on the rear floor on the
passenger side of the vehicle.
Page 325 of 373
Chevrolet Express Owner Manual (GMNA-Localizing-U.S./Canada/Mexico-
12146162) - 2019 - crc - 11/26/18
324 Service and Maintenance
(5)Replace brake fluid every five
years. See Brake Fluid 0252.
(6) Or every 12 months, whichever
comes first. See Wiper Blade
Replacement 0257.Special Application
Services
.
Vehicles with Dual Wheels:
Check dual wheel nut torque at
160, 1 600, and 10 000 km
(100, 1,000, and 6,000 mi) of
driving. Repeat this service
whenever a tire/wheel is
serviced or removed.
. Severe Commercial Use
Vehicles Only: Lubricate chassis
components every oil change.
. Have underbody flushing service
performed. See “Underbody
Maintenance” inExterior Care
0 308.
Additional
Maintenance and Care
Your vehicle is an important
investment and caring for it properly
may help to avoid future costly
repairs. To maintain vehicle
performance, additional
maintenance services may be
required.
It is recommended that your dealer
perform these services —their
trained dealer technicians know
your vehicle best. Your dealer can
also perform a thorough
assessment with a multi-point
inspection to recommend when your
vehicle may need attention.
The following list is intended to
explain the services and conditions
to look for that may indicate
services are required.
Battery
The 12-volt battery supplies power
to start the engine and operate any
additional electrical accessories.
Page 370 of 373

Chevrolet Express Owner Manual (GMNA-Localizing-U.S./Canada/Mexico-
12146162) - 2019 - crc - 11/26/18
Index 369
Seat Belts (cont'd)Extender . . . . . . . . . . . . . . . . . . . . . . . . 58
How to Wear Seat Belts
Properly . . . . . . . . . . . . . . . . . . . . . . . 51
Lap-Shoulder Belt . . . . . . . . . . . . . . 53
Reminders . . . . . . . . . . . . . . . . . . . . 105
Replacing after a Crash . . . . . . . . 59
Use During Pregnancy . . . . . . . . . . 57
Seats
Adjustment, Front . . . . . . . . . . . . . . . 44
Head Restraints . . . . . . . . . . . . . . . . 44
Power Adjustment, Front . . . . . . . 44
Rear . . . . . . . . . . . . . . . . . . . . . . . . . . . . 46
Reclining Seatbacks . . . . . . . . . . . . 45
Securing Child Restraints . . . . 85, 87
Security Light . . . . . . . . . . . . . . . . . . . . . . . . . . .113
OnStar . . . . . . . . . . . . . . . . . . . . . . . 351
Vehicle . . . . . . . . . . . . . . . . . . . . . . . . . 36
Vehicle Alarm . . . . . . . . . . . . . . . . . . . 36
Service . . . . . . . . . . . . . . . . . . . . . . . . . 164 Accessories andModifications . . . . . . . . . . . . . . . . 230
Climate Control System . . . . . . . 159
Doing Your Own Work . . . . . . . . 230
Maintenance Records . . . . . . . . 330
Maintenance, General Information . . . . . . . . . . . . . . . . . . 317 Service (cont'd)
Parts Identification Label . . . . . 331
Scheduling Appointments . . . . . 341
Services
Special Application . . . . . . . . . . . 324
Servicing the Airbag . . . . . . . . . . . . . 70
Shift Lock Control Function Check, Automatic
Transmission . . . . . . . . . . . . . . . . . . 256
Shifting Into Park . . . . . . . . . . . . . . . . . . . . . . 182
Out of Park . . . . . . . . . . . . . . . . . . . 183
Side Blind Zone Alert (SBZA) . . . 202
Side Door . . . . . . . . . . . . . . . . . . . . . . . 33
Sidemarker Bulb Replacement . . . . . . . . . . . . 260
Signals, Turn and Lane-Change . . . . . . . . . . . . . . . . . 128
Sliding Door . . . . . . . . . . . . . . . . . . . . . 34
Special Application Services . . . . 324
Specifications and Capacities . . . . . . . . . . . . . . . . . . . . . 332
Speedometer . . . . . . . . . . . . . . . . . . . 102
StabiliTrak
OFF Light . . . . . . . . . . . . . . . . . . . . . . 111
Start Assist, Hill . . . . . . . . . . . . . . . . . 192
Start Vehicle, Remote . . . . . . . . . . . 29
Starter Switch Check . . . . . . . . . . . 256 Starting the Engine . . . . . . . . . . . . . 178
Steering . . . . . . . . . . . . . . . . . . . . . . . . 167
Fluid, Power . . . . . . . . . . . . . . . . . . 250
Wheel Adjustment . . . . . . . . . . . . . . 94
Wheel Controls . . . . . . . . . . . . . . . . . 94
Storage Areas Front . . . . . . . . . . . . . . . . . . . . . . . . . . . 91
Storage Compartments . . . . . . . . . . 91
Struts Gas . . . . . . . . . . . . . . . . . . . . . . . . . . . 258
Stuck Vehicle . . . . . . . . . . . . . . . . . . . 172
Sun Visors . . . . . . . . . . . . . . . . . . . . . . . 42
Swing-out Windows . . . . . . . . . . . . . . 41
Switches
Airbag On-Off . . . . . . . . . . . . . . . . . . . 67
Symbols . . . . . . . . . . . . . . . . . . . . . . . . . . 3
System
Forward CollisionAlert (FCA) . . . . . . . . . . . . . . . . . . 201
Infotainment . . . . . . . . . . . . . 132, 348
Noise Control . . . . . . . . . . . . . . . . . 255
Systems Driver Assistance . . . . . . . . . . . . . 197
T
Taillamps . . . . . . . . . . . . . . . . . . . . . . . 261
Text Telephone (TTY) Users . . . . 338
Theft-Deterrent Systems . . . . . . . . . 37
Page 371 of 373

Chevrolet Express Owner Manual (GMNA-Localizing-U.S./Canada/Mexico-
12146162) - 2019 - crc - 11/26/18
370 Index
Theft-Deterrent Systems (cont'd)Immobilizer . . . . . . . . . . . . . . . . . . . . . 37
Time . . . . . . . . . . . . . . . . . . . . . . . . . . . . . 98
Tires . . . . . . . . . . . . . . . . . . . . . . . . . . . . 270 All-Season . . . . . . . . . . . . . . . . . . . . 271
Buying New Tires . . . . . . . . . . . . . 286
Chains . . . . . . . . . . . . . . . . . . . . . . . . 290
Changing . . . . . . . . . . . . . . . . . . . . . 292
Designations . . . . . . . . . . . . . . . . . 274
Different Size . . . . . . . . . . . . . . . . . 287
Dual Rotation . . . . . . . . . . . . . . . . . 285
Full-Size Spare . . . . . . . . . . . . . . . 301
If a Tire Goes Flat . . . . . . . . . . . . 291
Inspection . . . . . . . . . . . . . . . . . . . . 283
Pressure . . . . . . . . . . . . . . . . . . . . . . 278
Pressure Light . . . . . . . . . . . . . . . . .112
Pressure Monitor Operation . . 280
Pressure Monitor System . . . . . 279
Rotation . . . . . . . . . . . . . . . . . . . . . . 283
Sidewall Labeling . . . . . . . . . . . . . 272
Terminology and Definitions . . 275
Uniform Tire QualityGrading . . . . . . . . . . . . . . . . . . . . . 288
Wheel Alignment and Tire Balance . . . . . . . . . . . . . . . . . . . . . 289
Wheel Replacement . . . . . . . . . . 289
When It Is Time for New Tires . . . . . . . . . . . . . . . . . . . . . . . . 285 Tires (cont'd)
Winter . . . . . . . . . . . . . . . . . . . . . . . . 271
Top Tier Fuel . . . . . . . . . . . . . . . . . . . 206
Tow/Haul Mode . . . . . . . . . . . . . . . . . 189
Tow/Haul Mode Light . . . . . . . . . . . 111
Towing Driving Characteristics . . . . . . . . 210
Equipment . . . . . . . . . . . . . . . . . . . . 222
General Information . . . . . . . . . . 210
Recreational Vehicle . . . . . . . . . . 306
Trailer . . . . . . . . . . . . . . . . . . . . . . . . 215
Trailer Sway Control (TSC) . . . 225
Vehicle . . . . . . . . . . . . . . . . . . . . . . . 306
Traction
Control System(TCS)/StabiliTrak Light . . . . . . .112
Traction Control/Electronic Stability Control . . . . . . . . . . . . . . . 192
Trailer Sway Control (TSC) . . . . . . . . . . 225
Tow Mirrors . . . . . . . . . . . . . . . . . . . . . 38
Towing . . . . . . . . . . . . . . . . . . . . . . . . 215
Transmission
Automatic . . . . . . . . . . . . . . . . . . . . . 185
Fluid, Automatic . . . . . . . . . 238, 241
Transportation Program, Courtesy . . . . . . . . . . . . . . . . . . . . . . 341 Trip Odometer . . . . . . . . . . . . . . . . . . 102
Turn and Lane-Change
Signals . . . . . . . . . . . . . . . . . . . . . . . . 128
U
Uniform Tire Quality Grading . . . 288
Using This Manual . . . . . . . . . . . . . . . . 2
V
VehicleAlarm System . . . . . . . . . . . . . . . . . . 36
Canadian Owners . . . . . . . . . . . . . . . 2
Control . . . . . . . . . . . . . . . . . . . . . . . 167
Identification Number (VIN) . . . 331
Load Limits . . . . . . . . . . . . . . . . . . . 172
Messages . . . . . . . . . . . . . . . . . . . . .119
Personalization . . . . . . . . . . . . . . . 120
Remote Start . . . . . . . . . . . . . . . . . . . 29
Security . . . . . . . . . . . . . . . . . . . . . . . . 36
Speed Messages . . . . . . . . . . . . . .119
Towing . . . . . . . . . . . . . . . . . . . . . . . . 306
Vehicle Ahead Indicator . . . . . . . . 111
Vehicle Care
Tire Pressure . . . . . . . . . . . . . . . . . 278
Vehicle Data Recording and Privacy . . . . . . . . . . . . . . . . . . . . . . . . 347
Ventilation, Air . . . . . . . . . . . . . . . . . . 164
Visors . . . . . . . . . . . . . . . . . . . . . . . . . . . 42
Voltmeter Gauge . . . . . . . . . . . . . . . 105