parking brake CHEVROLET EXPRESS 2019 Owner's Guide
[x] Cancel search | Manufacturer: CHEVROLET, Model Year: 2019, Model line: EXPRESS, Model: CHEVROLET EXPRESS 2019Pages: 373, PDF Size: 5.57 MB
Page 257 of 373
Chevrolet Express Owner Manual (GMNA-Localizing-U.S./Canada/Mexico-
12146162) - 2019 - crc - 11/26/18
256 Vehicle Care
2. The use of the vehicle aftersuch device or element of
design has been removed or
rendered inoperative by any
person.
Among those acts presumed to
constitute tampering are the acts
listed below.
Insulation:
Removal of the noise shields or any
underhood insulation.
Engine:
Removal or rendering the engine
speed governor, if equipped,
inoperative so as to allow engine
speed to exceed manufacturer
specifications.
Fan and Drive:
. Removal of the fan clutch,
if equipped, or rendering the
clutch inoperative.
. Removal of the fan shroud,
if equipped. Air Intake:
.
Removal of the air cleaner
silencer.
. Modification of the air cleaner.
Exhaust:
. Removal of the muffler and/or
resonator.
. Removal of the exhaust pipes
and exhaust pipe clamps.
Fuel Operated Heater (FOH) -
Diesel Engine:
. Removal of the muffler.
Starter Switch Check
{Warning
When you are doing this
inspection, the vehicle could
move suddenly. If the vehicle
moves, you or others could be
injured.
1. Before starting this check, be sure there is enough room
around the vehicle. 2. Apply both the parking brake
and the regular brake.
Do not use the accelerator
pedal, and be ready to turn off
the engine immediately if it
starts.
3. Try to start the engine in each gear. The vehicle should start
only in P (Park) or N (Neutral).
If the vehicle starts in any other
position, contact your dealer for
service.
Automatic Transmission
Shift Lock Control
Function Check
{Warning
When you are doing this
inspection, the vehicle could
move suddenly. If the vehicle
moves, you or others could be
injured.
Page 258 of 373
Chevrolet Express Owner Manual (GMNA-Localizing-U.S./Canada/Mexico-
12146162) - 2019 - crc - 11/26/18
Vehicle Care 257
1. Before starting this check, besure there is enough room
around the vehicle. It should be
parked on a level surface.
2. Apply the parking brake. Be ready to apply the regular
brake immediately if the vehicle
begins to move.
3. With the engine off, turn the ignition on, but do not start the
engine. Without applying the
regular brake, try to move the
shift lever out of P (Park) with
normal effort. If the shift lever
moves out of P (Park), contact
your dealer for service.
Ignition Transmission
Lock Check
While parked, and with the parking
brake set, try to turn the ignition off
in each shift lever position.
.The ignition should turn to off
only when the shift lever is in
P (Park).
. The ignition key should come
out only when the ignition is off. Contact your dealer if service is
required.
Park Brake and P (Park)
Mechanism Check
{Warning
When you are doing this check,
the vehicle could begin to move.
You or others could be injured
and property could be damaged.
Make sure there is room in front
of the vehicle in case it begins to
roll. Be ready to apply the regular
brake at once should the vehicle
begin to move.
Park on a fairly steep hill, with the
vehicle facing downhill. Keeping
your foot on the regular brake, set
the parking brake.
. To check the parking brake's
holding ability: With the engine
running and the transmission in
N (Neutral), slowly remove foot pressure from the regular brake
pedal. Do this until the vehicle is
held by the parking brake only.
. To check the P (Park)
mechanism's holding ability:
With the engine running, shift to
P (Park). Then release the
parking brake followed by the
regular brake.
Contact your dealer if service is
required.
Wiper Blade Replacement
Windshield wiper blades should be
inspected for wear and cracking.
See Maintenance Schedule 0319.
Replacement blades come in
different types and are removed in
different ways. For proper type and
length, see Maintenance
Replacement Parts 0329.
Page 283 of 373
Chevrolet Express Owner Manual (GMNA-Localizing-U.S./Canada/Mexico-
12146162) - 2019 - crc - 11/26/18
282 Vehicle Care
message should go off when the
TPMS sensors are installed and
the sensor matching process is
performed successfully. See
your dealer for service.
. Replacement tires or wheels do
not match the original equipment
tires or wheels. Tires and wheels
other than those recommended
could prevent the TPMS from
functioning properly. See Buying
New Tires 0286.
. Operating electronic devices or
being near facilities using radio
wave frequencies similar to the
TPMS could cause the TPMS
sensors to malfunction.
If the TPMS is not functioning
properly, it cannot detect or signal a
low tire pressure condition. See
your dealer for service if the TPMS
malfunction light and DIC message
come on and stay on.
TPMS Sensor Matching
Process
Each TPMS sensor has a unique
identification code. The identification
code needs to be matched to a new tire/wheel position after rotating the
vehicle’s tires or replacing one or
more of the TPMS sensors. Also,
the TPMS sensor matching process
should be performed after replacing
a spare tire with a road tire
containing the TPMS sensor. The
malfunction light and the DIC
message should go off at the next
ignition cycle. The sensors are
matched to the tire/wheel positions,
using a TPMS relearn tool, in the
following order: driver side front tire,
passenger side front tire, passenger
side rear tire, and driver side rear.
See your dealer for service or to
purchase a relearn tool. A TPMS
relearn tool can also be purchased.
See Tire Pressure Monitor Sensor
Activation Tool at
www.gmtoolsandequipment.com or
call 1-800-GM TOOLS
(1-800-468-6657).
There are two minutes to match the
first tire/wheel position, and
five minutes overall to match all four
tire/wheel positions. If it takes
longer, the matching process stops
and must be restarted.
The TPMS sensor matching
process is:
1. Set the parking brake.
2. Turn the ignition on without starting the vehicle. See
Ignition Positions 0176.
3. Press the Remote Keyless Entry (RKE) transmitter's
Q
andKbuttons at the same
time for approximately
five seconds. The horn sounds
twice to signal the receiver is in
relearn mode and TIRE
LEARNING ACTIVE message
displays on the DIC screen.
If the vehicle does not have
RKE, press the Driver
Information Center (DIC)
vehicle information button until
the PRESS VTO RELEARN
TIRE POSITIONS message
displays. The horn sounds
twice to signal the receiver is in
relearn mode and TIRE
LEARNING ACTIVE message
displays on the DIC screen.
Page 287 of 373
Chevrolet Express Owner Manual (GMNA-Localizing-U.S./Canada/Mexico-
12146162) - 2019 - crc - 11/26/18
286 Vehicle Care
Vehicle Storage
Tires age when stored normally
mounted on a parked vehicle. Park
a vehicle that will be stored for at
least a month in a cool, dry, clean
area away from direct sunlight to
slow aging. This area should be free
of grease, gasoline, or other
substances that can deteriorate
rubber.
Parking for an extended period can
cause flat spots on the tires that
may result in vibrations while
driving. When storing a vehicle for
at least a month, remove the tires or
raise the vehicle to reduce the
weight from the tires.
Buying New Tires
GM has developed and matched
specific tires for the vehicle. The
original equipment tires installed
were designed to meet General
Motors Tire Performance Criteria
Specification (TPC Spec)
system rating. When
replacement tires are needed,GM strongly recommends
buying tires with the same TPC
Spec rating.
GM's exclusive TPC Spec
system considers over a dozen
critical specifications that impact
the overall performance of the
vehicle, including brake system
performance, ride and handling,
traction control, and tire
pressure monitoring
performance. GM's TPC Spec
number is molded onto the tire's
sidewall near the tire size. If the
tires have an all-season tread
design, the TPC Spec number
will be followed by MS for mud
and snow. See
Tire Sidewall
Labeling 0272 for additional
information.
GM recommends replacing worn
tires in complete sets of four (six
for dual rear wheels). Uniform
tread depth on all tires will help
to maintain the performance of
the vehicle. Braking and handling performance may be
adversely affected if all the tires
are not replaced at the same
time. If proper rotation and
maintenance have been done,
all four tires (six for dual rear
wheels) should wear out at
about the same time. See
Tire
Rotation 0283 for information
on proper tire rotation. However,
if it is necessary to replace only
one axle set of worn tires, place
the new tires on the rear axle
(two for single rear wheels, four
for dual rear wheels).
{Warning
Tires could explode during
improper service. Attempting
to mount or dismount a tire
could cause injury or death.
Only your dealer or authorized
tire service center should
mount or dismount the tires.
Page 293 of 373
Chevrolet Express Owner Manual (GMNA-Localizing-U.S./Canada/Mexico-
12146162) - 2019 - crc - 11/26/18
292 Vehicle Care
If a tire goes flat, avoid further tire
and wheel damage by driving slowly
to a level place, well off the road,
if possible. Turn on the hazard
warning flashers. SeeHazard
Warning Flashers 0128.
{Warning
Changing a tire can be
dangerous. The vehicle can slip
off the jack and roll over or fall
causing injury or death. Find a
level place to change the tire. To
help prevent the vehicle from
moving:
1. Set the parking brake firmly.
2. Put an automatictransmission in P (Park) or a
manual transmission in
1 (First) or R (Reverse).
3. Turn off the engine and do not restart while the vehicle
is raised.
4. Do not allow passengers to remain in the vehicle.
(Continued)
Warning (Continued)
5. Place wheel blocks,if equipped, on both sides of
the tire at the opposite
corner of the tire being
changed.
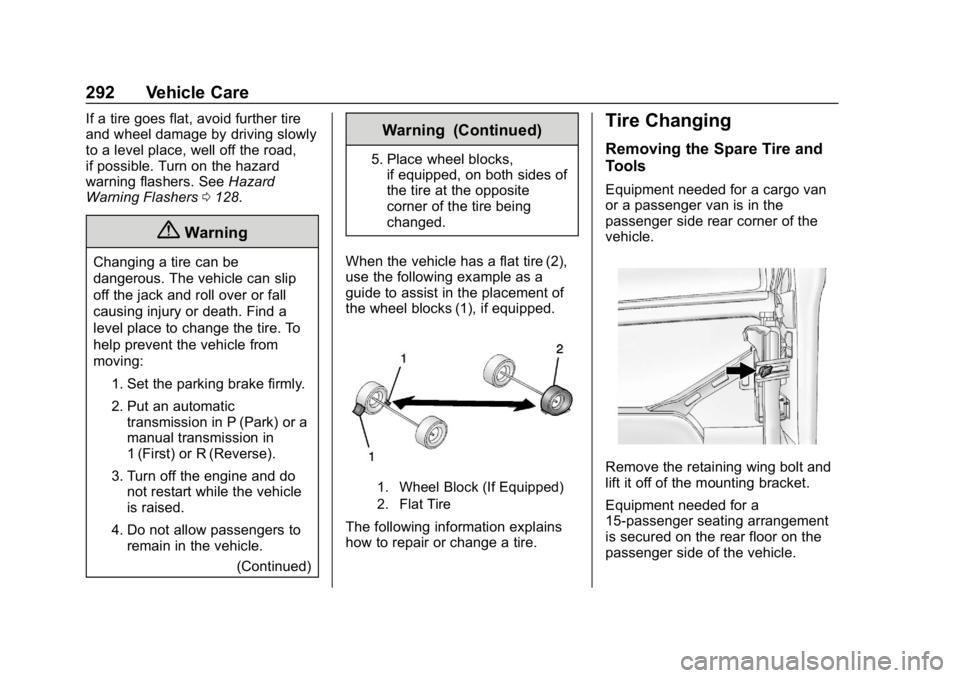
When the vehicle has a flat tire (2),
use the following example as a
guide to assist in the placement of
the wheel blocks (1), if equipped.
1. Wheel Block (If Equipped)
2. Flat Tire
The following information explains
how to repair or change a tire.
Tire Changing
Removing the Spare Tire and
Tools
Equipment needed for a cargo van
or a passenger van is in the
passenger side rear corner of the
vehicle.
Remove the retaining wing bolt and
lift it off of the mounting bracket.
Equipment needed for a
15-passenger seating arrangement
is secured on the rear floor on the
passenger side of the vehicle.
Page 304 of 373
Chevrolet Express Owner Manual (GMNA-Localizing-U.S./Canada/Mexico-
12146162) - 2019 - crc - 11/26/18
Vehicle Care 303
Caution
Ignoring these steps could result
in costly damage to the vehicle
that would not be covered by the
vehicle warranty. Trying to start
the vehicle by pushing or pulling it
will not work, and it could damage
the vehicle.
1. Check the other vehicle. It must have a 12-volt battery
with a negative ground system.
Caution
If the other vehicle does not have
a 12-volt system with a negative
ground, both vehicles can be
damaged. Only use a vehicle that
has a 12-volt system with a
negative ground for jump starting.
2. Get the vehicles close enough so the jumper cables can
reach, but be sure the vehicles
are not touching each other.
If they are, it could cause a ground connection you do not
want. You would not be able to
start your vehicle, and the bad
grounding could damage the
electrical systems.
To avoid the possibility of the
vehicles rolling, set the parking
brake firmly on both vehicles
involved in the jump start
procedure. Put an automatic
transmission in P (Park) or a
manual transmission in Neutral
before setting the parking
brake.
Caution
If any accessories are left on or
plugged in during the jump
starting procedure, they could be
damaged. The repairs would not
be covered by the vehicle
warranty. Whenever possible, turn
off or unplug all accessories on
either vehicle when jump starting.
3. Turn the ignition off on both vehicles. Unplug unnecessary
accessories plugged into the cigarette lighter or the
accessory power outlet. Turn
off the radio and all lamps that
are not needed. This will avoid
sparks and help save both
batteries. And it could save the
radio!
4. Open the hoods and locate the positive (+) and negative (−)
terminal locations of the other
vehicle.
On your van, use the unpainted
radio antenna bracket as a
remote negative (−) terminal.
{Warning
Using a match near a battery can
cause battery gas to explode.
People have been hurt doing this,
and some have been blinded.
Use a flashlight if you need more
light.
Battery fluid contains acid that
can burn you. Do not get it on
you. If you accidentally get it in
(Continued)
Page 308 of 373
Chevrolet Express Owner Manual (GMNA-Localizing-U.S./Canada/Mexico-
12146162) - 2019 - crc - 11/26/18
Vehicle Care 307
.Is the proper towing equipment
going to be used? See your
dealer or trailering professional
for additional advice and
equipment recommendations.
. Is the vehicle ready to be
towed? Just as preparing the
vehicle for a long trip, make sure
the vehicle is prepared to be
towed.
Caution
Use of a shield mounted in front
of the vehicle grille could restrict
airflow and cause damage to the
transmission. The repairs would
not be covered by the vehicle
warranty. If using a shield, only
use one that attaches to the
towing vehicle.
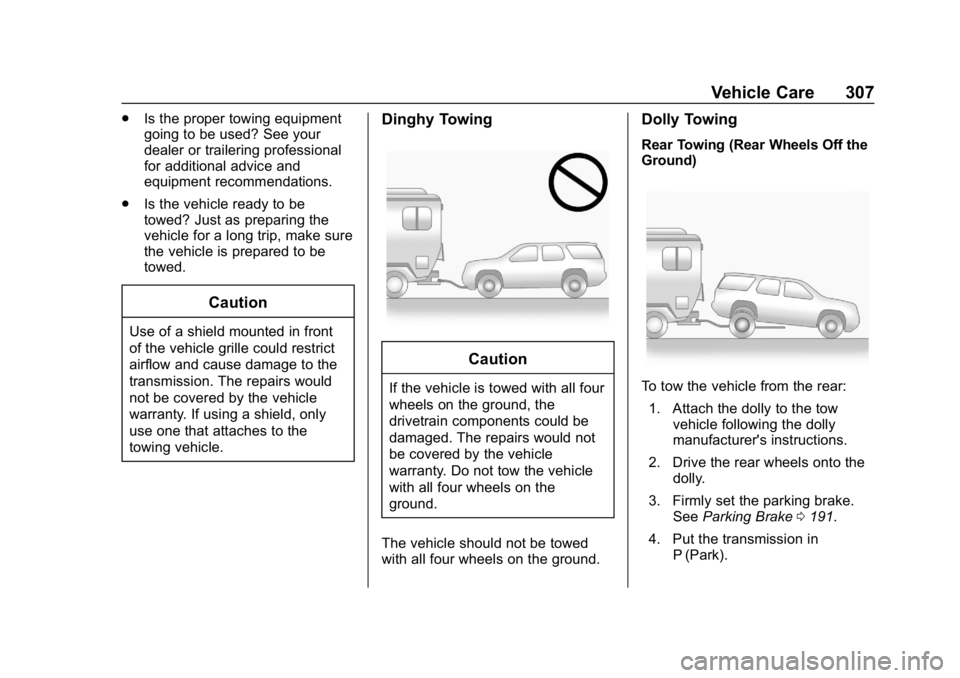
Dinghy Towing
Caution
If the vehicle is towed with all four
wheels on the ground, the
drivetrain components could be
damaged. The repairs would not
be covered by the vehicle
warranty. Do not tow the vehicle
with all four wheels on the
ground.
The vehicle should not be towed
with all four wheels on the ground.
Dolly Towing
Rear Towing (Rear Wheels Off the
Ground)
To tow the vehicle from the rear: 1. Attach the dolly to the tow vehicle following the dolly
manufacturer's instructions.
2. Drive the rear wheels onto the dolly.
3. Firmly set the parking brake. See Parking Brake 0191.
4. Put the transmission in P (Park).
Page 321 of 373

Chevrolet Express Owner Manual (GMNA-Localizing-U.S./Canada/Mexico-
12146162) - 2019 - crc - 11/26/18
320 Service and Maintenance
.Inspect brake system. See
Exterior Care 0308.
. Visually inspect steering,
suspension, and chassis
components for damage,
including cracks or tears in the
rubber boots, loose or missing
parts, or signs of wear at least
once a year. See Exterior Care
0 308.
. Inspect power steering for
proper attachment, connections,
binding, leaks, cracks,
chafing, etc.
. Visually inspect halfshafts and
drive shafts for excessive wear,
lubricant leaks, and/or damage
including: tube dents or cracks,
constant velocity joint or
universal joint looseness,
cracked or missing boots, loose
or missing boot clamps, center
bearing excessive looseness,
loose or missing fasteners, and
axle seal leaks.
. Check restraint system
components. See Safety System
Check 058. .
Visually inspect fuel system for
damage or leaks.
. Visually inspect exhaust system
and nearby heat shields for
loose or damaged parts.
. Lubricate body components. See
Exterior Care 0308.
. Check starter switch. See Starter
Switch Check 0256.
. Check automatic transmission
shift lock control function. See
Automatic Transmission Shift
Lock Control Function Check
0256.
. Check ignition transmission lock.
See Ignition Transmission Lock
Check 0257.
. Check parking brake and
automatic transmission park
mechanism. See Park Brake and
P (Park) Mechanism Check
0 257.
. Check accelerator pedal for
damage, high effort, or binding.
Replace if needed. .
Visually inspect gas strut for
signs of wear, cracks, or other
damage. Check the hold open
ability of the strut. If the hold
open is low, service the gas
strut. See Gas Strut(s) 0258.
. Lubricate the steering linkage
(greasable joints). See Normal
and Severe Maintenance
Schedules. For severe
commercial use vehicles, see
Special Application Services
0324.
. Visually inspect the spare tire to
ensure that it is tightly stowed
under the vehicle. Push, pull,
and try to turn the tire. If the
spare tire moves, tighten as
necessary. Verify that the wheel
retainer plate compression
spring is fully compressed. See
Tire Changing 0292.
Page 328 of 373
Chevrolet Express Owner Manual (GMNA-Localizing-U.S./Canada/Mexico-
12146162) - 2019 - crc - 11/26/18
Service and Maintenance 327
Recommended Fluids, Lubricants, and Parts
Recommended Fluids and Lubricants
This maintenance section applies to vehicles with a gasoline engine. If the vehicle has a diesel engine, see the
maintenance schedule section in the Duramax diesel supplement.
Fluids and lubricants identified below by name, part number, or specification can be obtained from your dealer.Usage Fluid/Lubricant
Automatic Transmission (6-Speed Transmission) DEXRON-VI Automatic Transmission Fluid.
Automatic Transmission (8-Speed Transmission) DEXRON-HP Automatic Transmission Fluid.
Chassis Lubrication, Parking Brake Cable Guides Chassis Lubricant (GM Part No. 12377985, in Canada 88901242) or
lubricant meeting requirements of NLGI #2, Category LB or GC-LB.
Engine Coolant 50/50 mixture of clean, drinkable water and use only DEX-COOL Coolant. SeeCooling System 0244.
Engine Oil Engine oil meeting the dexos1 specification of the proper SAE viscosity grade. ACDelco dexos1 full synthetic is recommended. See Engine Oil
0 235.
Front Wheel Bearings Wheel bearing lubricant meeting requirements of NLGI #2, Category GC or GC-LB (GM Part No. 1051344, in Canada 993037).
Hydraulic Brake System DOT 3 Hydraulic Brake Fluid (GM Part No. 19353126, in Canada 19353127).
Page 363 of 373

Chevrolet Express Owner Manual (GMNA-Localizing-U.S./Canada/Mexico-
12146162) - 2019 - crc - 11/26/18
362 Index
Automatic (cont'd)Headlamp System . . . . . . . . . . . . 127
Transmission . . . . . . . . . . . . . . . . . 185
Transmission Fluid . . . . . . 238, 241
Automatic Transmission Manual Mode . . . . . . . . . . . . . . . . . 188
Shift Lock Control FunctionCheck . . . . . . . . . . . . . . . . . . . . . . . 256
Auxiliary
Devices . . . . . . . . . . . . . . . . . . . . . . . 146
Avoiding Untrusted Media Devices . . . . . . . . . . . . . . . . . . . . . . . 141
Axle, Rear . . . . . . . . . . . . . . . . . . . . . . 254
B
Battery Exterior Lighting BatterySaver . . . . . . . . . . . . . . . . . . . . . . . 131
Load Management . . . . . . . . . . . . 130
Power Protection . . . . . . . . . . . . . 131
Battery - North America . . . . 253, 302
Blade Replacement, Wiper . . . . . 257
Bluetooth Overview . . . . . . . . . . . . . . . . . . . . . 151
Brake System Warning Light . . . . . . . . 109
Brakes . . . . . . . . . . . . . . . . . . . . . . . . . . 251 Antilock . . . . . . . . . . . . . . . . . . . . . . . 190 Brakes (cont'd)
Assist . . . . . . . . . . . . . . . . . . . . . . . . . 191
Fluid . . . . . . . . . . . . . . . . . . . . . . . . . . 252
Parking . . . . . . . . . . . . . . . . . . . . . . . 191
Braking . . . . . . . . . . . . . . . . . . . . . . . . . 167
Break-In, New Vehicle . . . . . . . . . . 176
Bulb Replacement Center High-MountedStoplamp (CHMSL) . . . . . . . . . 262
Front Turn Signal, Sidemarker, and Parking
Lamps . . . . . . . . . . . . . . . . . . . . . . 260
Halogen Bulbs . . . . . . . . . . . . . . . . 260
Headlamp Aiming . . . . . . . . . . . . . 259
Headlamps . . . . . . . . . . . . . . . . . . . 260
License Plate Lamps . . . . . . . . . 262
Taillamps . . . . . . . . . . . . . . . . . . . . . 261
Buying New Tires . . . . . . . . . . . . . . . 286
C
Calibration . . . . . . . . . . . . . . . . . . . . . . . 96
California
Perchlorate MaterialsRequirements . . . . . . . . . . . . . . . 230
California Proposition
65 Warning . . . . . . . . . .229, 253, 302, Back CoverCamera
Rear Vision (RVC) . . . . . . . . . . . . 198
Canadian Vehicle Owners . . . . . . . . 2
Capacities and Specifications . . . . . . . . . . . . . . . . . 332
Carbon Monoxide Engine Exhaust . . . . . . . . . . . . . . . 184
Winter Driving . . . . . . . . . . . . . . . . 170
Cargo Tie-Downs . . . . . . . . . . . . . . . . . . . . . . 92
Cargo Door Relocking . . . . . . . . . . . 31
Caution, Danger, and Warning . . . . 2
CD Player . . . . . . . . . . . . . . . . . . . . . . 141
Center High-Mounted
Stoplamp (CHMSL) . . . . . . . . . . . 262
Chains, Tire . . . . . . . . . . . . . . . . . . . . 290
Charging System Light . . . . . . . . . 107
Check
Engine Light (MalfunctionIndicator) . . . . . . . . . . . . . . . . . . . . 108
Ignition Transmission Lock . . . 257
Child Restraints Infants and Young Children . . . . . 73
Lower Anchors and Tethersfor Children . . . . . . . . . . . . . . . . . . . 79
Older Children . . . . . . . . . . . . . . . . . . 72
Securing . . . . . . . . . . . . . . . . . . . . 85, 87
Systems . . . . . . . . . . . . . . . . . . . . . . . . 76