remote control CHEVROLET EXPRESS 2021 Owners Manual
[x] Cancel search | Manufacturer: CHEVROLET, Model Year: 2021, Model line: EXPRESS, Model: CHEVROLET EXPRESS 2021Pages: 289, PDF Size: 11.46 MB
Page 4 of 289

Chevrolet Express Owner Manual (GMNA-Localizing-U.S./Canada/Mexico-
15555951) - 2022 - CRC - 1/27/22
Introduction 3
Q:Keep Fuse Block Covers Properly
Installed
|: Lane Change Alert
@:Lane Departure Warning
A:Lane Keep Assist
*: Malfunction Indicator Lamp
::Oil Pressure
X:Park Assist
~:Pedestrian Ahead Indicator
O:Power
7:Rear Cross Traffic Alert
I:Registered Technician
/:Remote Vehicle Start
h:Risk of Electrical Fire
>:Seat Belt Reminders
I:Side Blind Zone Alert
7:Tire Pressure Monitor
d:Traction Control/StabiliTrak/Electronic
Stability Control (ESC)
a: Under Pressure
k: Vehicle Ahead Indicator
Page 7 of 289
Chevrolet Express Owner Manual (GMNA-Localizing-U.S./Canada/Mexico-
15555951) - 2022 - CRC - 1/27/22
6 Keys, Doors, and Windows
Keys, Doors, and
Windows
Keys and Locks
Keys . . . . . . . . . . . . . . . . . . . . . . . . . . . . . . . . . . . . . 6
Remote Keyless Entry (RKE) System . . . . . 8
Remote Keyless Entry (RKE) SystemOperation . . . . . . . . . . . . . . . . . . . . . . . . . . . . . . 8
Remote Vehicle Start . . . . . . . . . . . . . . . . . . . 10
Door Locks . . . . . . . . . . . . . . . . . . . . . . . . . . . . . . 11
Power Door Locks . . . . . . . . . . . . . . . . . . . . . . . 12
Cargo Door Relocking . . . . . . . . . . . . . . . . . . . 12
Delayed Locking . . . . . . . . . . . . . . . . . . . . . . . . 12
Automatic Door Locks . . . . . . . . . . . . . . . . . . . 12
Lockout Protection . . . . . . . . . . . . . . . . . . . . . . 12
Safety Locks . . . . . . . . . . . . . . . . . . . . . . . . . . . . 12
Doors
Side Door (60/40 Swing-Out) . . . . . . . . . . . 13
Sliding Door . . . . . . . . . . . . . . . . . . . . . . . . . . . . 14
Rear Doors . . . . . . . . . . . . . . . . . . . . . . . . . . . . . . 15
Vehicle Security
Vehicle Security . . . . . . . . . . . . . . . . . . . . . . . . . 15
Vehicle Alarm System . . . . . . . . . . . . . . . . . . . 15
Immobilizer . . . . . . . . . . . . . . . . . . . . . . . . . . . . . 16
Immobilizer Operation . . . . . . . . . . . . . . . . . . 16
Exterior Mirrors
Convex Mirrors . . . . . . . . . . . . . . . . . . . . . . . . . 17 Manual Mirrors . . . . . . . . . . . . . . . . . . . . . . . . . 17
Trailer-Tow Mirrors . . . . . . . . . . . . . . . . . . . . . 18
Power Mirrors . . . . . . . . . . . . . . . . . . . . . . . . . . 18
Folding Mirrors . . . . . . . . . . . . . . . . . . . . . . . . . 18
Heated Mirrors . . . . . . . . . . . . . . . . . . . . . . . . . 18
Interior Mirrors
Interior Rearview Mirrors . . . . . . . . . . . . . . . 18
Manual Rearview Mirror . . . . . . . . . . . . . . . . 19
Windows
Windows . . . . . . . . . . . . . . . . . . . . . . . . . . . . . . . 19
Manual Windows . . . . . . . . . . . . . . . . . . . . . . . 19
Power Windows . . . . . . . . . . . . . . . . . . . . . . . . 19
Swing-Out Windows . . . . . . . . . . . . . . . . . . . . 20
Enhanced Technology Glass . . . . . . . . . . . . 20
Rear Windows . . . . . . . . . . . . . . . . . . . . . . . . . . 21
Sun Visors . . . . . . . . . . . . . . . . . . . . . . . . . . . . . . 21
Keys and Locks
Keys
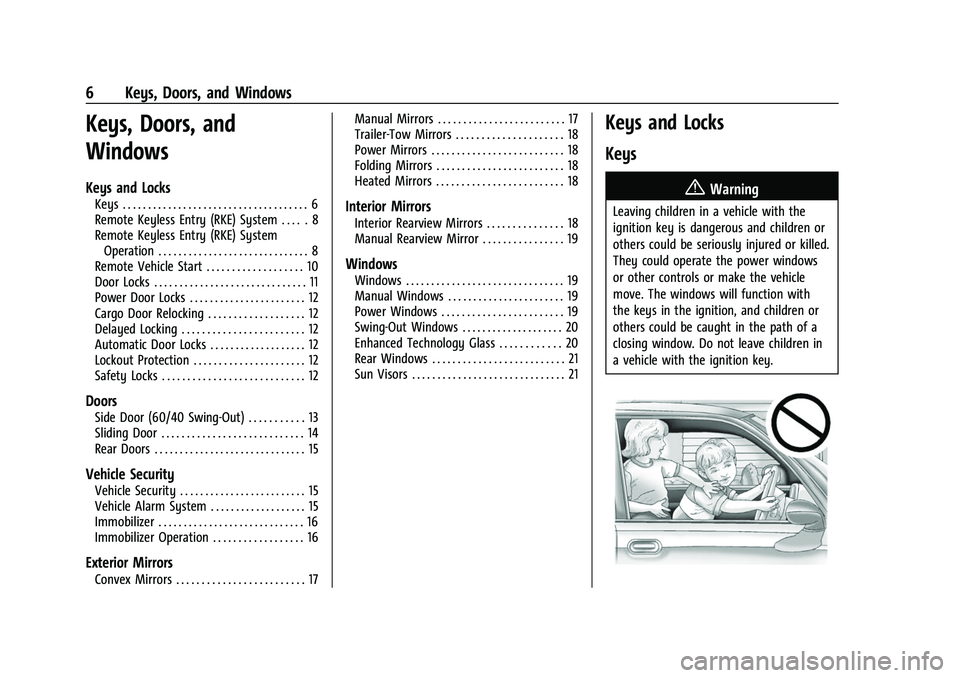
{Warning
Leaving children in a vehicle with the
ignition key is dangerous and children or
others could be seriously injured or killed.
They could operate the power windows
or other controls or make the vehicle
move. The windows will function with
the keys in the ignition, and children or
others could be caught in the path of a
closing window. Do not leave children in
a vehicle with the ignition key.
Page 11 of 289
Chevrolet Express Owner Manual (GMNA-Localizing-U.S./Canada/Mexico-
15555951) - 2022 - CRC - 1/27/22
10 Keys, Doors, and Windows
To replace the battery:1. Separate the transmitter with a flat, thin object, such as a flat head screwdriver.
.Carefully insert the tool into the
notch located along the parting line
of the transmitter. Do not insert the
tool too far. Stop as soon as
resistance is felt.
.Twist the tool until the transmitter is
separated.
2. Remove the old battery. Do not use a metal object.
3. Insert the new battery, positive side facing down. Replace with a CR2032 or
equivalent battery.
4. Set transmitter button side down on a hard surface and press the other half
straight down to force the halves
together.
Remote Vehicle Start
This vehicle may have a remote start
feature. This feature allows you to start the
engine from outside the vehicle. It may also
start the vehicle's heating or air conditioning
systems. See Climate Control Systems 0114. Laws in some local communities may restrict
the use of remote starters. For example,
some laws may require a person using
remote start to have the vehicle in view
when doing so. Check local regulations for
any requirements on remote starting of
vehicles.
Do not use the remote start feature if the
vehicle is low on fuel. The vehicle may run
out of fuel.
The RKE transmitter range may be less while
the vehicle is running.
Other conditions can affect the performance
of the transmitter. See
Remote Keyless Entry
(RKE) System 08.
/:This button will be on the RKE
transmitter if the vehicle has remote start.
To start the engine using the remote start
feature:
1. Press and release
Qon the transmitter.
2. Immediately press and hold
/until the
turn signal lamps flash. If you cannot see
the lamps, press and hold
/for at least
four seconds. When the engine starts, the parking
lamps will turn on and remain on while
the engine is running. The doors will be
locked.
The engine will continue to run for
10 minutes. After 30 seconds, repeat the
steps if a 10-minute extension is desired.
Remote start can be extended only once.
After entering the vehicle during a remote
start, turn the ignition on to drive the
vehicle.
A maximum of two remote starts or a start
with an extension are allowed between
ignition cycles.
If the remote start procedure is used again
before the first 10-minute time frame has
ended, the first 10 minutes will immediately
expire and the second 10-minute time frame
will start.
After the engine has been remote started
two times or a start with an extension, the
ignition must be turned on and then off
before the remote start procedure can be
used again.
Page 12 of 289
Chevrolet Express Owner Manual (GMNA-Localizing-U.S./Canada/Mexico-
15555951) - 2022 - CRC - 1/27/22
Keys, Doors, and Windows 11
To cancel a remote start do any of the
following:
.Press and hold/until the parking lamps
turn off.
.Turn on the hazard warning flashers.
.Turn the ignition on and then off.
The remote vehicle start feature will not
operate if:
.The key is in the ignition.
.The hood is open.
.The hazard warning flashers are on.
.There is an emission control system
malfunction. See Malfunction Indicator
Lamp (Check Engine Light) 077.
.The engine coolant temperature is
too high.
.The oil pressure is low.
.The vehicle is not in park.
.Two remote starts or a start with an
extension have already been provided.
To turn on or off, see Vehicle Personalization
0 87.
Door Locks
{Warning
.Passengers, especially children, can
easily open the doors and fall out of a
moving vehicle. When a door is locked,
the handle will not open it. The
chance of being thrown out of the
vehicle in a crash is increased if the
doors are not locked. So, all
passengers should wear seat belts
properly and the doors should be
locked whenever the vehicle is driven.
.Young children who get into unlocked
vehicles may be unable to get out.
A child can be overcome by extreme
heat and can suffer permanent injuries
or even death from heat stroke.
Always lock the vehicle whenever
leaving it.
.Outsiders can easily enter through an
unlocked door when you slow down
or stop the vehicle. Locking the doors
can help prevent this from happening.
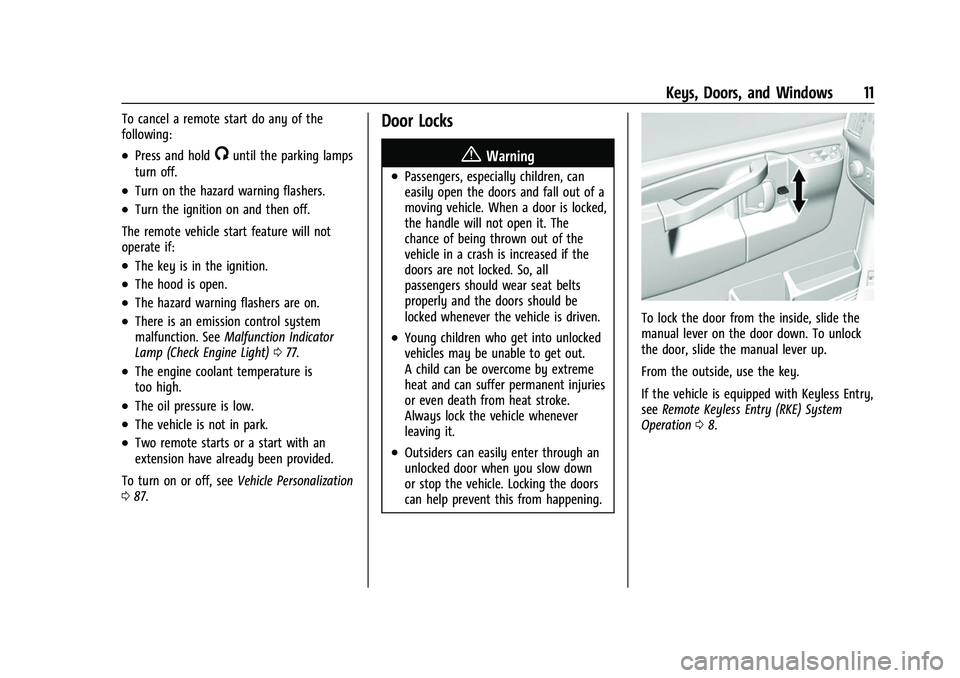
To lock the door from the inside, slide the
manual lever on the door down. To unlock
the door, slide the manual lever up.
From the outside, use the key.
If the vehicle is equipped with Keyless Entry,
see Remote Keyless Entry (RKE) System
Operation 08.
Page 84 of 289
Chevrolet Express Owner Manual (GMNA-Localizing-U.S./Canada/Mexico-
15555951) - 2022 - CRC - 1/27/22
Instruments and Controls 83
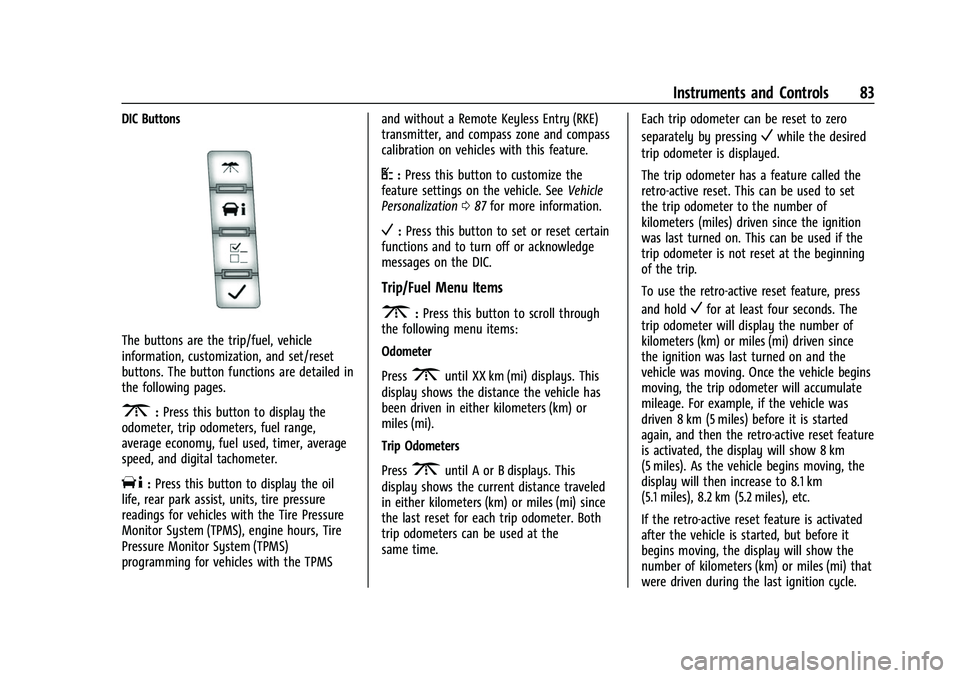
DIC Buttons
The buttons are the trip/fuel, vehicle
information, customization, and set/reset
buttons. The button functions are detailed in
the following pages.
3:Press this button to display the
odometer, trip odometers, fuel range,
average economy, fuel used, timer, average
speed, and digital tachometer.
T: Press this button to display the oil
life, rear park assist, units, tire pressure
readings for vehicles with the Tire Pressure
Monitor System (TPMS), engine hours, Tire
Pressure Monitor System (TPMS)
programming for vehicles with the TPMS and without a Remote Keyless Entry (RKE)
transmitter, and compass zone and compass
calibration on vehicles with this feature.
U:
Press this button to customize the
feature settings on the vehicle. See Vehicle
Personalization 087 for more information.
V:Press this button to set or reset certain
functions and to turn off or acknowledge
messages on the DIC.
Trip/Fuel Menu Items
3: Press this button to scroll through
the following menu items:
Odometer
Press
3until XX km (mi) displays. This
display shows the distance the vehicle has
been driven in either kilometers (km) or
miles (mi).
Trip Odometers
Press
3until A or B displays. This
display shows the current distance traveled
in either kilometers (km) or miles (mi) since
the last reset for each trip odometer. Both
trip odometers can be used at the
same time. Each trip odometer can be reset to zero
separately by pressing
Vwhile the desired
trip odometer is displayed.
The trip odometer has a feature called the
retro-active reset. This can be used to set
the trip odometer to the number of
kilometers (miles) driven since the ignition
was last turned on. This can be used if the
trip odometer is not reset at the beginning
of the trip.
To use the retro-active reset feature, press
and hold
Vfor at least four seconds. The
trip odometer will display the number of
kilometers (km) or miles (mi) driven since
the ignition was last turned on and the
vehicle was moving. Once the vehicle begins
moving, the trip odometer will accumulate
mileage. For example, if the vehicle was
driven 8 km (5 miles) before it is started
again, and then the retro-active reset feature
is activated, the display will show 8 km
(5 miles). As the vehicle begins moving, the
display will then increase to 8.1 km
(5.1 miles), 8.2 km (5.2 miles), etc.
If the retro-active reset feature is activated
after the vehicle is started, but before it
begins moving, the display will show the
number of kilometers (km) or miles (mi) that
were driven during the last ignition cycle.
Page 89 of 289
Chevrolet Express Owner Manual (GMNA-Localizing-U.S./Canada/Mexico-
15555951) - 2022 - CRC - 1/27/22
88 Instruments and Controls
To select a setting, pressVwhile the
desired setting is displayed on the DIC.
A beep will sound once a language has been
selected.
AUTO DOOR LOCK
This feature allows you to select when the
doors will automatically lock.
Press
Uuntil AUTO DOOR LOCK appears on
the DIC display. Press
Vonce to access the
settings for this feature. Then press
Uto
scroll through the following settings:
SHIFT OUT OF PARK (default) : The doors
will automatically lock when the vehicle is
shifted out of P (Park).
AT VEHICLE SPEED : The doors will
automatically lock when the vehicle speed is
above 13 km/h (8 mph) for three seconds.
NO CHANGE : No change will be made to
this feature. The current setting will remain.
To select a setting, press
Vwhile the
desired setting is displayed on the DIC. AUTO DOOR UNLOCK
This feature allows you to select whether or
not to turn off the automatic door unlocking
feature. It also allows you to select which
doors and when the doors will automatically
unlock.
Press
Uuntil AUTO DOOR UNLOCK appears
on the DIC display. Press
Vonce to access
the settings for this feature. Then press
U
to scroll through the following settings:
OFF : None of the doors will automatically
unlock.
DRIVER AT KEY OUT : Only the driver door
will unlock when the key is taken out of the
ignition.
DRIVER IN PARK : Only the driver door will
unlock when the vehicle is shifted into
P (Park).
ALL AT KEY OUT : All of the doors will
unlock when the key is taken out of the
ignition.
ALL IN PARK (default) : All of the doors will
unlock when the vehicle is shifted into
P (Park).
NO CHANGE : No change will be made to
this feature. The current setting will remain. To select a setting, press
Vwhile the
desired setting is displayed on the DIC.
REMOTE DOOR LOCK
This feature allows you to select the type of
feedback you will receive when locking the
vehicle with the Remote Keyless Entry (RKE)
transmitter. You will not receive feedback
when locking the vehicle with the RKE
transmitter if the doors are open. See
Remote Keyless Entry (RKE) System
Operation 08.
Press
Uuntil REMOTE DOOR LOCK appears
on the DIC display. Press
Vonce to access
the settings for this feature. Then press
U
to scroll through the following settings:
OFF : There will be no feedback when you
press
Qon the RKE transmitter.
LIGHTS ONLY : The exterior lamps will flash
when you press
Qon the RKE transmitter.
HORN ONLY : The horn will sound on the
second press of
Qon the RKE transmitter.
Page 90 of 289
Chevrolet Express Owner Manual (GMNA-Localizing-U.S./Canada/Mexico-
15555951) - 2022 - CRC - 1/27/22
Instruments and Controls 89
HORN & LIGHTS (default) :The exterior
lamps will flash when you press
Qon the
RKE transmitter, and the horn will sound
when
Qis pressed again within five seconds
of the previous command.
NO CHANGE : No change will be made to
this feature. The current setting will remain.
To select a setting, press
Vwhile the
desired setting is displayed on the DIC.
REMOTE DOOR UNLOCK
This feature allows you to select the type of
feedback you will receive when unlocking
the vehicle with the Remote Keyless
Entry (RKE) transmitter. You will not receive
feedback when unlocking the vehicle with
the RKE transmitter if the doors are open.
See Remote Keyless Entry (RKE) System
Operation 08.
Press
Uuntil REMOTE DOOR UNLOCK
appears on the DIC display. Press
Vonce to
access the settings for this feature. Then
press
Uto scroll through the following
settings:
LIGHTS OFF : The exterior lamps will not
flash when you press
Kon the RKE
transmitter. LIGHTS ON (default) :
The exterior lamps
will flash when you press
Kon the RKE
transmitter.
NO CHANGE : No change will be made to
this feature. The current setting will remain.
To select a setting, press
Vwhile the
desired setting is displayed on the DIC.
DELAY DOOR LOCK
This feature allows you to select whether or
not the locking of the doors will be delayed.
When locking the doors with the power
door lock switch and a door is open, this
feature will delay locking the doors until
five seconds after the last door is closed.
You will hear three chimes to signal that the
delayed locking feature is in use. The key
must be out of the ignition for this feature
to work. You can temporarily override
delayed locking by pressing the power door
lock switch twice or
Qon the RKE
transmitter twice. See Delayed Locking012.
Press
Uuntil DELAY DOOR LOCK appears on
the DIC display. Press
Vonce to access the
settings for this feature. Then press
Uto
scroll through the following settings: OFF :
There will be no delayed locking of
the vehicle's doors.
ON (default) : The doors will not lock until
five seconds after the last door is closed.
NO CHANGE : No change will be made to
this feature. The current setting will remain.
To select a setting, press
Vwhile the
desired setting is displayed on the DIC.
EXIT LIGHTING
This feature allows you to select the
amount of time you want the exterior
lamps to remain on when it is dark enough
outside. This happens after the key is turned
from on to off.
Press
Uuntil EXIT LIGHTING appears on the
DIC display. Press
Vonce to access the
settings for this feature. Then press
Uto
scroll through the following settings:
OFF : The exterior lamps will not turn on.
10 SECONDS (default) : The exterior lamps
will stay on for 10 seconds.
1 MINUTE : The exterior lamps will stay on
for one minute.
2 MINUTES : The exterior lamps will stay on
for two minutes.
Page 95 of 289
Chevrolet Express Owner Manual (GMNA-Localizing-U.S./Canada/Mexico-
15555951) - 2022 - CRC - 1/27/22
94 Lighting
G:An arrow on the instrument cluster
flashes in the direction of the turn or lane
change.
To signal a turn, move the lever all the way
up or down.
To signal a lane change, raise or lower the
lever until the arrow starts to flash. The
turn signal automatically flashes three times
and if the Tow/Haul Mode is active it
flashes six times. Holding the turn signal
lever for more than one second causes the
turn signals to flash continually until the
lever is released.
The lever returns to its starting position
when released.
If after signaling a turn or lane change the
arrow flashes rapidly or does not come on, a
signal bulb may be burned out.
Have any burned out bulbs replaced. If a
bulb is not burned out, check the fuse. See
Fuses and Circuit Breakers 0198.
Turn Signal On Chime
If the turn signal is left on for more than
1.2 km (0.75 mi), a chime sounds at each
flash of the turn signal and the message
TURN SIGNAL ON also appears in the Driver Information Center (DIC). To turn off the
chime and message, move the turn signal
lever to the off position.
Interior Lighting
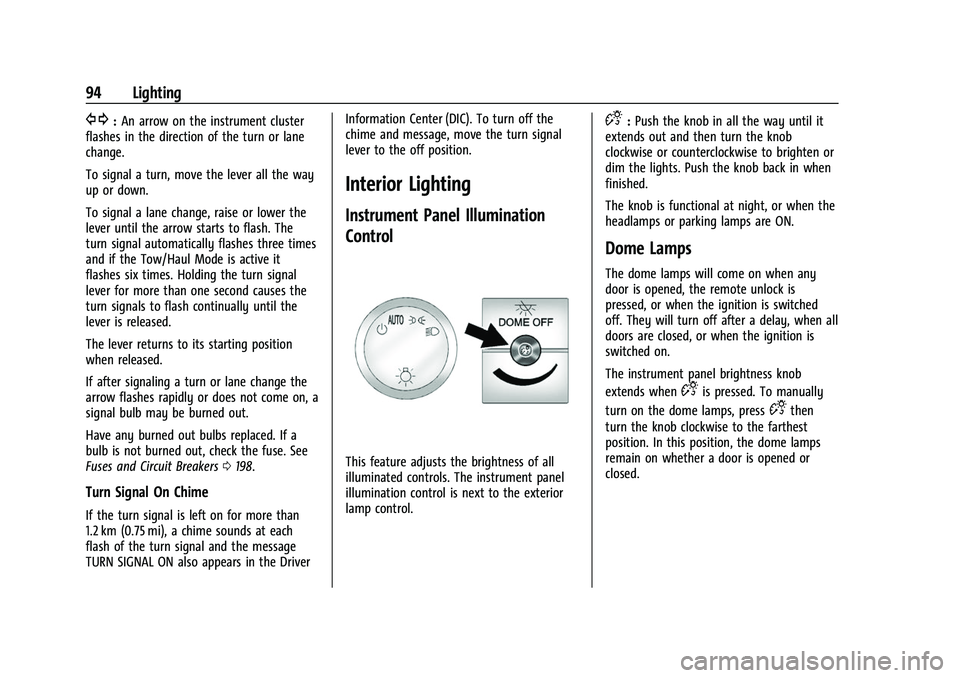
Instrument Panel Illumination
Control
This feature adjusts the brightness of all
illuminated controls. The instrument panel
illumination control is next to the exterior
lamp control.
D:
Push the knob in all the way until it
extends out and then turn the knob
clockwise or counterclockwise to brighten or
dim the lights. Push the knob back in when
finished.
The knob is functional at night, or when the
headlamps or parking lamps are ON.
Dome Lamps
The dome lamps will come on when any
door is opened, the remote unlock is
pressed, or when the ignition is switched
off. They will turn off after a delay, when all
doors are closed, or when the ignition is
switched on.
The instrument panel brightness knob
extends when
Dis pressed. To manually
turn on the dome lamps, press
Dthen
turn the knob clockwise to the farthest
position. In this position, the dome lamps
remain on whether a door is opened or
closed.
Page 96 of 289
Chevrolet Express Owner Manual (GMNA-Localizing-U.S./Canada/Mexico-
15555951) - 2022 - CRC - 1/27/22
Lighting 95
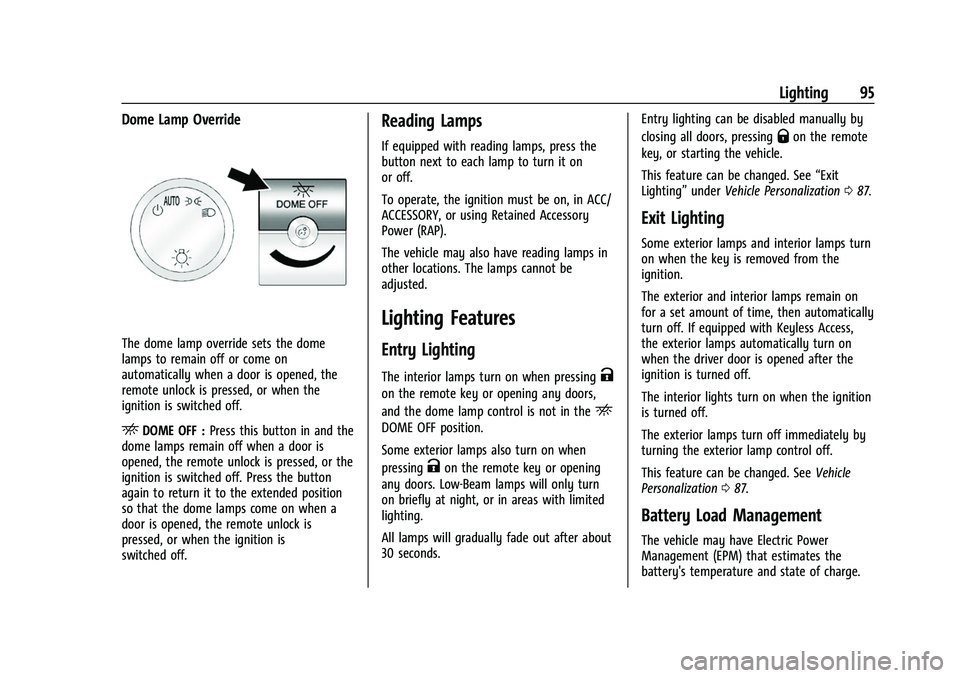
Dome Lamp Override
The dome lamp override sets the dome
lamps to remain off or come on
automatically when a door is opened, the
remote unlock is pressed, or when the
ignition is switched off.
EDOME OFF :Press this button in and the
dome lamps remain off when a door is
opened, the remote unlock is pressed, or the
ignition is switched off. Press the button
again to return it to the extended position
so that the dome lamps come on when a
door is opened, the remote unlock is
pressed, or when the ignition is
switched off.
Reading Lamps
If equipped with reading lamps, press the
button next to each lamp to turn it on
or off.
To operate, the ignition must be on, in ACC/
ACCESSORY, or using Retained Accessory
Power (RAP).
The vehicle may also have reading lamps in
other locations. The lamps cannot be
adjusted.
Lighting Features
Entry Lighting
The interior lamps turn on when pressingK
on the remote key or opening any doors,
and the dome lamp control is not in the
E
DOME OFF position.
Some exterior lamps also turn on when
pressing
Kon the remote key or opening
any doors. Low-Beam lamps will only turn
on briefly at night, or in areas with limited
lighting.
All lamps will gradually fade out after about
30 seconds. Entry lighting can be disabled manually by
closing all doors, pressing
Qon the remote
key, or starting the vehicle.
This feature can be changed. See “Exit
Lighting” underVehicle Personalization 087.
Exit Lighting
Some exterior lamps and interior lamps turn
on when the key is removed from the
ignition.
The exterior and interior lamps remain on
for a set amount of time, then automatically
turn off. If equipped with Keyless Access,
the exterior lamps automatically turn on
when the driver door is opened after the
ignition is turned off.
The interior lights turn on when the ignition
is turned off.
The exterior lamps turn off immediately by
turning the exterior lamp control off.
This feature can be changed. See Vehicle
Personalization 087.
Battery Load Management
The vehicle may have Electric Power
Management (EPM) that estimates the
battery's temperature and state of charge.
Page 204 of 289
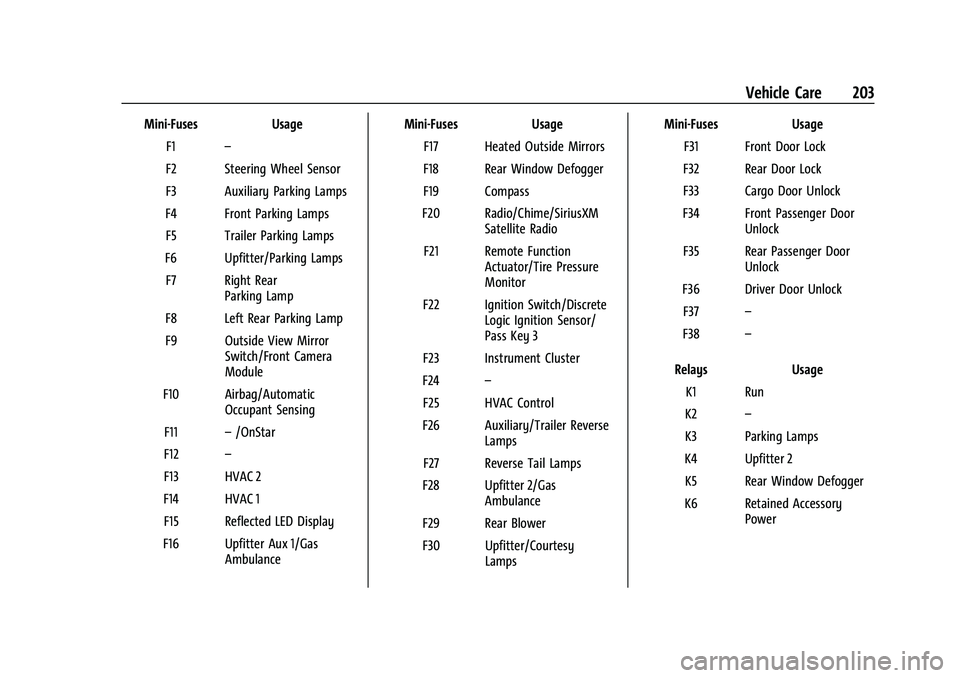
Chevrolet Express Owner Manual (GMNA-Localizing-U.S./Canada/Mexico-
15555951) - 2022 - CRC - 1/27/22
Vehicle Care 203
Mini-FusesUsage
F1 –
F2 Steering Wheel Sensor
F3 Auxiliary Parking Lamps
F4 Front Parking Lamps F5 Trailer Parking Lamps
F6 Upfitter/Parking Lamps F7 Right Rear Parking Lamp
F8 Left Rear Parking Lamp
F9 Outside View Mirror Switch/Front Camera
Module
F10 Airbag/Automatic Occupant Sensing
F11 –/OnStar
F12 –
F13 HVAC 2
F14 HVAC 1 F15 Reflected LED Display
F16 Upfitter Aux 1/Gas Ambulance Mini-Fuses
Usage
F17 Heated Outside Mirrors
F18 Rear Window Defogger
F19 Compass
F20 Radio/Chime/SiriusXM Satellite Radio
F21 Remote Function Actuator/Tire Pressure
Monitor
F22 Ignition Switch/Discrete Logic Ignition Sensor/
Pass Key 3
F23 Instrument Cluster
F24 –
F25 HVAC Control
F26 Auxiliary/Trailer Reverse Lamps
F27 Reverse Tail Lamps
F28 Upfitter 2/Gas Ambulance
F29 Rear Blower
F30 Upfitter/Courtesy Lamps Mini-Fuses
Usage
F31 Front Door Lock
F32 Rear Door Lock
F33 Cargo Door Unlock
F34 Front Passenger Door Unlock
F35 Rear Passenger Door Unlock
F36 Driver Door Unlock F37 –
F38 –
Relays Usage
K1 Run
K2 –
K3 Parking Lamps
K4 Upfitter 2 K5 Rear Window Defogger
K6 Retained Accessory Power