display CHEVROLET EXPRESS 2022 User Guide
[x] Cancel search | Manufacturer: CHEVROLET, Model Year: 2022, Model line: EXPRESS, Model: CHEVROLET EXPRESS 2022Pages: 289, PDF Size: 11.46 MB
Page 84 of 289
Chevrolet Express Owner Manual (GMNA-Localizing-U.S./Canada/Mexico-
15555951) - 2022 - CRC - 1/27/22
Instruments and Controls 83
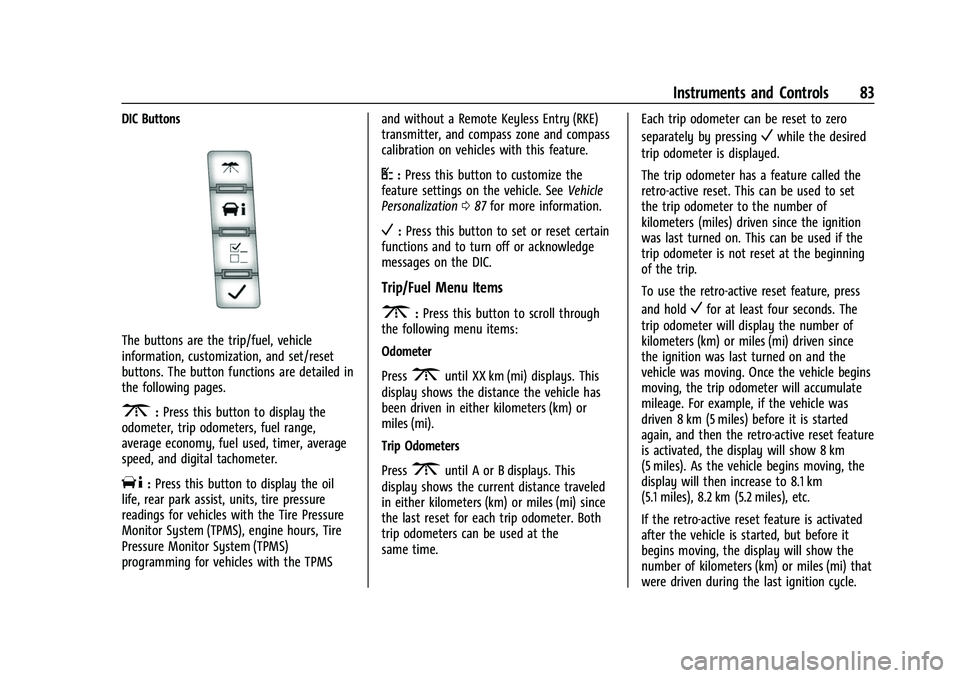
DIC Buttons
The buttons are the trip/fuel, vehicle
information, customization, and set/reset
buttons. The button functions are detailed in
the following pages.
3:Press this button to display the
odometer, trip odometers, fuel range,
average economy, fuel used, timer, average
speed, and digital tachometer.
T: Press this button to display the oil
life, rear park assist, units, tire pressure
readings for vehicles with the Tire Pressure
Monitor System (TPMS), engine hours, Tire
Pressure Monitor System (TPMS)
programming for vehicles with the TPMS and without a Remote Keyless Entry (RKE)
transmitter, and compass zone and compass
calibration on vehicles with this feature.
U:
Press this button to customize the
feature settings on the vehicle. See Vehicle
Personalization 087 for more information.
V:Press this button to set or reset certain
functions and to turn off or acknowledge
messages on the DIC.
Trip/Fuel Menu Items
3: Press this button to scroll through
the following menu items:
Odometer
Press
3until XX km (mi) displays. This
display shows the distance the vehicle has
been driven in either kilometers (km) or
miles (mi).
Trip Odometers
Press
3until A or B displays. This
display shows the current distance traveled
in either kilometers (km) or miles (mi) since
the last reset for each trip odometer. Both
trip odometers can be used at the
same time. Each trip odometer can be reset to zero
separately by pressing
Vwhile the desired
trip odometer is displayed.
The trip odometer has a feature called the
retro-active reset. This can be used to set
the trip odometer to the number of
kilometers (miles) driven since the ignition
was last turned on. This can be used if the
trip odometer is not reset at the beginning
of the trip.
To use the retro-active reset feature, press
and hold
Vfor at least four seconds. The
trip odometer will display the number of
kilometers (km) or miles (mi) driven since
the ignition was last turned on and the
vehicle was moving. Once the vehicle begins
moving, the trip odometer will accumulate
mileage. For example, if the vehicle was
driven 8 km (5 miles) before it is started
again, and then the retro-active reset feature
is activated, the display will show 8 km
(5 miles). As the vehicle begins moving, the
display will then increase to 8.1 km
(5.1 miles), 8.2 km (5.2 miles), etc.
If the retro-active reset feature is activated
after the vehicle is started, but before it
begins moving, the display will show the
number of kilometers (km) or miles (mi) that
were driven during the last ignition cycle.
Page 85 of 289
Chevrolet Express Owner Manual (GMNA-Localizing-U.S./Canada/Mexico-
15555951) - 2022 - CRC - 1/27/22
84 Instruments and Controls
Fuel Range
Press
3until FUEL RANGE displays. This
display shows the approximate number of
remaining kilometers (km) or miles (mi) the
vehicle can be driven without refueling.
The fuel range estimate is based on an
average of the fuel economy over recent
driving history and the amount of fuel
remaining in the fuel tank. This estimate
will change if driving conditions change. For
example, if driving in traffic and making
frequent stops, this display may read one
number, but if the vehicle is driven on a
freeway, the number may change even
though the same amount of fuel is in the
fuel tank. This is because different driving
conditions produce different fuel economies.
Generally, freeway driving produces better
fuel economy than city driving.
If the vehicle is low on fuel, the FUEL LEVEL
LOW message will be displayed.
Average Economy
Press
3until AVG ECONOMY displays.
This display shows the approximate average
liters per 100 kilometers (L/100 km) or miles
per gallon (mpg). This number is calculated
based on the number of L/100 km (mpg) recorded since the last time this menu item
was reset. To reset AVG ECONOMY, press
and hold
V. The display will return to zero.
Fuel Used
Press
3until FUEL USED displays. This
display shows the number of liters (L) or
gallons (gal) of fuel used since the last reset
of this menu item. To reset the fuel used
information, press and hold
Vwhile FUEL
USED is displayed.
Timer
Press
3until TIMER displays. This
display can be used as a timer.
To start the timer, press
Vwhile TIMER is
displayed. The display will show the amount
of time that has passed since the timer was
last reset, not including time the ignition is
off. Time will continue to be counted as
long as the ignition is on, even if another
display is being shown on the DIC. The
timer will record up to 99 hours, 59 minutes
and 59 seconds (99:59:59) after which the
display will return to zero.
To stop the timer, press
Vbriefly while
TIMER is displayed. To reset the timer to zero, press and hold
V
while TIMER is displayed.
Average Speed
Press
3until AVERAGE SPEED displays.
This display shows the average speed of the
vehicle in kilometers per hour (km/h) or
miles per hour (mph). This average is
calculated based on the various vehicle
speeds recorded since the last reset of this
value. To reset the value, press and hold
V.
The display will return to zero.
Digital Tachometer
Press
3until Tachometer ##00 RPM
displays. This display shows the engine
speed in revolutions per minute (RPM).
Blank Display
This display shows no information.
Vehicle Information Menu Items
T: Press this button to scroll through the
following menu items:
Oil Life
Press
Tuntil OIL LIFE REMAINING displays.
This display shows an estimate of the oil's
remaining useful life. If you see 99% OIL LIFE
REMAINING on the display, that means 99%
Page 86 of 289
Chevrolet Express Owner Manual (GMNA-Localizing-U.S./Canada/Mexico-
15555951) - 2022 - CRC - 1/27/22
Instruments and Controls 85
of the current oil life remains. The engine oil
life system will alert you to change the oil
on a schedule consistent with your driving
conditions.
When the remaining oil life is low, the
CHANGE ENGINE OIL SOON message will
appear on the display. You should change
the oil as soon as possible. SeeEngine Oil
0 179. In addition to the engine oil life
system monitoring the oil life, additional
maintenance is recommended. See
Maintenance Schedule 0245.
Remember, you must reset the OIL LIFE
yourself after each oil change. It will not
reset itself. Also, be careful not to reset the
OIL LIFE accidentally at any time other than
when the oil has just been changed.
It cannot be reset accurately until the next
oil change. To reset the engine oil life
system, see Engine Oil Life System 0181.
Side Blind Zone Alert
If the vehicle has Side Blind Zone Alert
(SBZA), this display allows the system to be
turned on or off. Press
Tuntil SBZA
displays. Once in this display, press
Vto
select between ON or OFF. When the SBZA system is turned off, a DIC message will
display. See
Side Blind Zone Alert (SBZA)
0 150.
Park Assist
If the vehicle has the Rear Park Assist (RPA)
system, press
Tuntil PARK ASSIST
displays. This display allows the system to
be turned on or off. Once in this display,
press to select between ON or OFF. The RPA
system automatically turns back on after
each vehicle start. When the RPA system is
turned off and the vehicle is shifted out of
P (Park), the DIC will display the PARK
ASSIST OFF message as a reminder that the
system has been turned off. See Park Assist
0 148.
Units
Press
Tuntil UNITS displays. This display
allows you to select between metric or
English units of measurement. Once in this
display, press
Vto select between METRIC
or ENGLISH units. Tire Pressure
If the vehicle has the Tire Pressure Monitor
System (TPMS), the pressure for each tire
can be viewed in the DIC. The tire pressure
will be shown in either kilopascals (kPa) or
pounds per square inch (psi). Press
Tuntil
the DIC displays FRONT TIRES PSI (kPa)
LEFT ## RIGHT ##. Press
Tagain until the
DIC displays REAR TIRES PSI (kPa) LEFT ##
RIGHT ##.
If a low tire pressure condition is detected
by the system while driving, a message
advising you to check the pressure in a
specific tire will appear in the display. See
Tire Pressure 0210.
If the tire pressure display shows dashes
instead of a value, there may be a problem
with the vehicle. If this consistently occurs,
see your dealer for service.
Engine Hours
Press
Tuntil ENGINE HOURS displays. This
display shows the total number of hours the
engine has run.
Page 87 of 289
Chevrolet Express Owner Manual (GMNA-Localizing-U.S./Canada/Mexico-
15555951) - 2022 - CRC - 1/27/22
86 Instruments and Controls
Relearn Tire Positions
The vehicle may have this display. To access
this display, the vehicle must be in P (Park).
If the vehicle has the Tire Pressure Monitor
System (TPMS), after rotating the tires or
after replacing a tire or sensor, the system
must re-learn the tire positions. To re-learn
the tire positions, seeTire Pressure Monitor
System 0211. See Tire Inspection 0214 and
Tire Rotation 0214.
Change Compass Zone
The vehicle may have this feature. To
change the compass zone through the DIC,
see Compass 068.
Calibrate Compass
The vehicle may have this feature. The
compass can be manually calibrated. To
calibrate the compass through the DIC, see
Compass 068.
Blank Display
This display shows no information.Vehicle Messages
Messages displayed on the DIC indicate the
status of the vehicle or some action that
may be needed to correct a condition.
Multiple messages may appear one after
another.
The messages that do not require
immediate action can be acknowledged and
cleared by pressing
V. The messages that
require immediate action cannot be cleared
until that action is performed.
All messages should be taken seriously;
clearing the message does not correct the
problem.
If a SERVICE message appears, see your
dealer.
Follow the instructions given in the
messages. The system displays messages
regarding the following topics:
.Service Messages
.Fluid Levels
.Vehicle Security
.Brakes
.Steering
.Ride Control Systems
.Driver Assistance Systems
.Cruise Control
.Lighting and Bulb Replacement
.Wiper/Washer Systems
.Doors and Windows
.Seat Belts
.Airbag Systems
.Engine and Transmission
.Tire Pressure
.Battery
Engine Power Messages
ENGINE POWER IS REDUCED
This message displays when the vehicle's
propulsion power is reduced. A reduction in
propulsion power can affect the vehicle's
ability to accelerate. If this message is on,
but there is no observed reduction in
performance, proceed to your destination.
Under certain conditions the performance
may be reduced the next time the vehicle is
driven. The vehicle may be driven while this
message is on, but maximum acceleration
and speed may be reduced. Anytime this
message stays on, or displays repeatedly,
the vehicle should be taken to your dealer
for service as soon as possible.
Page 88 of 289
Chevrolet Express Owner Manual (GMNA-Localizing-U.S./Canada/Mexico-
15555951) - 2022 - CRC - 1/27/22
Instruments and Controls 87
Under certain operating conditions,
propulsion will be disabled. Try restarting
after the ignition has been off for
30 seconds.
Vehicle Speed Messages
SPEED LIMITED TO XXX KM/H (MPH)
This message shows that the vehicle speed
has been limited to the speed displayed. The
limited speed is a protection for various
propulsion and vehicle systems, such as
lubrication, thermal, brakes, suspension,
Teen Driver if equipped, or tires.
Vehicle Personalization
This vehicle may have customization
capabilities that allow you to program
certain features to one preferred setting.
Customization features can only be
programmed to one setting on the vehicle
and cannot be programmed to a preferred
setting for two different drivers.
All of the customization options may not be
available on your vehicle. Only the options
available will be displayed on the DIC.The default settings for the customization
features were set when the vehicle left the
factory, but may have been changed from
their default state since then.
The customization preferences are
automatically recalled.
To change customization preferences, use
the following procedure.
Entering the Feature Settings Menu
1. Turn the ignition on and place the
vehicle in P (Park).
To avoid excessive drain on the battery,
it is recommended that the headlamps
are turned off.
2. Press
Uto enter the feature
settings menu.
If the menu is not available, FEATURE
SETTINGS AVAILABLE IN PARK will display.
Before entering the menu, make sure the
vehicle is in P (Park).
Feature Settings Menu Items
The following are customization features
that allow you to program settings to the
vehicle: DISPLAY IN ENGLISH
This feature will only display if a language
other than English has been set. This feature
allows you to change the language in which
the DIC messages appear to English.
Press
Uuntil the PRESSVTO DISPLAY IN
ENGLISH screen appears on the DIC display.
Press the set/reset button once to display
all DIC messages in English.
LANGUAGE
This feature allows you to select the
language in which the DIC messages will
appear.
Press
Uuntil the LANGUAGE screen appears
on the DIC display. Press
Vonce to access
the settings for this feature. Then press
U
to scroll through the following settings:
ENGLISH (default) : All messages will appear
in English.
FRANCAIS : All messages will appear in
French.
ESPANOL : All messages will appear in
Spanish.
NO CHANGE : No change will be made to
this feature. The current setting will remain.
Page 89 of 289
Chevrolet Express Owner Manual (GMNA-Localizing-U.S./Canada/Mexico-
15555951) - 2022 - CRC - 1/27/22
88 Instruments and Controls
To select a setting, pressVwhile the
desired setting is displayed on the DIC.
A beep will sound once a language has been
selected.
AUTO DOOR LOCK
This feature allows you to select when the
doors will automatically lock.
Press
Uuntil AUTO DOOR LOCK appears on
the DIC display. Press
Vonce to access the
settings for this feature. Then press
Uto
scroll through the following settings:
SHIFT OUT OF PARK (default) : The doors
will automatically lock when the vehicle is
shifted out of P (Park).
AT VEHICLE SPEED : The doors will
automatically lock when the vehicle speed is
above 13 km/h (8 mph) for three seconds.
NO CHANGE : No change will be made to
this feature. The current setting will remain.
To select a setting, press
Vwhile the
desired setting is displayed on the DIC. AUTO DOOR UNLOCK
This feature allows you to select whether or
not to turn off the automatic door unlocking
feature. It also allows you to select which
doors and when the doors will automatically
unlock.
Press
Uuntil AUTO DOOR UNLOCK appears
on the DIC display. Press
Vonce to access
the settings for this feature. Then press
U
to scroll through the following settings:
OFF : None of the doors will automatically
unlock.
DRIVER AT KEY OUT : Only the driver door
will unlock when the key is taken out of the
ignition.
DRIVER IN PARK : Only the driver door will
unlock when the vehicle is shifted into
P (Park).
ALL AT KEY OUT : All of the doors will
unlock when the key is taken out of the
ignition.
ALL IN PARK (default) : All of the doors will
unlock when the vehicle is shifted into
P (Park).
NO CHANGE : No change will be made to
this feature. The current setting will remain. To select a setting, press
Vwhile the
desired setting is displayed on the DIC.
REMOTE DOOR LOCK
This feature allows you to select the type of
feedback you will receive when locking the
vehicle with the Remote Keyless Entry (RKE)
transmitter. You will not receive feedback
when locking the vehicle with the RKE
transmitter if the doors are open. See
Remote Keyless Entry (RKE) System
Operation 08.
Press
Uuntil REMOTE DOOR LOCK appears
on the DIC display. Press
Vonce to access
the settings for this feature. Then press
U
to scroll through the following settings:
OFF : There will be no feedback when you
press
Qon the RKE transmitter.
LIGHTS ONLY : The exterior lamps will flash
when you press
Qon the RKE transmitter.
HORN ONLY : The horn will sound on the
second press of
Qon the RKE transmitter.
Page 90 of 289
Chevrolet Express Owner Manual (GMNA-Localizing-U.S./Canada/Mexico-
15555951) - 2022 - CRC - 1/27/22
Instruments and Controls 89
HORN & LIGHTS (default) :The exterior
lamps will flash when you press
Qon the
RKE transmitter, and the horn will sound
when
Qis pressed again within five seconds
of the previous command.
NO CHANGE : No change will be made to
this feature. The current setting will remain.
To select a setting, press
Vwhile the
desired setting is displayed on the DIC.
REMOTE DOOR UNLOCK
This feature allows you to select the type of
feedback you will receive when unlocking
the vehicle with the Remote Keyless
Entry (RKE) transmitter. You will not receive
feedback when unlocking the vehicle with
the RKE transmitter if the doors are open.
See Remote Keyless Entry (RKE) System
Operation 08.
Press
Uuntil REMOTE DOOR UNLOCK
appears on the DIC display. Press
Vonce to
access the settings for this feature. Then
press
Uto scroll through the following
settings:
LIGHTS OFF : The exterior lamps will not
flash when you press
Kon the RKE
transmitter. LIGHTS ON (default) :
The exterior lamps
will flash when you press
Kon the RKE
transmitter.
NO CHANGE : No change will be made to
this feature. The current setting will remain.
To select a setting, press
Vwhile the
desired setting is displayed on the DIC.
DELAY DOOR LOCK
This feature allows you to select whether or
not the locking of the doors will be delayed.
When locking the doors with the power
door lock switch and a door is open, this
feature will delay locking the doors until
five seconds after the last door is closed.
You will hear three chimes to signal that the
delayed locking feature is in use. The key
must be out of the ignition for this feature
to work. You can temporarily override
delayed locking by pressing the power door
lock switch twice or
Qon the RKE
transmitter twice. See Delayed Locking012.
Press
Uuntil DELAY DOOR LOCK appears on
the DIC display. Press
Vonce to access the
settings for this feature. Then press
Uto
scroll through the following settings: OFF :
There will be no delayed locking of
the vehicle's doors.
ON (default) : The doors will not lock until
five seconds after the last door is closed.
NO CHANGE : No change will be made to
this feature. The current setting will remain.
To select a setting, press
Vwhile the
desired setting is displayed on the DIC.
EXIT LIGHTING
This feature allows you to select the
amount of time you want the exterior
lamps to remain on when it is dark enough
outside. This happens after the key is turned
from on to off.
Press
Uuntil EXIT LIGHTING appears on the
DIC display. Press
Vonce to access the
settings for this feature. Then press
Uto
scroll through the following settings:
OFF : The exterior lamps will not turn on.
10 SECONDS (default) : The exterior lamps
will stay on for 10 seconds.
1 MINUTE : The exterior lamps will stay on
for one minute.
2 MINUTES : The exterior lamps will stay on
for two minutes.
Page 91 of 289
Chevrolet Express Owner Manual (GMNA-Localizing-U.S./Canada/Mexico-
15555951) - 2022 - CRC - 1/27/22
90 Instruments and Controls
NO CHANGE :No change will be made to
this feature. The current setting will remain.
To select a setting, press
Vwhile the
desired setting is displayed on the DIC.
CHIME VOLUME
This feature allows you to select the volume
level of the chime.
Press
Uuntil CHIME VOLUME appears on
the DIC display. Press
Vonce to access the
settings for this feature. Then press
Uto
scroll through the following settings:
NORMAL : The chime volume will be set to
a normal level.
LOUD : The chime volume will be set to a
loud level.
NO CHANGE : No change will be made to
this feature. The current setting will remain.
There is no default for chime volume. The
volume will stay at the last known setting.
To select a setting, press
Vwhile the
desired setting is displayed on the DIC.
FACTORY SETTINGS
This feature allows you to set all of the
customization features back to their factory
default settings. Press
Uuntil FACTORY SETTINGS appears on
the DIC display. Press
Vonce to access the
settings for this feature. Then press
Uto
scroll through the following settings:
RESTORE ALL (default) : The customization
features will be set to their factory default
settings.
DO NOT RESTORE : The customization
features will not be set to their factory
default settings.
To select a setting, press
Vwhile the
desired setting is displayed on the DIC.
EXIT FEATURE SETTINGS
This feature allows you to exit the feature
settings menu.
Press
Uuntil FEATURE SETTINGS PRESSV
TO EXIT appears in the DIC display. PressV
once to exit the menu.
If you do not exit, pressing
Uwill return
you to the beginning of the feature
settings menu.
Exiting the Feature Settings Menu
The feature settings menu will be exited
when any of the following occurs:
.The vehicle is no longer on.
.The3orTDIC buttons are
pressed.
.The end of the feature settings menu is
reached and exited.
.A 40–second time period has elapsed
with no selection made.
Page 97 of 289
Chevrolet Express Owner Manual (GMNA-Localizing-U.S./Canada/Mexico-
15555951) - 2022 - CRC - 1/27/22
96 Lighting
It then adjusts the voltage for best
performance and extended life of the
battery.
When the battery's state of charge is low,
the voltage is raised slightly to quickly bring
the charge back up. When the state of
charge is high, the voltage is lowered
slightly to prevent overcharging. If the
vehicle has a voltmeter gauge or a voltage
display on the Driver Information Center
(DIC), you may see the voltage move up or
down. This is normal. If there is a problem,
an alert will be displayed.
The battery can be discharged at idle if the
electrical loads are very high. This is true for
all vehicles. This is because the generator
(alternator) may not be spinning fast
enough at idle to produce all the power
that is needed for very high electrical loads.
A high electrical load occurs when several of
the following are on, such as: headlamps,
high beams, fog lamps, rear window
defogger, climate control fan at high speed,
heated seats, engine cooling fans, trailer
loads, and loads plugged into accessory
power outlets.
EPM works to prevent excessive discharge of
the battery. It does this by balancing the
generator's output and the vehicle'selectrical needs. It can increase engine idle
speed to generate more power, whenever
needed. It can temporarily reduce the power
demands of some accessories.
Normally, these actions occur in steps or
levels, without being noticeable. In rare
cases at the highest levels of corrective
action, this action may be noticeable to the
driver. If so, a Driver Information Center
(DIC) message might be displayed, such as
SERVICE BATTERY CHARGING SYSTEM. If this
messages displays, it is recommended that
the driver reduce the electrical loads as
much as possible.
Battery Power Protection
This feature helps prevent the battery from
being drained, if the interior courtesy lamps
or reading lamps are accidentally left on.
If any of these lamps are left on, they
automatically turn off after 10 minutes,
if the ignition is off. The lamps will not
come back on again until one of the
following occurs:
.The ignition is turned on.
.The doors are closed and then re-opened.
Exterior Lighting Battery Saver
The exterior lamps turn off about 10 minutes
after the ignition is turned off, if the parking
lamps or headlamps have been manually
left on. This protects against draining the
battery. To restart the 10-minute timer, turn
the exterior lamp control to the
Oposition
and then back to the
;or2position.
To keep the lamps on for more than
10 minutes, the ignition must be on or in
ACC/ACCESSORY.
Page 98 of 289
Chevrolet Express Owner Manual (GMNA-Localizing-U.S./Canada/Mexico-
15555951) - 2022 - CRC - 1/27/22
Infotainment System 97
Infotainment System
Introduction
Infotainment . . . . . . . . . . . . . . . . . . . . . . . . . . . 97
Theft-Deterrent Feature . . . . . . . . . . . . . . . . 98
Overview . . . . . . . . . . . . . . . . . . . . . . . . . . . . . . . 98
Operation . . . . . . . . . . . . . . . . . . . . . . . . . . . . . . 99
Radio
AM-FM Radio . . . . . . . . . . . . . . . . . . . . . . . . . . 100
Satellite Radio . . . . . . . . . . . . . . . . . . . . . . . . . 101
Radio Reception . . . . . . . . . . . . . . . . . . . . . . . 102
Fixed Mast Antenna . . . . . . . . . . . . . . . . . . . 103
Multi-Band Antenna . . . . . . . . . . . . . . . . . . . 103
Audio Players
Avoiding Untrusted Media Devices . . . . 103
Auxiliary Devices . . . . . . . . . . . . . . . . . . . . . . 103
Phone
Bluetooth . . . . . . . . . . . . . . . . . . . . . . . . . . . . . . 107
Trademarks and License Agreements
Trademarks and License Agreements . . . 112
Introduction
Infotainment
Read the following pages to become familiar
with the features.
{Warning
Taking your eyes off the road for too
long or too often while using any
infotainment feature can cause a crash.
You or others could be injured or killed.
Do not give extended attention to
infotainment tasks while driving. Limit
your glances at the vehicle displays and
focus your attention on driving. Use voice
commands whenever possible.
The infotainment system has built-in
features intended to help avoid distraction
by disabling some functions when driving.
Many infotainment features are also
available through the instrument cluster and
steering wheel controls. Before driving:
.Become familiar with the operation,
center stack controls, and infotainment
controls.
.Set up the audio by presetting favorite
stations, setting the tone, and adjusting
the speakers.
.Set up phone numbers in advance so they
can be called easily by pressing a single
control or by using a single voice
command if equipped with Bluetooth
phone capability.
See Defensive Driving 0121.
To play the infotainment system with the
ignition off, see Retained Accessory Power
(RAP) 0133.
Active Noise Cancellation (ANC)
If equipped, ANC reduces engine noise in the
vehicle’s interior. ANC requires the
factory-installed audio system, radio,
speakers, amplifier (if equipped), induction
system, and exhaust system to work
properly. Deactivation is required by your
dealer if related aftermarket equipment is
installed.