display CHEVROLET EXPRESS 2023 Owners Manual
[x] Cancel search | Manufacturer: CHEVROLET, Model Year: 2023, Model line: EXPRESS, Model: CHEVROLET EXPRESS 2023Pages: 283, PDF Size: 16.23 MB
Page 10 of 283
Chevrolet Express Owner Manual (GMNA-Localizing-U.S./Canada/Mexico-
16547501) - 2023 - CRC - 6/10/22
Keys, Doors, and Windows 9
If equipped with an RKE transmitter and
OnStar, refer to“Theft Alarm Notification" in
OnStar Security 0265.
Programming Transmitters to the Vehicle
Only RKE transmitters programmed to the
vehicle will work. If a transmitter is lost or
stolen, a replacement can be purchased and
programmed through your dealer. When the
replacement transmitter is programmed to
the vehicle, all remaining transmitters must
also be programmed. Any lost or stolen
transmitters no longer work once the new
transmitter is programmed. Each vehicle can
have up to four transmitters programmed
to it.
Battery Replacement
{Warning
Never allow children to play with the RKE
transmitter. The transmitter contains a
small battery, which can be a choking
hazard. If swallowed, internal burns can
occur, resulting in severe injury or death.
Seek medical attention immediately if a
battery is swallowed.
{Warning
To avoid personal injury, do not touch
metal surfaces on the RKE transmitter
when it has been exposed to extreme
heat. These surfaces can be hot to the
touch at temperatures above 59 °C
(138 °F).
Caution
When replacing the battery, do not touch
any of the circuitry on the transmitter.
Static from your body could damage the
transmitter.
Caution
Always replace the battery with the
correct type. Replacing the battery with
an incorrect type could potentially create
a risk of battery explosion. Dispose of
used batteries according to instructions
and local laws. Do not attempt to burn,
crush, or cut the used battery, and avoid
exposing the battery to environments
with extremely low air pressures or high
temperatures.
Caution
If the RKE transmitter is not reassembled
properly, liquids could enter the housing
and damage the circuitry, resulting in an
RKE transmitter malfunction and/or
failure. To prevent damage, always follow
the steps for RKE transmitter reassembly
in this manual to ensure the transmitter
is sealed properly whenever the RKE
transmitter is opened.
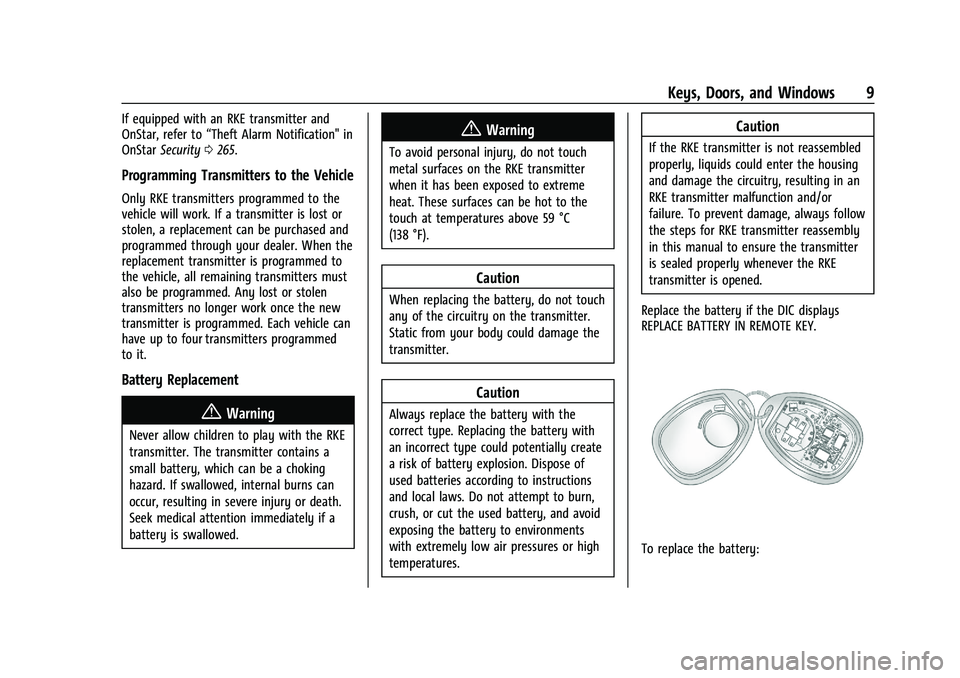
Replace the battery if the DIC displays
REPLACE BATTERY IN REMOTE KEY.
To replace the battery:
Page 20 of 283

Chevrolet Express Owner Manual (GMNA-Localizing-U.S./Canada/Mexico-
16547501) - 2023 - CRC - 6/10/22
Keys, Doors, and Windows 19
Do not spray glass cleaner directly on the
mirror. Use a soft towel dampened with
water.
Manual Rearview Mirror
Push the tab forward for daytime use and
pull it rearward for nighttime use to avoid
glare of the headlamps from behind.
Backup Video Manual Mirror
If equipped, this manual dimming mirror
provides a camera view of the area behind
the vehicle. The video display feature comes
on when the vehicle is shifted in R (Reverse),
and turns off when the vehicle is shifted out
of R (Reverse).
Troubleshooting
If the vehicle is in R (Reverse) and a blue
screen is displayed in the mirror and then
the display shuts off, see your dealer for
service.
SeeRear Vision Camera (RVC) 0146.
Windows
{
Warning
Never leave a child, a helpless adult, or a
pet alone in a vehicle, especially with the
windows closed in warm or hot weather.
They can be overcome by the extreme
heat and suffer permanent injuries or
even death from heat stroke.
Manual Windows
Operate the manual windows by turning the
hand crank on each door to raise or lower
the side door windows.
Power Windows
{Warning
Children could be seriously injured or
killed if caught in the path of a closing
window. Never leave keys in a vehicle
with children. See Keys06.
If equipped, power windows work when the
ignition is on, in accessory mode, or when
Retained Accessory Power (RAP) is active.
See Retained Accessory Power (RAP) 0133.
Using the window switch, press to open or
pull to close the window.
Page 67 of 283
Chevrolet Express Owner Manual (GMNA-Localizing-U.S./Canada/Mexico-
16547501) - 2023 - CRC - 6/10/22
66 Instruments and Controls
Instruments and Controls
Controls
Steering Wheel Adjustment . . . . . . . . . . . . 66
Steering Wheel Controls . . . . . . . . . . . . . . . . 67
Horn . . . . . . . . . . . . . . . . . . . . . . . . . . . . . . . . . . . 68
Windshield Wiper/Washer . . . . . . . . . . . . . 68
Compass . . . . . . . . . . . . . . . . . . . . . . . . . . . . . . . 68
Clock . . . . . . . . . . . . . . . . . . . . . . . . . . . . . . . . . . . 70
Power Outlets . . . . . . . . . . . . . . . . . . . . . . . . . . 70
Cigarette Lighter . . . . . . . . . . . . . . . . . . . . . . . . 71
Ashtrays . . . . . . . . . . . . . . . . . . . . . . . . . . . . . . . . 71
Warning Lights, Gauges, and Indicators
Warning Lights, Gauges, andIndicators . . . . . . . . . . . . . . . . . . . . . . . . . . . . . 71
Instrument Cluster . . . . . . . . . . . . . . . . . . . . . . 72
Speedometer . . . . . . . . . . . . . . . . . . . . . . . . . . . 72
Odometer . . . . . . . . . . . . . . . . . . . . . . . . . . . . . . 72
Trip Odometer . . . . . . . . . . . . . . . . . . . . . . . . . . 72
Fuel Gauge . . . . . . . . . . . . . . . . . . . . . . . . . . . . . 72
Engine Oil Pressure Gauge . . . . . . . . . . . . . . 73
Engine Coolant Temperature Gauge . . . . 74
Voltmeter Gauge . . . . . . . . . . . . . . . . . . . . . . . 74
Seat Belt Reminders . . . . . . . . . . . . . . . . . . . . 75
Airbag Readiness Light . . . . . . . . . . . . . . . . . . 75
Airbag On-Off Light . . . . . . . . . . . . . . . . . . . . . 76
Charging System Light . . . . . . . . . . . . . . . . . . 77
Malfunction Indicator Lamp (Check Engine Light) . . . . . . . . . . . . . . . . . . . . . . . . . . 77 Brake System Warning Light . . . . . . . . . . . 78
Antilock Brake System (ABS) Warning
Light . . . . . . . . . . . . . . . . . . . . . . . . . . . . . . . . . . 79
Tow/Haul Mode Light . . . . . . . . . . . . . . . . . . 79
Lane Departure Warning (LDW) Light . . . 79
Vehicle Ahead Indicator . . . . . . . . . . . . . . . . 80
StabiliTrak OFF Light . . . . . . . . . . . . . . . . . . . 80
Traction Control System (TCS)/StabiliTrak Light . . . . . . . . . . . . . . . . . . . . . . . . . . . . . . . . . 80
Tire Pressure Light . . . . . . . . . . . . . . . . . . . . . 80
Engine Oil Pressure Light . . . . . . . . . . . . . . . 81
Low Fuel Warning Light . . . . . . . . . . . . . . . . 81
Security Light . . . . . . . . . . . . . . . . . . . . . . . . . . 82
High-Beam On Light . . . . . . . . . . . . . . . . . . . . 82
Cruise Control Light . . . . . . . . . . . . . . . . . . . . 82
Information Displays
Driver Information Center (DIC) . . . . . . . . . 82
Vehicle Messages
Vehicle Messages . . . . . . . . . . . . . . . . . . . . . . 86
Engine Power Messages . . . . . . . . . . . . . . . . 86
Vehicle Speed Messages . . . . . . . . . . . . . . . . 87
Vehicle Personalization
Vehicle Personalization . . . . . . . . . . . . . . . . . 87
Controls
Steering Wheel Adjustment
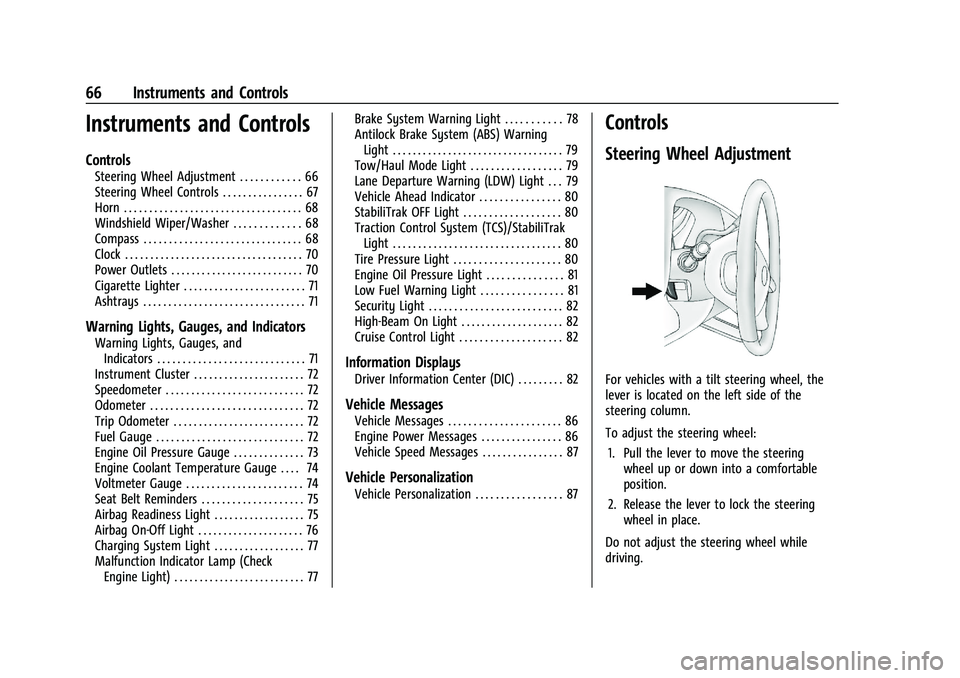
For vehicles with a tilt steering wheel, the
lever is located on the left side of the
steering column.
To adjust the steering wheel:
1. Pull the lever to move the steering wheel up or down into a comfortable
position.
2. Release the lever to lock the steering wheel in place.
Do not adjust the steering wheel while
driving.
Page 68 of 283

Chevrolet Express Owner Manual (GMNA-Localizing-U.S./Canada/Mexico-
16547501) - 2023 - CRC - 6/10/22
Instruments and Controls 67
Steering Wheel Controls
If equipped, some audio controls can be
adjusted at the steering wheel.
w:Press to go to the next favorite radio
station, track on a CD, or folder on an iPod
or USB device.
c/x: Press to go to the previous
favorite radio station, track on a CD,
or folder on an iPod or USB device. Also
press to reject an incoming call or end a
current call. Radio
To select preset or favorite radio stations:
Press and release
worc/xto go to
the next or previous radio station stored as
a preset or favorite.
CD
To select tracks on a CD:
Press and release
worc/xto go to
the next or previous track.
Selecting Tracks on an iPod or USB Device
1. Press and hold
worc/xwhile
listening to a song until the contents of
the current folder appear on the
infotainment display.
2. Press and release
worc/xto
scroll up or down the list, then press and
hold
w, or press¨to play the
highlighted track.
Navigating Folders on an iPod or USB Device
1. Press and hold
worc/xwhile
listening to a song until the contents of
the current folder appear on the
infotainment display.
2. Press and hold
c/xto go back to
the previous folder list. 3. Press and release
worc/xto
scroll up or down the list.
.To select a folder, press and holdw
, or press¨when the folder is
highlighted.
.To go back further in the folder list,
press and hold
c/x.
b/g: Press to silence the vehicle
speakers only. Press again to turn the
sound on.
For vehicles with Bluetooth or OnStar
systems, press and hold for longer than
two seconds to interact with those systems.
See Bluetooth 0107 and
OnStar Overview 0264, if equipped.
SRCE : Press to switch between the radio
and CD, and for equipped vehicles, the front
auxiliary.
¨: Press to go to the next radio station
while in AM, FM, or SiriusXM, if equipped.
If equipped with a CD player or USB port:
Press
¨to go to the next track or chapter
while sourced to the CD.
Press
¨to select a track or a folder when
navigating folders on an iPod or USB device.
Page 70 of 283

Chevrolet Express Owner Manual (GMNA-Localizing-U.S./Canada/Mexico-
16547501) - 2023 - CRC - 6/10/22
Instruments and Controls 69
to the zone where you live, the compass
may give false readings. The compass must
be set to the variance zone in which the
vehicle is traveling.
To adjust for compass variance, use the
following procedure:
Compass Variance (Zone) Procedure1. Do not set the compass zone when the vehicle is moving. Only set it when the
vehicle is in P (Park).
Press
Tuntil PRESSVTO CHANGE
COMPASS ZONE displays.
2. Find the vehicle's current location and variance zone number on the map.
Zones 1 through 15 are available. 3. Press
Vto scroll through and select the
appropriate variance zone.
4. Press
3until the vehicle heading, for
example, N for North, is displayed in
the DIC.
5. If calibration is necessary, calibrate the compass. See “Compass Calibration
Procedure” following.
Compass Calibration
The compass can be manually calibrated.
Only calibrate the compass in a magnetically
clean and safe location, such as an open
parking lot, where driving the vehicle in
circles is not a danger. It is suggested to
calibrate away from tall buildings, utility
wires, manhole covers, or other industrial
structures, if possible.
If CAL should ever appear in the DIC display,
the compass should be calibrated.
If the DIC display does not show a heading,
for example, N for North, or the heading
does not change after making turns, there
may be a strong magnetic field interfering
with the compass. Such interference may be
caused by a magnetic CB or cell phone
antenna mount, a magnetic emergency
light, magnetic note pad holder, or any other magnetic item. Turn off the vehicle,
move the magnetic item, then turn on the
vehicle and calibrate the compass.
To calibrate the compass, use the following
procedure:
Compass Calibration Procedure
1. Before calibrating the compass, make sure the compass zone is set to the
variance zone in which the vehicle is
located. See “Compass Variance (Zone)
Procedure” earlier in this section.
Do not operate any switches such as
window, climate controls, seats, etc.
during the calibration procedure.
2. Press
Tuntil PRESSVTO CALIBRATE
COMPASS displays.
3. Press
Vto start the compass calibration.
4. The DIC will display CALIBRATING: DRIVE IN CIRCLES. Drive the vehicle in tight
circles at less than 8 km/h (5 mph) to
complete the calibration. The DIC will
display CALIBRATION COMPLETE for a few
seconds when the calibration is
complete. The DIC display will then
return to PRESS
VTO CALIBRATE
COMPASS.
Page 71 of 283
Chevrolet Express Owner Manual (GMNA-Localizing-U.S./Canada/Mexico-
16547501) - 2023 - CRC - 6/10/22
70 Instruments and Controls
Clock
Setting the Time or Date
1. With the radio on, pressHand the HR,
MIN, MM, DD, and YYYY (hour, minute,
month, day, and year) display.
2. Press the softkey under any one of the tabs to be changed. Every time the
softkey is pressed again, the time or the
date if selected, increases by one.
Another way to increase the time or
date is to press
¨SEEK or\FWD
(forward).
3. To decrease, press
©SEEK orsREV.
Turn the
fknob, on the upper right side
of the radio, to adjust the selected
setting.
Changing the Time or Date Default Settings
1. With the radio on, press
Hand then the
softkey under the forward arrow that is
currently displayed on the infotainment
display until the time 12H (hour) and 24H
(hour), and the date MM/DD (month and
day) and DD/MM (day and month) are
displayed.
2. Press the softkey under the desired option. 3. Press
Hagain to apply the selected
default, or let the screen time out.
Power Outlets
Power Outlets 12 Volt Direct Current
The accessory power outlets can be used to
plug in electrical equipment, such as a cell
phone or an MP3 player.
The vehicle may have two accessory power
outlets on the instrument panel.
Remove the cover to access and replace
when not in use.
Certain power accessory plugs may not be
compatible to the accessory power outlet
and could overload vehicle or adapter fuses.
If a problem is experienced, see your dealer.
{Warning
Power is always supplied to the outlets.
Do not leave electrical equipment
plugged in when the vehicle is not in use
because the vehicle could catch fire and
cause injury or death.
Caution
Leaving electrical equipment plugged in
for an extended period of time while the
vehicle is off will drain the battery.
Always unplug electrical equipment when
not in use and do not plug in equipment
that exceeds the maximum 20 amp
rating.
When adding electrical equipment, be sure
to follow the proper installation instructions
included with the equipment. See Add-On
Electrical Equipment 0171.
Caution
Hanging heavy equipment from the
power outlet can cause damage not
covered by the vehicle warranty. The
power outlets are designed for accessory
power plugs only, such as cell phone
charge cords.
Power Outlet 110/120 Volt Alternating
Current
This power outlet can be used to plug in
electrical equipment that uses a maximum
limit of 150 watts.
Page 78 of 283

Chevrolet Express Owner Manual (GMNA-Localizing-U.S./Canada/Mexico-
16547501) - 2023 - CRC - 6/10/22
Instruments and Controls 77
Charging System Light
The charging system light comes on briefly
when the ignition is turned on, but the
engine is not running, as a check to show
the light is working. It should go out when
the engine is started.
If the light stays on, or comes on while
driving, there may be a problem with the
electrical charging system. Have it checked
by your dealer. Driving while this light is on
could drain the battery.
When this light comes on, or is flashing, the
Driver Information Center (DIC) also displays
a message.
If a short distance must be driven with the
light on, be sure to turn off all accessories,
such as the radio and air conditioner. Find a
safe place to stop the vehicle.
Malfunction Indicator Lamp
(Check Engine Light)
This light is part of the vehicle’s emission
control on-board diagnostic system. If this
light is on while the engine is running, a
malfunction has been detected and the
vehicle may require service. The light should
come on to show that it is working when
the ignition is on and the engine is not
running. SeeIgnition Positions 0130.
Malfunctions are often indicated by the
system before any problem is noticeable.
Being aware of the light and seeking service
promptly when it comes on may prevent
damage.
Caution
If the vehicle is driven continually with
this light on, the emission control system
may not work as well, the fuel economy
may be lower, and the vehicle may not
(Continued)
Caution (Continued)
run smoothly. This could lead to costly
repairs that might not be covered by the
vehicle warranty.
Caution
Modifications to the engine, transmission,
exhaust, intake, or fuel system, or the
use of replacement tires that do not
meet the original tire specifications, can
cause this light to come on. This could
lead to costly repairs not covered by the
vehicle warranty. This could also affect
the vehicle’s ability to pass an Emissions
Inspection/Maintenance test. See
Accessories and Modifications 0173.
If the light is flashing : A malfunction has
been detected that could damage the
emission control system and increase vehicle
emissions. Diagnosis and service may be
required.
To help prevent damage, reduce vehicle
speed and avoid hard accelerations and
uphill grades. If towing a trailer, reduce the
amount of cargo being hauled as soon as
possible.
Page 81 of 283

Chevrolet Express Owner Manual (GMNA-Localizing-U.S./Canada/Mexico-
16547501) - 2023 - CRC - 6/10/22
80 Instruments and Controls
SeeLane Departure Warning (LDW) 0151.
Vehicle Ahead Indicator
If equipped, this indicator will display green
when a vehicle is detected ahead and amber
when you are following a vehicle ahead
much too closely.
See Forward Collision Alert (FCA) System
0 148.
StabiliTrak OFF Light
This light comes on briefly when the vehicle
is turned on to show that the light is
working. If it does not come on then, have
it fixed so it will be ready to warn you if
there is a problem. This light comes on when the StabiliTrak/
Electronic Stability Control (ESC) system is
turned off. If StabiliTrak/ESC is off, the
Traction Control System (TCS) is also off. To
turn ESC off and on, see
Traction Control/
Electronic Stability Control 0142.
If ESC and TCS are off, the systems do not
assist in controlling the vehicle. Adjust
driving accordingly.
Traction Control System (TCS)/
StabiliTrak Light
This light comes on briefly when the vehicle
is turned on to show that the light is
working. If it does not come on then, have
it fixed so it will be ready to warn you if
there is a problem.
If the light is on and not flashing, the TCS
and potentially the StabiliTrak/ESC system
are not fully operational and may not assist
in maintaining control. Adjust driving
accordingly. If the condition persists, see your dealer as soon as possible. A Driver
Information Center (DIC) message may
display.
The light flashes when the TCS and/or the
StabiliTrak/ESC system is actively working.
See
Traction Control/Electronic Stability
Control 0142.
Tire Pressure Light
If equipped with the Tire Pressure Monitor
System (TPMS), this light comes on briefly
when the vehicle is started. It provides
information about tire pressures and
the TPMS.
When the Light Is On Steady
This indicates that one or more of the tires
are significantly underinflated.
A Driver Information Center (DIC) tire
pressure message may also display. Stop as
soon as possible, and inflate the tires to the
Page 83 of 283
Chevrolet Express Owner Manual (GMNA-Localizing-U.S./Canada/Mexico-
16547501) - 2023 - CRC - 6/10/22
82 Instruments and Controls
Security Light
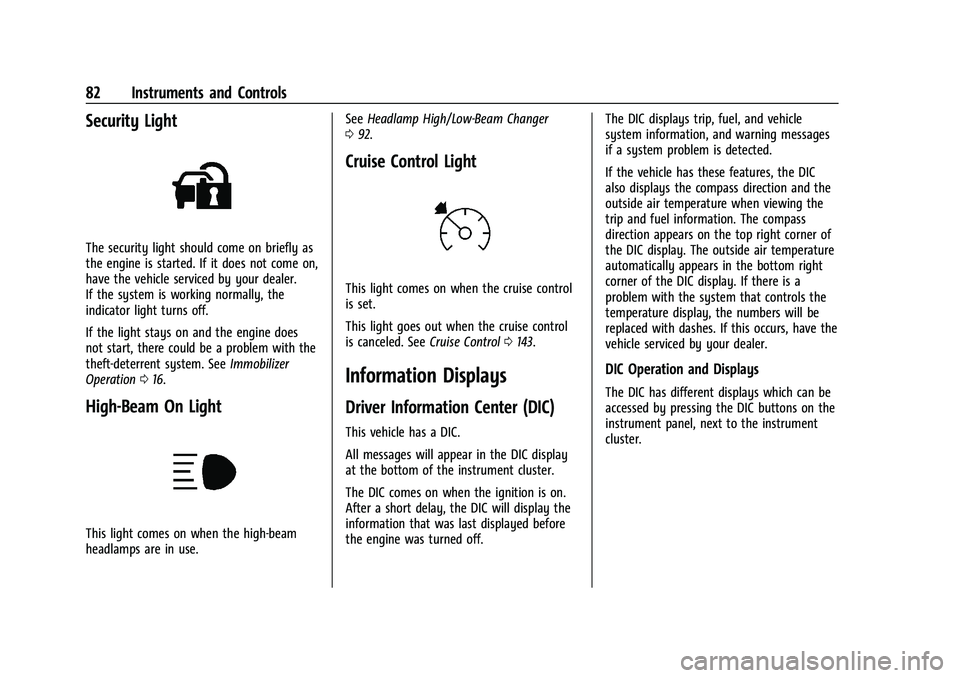
The security light should come on briefly as
the engine is started. If it does not come on,
have the vehicle serviced by your dealer.
If the system is working normally, the
indicator light turns off.
If the light stays on and the engine does
not start, there could be a problem with the
theft-deterrent system. SeeImmobilizer
Operation 016.
High-Beam On Light
This light comes on when the high-beam
headlamps are in use. See
Headlamp High/Low-Beam Changer
0 92.
Cruise Control Light
This light comes on when the cruise control
is set.
This light goes out when the cruise control
is canceled. See Cruise Control0143.
Information Displays
Driver Information Center (DIC)
This vehicle has a DIC.
All messages will appear in the DIC display
at the bottom of the instrument cluster.
The DIC comes on when the ignition is on.
After a short delay, the DIC will display the
information that was last displayed before
the engine was turned off. The DIC displays trip, fuel, and vehicle
system information, and warning messages
if a system problem is detected.
If the vehicle has these features, the DIC
also displays the compass direction and the
outside air temperature when viewing the
trip and fuel information. The compass
direction appears on the top right corner of
the DIC display. The outside air temperature
automatically appears in the bottom right
corner of the DIC display. If there is a
problem with the system that controls the
temperature display, the numbers will be
replaced with dashes. If this occurs, have the
vehicle serviced by your dealer.
DIC Operation and Displays
The DIC has different displays which can be
accessed by pressing the DIC buttons on the
instrument panel, next to the instrument
cluster.
Page 84 of 283
Chevrolet Express Owner Manual (GMNA-Localizing-U.S./Canada/Mexico-
16547501) - 2023 - CRC - 6/10/22
Instruments and Controls 83
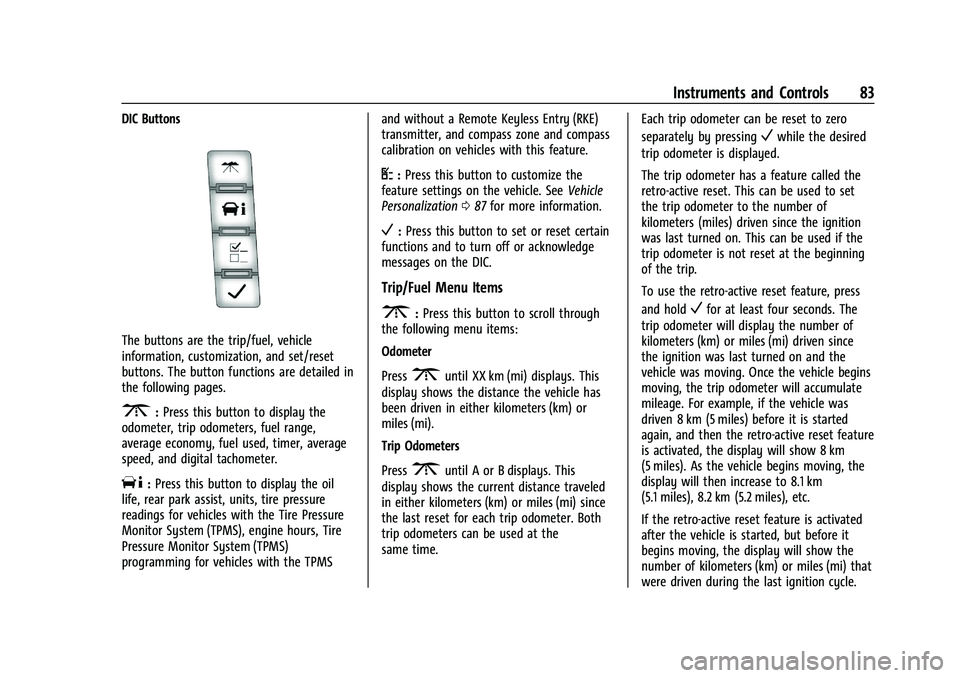
DIC Buttons
The buttons are the trip/fuel, vehicle
information, customization, and set/reset
buttons. The button functions are detailed in
the following pages.
3:Press this button to display the
odometer, trip odometers, fuel range,
average economy, fuel used, timer, average
speed, and digital tachometer.
T: Press this button to display the oil
life, rear park assist, units, tire pressure
readings for vehicles with the Tire Pressure
Monitor System (TPMS), engine hours, Tire
Pressure Monitor System (TPMS)
programming for vehicles with the TPMS and without a Remote Keyless Entry (RKE)
transmitter, and compass zone and compass
calibration on vehicles with this feature.
U:
Press this button to customize the
feature settings on the vehicle. See Vehicle
Personalization 087 for more information.
V:Press this button to set or reset certain
functions and to turn off or acknowledge
messages on the DIC.
Trip/Fuel Menu Items
3: Press this button to scroll through
the following menu items:
Odometer
Press
3until XX km (mi) displays. This
display shows the distance the vehicle has
been driven in either kilometers (km) or
miles (mi).
Trip Odometers
Press
3until A or B displays. This
display shows the current distance traveled
in either kilometers (km) or miles (mi) since
the last reset for each trip odometer. Both
trip odometers can be used at the
same time. Each trip odometer can be reset to zero
separately by pressing
Vwhile the desired
trip odometer is displayed.
The trip odometer has a feature called the
retro-active reset. This can be used to set
the trip odometer to the number of
kilometers (miles) driven since the ignition
was last turned on. This can be used if the
trip odometer is not reset at the beginning
of the trip.
To use the retro-active reset feature, press
and hold
Vfor at least four seconds. The
trip odometer will display the number of
kilometers (km) or miles (mi) driven since
the ignition was last turned on and the
vehicle was moving. Once the vehicle begins
moving, the trip odometer will accumulate
mileage. For example, if the vehicle was
driven 8 km (5 miles) before it is started
again, and then the retro-active reset feature
is activated, the display will show 8 km
(5 miles). As the vehicle begins moving, the
display will then increase to 8.1 km
(5.1 miles), 8.2 km (5.2 miles), etc.
If the retro-active reset feature is activated
after the vehicle is started, but before it
begins moving, the display will show the
number of kilometers (km) or miles (mi) that
were driven during the last ignition cycle.