service schedule CHEVROLET EXPRESS 2023 Owners Manual
[x] Cancel search | Manufacturer: CHEVROLET, Model Year: 2023, Model line: EXPRESS, Model: CHEVROLET EXPRESS 2023Pages: 283, PDF Size: 16.23 MB
Page 1 of 283
2023 Express
Scan to Access
United States
United States and Canada
Connected Services1-888-4-ONSTAR Customer Assistance
1-800-263-3777
Canada
• Owner’s Manuals
• Warranty Information
• Connected Services
• My Chevrolet Rewards
• myChevrolet Mobile App
• How-To Videos
• Vehicle Diagnostics
• Scheduled Maintenance
• Vehicle Features
• Many Additional Resources
United States
Customer Assistance 1-800-222-1020
Roadside Assistance 1-800-243-8872
84892724 A
Express
Owner’s Manual
Roadside Assistance1-800-268-6800
Canada
C
M
Y
CM
MY
CY
CMY
K
ai1652903903161_23_CHEV_Express_COV_en_US_84892724 A_2022JUN20.pdf 1 \
5/18/2022 3:58:24 PM
Page 45 of 283
Chevrolet Express Owner Manual (GMNA-Localizing-U.S./Canada/Mexico-
16547501) - 2023 - CRC - 6/10/22
44 Seats and Restraints
Servicing the Airbag-Equipped
Vehicle
Airbags affect how the vehicle should be
serviced. There are parts of the airbag
system in several places around the vehicle.
Your dealer and the service manual have
information about servicing the vehicle and
the airbag system. To purchase a service
manual, seePublication Ordering
Information 0260.
{Warning
For up to 10 seconds after the vehicle is
turned off and the battery is
disconnected, an airbag can still inflate
during improper service. You can be
injured if you are close to an airbag
when it inflates. Avoid yellow connectors.
They are probably part of the airbag
system. Be sure to follow proper service
procedures, and make sure the person
performing work for you is qualified to
do so.
Adding Equipment to the
Airbag-Equipped Vehicle
Adding accessories that change the vehicle's
frame, bumper system, height, front end,
or side sheet metal may keep the airbag
system from working properly.
The operation of the airbag system can also
be affected by changing, including
improperly repairing or replacing, any parts
of the following:
.Airbag system, including airbag modules,
front or side impact sensors, sensing and
diagnostic module, or airbag wiring
.Front seats, including stitching, seams or
zippers
.Seat belts
.Steering wheel, instrument panel, ceiling
trim, or pillar garnish trim
.Inner door seals, including speakers
Your dealer and the service manual have
information about the location of the airbag
modules and sensors, sensing and diagnostic
module, and airbag wiring along with the
proper replacement procedures.
If the vehicle has rollover roof-rail airbags,
see Different Size Tires and Wheels 0216 for
additional important information. If the vehicle must be modified because you
have a disability and have questions about
whether the modifications will affect the
vehicle's airbag system, or if you have
questions about whether the airbag system
will be affected if the vehicle is modified for
any other reason, call Customer Assistance.
See
Customer Assistance Offices 0254.
Airbag System Check
The airbag system does not need regularly
scheduled maintenance or replacement.
Make sure the airbag readiness light is
working. See Airbag Readiness Light 075.
Caution
If an airbag covering is damaged, opened,
or broken, the airbag may not work
properly. Do not open or break the airbag
coverings. If there are any opened or
broken airbag coverings, have the airbag
covering and/or airbag module replaced.
For the location of the airbags, see Where
Are the Airbags? 037. See your dealer for
service.
Page 75 of 283
Chevrolet Express Owner Manual (GMNA-Localizing-U.S./Canada/Mexico-
16547501) - 2023 - CRC - 6/10/22
74 Instruments and Controls
Caution
Lack of proper engine oil maintenance
can damage the engine. Driving with the
engine oil low can also damage the
engine. The repairs would not be covered
by the vehicle warranty. Check the oil
level as soon as possible. Add oil if
required, but if the oil level is within the
operating range and the oil pressure is
still low, have the vehicle serviced.
Always follow the maintenance schedule
for changing engine oil.
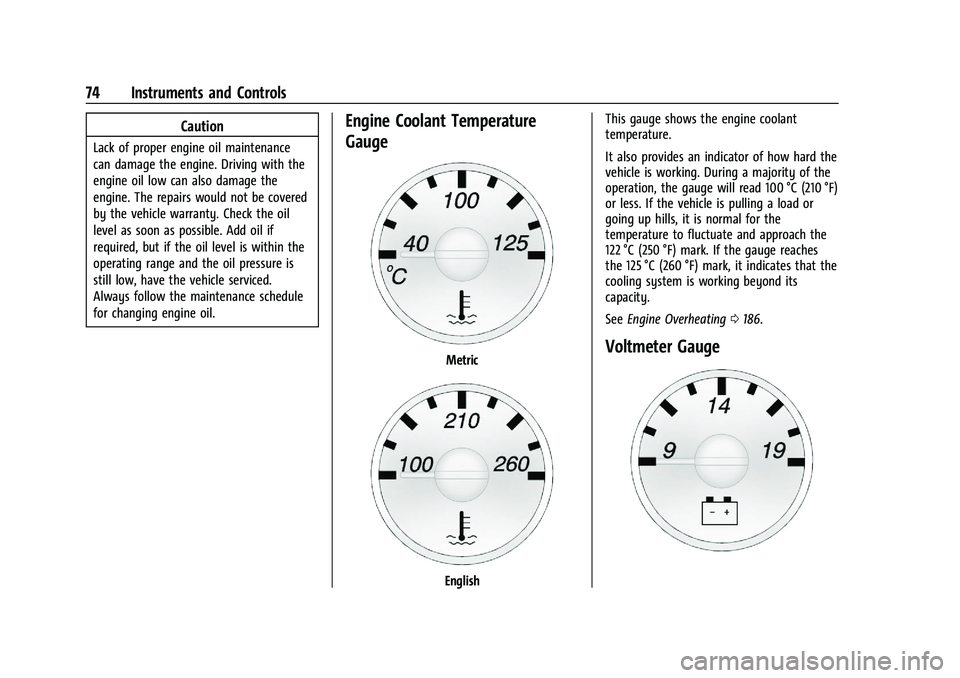
Engine Coolant Temperature
Gauge
Metric
EnglishThis gauge shows the engine coolant
temperature.
It also provides an indicator of how hard the
vehicle is working. During a majority of the
operation, the gauge will read 100 °C (210 °F)
or less. If the vehicle is pulling a load or
going up hills, it is normal for the
temperature to fluctuate and approach the
122 °C (250 °F) mark. If the gauge reaches
the 125 °C (260 °F) mark, it indicates that the
cooling system is working beyond its
capacity.
See
Engine Overheating 0186.
Voltmeter Gauge
Page 86 of 283
Chevrolet Express Owner Manual (GMNA-Localizing-U.S./Canada/Mexico-
16547501) - 2023 - CRC - 6/10/22
Instruments and Controls 85
of the current oil life remains. The engine oil
life system will alert you to change the oil
on a schedule consistent with your driving
conditions.
When the remaining oil life is low, the
CHANGE ENGINE OIL SOON message will
appear on the display. You should change
the oil as soon as possible. SeeEngine Oil
0 179. In addition to the engine oil life
system monitoring the oil life, additional
maintenance is recommended. See
Maintenance Schedule 0242.
Remember, you must reset the OIL LIFE
yourself after each oil change. It will not
reset itself. Also, be careful not to reset the
OIL LIFE accidentally at any time other than
when the oil has just been changed.
It cannot be reset accurately until the next
oil change. To reset the engine oil life
system, see Engine Oil Life System 0181.
Side Blind Zone Alert
If the vehicle has Side Blind Zone Alert
(SBZA), this display allows the system to be
turned on or off. Press
Tuntil SBZA
displays. Once in this display, press
Vto
select between ON or OFF. When the SBZA system is turned off, a DIC message will
display. See
Side Blind Zone Alert (SBZA)
0 150.
Park Assist
If the vehicle has the Rear Park Assist (RPA)
system, press
Tuntil PARK ASSIST
displays. This display allows the system to
be turned on or off. Once in this display,
press to select between ON or OFF. The RPA
system automatically turns back on after
each vehicle start. When the RPA system is
turned off and the vehicle is shifted out of
P (Park), the DIC will display the PARK
ASSIST OFF message as a reminder that the
system has been turned off. See Park Assist
0 147.
Units
Press
Tuntil UNITS displays. This display
allows you to select between metric or
English units of measurement. Once in this
display, press
Vto select between METRIC
or ENGLISH units. Tire Pressure
If the vehicle has the Tire Pressure Monitor
System (TPMS), the pressure for each tire
can be viewed in the DIC. The tire pressure
will be shown in either kilopascals (kPa) or
pounds per square inch (psi). Press
Tuntil
the DIC displays FRONT TIRES PSI (kPa)
LEFT ## RIGHT ##. Press
Tagain until the
DIC displays REAR TIRES PSI (kPa) LEFT ##
RIGHT ##.
If a low tire pressure condition is detected
by the system while driving, a message
advising you to check the pressure in a
specific tire will appear in the display. See
Tire Pressure 0208.
If the tire pressure display shows dashes
instead of a value, there may be a problem
with the vehicle. If this consistently occurs,
see your dealer for service.
Engine Hours
Press
Tuntil ENGINE HOURS displays. This
display shows the total number of hours the
engine has run.
Page 120 of 283

Chevrolet Express Owner Manual (GMNA-Localizing-U.S./Canada/Mexico-
16547501) - 2023 - CRC - 6/10/22
Climate Controls 119
Operation Tips
.Clear away any ice, snow or leaves from
the air inlets at the base of the
windshield that may block the flow of air
into the vehicle.
.Use of non-GM approved hood deflectors
may adversely affect the performance of
the system.
.Clear snow off the hood to improve
visibility and help decrease moisture
drawn into the vehicle.
.Keep the path under the front seats clear
of objects to help circulate the air inside
of the vehicle more effectively.
Maintenance
Service
All vehicles have a label underhood that
identifies the refrigerant used in the vehicle.
The refrigerant system should only be
serviced by trained and certified technicians.
The air conditioning evaporator should never
be repaired or replaced by one from a
salvage vehicle. It should only be replaced
by a new evaporator to ensure proper and
safe operation.During service, all refrigerants should be
reclaimed with proper equipment. Venting
refrigerants directly to the atmosphere is
harmful to the environment and may also
create unsafe conditions based on
inhalation, combustion, frostbite, or other
health-based concerns.
The air conditioning system requires periodic
maintenance. See
Maintenance Schedule
0 242.
Page 160 of 283

Chevrolet Express Owner Manual (GMNA-Localizing-U.S./Canada/Mexico-
16547501) - 2023 - CRC - 6/10/22
Driving and Operating 159
Maintenance when Trailer Towing
The vehicle needs service more often when
used to tow trailers. SeeMaintenance
Schedule 0242. It is especially important to
check the automatic transmission fluid,
engine oil, axle lubricant, belts, cooling
system, and brake system before and during
each trip.
Check periodically that all nuts and bolts on
the trailer hitch are tight.
Engine Cooling when Trailer Towing
The cooling system may temporarily
overheat during severe operating conditions.
See Engine Overheating 0186.
Trailer Towing
Caution
Towing a trailer improperly can damage
the vehicle and result in costly repairs
not covered by the vehicle warranty. To
tow a trailer correctly, follow the
directions in this section and see your
dealer for important information about
towing a trailer with the vehicle. Trailering is different than just driving the
vehicle by itself. Trailering means changes in
handling, acceleration, braking, durability,
and fuel economy. Successful, safe trailering
takes correct equipment, and it has to be
used properly.
The following information has many
time-tested, important trailering tips and
safety rules. Many of these are important
for your safety and that of your passengers.
Read this section carefully before pulling a
trailer.
Trailer Weight
{Warning
Never exceed the towing capacity for
your vehicle.
Safe trailering requires monitoring the
weight, speed, altitude, road grades, outside
temperature, dimensions of the front of the
trailer, and how frequently the vehicle is
used to tow a trailer.
Trailering Weight Ratings
When towing a trailer, the combined weight
of the vehicle, vehicle contents, trailer, and
trailer contents must be below all of the
maximum weight ratings for the vehicle,
including:
.Gross Combined Weight Rating (GCWR)
.Gross Vehicle Weight Rating (GVWR)
.Maximum Trailer Weight Rating
.Gross Axle Weight Rating-Rear (GAWR-RR)
.Maximum Trailer Tongue Weight Rating
See “Weight-Distributing Hitch Adjustment”
under Towing Equipment 0167 to determine
if equalizer bars are required to obtain the
maximum trailer weight rating.
See “Trailer Brakes” underTowing
Equipment 0167 to determine if brakes are
required based on the trailer weight.
The only way to be sure the weight is not
exceeding any of these ratings is to weigh
the tow vehicle and trailer combination,
fully loaded for the trip, getting individual
weights for each of these items.
Page 191 of 283

Chevrolet Express Owner Manual (GMNA-Localizing-U.S./Canada/Mexico-
16547501) - 2023 - CRC - 6/10/22
190 Vehicle Care
Brake pads should be replaced as complete
axle sets.
Brake Pedal Travel
See your dealer if the brake pedal does not
return to normal height, or if there is a
rapid increase in pedal travel. This could be
a sign that brake service may be required.
Replacing Brake System Parts
Always replace brake system parts with
new, approved replacement parts. If this is
not done, the brakes may not work
properly. The braking performance can
change in many ways if the wrong brake
parts are installed or if parts are improperly
installed.
Brake Fluid
The brake master cylinder reservoir is filled
with GM approved DOT 4 brake fluid as
indicated on the reservoir cap. SeeEngine
Compartment Overview 0176 for the
location of the reservoir.
Checking Brake Fluid
With the vehicle in P (Park) on a level
surface, the brake fluid level should be
between the minimum and maximum marks
on the brake fluid reservoir.
There are only two reasons why the brake
fluid level in the reservoir may go down:
.Normal brake lining wear. When new
linings are installed, the fluid level goes
back up.
.A fluid leak in the brake hydraulic system.
Have the brake hydraulic system fixed.
With a leak, the brakes will not
work well.
Always clean the brake fluid reservoir cap
and the area around the cap before
removing it.
Do not top off the brake fluid. Adding fluid
does not correct a leak. If fluid is added
when the linings are worn, there will be too
much fluid when new brake linings are installed. Add or remove fluid, as necessary,
only when work is done on the brake
hydraulic system.
{Warning
If too much brake fluid is added, it can
spill on the engine and burn, if the
engine is hot enough. You or others could
be burned, and the vehicle could be
damaged. Add brake fluid only when
work is done on the brake hydraulic
system.
When the brake fluid falls to a low level,
the brake warning light comes on. See Brake
System Warning Light 078.
Brake fluid absorbs water over time which
degrades the effectiveness of the brake fluid.
Replace brake fluid at the specified intervals
to prevent increased stopping distance. See
Maintenance Schedule 0242.
What to Add
Use only GM approved DOT 4 brake fluid
from a clean, sealed container. See
Recommended Fluids and Lubricants 0246.
Page 194 of 283

Chevrolet Express Owner Manual (GMNA-Localizing-U.S./Canada/Mexico-
16547501) - 2023 - CRC - 6/10/22
Vehicle Care 193
Automatic Transmission Shift Lock
Control Function Check
{Warning
When you are doing this inspection, the
vehicle could move suddenly. If the
vehicle moves, you or others could be
injured.
1. Before starting this check, be sure there is enough room around the vehicle.
It should be parked on a level surface.
2. Apply the parking brake. Be ready to apply the regular brake immediately if
the vehicle begins to move.
3. With the engine off, turn the ignition on, but do not start the engine. Without
applying the regular brake, try to move
the shift lever out of P (Park) with
normal effort. If the shift lever moves
out of P (Park), contact your dealer for
service.
Ignition Transmission Lock Check
While parked, and with the parking brake
set, try to turn the ignition off in each shift
lever position.
.The ignition should turn to off only when
the shift lever is in P (Park).
.The ignition key should come out only
when the ignition is off.
Contact your dealer if service is required.
Park Brake and P (Park)
Mechanism Check
{Warning
When you are doing this check, the
vehicle could begin to move. You or
others could be injured and property
could be damaged. Make sure there is
room in front of the vehicle in case it
begins to roll. Be ready to apply the
regular brake at once should the vehicle
begin to move.
Park on a fairly steep hill, with the vehicle
facing downhill. Keeping your foot on the
regular brake, set the parking brake.
.To check the parking brake's holding
ability: With the engine running and the
transmission in N (Neutral), slowly remove
foot pressure from the regular brake
pedal. Do this until the vehicle is held by
the parking brake only.
.To check the P (Park) mechanism's holding
ability: With the engine running, shift to
P (Park). Then release the parking brake
followed by the regular brake.
Contact your dealer if service is required.
Wiper Blade Replacement
Windshield wiper blades should be inspected
for wear and cracking. See Maintenance
Schedule 0242.
Replacement blades come in different types
and are removed in different ways. For
proper type and length, see Maintenance
Replacement Parts 0247.
Caution
Allowing the wiper arm to touch the
windshield when no wiper blade is
installed could damage the windshield.
Any damage that occurs would not be
covered by the vehicle warranty. Do not
allow the wiper arm to touch the
windshield.
1. Lift the wiper arm away from the windshield.
Page 214 of 283
Chevrolet Express Owner Manual (GMNA-Localizing-U.S./Canada/Mexico-
16547501) - 2023 - CRC - 6/10/22
Vehicle Care 213
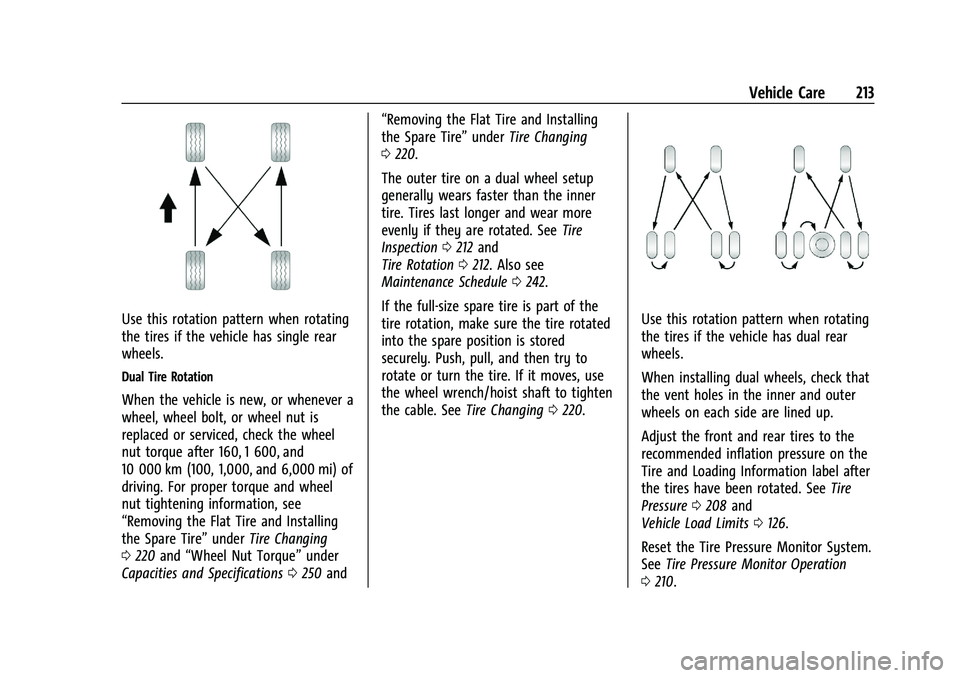
Use this rotation pattern when rotating
the tires if the vehicle has single rear
wheels.
Dual Tire Rotation
When the vehicle is new, or whenever a
wheel, wheel bolt, or wheel nut is
replaced or serviced, check the wheel
nut torque after 160, 1 600, and
10 000 km (100, 1,000, and 6,000 mi) of
driving. For proper torque and wheel
nut tightening information, see
“Removing the Flat Tire and Installing
the Spare Tire”underTire Changing
0 220 and “Wheel Nut Torque” under
Capacities and Specifications 0250 and “Removing the Flat Tire and Installing
the Spare Tire”
underTire Changing
0 220.
The outer tire on a dual wheel setup
generally wears faster than the inner
tire. Tires last longer and wear more
evenly if they are rotated. See Tire
Inspection 0212 and
Tire Rotation 0212. Also see
Maintenance Schedule 0242.
If the full-size spare tire is part of the
tire rotation, make sure the tire rotated
into the spare position is stored
securely. Push, pull, and then try to
rotate or turn the tire. If it moves, use
the wheel wrench/hoist shaft to tighten
the cable. See Tire Changing0220.
Use this rotation pattern when rotating
the tires if the vehicle has dual rear
wheels.
When installing dual wheels, check that
the vent holes in the inner and outer
wheels on each side are lined up.
Adjust the front and rear tires to the
recommended inflation pressure on the
Tire and Loading Information label after
the tires have been rotated. See Tire
Pressure 0208 and
Vehicle Load Limits 0126.
Reset the Tire Pressure Monitor System.
See Tire Pressure Monitor Operation
0 210.
Page 228 of 283

Chevrolet Express Owner Manual (GMNA-Localizing-U.S./Canada/Mexico-
16547501) - 2023 - CRC - 6/10/22
Vehicle Care 227
5. Insert the chisel end of the hoist handle,on an angle, through the hole in the rear
floor panel above the bumper and onto
the hoist shaft.
Do not use the chiseled end of the wheel
wrench.
6. Raise the tire part way upward. Make sure the retainer is seated in the wheel
opening.
7. Raise the tire fully against the underside of the vehicle by turning the wheel
wrench clockwise until you hear two
clicks or feel it skip twice. You cannot
overtighten the cable.8. Make sure the tire is stored securely.Push, pull (1), and then try to turn (2) the
tire. If the tire moves, use the wheel
wrench to tighten the cable.
Two clicks mean the tire is up all
the way.
Repeat this tightness check procedure
when checking the spare tire pressure
according to the scheduled maintenance
information or any time the spare tire is
handled due to service of other
components.
Correctly Stored
Incorrectly Stored
9. Return the jacking equipment to the proper location. Secure the items and
replace the jack cover.
Full-Size Spare Tire
If this vehicle came with a full-size spare
tire, it was fully inflated when new,
however, it can lose air over time. Check the
inflation pressure regularly. See Tire Pressure
0 208 and Vehicle Load Limits 0126 for
information regarding proper tire inflation
and loading the vehicle. For instructions on
how to remove, install, or store a spare tire,
see Tire Changing 0220.