light CHEVROLET EXPRESS CARGO VAN 2003 1.G Owners Manual
[x] Cancel search | Manufacturer: CHEVROLET, Model Year: 2003, Model line: EXPRESS CARGO VAN, Model: CHEVROLET EXPRESS CARGO VAN 2003 1.GPages: 386, PDF Size: 2.73 MB
Page 1 of 386

Seats and Restraint Systems........................... 1-1
Front Seats
............................................... 1-3
Rear Seats
............................................... 1-6
Safety Belts
.............................................1-10
Child Restraints
.......................................1-34
Air Bag System
.......................................1-63
Restraint System Check
............................1-74
Features and Controls..................................... 2-1
Keys
........................................................ 2-2
Doors and Locks
....................................... 2-7
Windows
.................................................2-16
Theft-Deterrent Systems
............................2-19
Starting and Operating Your Vehicle
...........2-20
Mirrors
....................................................2-31
OnStar
žSystem
......................................2-35
Storage Areas
.........................................2-36
Instrument Panel............................................. 3-1
Instrument Panel Overview
.......................... 3-4
Climate Controls
......................................3-19
Warning Lights, Gages and Indicators
.........3-23
Audio System(s)
.......................................3-40
Driving Your Vehicle....................................... 4-1
Your Driving, the Road, and Your Vehicle
..... 4-2
Towing
...................................................4-29Service and Appearance Care.......................... 5-1
Service
..................................................... 5-3
Fuel
......................................................... 5-4
Checking Things Under the Hood
................. 5-9
All-Wheel Drive
........................................5-46
Rear Axle
...............................................5-47
Front Axle
...............................................5-48
Noise Control System
...............................5-49
Bulb Replacement
....................................5-50
Windshield Wiper Blade Replacement
.........5-55
Tires
......................................................5-56
Appearance Care
.....................................5-80
Vehicle Identi®cation
.................................5-90
Electrical System
......................................5-91
Capacities and Speci®cations
.....................5-97
Normal Maintenance
Replacement Parts
..............................5-100
Maintenance Schedule..................................... 6-1
Maintenance Schedule
................................ 6-2
Customer Assistance Information.................... 7-1
Customer Assistance Information
.................. 7-2
Reporting Safety Defects
............................ 7-8
Index................................................................ 1
2003 Chevrolet Express Owner ManualM
Page 4 of 386

Vehicle Damage Warnings
Also, in this book you will ®nd these notices:
Notice:These mean there is something that could
damage your vehicle.
A notice will tell you about something that can
damage your vehicle. Many times, this damage would
not be covered by your warranty, and it could be costly.
But the notice will tell you what to do to help avoid
the damage.
When you read other manuals, you might see
CAUTION and NOTICE warnings in different colors
or in different words.
You'll also see warning labels on your vehicle. They use
the same words, CAUTION or NOTICE.
Vehicle Symbols
Your vehicle has components and labels that use
symbols instead of text. Symbols, used on your vehicle,
are shown along with the text describing the operation
or information relating to a speci®c component, control,
message, gage or indicator.
If you need help ®guring out a speci®c name of
a component, gage or indicator, reference the
following topics:
·Seats and Restraint Systems in Section 1
·Features and Controls in Section 2
·Instrument Panel Overview in Section 3
·Climate Controls in Section 3
·Warning Lights, Gages and Indicators in Section 3
·Audio System(s) in Section 3
·Engine Compartment Overview in Section 5
iv
Page 14 of 386
Replacing the Rear Seats
{CAUTION:
A seat that isn't locked into place properly can
move around in a collision or sudden stop.
People in the vehicle could be injured. Be sure
to lock the seat into place properly when
installing it.
{CAUTION:
A safety belt that is improperly routed, not
properly attached, or twisted won't provide the
protection needed in a crash. The person
wearing the belt could be seriously injured.
After raising the rear seatback, always check
to be sure that the safety belts are properly
routed and attached, and are not twisted.1. Position the seat into the open slots in both rails.
Push the seat forward in the rail, hooking both
seat bases onto the pins inside of the rails.
2. To install the locking pins at the rear of the seat
base, locate the hole in the rail for the pin. It is
found on the inboard side of the seat. If the vehicle
has ¯oor mats, pull the ¯ap that has been cut
into the mat.
3. Insert the black or white locking pin into the seat
base. Possible slight seat pushing may be needed
to line up the pin with the base. Remember,
each pin has its own side. The pin with the white
handle marked ªRº must be installed on the
passenger's side and the pin with the black handle
marked ªLº on the driver's side.
4. Push the pin with the white handle marked ªRº
down until it is in the retaining clip.
1-8
Page 16 of 386
Safety Belts
Safety Belts: They Are for Everyone
This part of the manual tells you how to use safety
belts properly. It also tells you some things you should
not do with safety belts.
{CAUTION:
Don't let anyone ride where he or she can't
wear a safety belt properly. If you are in a
crash and you're not wearing a safety belt,
your injuries can be much worse. You can hit
things inside the vehicle or be ejected from it.
You can be seriously injured or killed. In the
same crash, you might not be, if you are
buckled up. Always fasten your safety belt,
and check that your passengers' belts are
fastened properly too.
{CAUTION:
It is extremely dangerous to ride in a cargo
area, inside or outside of a vehicle. In a
collision, people riding in these areas are more
likely to be seriously injured or killed. Do not
allow people to ride in any area of your vehicle
that is not equipped with seats and safety
belts. Be sure everyone in your vehicle is in a
seat and using a safety belt properly.
Your vehicle has a light
that comes on as a
reminder to buckle up. See
Safety Belt Reminder
Light on page 3-26.
1-10
Page 66 of 386
Although a rear seat is a safer place, you can secure a
forward-facing child restraint in the right front seat.
{CAUTION:
If the air bag readiness light ever comes on
when you have turned off the air bag, it means
that something may be wrong with the air bag
system. The right front passenger's air bag
could in¯ate even though the switch is off. If
this ever happens, don't let anyone whom the
national government has identi®ed as a
member of a passenger air bag risk group sit
in the right front passenger's position (for
example, don't secure a rear-facing child
restraint in your vehicle) until you have your
vehicle serviced. See ªAir Bag Off Switchº in
the Index.You'll be using the lap-shoulder belt. See
Top Strap on
page 1-48if the child restraint has one. Be sure to
follow the instructions that came with the child restraint.
Secure the child in the child restraint when and as
the instructions say.
1. If your vehicle has a passenger air bag and an air
bag off switch, and you are using a rear-facing child
restraint in this seat, make sure the air bag is
turned off. See
Air Bag Off Switch on page 1-70.If
your child restraint is forward-facing, always
move the seat as far back as it will go before
securing it in this seat. See
Power Seat on page 1-4orManual Seats on page 1-3.
2. Put the restraint on the seat.
3. Pick up the latch plate, and run the lap and shoulder
portions of the vehicle's safety belt through or
around the restraint. The child restraint instructions
will show you how.
1-60
Page 71 of 386
If your vehicle has an air bag for the right front
passenger read this.
{CAUTION:
Anyone who is up against, or very close to,
any air bag when it in¯ates can be seriously
injured or killed. Air bags plus lap-shoulder
belts offer the best protection for adults, but
not for young children and infants. Neither the
vehicle's safety belt system nor its air bag
system is designed for them. Young children
and infants need the protection that a child
restraint system can provide. Always secure
children properly in your vehicle. To read how,
see
Older Children on page 1-34 and Infants
and Young Children on page 1-36.
There is a air bag
readiness light on the
instrument panel, which
shows the air bag symbol.The system checks the air bag electrical system for
malfunctions. The light tells you if there is an electrical
problem. See
Air Bag Readiness Light on page 3-27for more information.
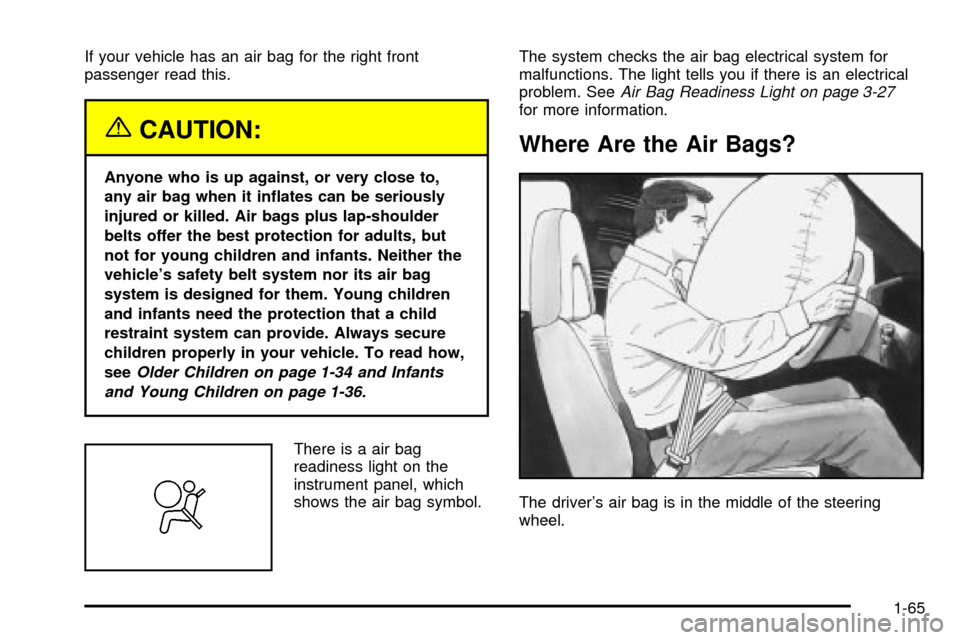
Where Are the Air Bags?
The driver's air bag is in the middle of the steering
wheel.
1-65
Page 78 of 386
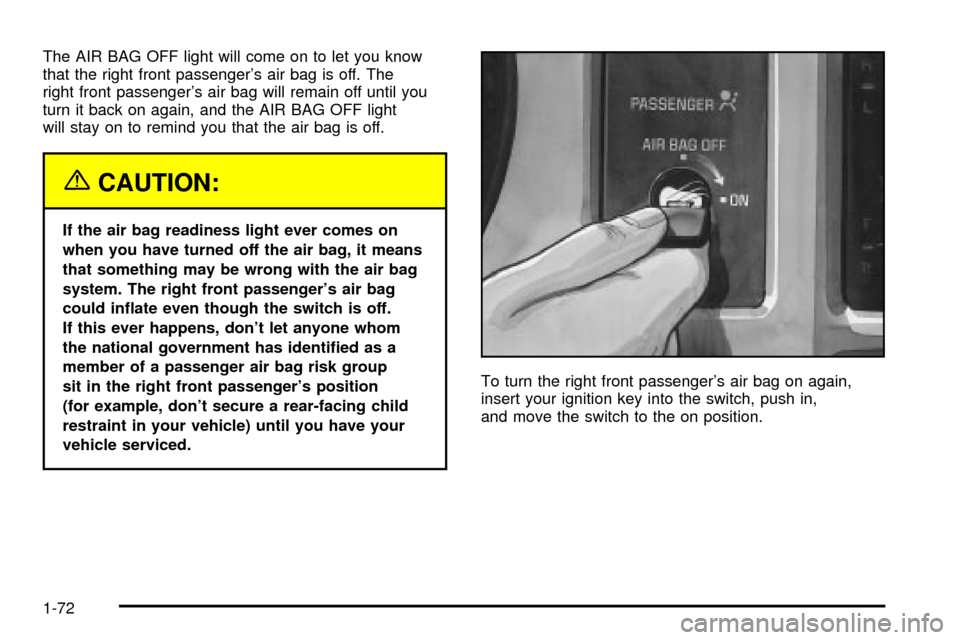
The AIR BAG OFF light will come on to let you know
that the right front passenger's air bag is off. The
right front passenger's air bag will remain off until you
turn it back on again, and the AIR BAG OFF light
will stay on to remind you that the air bag is off.
{CAUTION:
If the air bag readiness light ever comes on
when you have turned off the air bag, it means
that something may be wrong with the air bag
system. The right front passenger's air bag
could in¯ate even though the switch is off.
If this ever happens, don't let anyone whom
the national government has identi®ed as a
member of a passenger air bag risk group
sit in the right front passenger's position
(for example, don't secure a rear-facing child
restraint in your vehicle) until you have your
vehicle serviced.To turn the right front passenger's air bag on again,
insert your ignition key into the switch, push in,
and move the switch to the on position.
1-72
Page 80 of 386

Adding Equipment to Your Air
Bag-Equipped Vehicle
Q:If I add a push bumper or a bicycle rack to the
front of my vehicle, will it keep the air bags
from working properly?
A:As long as the push bumper or bicycle rack is
attached to your vehicle so that the vehicle's
basic structure isn't changed, it's not likely to keep
the air bags from working properly in a crash.
Q:Is there anything I might add to the front of the
vehicle that could keep the air bags from
working properly?
A:Yes. If you add things that change your vehicle's
frame, bumper system, front end sheet metal or
height, they may keep the air bag system
from working properly. Also, the air bag system
may not work properly if you relocate any of the air
bag sensors. If you have any questions about
this, you should contact Customer Assistance
before you modify your vehicle. The phone
numbers and addresses for Customer Assistance
are in Step Two of the
Customer Satisfaction
Procedure on page 7-2
.
Restraint System Check
Checking Your Restraint Systems
Now and then, make sure the safety belt reminder light
and all your belts, buckles, latch plates, retractors
and anchorages are working properly. Look for any other
loose or damaged safety belt system parts. If you see
anything that might keep a safety belt system from doing
its job, have it repaired.
Torn or frayed safety belts may not protect you in a
crash. They can rip apart under impact forces. If a belt
is torn or frayed, get a new one right away.
Also look for any opened or broken air bag covers, and
have them repaired or replaced. (The air bag system
does not need regular maintenance.)
1-74
Page 99 of 386
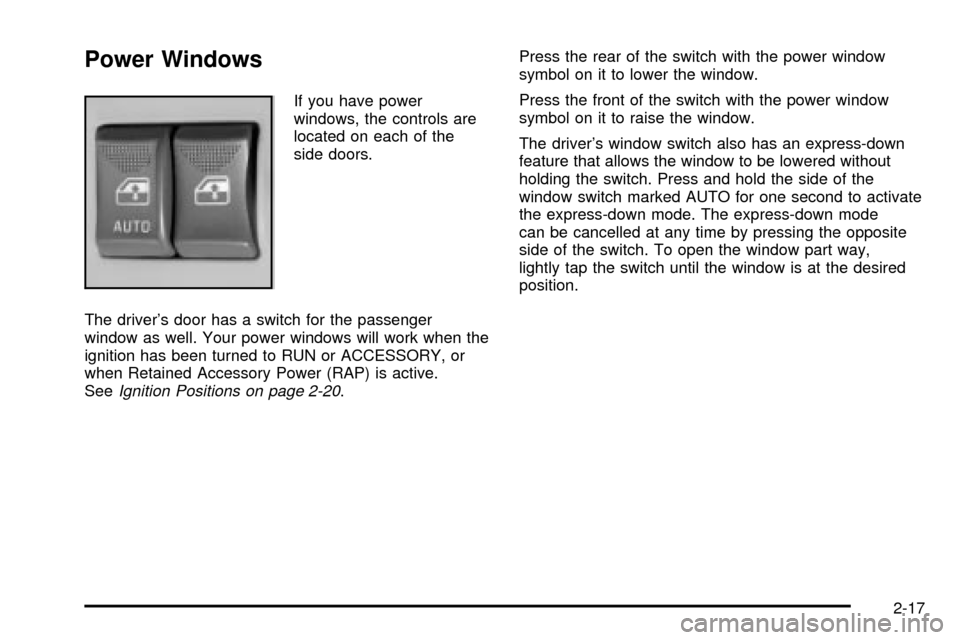
Power Windows
If you have power
windows, the controls are
located on each of the
side doors.
The driver's door has a switch for the passenger
window as well. Your power windows will work when the
ignition has been turned to RUN or ACCESSORY, or
when Retained Accessory Power (RAP) is active.
See
Ignition Positions on page 2-20.Press the rear of the switch with the power window
symbol on it to lower the window.
Press the front of the switch with the power window
symbol on it to raise the window.
The driver's window switch also has an express-down
feature that allows the window to be lowered without
holding the switch. Press and hold the side of the
window switch marked AUTO for one second to activate
the express-down mode. The express-down mode
can be cancelled at any time by pressing the opposite
side of the switch. To open the window part way,
lightly tap the switch until the window is at the desired
position.
2-17
Page 101 of 386

Sun Visors
To block out glare, you can swing down the visors.
You can also swing them from side to side.
Visor Vanity Mirror
Some visors have mirrors built in, with or without lamps.
Just lift the mirror cover on each visor to turn the
lamps on, if you have them.
Theft-Deterrent Systems
Vehicle theft is a big business, especially in some cities.
Although your vehicle has a number of theft-deterrent
features, we know that nothing we put on it can make it
impossible to steal. However, there are ways you
can help.
Passlockž
Your vehicle is equipped with the Passlockž
theft-deterrent system.
Passlock
žis a passive theft-deterrent system. Passlockž
enables fuel if the ignition lock cylinder is turned with
a valid key. If a correct key is not used or the ignition
lock cylinder is tampered with, fuel is disabled.
During normal operation, the SECURITY light will
go off approximately ®ve seconds after the key is
turned to RUN.
If the engine stalls and the SECURITY light ¯ashes,
wait until the light stops ¯ashing before trying to restart
the engine. Remember to release the key from
START as soon as the engine starts.
If the engine is running and the SECURITY light comes
on, you will be able to restart the engine if you turn
the engine off. However, your Passlock
žsystem is not
working properly and must be serviced by your
dealer. Your vehicle is not protected by Passlock
žat
this time. You may also want to check the fuse.
See
Fuses and Circuit Breakers on page 5-92. See your
dealer for service.
2-19