oil change CHEVROLET EXPRESS CARGO VAN 2008 1.G Owners Manual
[x] Cancel search | Manufacturer: CHEVROLET, Model Year: 2008, Model line: EXPRESS CARGO VAN, Model: CHEVROLET EXPRESS CARGO VAN 2008 1.GPages: 414, PDF Size: 2.34 MB
Page 102 of 414
Starting Procedure
1. With your foot off the accelerator pedal, turn the
ignition key to START. When the engine starts,
let go of the key. The idle speed will go down as
your engine gets warm. Do not race the engine
immediately after starting it. Operate the engine and
transmission gently to allow the oil to warm up
and lubricate all moving parts.
Your vehicle has a Computer-Controlled Cranking
System. This feature assists in starting the
engine and protects components. If the ignition key
is turned to the START position, and then
released when the engine begins cranking, the
engine will continue cranking for a few seconds or
until the vehicle starts. If the engine does not
start and the key is held in START for many
seconds, cranking will be stopped after 15 seconds
to prevent cranking motor damage. To prevent
gear damage, this system also prevents cranking if
the engine is already running. Engine cranking
can be stopped by turning the ignition switch to the
ACC/ACCESSORY or LOCK/OFF position.
Notice:Cranking the engine for long periods of
time, by returning the key to the START position
immediately after cranking has ended, can overheat
and damage the cranking motor, and drain the
battery. Wait at least 15 seconds between each try,
to let the cranking motor cool down.2. If the engine does not start after 5-10 seconds,
especially in very cold weather (below 0°F or−18°C),
it could be flooded with too much gasoline. Try
pushing the accelerator pedal all the way to the floor
and holding it there as you hold the key in START for
up to a maximum of 15 seconds. Wait at least
15 seconds between each try, to allow the cranking
motor to cool down. When the engine starts, let go of
the key and accelerator. If the vehicle starts briefly
but then stops again, do the same thing. This clears
the extra gasoline from the engine. Do not race the
engine immediately after starting it. Operate the
engine and transmission gently until the oil warms up
and lubricates all moving parts.
Notice:The engine is designed to work with the
electronics in your vehicle. If you add electrical
parts or accessories, you could change the way the
engine operates. Before adding electrical equipment,
check with your dealer/retailer. If you do not, your
engine might not perform properly. Any resulting
damage would not be covered by your vehicle’s
warranty.
2-22
Page 117 of 414
Instrument Panel Overview...............................3-4
Hazard Warning Flashers................................3-6
Other Warning Devices...................................3-6
Horn.............................................................3-6
Tilt Wheel.....................................................3-6
Turn Signal/Multifunction Lever.........................3-7
Turn and Lane-Change Signals........................3-8
Headlamp High/Low-Beam Changer..................3-9
Flash-to-Pass.................................................3-9
Windshield Wipers..........................................3-9
Windshield Washer.......................................3-10
Cruise Control..............................................3-11
Exterior Lamps.............................................3-14
Headlamps on Reminder................................3-15
Daytime Running Lamps (DRL).......................3-15
Automatic Headlamp System..........................3-16
Instrument Panel Brightness...........................3-16
Dome Lamps...............................................3-17
Dome Lamp Override....................................3-17
Entry/Exit Lighting.........................................3-17
Reading Lamps............................................3-17
Electric Power Management...........................3-17
Battery Run-Down Protection..........................3-18
Accessory Power Outlet(s).............................3-18
Ashtray(s) and Cigarette Lighter......................3-19Climate Controls............................................3-19
Climate Control System.................................3-19
Outlet Adjustment.........................................3-22
Rear Heating System....................................3-22
Rear Air Conditioning and Heating System.......3-23
Warning Lights, Gages, and Indicators............3-25
Instrument Panel Cluster................................3-26
Speedometer and Odometer...........................3-27
Trip Odometer..............................................3-27
Safety Belt Reminders...................................3-28
Airbag Readiness Light..................................3-29
Airbag Off Light............................................3-30
Passenger Airbag Status Indicator...................3-31
Charging System Light..................................3-33
Voltmeter Gage............................................3-34
Brake System Warning Light..........................3-34
Antilock Brake System Warning Light...............3-35
StabiliTrak
®Indicator Light..............................3-36
Engine Coolant Temperature Gage..................3-36
Tire Pressure Light.......................................3-37
Malfunction Indicator Lamp.............................3-38
Oil Pressure Gage........................................3-41
Oil Pressure Light.........................................3-42
Security Light...............................................3-42
Cruise Control Light......................................3-42
Section 3 Instrument Panel
3-1
Page 164 of 414
Vehicle Information Menu Items
T
(Vehicle Information):Press this button to scroll
through the following menu items:
Oil Life
Press the vehicle information button until OIL LIFE
REMAINING displays. This display shows an estimate
of the oil’s remaining useful life. If you see 99% OIL LIFE
REMAINING on the display, that means 99% of the
current oil life remains. The engine oil life system
will alert you to change the oil on a schedule consistent
with your driving conditions.
When the remaining oil life is low, the CHANGE
ENGINE OIL SOON message will appear on the display.
See “CHANGE ENGINE OIL SOON” underDIC
Warnings and Messages on page 3-52. You should
change the oil as soon as possible. SeeEngine
Oil (Gasoline Engine) on page 5-15. In addition to the
engine oil life system monitoring the oil life, additional
maintenance is recommended in the Maintenance
Schedule in this manual. SeeScheduled Maintenance
on page 6-4for more information.
Remember, you must reset the OIL LIFE yourself after
each oil change. It will not reset itself. Also, be
careful not to reset the OIL LIFE accidentally at any
time other than when the oil has just been changed.It cannot be reset accurately until the next oil change.
To reset the engine oil life system, seeEngine Oil
Life System on page 5-18.
Units
Press the vehicle information button until UNITS
displays. This display allows you to select between
English or Metric units of measurement. Once in this
display, press the set/reset button to select between
ENGLISH or METRIC units.
Tire Pressure
If your vehicle has the Tire Pressure Monitor System
(TPMS), the pressure for each tire can be viewed in the
DIC. The tire pressure will be shown in either pounds
per square inch (psi) or kilopascals (kPa). Press
the vehicle information button until the DIC displays
FRONT TIRES PSI (kPa) LEFT ## RIGHT ##. Press the
vehicle information button again until the DIC displays
REAR TIRES PSI (kPa) LEFT ## RIGHT ##.
If a low or high tire pressure condition is detected by the
system while driving, a message advising you to
check the pressure in a specific tire will appear in the
display. SeeInflation - Tire Pressure on page 5-64and
DIC Warnings and Messages on page 3-52for more
information.
3-48
Page 169 of 414
CHANGE ENGINE OIL SOON
This message displays when the engine oil needs to be
changed. When you change the engine oil, be sure
to reset the CHANGE ENGINE OIL SOON message.
SeeEngine Oil Life System on page 5-18for information
on how to reset the message. SeeEngine Oil (Gasoline
Engine) on page 5-15andScheduled Maintenance
on page 6-4for more information.
CHECK TIRE PRESSURE
If your vehicle has the Tire Pressure Monitor System
(TPMS), this message displays when the pressure
in one or more of the vehicle’s tires needs to be
checked. This message also displays LEFT FRONT,
RIGHT FRONT, LEFT REAR, or RIGHT REAR to
indicate which tire needs to be checked. You can
receive more than one tire pressure message at a time.
To read the other messages that may have been
sent at the same time, press the set/reset button. If a
tire pressure message appears on the DIC, stop as soon
as you can. Have the tire pressures checked and set
to those shown on the Tire Loading Information
label. SeeTires on page 5-56,Loading Your Vehicle on
page 4-20, andInflation - Tire Pressure on page 5-64.
The DIC also shows the tire pressure values. See
DIC Operation and Displays on page 3-45. If the tire
pressure is low, the low tire pressure warning light
comes on. SeeTire Pressure Light on page 3-37.
DRIVER DOOR OPEN
This message displays and a chime sounds if the driver
door is not fully closed and the vehicle is in a drive
gear. Stop and turn off the vehicle, check the door for
obstructions, and close the door again. Check to
see if the message still appears on the DIC.
ENGINE HOT A/C
(Air Conditioning) OFF
This message displays when the engine coolant
becomes hotter than the normal operating temperature.
SeeEngine Coolant Temperature Gage on page 3-36.
To avoid added strain on a hot engine, the air
conditioning compressor automatically turns off. When
the coolant temperature returns to normal, the air
conditioning compressor turns back on. You can
continue to drive your vehicle.
If this message continues to appear, have the system
repaired by your dealer/retailer as soon as possible
to avoid damage to the engine.
3-53
Page 264 of 414
If you are in an area of extreme cold, where the
temperature falls below−20°F (−29°C), it is
recommended that you use either an SAE 5W-30
synthetic oil or an SAE 0W-30 oil. Both provide easier
cold starting and better protection for the engine at
extremely low temperatures.
Engine Oil Additives
Do not add anything to the oil. The recommended oils
with the starburst symbol that meet GM Standard
GM6094M are all you need for good performance and
engine protection.
Engine Oil Life System
When to Change Engine Oil
Your vehicle has a computer system that lets you know
when to change the engine oil and filter. This is based on
engine revolutions and engine temperature, and not on
mileage. Based on driving conditions, the mileage at
which an oil change will be indicated can vary
considerably. For the oil life system to work properly, you
must reset the system every time the oil is changed.When the system has calculated that oil life has been
diminished, it will indicate that an oil change is
necessary. A CHANGE ENGINE OIL SOON message
will come on. SeeDIC Warnings and Messages on
page 3-52. Change the oil as soon as possible within the
next 600 miles (1 000 km). It is possible that, if you
are driving under the best conditions, the oil life system
might not indicate that an oil change is necessary for
over a year. However, the engine oil and filter must be
changed at least once a year and at this time the
system must be reset. Your dealer/retailer has trained
service people who will perform this work using genuine
parts and reset the system. It is also important to
check the oil regularly and keep it at the proper level.
If the system is ever reset accidentally, you must change
the oil at 3,000 miles (5 000 km) since your last oil
change. Remember to reset the oil life system whenever
the oil is changed.
5-18
Page 265 of 414
How to Reset the Engine Oil Life
System
The Engine Oil Life System calculates when to change
the engine oil and filter based on vehicle use.
Whenever the oil is changed, reset the system so it can
calculate when the next oil change is required. If a
situation occurs where you change the oil prior
to a CHANGE ENGINE OIL SOON message being
turned on, reset the system.
To reset the CHANGE ENGINE OIL SOON message:
1. Turn the ignition key to ON/RUN with the engine off.
2. Fully press and release the accelerator pedal
slowly three times within five seconds.
3. Turn the key to LOCK/OFF.
If the message comes back on when you start your
vehicle, the engine oil life system has not reset. Repeat
the procedure. If it still does not reset, see your
dealer/retailer for service.
What to Do with Used Oil
Used engine oil contains certain elements that can be
unhealthy for your skin and could even cause cancer.
Do not let used oil stay on your skin for very long. Clean
your skin and nails with soap and water, or a good
hand cleaner. Wash or properly dispose of clothing or
rags containing used engine oil. See the manufacturer’s
warnings about the use and disposal of oil products.
Used oil can be a threat to the environment. If you
change your own oil, be sure to drain all the oil from the
filter before disposal. Never dispose of oil by putting it
in the trash, pouring it on the ground, into sewers, or into
streams or bodies of water. Instead, recycle it by
taking it to a place that collects used oil. If you have a
problem properly disposing of used oil, ask your
dealer/retailer, a service station, or a local recycling
center for help.
5-19
Page 266 of 414
Engine Air Cleaner/Filter
If your vehicle has the DURAMAX®Diesel engine, see
the DURAMAX®Diesel manual for more information.
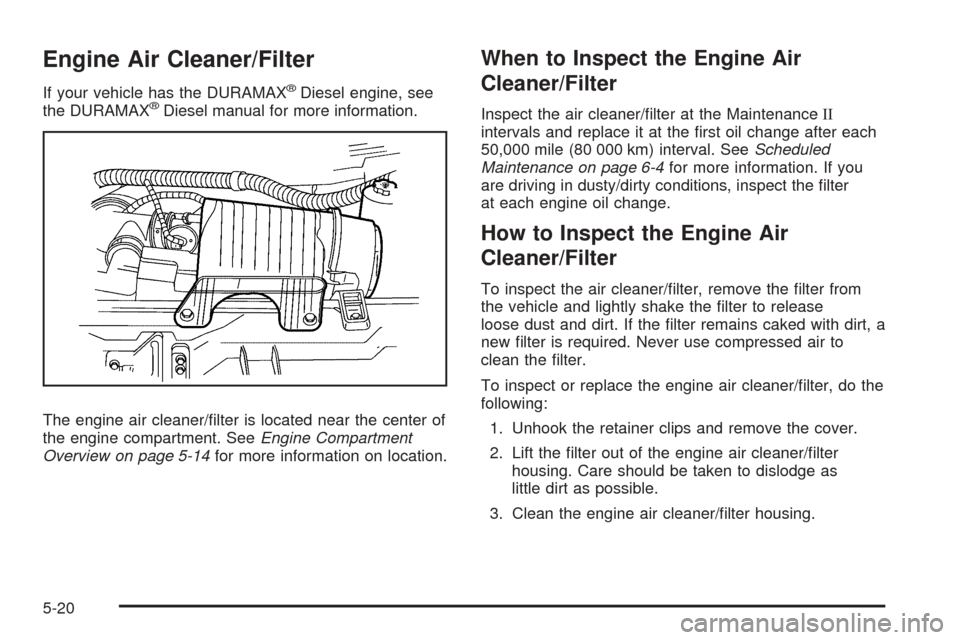
The engine air cleaner/filter is located near the center of
the engine compartment. SeeEngine Compartment
Overview on page 5-14for more information on location.
When to Inspect the Engine Air
Cleaner/Filter
Inspect the air cleaner/filter at the MaintenanceII
intervals and replace it at the first oil change after each
50,000 mile (80 000 km) interval. SeeScheduled
Maintenance on page 6-4for more information. If you
are driving in dusty/dirty conditions, inspect the filter
at each engine oil change.
How to Inspect the Engine Air
Cleaner/Filter
To inspect the air cleaner/filter, remove the filter from
the vehicle and lightly shake the filter to release
loose dust and dirt. If the filter remains caked with dirt, a
new filter is required. Never use compressed air to
clean the filter.
To inspect or replace the engine air cleaner/filter, do the
following:
1. Unhook the retainer clips and remove the cover.
2. Lift the filter out of the engine air cleaner/filter
housing. Care should be taken to dislodge as
little dirt as possible.
3. Clean the engine air cleaner/filter housing.
5-20
Page 267 of 414
4. Inspect or replace the engine air cleaner/filter. Make
sure that the filter fits properly into the housing.
5. Reinstall the cover and fasten the retaining clips.
{CAUTION:
Operating the engine with the air cleaner/�lter
off can cause you or others to be burned.
The air cleaner not only cleans the air; it helps
to stop �ames if the engine back�res. If it is
not there and the engine back�res, you could
be burned. Do not drive with it off, and be
careful working on the engine with the air
cleaner/�lter off.
Notice:If the air cleaner/�lter is off, a back�re can
cause a damaging engine �re. And, dirt can
easily get into your engine, which will damage it.
Always have the air cleaner/�lter in place when you
are driving.
Automatic Transmission Fluid
If your vehicle has the DURAMAX®Diesel engine,
see the DURAMAX®Diesel manual for more
information.
When to Check and Change Automatic
Transmission Fluid
A good time to check your automatic transmission fluid
level is when the engine oil is changed.
Change the fluid and filter at the intervals listed in
Additional Required Services (Gasoline Engine) on
page 6-6, and be sure to use the transmission fluid
listed inRecommended Fluids and Lubricants on
page 6-13.
5-21
Page 347 of 414
Fabric/Carpet
Use a vacuum cleaner with a soft brush attachment
frequently to remove dust and loose dirt. A canister
vacuum with a beater bar in the nozzle may only be used
on floor carpet and carpeted floor mats. For soils, always
try to remove them first with plain water or club soda.
Before cleaning, gently remove as much of the soil as
possible using one of the following techniques:
•For liquids: gently blot the remaining soil with a paper
towel. Allow the soil to absorb into the paper towel
until no more can be removed.
•For solid dry soils: remove as much as possible and
then vacuum.
To clean, use the following instructions:
1. Saturate a lint-free, clean white cloth with water or
club soda.
2. Wring the cloth to remove excess moisture.
3. Start on the outside edge of the soil and gently rub
toward the center. Continue cleaning, using a clean
area of the cloth each time it becomes soiled.
4. Continue to gently rub the soiled area until the
cleaning cloth remains clean.
5. If the soil is not completely removed, use a mild
soap solution and repeat the cleaning process
that was used with plain water.If any of the soil remains, a commercial fabric cleaner or
spot lifter may be necessary. When a commercial
upholstery cleaner or spot lifter is to be used, test a
small hidden area for colorfastness first. If the locally
cleaned area gives any impression that a ring formation
may result, clean the entire surface.
After the cleaning process has been completed, a paper
towel can be used to blot excess moisture from the
fabric or carpet.
Instrument Panel, Vinyl, and Other
Plastic Surfaces
A soft cloth dampened with water may be used to
remove dust. If a more thorough cleaning is necessary,
a clean soft cloth dampened with a mild soap solution
can be used to gently remove dust and dirt. Never use
spot lifters or removers on plastic surfaces. Many
commercial cleaners and coatings that are sold to
preserve and protect soft plastic surfaces may
permanently change the appearance and feel of your
interior and are not recommended. Do not use silicone
or wax-based products, or those containing organic
solvents to clean your vehicle’s interior because
they can alter the appearance by increasing the gloss in
a non-uniform manner.
5-101
Page 366 of 414
Maintenance Schedule
Introduction
This maintenance section applies to vehicles with a
gasoline engine. If your vehicle has a diesel engine,
see the maintenance schedule section in the
DURAMAX
®Diesel manual.
Important: Keep engine oil at the proper level and
change as recommended.
Have you purchased the GM Protection Plan? The Plan
supplements your new vehicle warranties. See your
Warranty and Owner Assistance booklet or your
dealer/retailer for details.
Maintenance Requirements
Notice:Maintenance intervals, checks, inspections,
replacement parts, and recommended �uids and
lubricants as prescribed in this manual are
necessary to keep your vehicle in good working
condition. Any damage caused by failure to follow
scheduled maintenance might not be covered
by warranty.
Your Vehicle and the Environment
Proper vehicle maintenance not only helps to keep your
vehicle in good working condition, but also helps the
environment. All recommended maintenance is
important. Improper vehicle maintenance can even affect
the quality of the air we breathe. Improper fluid levels or
the wrong tire inflation can increase the level of emissions
from your vehicle. To help protect our environment, and
to keep your vehicle in good condition, be sure to
maintain your vehicle properly.
6-2