door lock CHEVROLET EXPRESS CARGO VAN 2009 1.G Owner's Manual
[x] Cancel search | Manufacturer: CHEVROLET, Model Year: 2009, Model line: EXPRESS CARGO VAN, Model: CHEVROLET EXPRESS CARGO VAN 2009 1.GPages: 408, PDF Size: 2.36 MB
Page 177 of 408
AUTO DOOR UNLOCK
This feature allows you to select whether or not to turn
off the automatic door unlocking feature. It also allows
you to select which doors and when the doors will
automatically unlock. SeeProgrammable Automatic
Door Locks on page 2-7for more information.
Press the customization button until AUTO DOOR
UNLOCK appears on the DIC display. Press the
set/reset button once to access the settings for this
feature. Then press the customization button to scroll
through the following settings:
OFF:None of the doors will automatically unlock.
DRIVER AT KEY OUT:Only the driver’s door will
unlock when the key is taken out of the ignition.
DRIVER IN PARK:Only the driver’s door will unlock
when the vehicle is shifted into P (Park).
ALL AT KEY OUT:All of the doors will unlock when
the key is taken out of the ignition.
ALL IN PARK (default):All of the doors will unlock
when the vehicle is shifted into P (Park).
NO CHANGE:No change will be made to this feature.
The current setting will remain.
To select a setting, press the set/reset button while the
desired setting is displayed on the DIC.
REMOTE DOOR LOCK
This feature allows you to select the type of feedback
you will receive when locking the vehicle with the
Remote Keyless Entry (RKE) transmitter. You will not
receive feedback when locking the vehicle with the RKE
transmitter if the doors are open. SeeRemote Keyless
Entry (RKE) System Operation on page 2-4for more
information.
Press the customization button until REMOTE DOOR
LOCK appears on the DIC display. Press the set/reset
button once to access the settings for this feature.
Then press the customization button to scroll through
the following settings:
OFF:There will be no feedback when you press the
lock button on the RKE transmitter.
LIGHTS ONLY:The exterior lamps will flash when you
press the lock button on the RKE transmitter.
HORN ONLY:The horn will sound on the second press
of the lock button on the RKE transmitter.
HORN & LIGHTS (default):The exterior lamps
will flash when you press the lock button on the RKE
transmitter, and the horn will sound when the lock button
is pressed again within five seconds of the previous
command.
NO CHANGE:No change will be made to this feature.
The current setting will remain.
3-59
Page 178 of 408
To select a setting, press the set/reset button while the
desired setting is displayed on the DIC.
REMOTE DOOR UNLOCK
This feature allows you to select the type of feedback
you will receive when unlocking the vehicle with the
Remote Keyless Entry (RKE) transmitter. You will not
receive feedback when unlocking the vehicle with the
RKE transmitter if the doors are open. SeeRemote
Keyless Entry (RKE) System Operation on page 2-4
for more information.
Press the customization button until REMOTE DOOR
UNLOCK appears on the DIC display. Press the
set/reset button once to access the settings for this
feature. Then press the customization button to scroll
through the following settings:
LIGHTS OFF:The exterior lamps will not flash when
you press the unlock button on the RKE transmitter.
LIGHTS ON (default):The exterior lamps will
flash when you press the unlock button on the RKE
transmitter.
NO CHANGE:No change will be made to this feature.
The current setting will remain.
To select a setting, press the set/reset button while the
desired setting is displayed on the DIC.
DELAY DOOR LOCK
This feature allows you to select whether or not the
locking of the vehicle’s doors will be delayed. When
locking the doors with the power door lock switch and a
door is open, this feature will delay locking the doors until
five seconds after the last door is closed. You will hear
three chimes to signal that the delayed locking feature is
in use. The key must be out of the ignition for this feature
to work. You can temporarily override delayed locking by
pressing the power door lock switch twice or the lock
button on the RKE transmitter twice. SeeDelayed
Locking on page 2-7for more information.
Press the customization button until DELAY DOOR
LOCK appears on the DIC display. Press the set/reset
button once to access the settings for this feature.
Then press the customization button to scroll through
the following settings:
OFF:There will be no delayed locking of the vehicle’s
doors.
ON (default):The doors will not lock until five seconds
after the last door is closed.
NO CHANGE:No change will be made to this feature.
The current setting will remain.
To select a setting, press the set/reset button while the
desired setting is displayed on the DIC.
3-60
Page 222 of 408
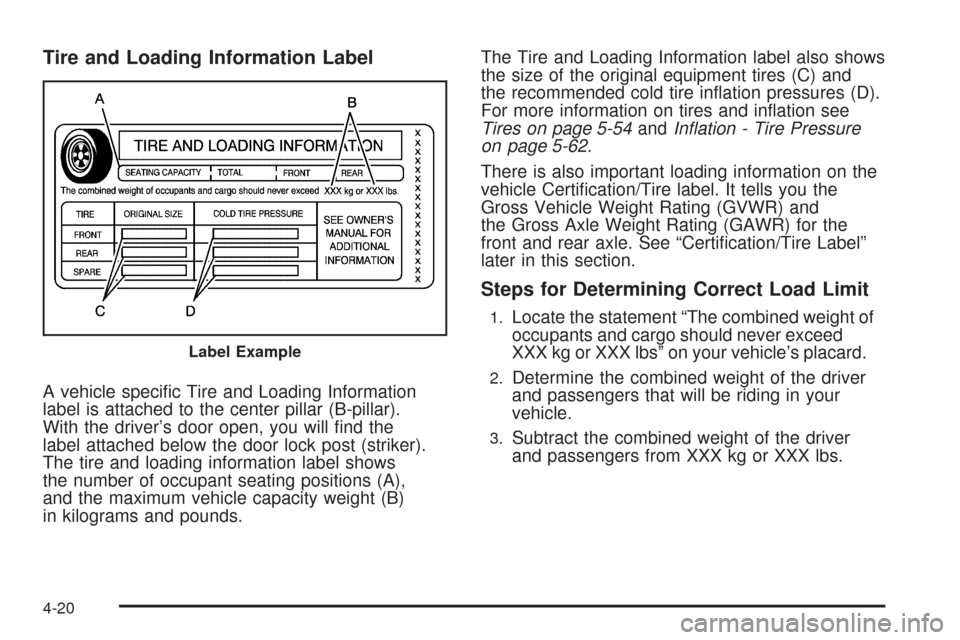
Tire and Loading Information Label
A vehicle specific Tire and Loading Information
label is attached to the center pillar (B-pillar).
With the driver’s door open, you will find the
label attached below the door lock post (striker).
The tire and loading information label shows
the number of occupant seating positions (A),
and the maximum vehicle capacity weight (B)
in kilograms and pounds.The Tire and Loading Information label also shows
the size of the original equipment tires (C) and
the recommended cold tire inflation pressures (D).
For more information on tires and inflation see
Tires on page 5-54andInflation - Tire Pressure
on page 5-62.
There is also important loading information on the
vehicle Certification/Tire label. It tells you the
Gross Vehicle Weight Rating (GVWR) and
the Gross Axle Weight Rating (GAWR) for the
front and rear axle. See “Certification/Tire Label”
later in this section.
Steps for Determining Correct Load Limit
1.Locate the statement “The combined weight of
occupants and cargo should never exceed
XXX kg or XXX lbs” on your vehicle’s placard.
2.Determine the combined weight of the driver
and passengers that will be riding in your
vehicle.
3.Subtract the combined weight of the driver
and passengers from XXX kg or XXX lbs.
Label Example
4-20
Page 254 of 408
Filling the Tank
{CAUTION:
Fuel vapor burns violently and a fuel fire can
cause bad injuries. To help avoid injuries to you
and others, read and follow all the instructions on
the pump island. Turn off the engine when you are
refueling. Do not smoke if you are near fuel or
refueling the vehicle. Do not use cellular phones.
Keep sparks, flames, and smoking materials away
from fuel. Do not leave the fuel pump unattended
when refueling the vehicle. This is against the law
in some places. Do not re-enter the vehicle while
pumping fuel. Keep children away from the fuel
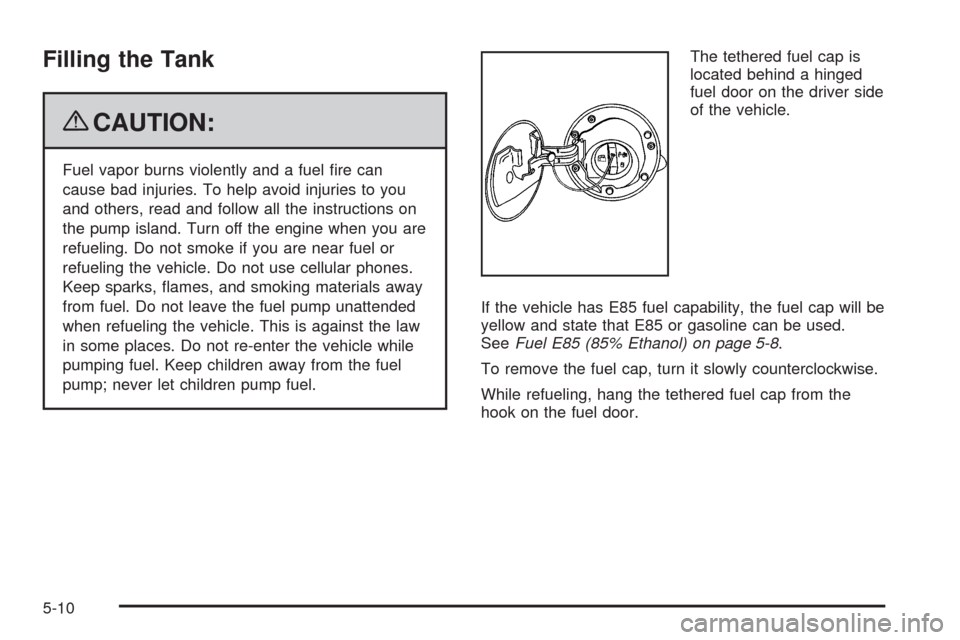
pump; never let children pump fuel.The tethered fuel cap is
located behind a hinged
fuel door on the driver side
of the vehicle.
If the vehicle has E85 fuel capability, the fuel cap will be
yellow and state that E85 or gasoline can be used.
SeeFuel E85 (85% Ethanol) on page 5-8.
To remove the fuel cap, turn it slowly counterclockwise.
While refueling, hang the tethered fuel cap from the
hook on the fuel door.
5-10
Page 295 of 408
Center High-Mounted
Stoplamp (CHMSL)
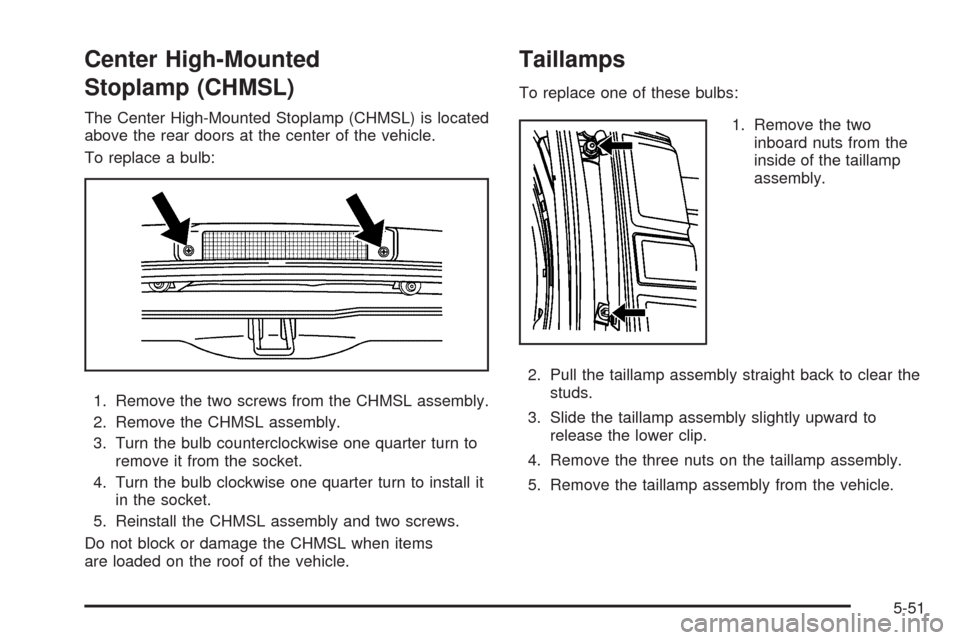
The Center High-Mounted Stoplamp (CHMSL) is located
above the rear doors at the center of the vehicle.
To replace a bulb:
1. Remove the two screws from the CHMSL assembly.
2. Remove the CHMSL assembly.
3. Turn the bulb counterclockwise one quarter turn to
remove it from the socket.
4. Turn the bulb clockwise one quarter turn to install it
in the socket.
5. Reinstall the CHMSL assembly and two screws.
Do not block or damage the CHMSL when items
are loaded on the roof of the vehicle.
Taillamps
To replace one of these bulbs:
1. Remove the two
inboard nuts from the
inside of the taillamp
assembly.
2. Pull the taillamp assembly straight back to clear the
studs.
3. Slide the taillamp assembly slightly upward to
release the lower clip.
4. Remove the three nuts on the taillamp assembly.
5. Remove the taillamp assembly from the vehicle.
5-51
Page 351 of 408
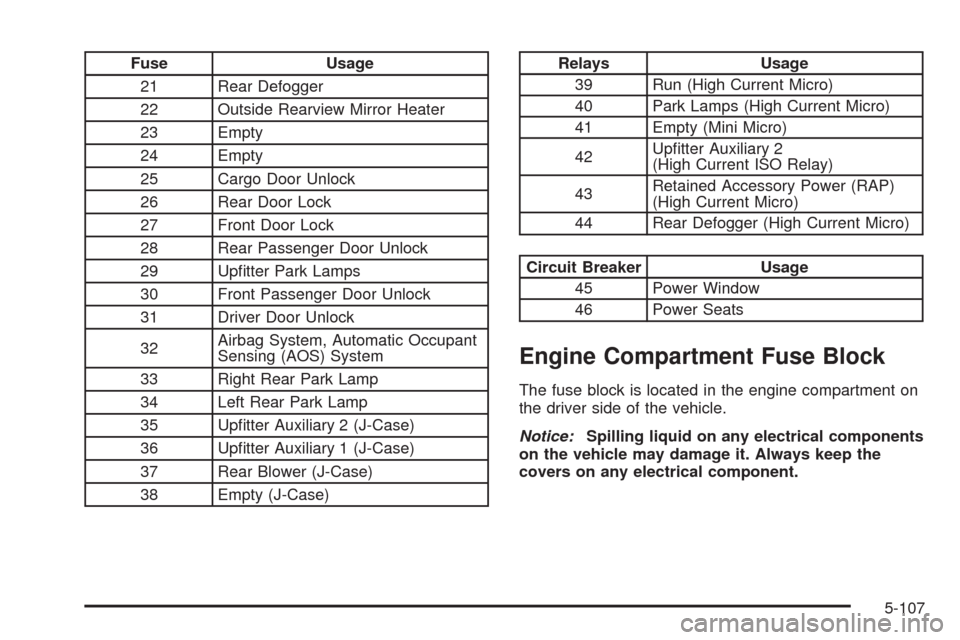
Fuse Usage
21 Rear Defogger
22 Outside Rearview Mirror Heater
23 Empty
24 Empty
25 Cargo Door Unlock
26 Rear Door Lock
27 Front Door Lock
28 Rear Passenger Door Unlock
29 Upfitter Park Lamps
30 Front Passenger Door Unlock
31 Driver Door Unlock
32Airbag System, Automatic Occupant
Sensing (AOS) System
33 Right Rear Park Lamp
34 Left Rear Park Lamp
35 Upfitter Auxiliary 2 (J-Case)
36 Upfitter Auxiliary 1 (J-Case)
37 Rear Blower (J-Case)
38 Empty (J-Case)Relays Usage
39 Run (High Current Micro)
40 Park Lamps (High Current Micro)
41 Empty (Mini Micro)
42Upfitter Auxiliary 2
(High Current ISO Relay)
43Retained Accessory Power (RAP)
(High Current Micro)
44 Rear Defogger (High Current Micro)
Circuit Breaker Usage
45 Power Window
46 Power Seats
Engine Compartment Fuse Block
The fuse block is located in the engine compartment on
the driver side of the vehicle.
Notice:Spilling liquid on any electrical components
on the vehicle may damage it. Always keep the
covers on any electrical component.
5-107
Page 364 of 408
Maintenance Footnotes
(Gasoline Engine)
This maintenance section applies to vehicles with a
gasoline engine. For diesel engine vehicles, see
the maintenance schedule section in the DURAMAX
®
Diesel manual.
†The U.S. Environmental Protection Agency or the
California Air Resources Board has determined that the
failure to perform this maintenance item will not nullify
the emission warranty or limit recall liability prior to
the completion of the vehicle’s useful life. We, however,
urge that all recommended maintenance services
be performed at the indicated intervals and the
maintenance be recorded.
#Lubricate the front suspension, kingpin bushings,
steering linkage, and rear driveline center splines.
(a)Visually inspect brake lines and hoses for proper
hook-up, binding, leaks, cracks, chafing, etc. Inspect
disc brake pads for wear and rotors for surface
condition. Inspect other brake parts, including calipers,
parking brake, etc.
(b)Visually inspect front and rear suspension and
steering system for damaged, loose, or missing parts,
signs of wear, or lack of lubrication. Inspect power
steering lines and hoses for proper hook-up, binding,
leaks, cracks, chafing, etc.(c)Visually inspect hoses and have them replaced if they
are cracked, swollen, or deteriorated. Inspect all pipes,
fittings, and clamps; replace with genuine parts as
needed. To help ensure proper operation, a pressure test
of the cooling system and pressure cap and cleaning the
outside of the radiator and air conditioning condenser is
recommended at least once a year.
(d)Inspect wiper blades for wear, cracking, or
contamination. Clean the windshield and wiper blades,
if contaminated. Replace wiper blades that are worn
or damaged. See Windshield Wiper Blade Replacement
on page 5-53 and Windshield and Wiper Blades on
page 5-102 for more information.
(e)Make sure the safety belt reminder light and safety
belt assemblies are working properly. Look for any
other loose or damaged safety belt system parts. If you
see anything that might keep a safety belt system
from doing its job, have it repaired. Have any torn or
frayed safety belts replaced. Also see Checking
the Restraint Systems on page 1-78.
(f)Lubricate all key lock cylinders, hood hinges, hood
prop rod pivot, hood latch assembly, secondary
latch, pivots, spring anchor, release pawl, rear
compartment hinges, latches, locks, fuel door hinge,
and any moving seat hardware. More frequent
lubrication may be required when exposed to a corrosive
environment. Applying silicone grease on weatherstrips
with a clean cloth will make them last longer, seal
better, and not stick or squeak.
6-8
Page 395 of 408
Important:EDR data is recorded by your vehicle only
if a non-trivial crash situation occurs; no data is recorded
by the EDR under normal driving conditions and no
personal data (e.g., name, gender, age, and crash
location) is recorded. However, other parties, such as law
enforcement, could combine the EDR data with the type
of personally identifying data routinely acquired during a
crash investigation.
To read data recorded by an EDR, special equipment
is required, and access to the vehicle or the EDR
is needed. In addition to the vehicle manufacturer,
other parties, such as law enforcement, that have the
special equipment, can read the information if they
have access to the vehicle or the EDR.
GM will not access this data or share it with others
except: with the consent of the vehicle owner or, if the
vehicle is leased, with the consent of the lessee; in
response to an official request of police or similar
government office; as part of GM’s defense of litigation
through the discovery process; or, as required by law.
Data that GM collects or receives may also be used for
GM research needs or may be made available to others
for research purposes, where a need is shown and the
data is not tied to a specific vehicle or vehicle owner.OnStar®
If your vehicle has OnStar and you subscribe to the
OnStar services, please refer to the OnStar Terms and
Conditions for information on data collection and use.
Navigation System
If your vehicle has a navigation system, use of the
system may result in the storage of destinations,
addresses, telephone numbers, and other trip
information. Refer to the navigation system operating
manual for information on stored data and for deletion
instructions.
Radio Frequency
Identi�cation (RFID)
RFID technology is used in some vehicles for functions
such as tire pressure monitoring and ignition system
security, as well as in connection with conveniences
such as key fobs for remote door locking/unlocking and
starting, and in-vehicle transmitters for garage door
openers. RFID technology in GM vehicles does not use
or record personal information or link with any other
GM system containing personal information.
7-19
Page 397 of 408
A
Accessories and Modifications............................ 5-3
Accessory Power Outlets.................................3-18
Adding Equipment to Your Airbag-Equipped
Vehicle.......................................................1-76
Additives, Fuel................................................. 5-7
Add-On Electrical Equipment...........................5-105
Air Cleaner/Filter, Engine.................................5-20
Air Conditioning..............................................3-19
Airbag
Off Light.....................................................3-28
Passenger Status Indicator...........................3-29
Readiness Light..........................................3-27
Airbag System................................................1-58
Adding Equipment to Your Airbag-Equipped
Vehicle...................................................1-76
Airbag Off Switch........................................1-67
How Does an Airbag Restrain?......................1-65
Passenger Sensing System...........................1-70
Servicing Your Airbag-Equipped Vehicle..........1-76
What Makes an Airbag Inflate?......................1-64
What Will You See After an Airbag Inflates?........1-65
When Should an Airbag Inflate?....................1-63
Where Are the Airbags?...............................1-60
All-Wheel-Drive (AWD) System...................4-8, 5-44
Antenna, Fixed Mast.......................................3-84
Antilock Brake System (ABS)............................. 4-4
Antilock Brake, System Warning Light................3-32Appearance Care
Aluminum Wheels......................................5-102
Care of Safety Belts...................................5-100
Chemical Paint Spotting..............................5-103
Cleaning Exterior Lamps/Lenses..................5-101
Fabric/Carpet..............................................5-98
Finish Care...............................................5-101
Finish Damage..........................................5-103
Instrument Panel, Vinyl, and Other Plastic
Surfaces.................................................5-99
Interior Cleaning..........................................5-97
Sheet Metal Damage..................................5-103
Tires........................................................5-103
Underbody Maintenance.............................5-103
Washing Your Vehicle.................................5-100
Weatherstrips............................................5-100
Windshield and Wiper Blades......................5-102
Appointments, Scheduling Service.....................7-10
Ashtray.........................................................3-18
Audio System.................................................3-63
Audio Steering Wheel Controls......................3-83
Fixed Mast Antenna.....................................3-84
Radio Reception..........................................3-84
Setting the Clock.........................................3-64
Theft-Deterrent Feature................................3-82
Audio System(s).............................................3-67
Automatic Door Lock......................................... 2-8
Automatic Door Unlock...................................... 2-8
1
Page 398 of 408
Automatic Headlamp System............................3-15
Automatic Transmission
Fluid..........................................................5-21
Operation...................................................2-23
B
Battery..........................................................5-39
Electric Power Management..........................3-17
Run-Down Protection...................................3-17
Brake
Emergencies................................................ 4-5
Brake Fluid....................................................5-36
Brakes..........................................................5-36
System Warning Light..................................3-31
Braking........................................................... 4-3
Braking in Emergencies..................................... 4-5
Break-In, New Vehicle.....................................2-19
Bulb Replacement...........................................5-48
Center High-Mounted Stoplamp (CHMSL)........5-51
Front Turn Signal, Sidemarker and
Parking Lamps.........................................5-50
Halogen Bulbs............................................5-48
Headlamps.................................................5-48
Replacement Bulbs......................................5-52
Taillamps....................................................5-51
Buying New Tires...........................................5-72
C
Calibration.....................................................3-46
California Fuel.................................................. 5-6
California Perchlorate Materials Requirements....... 5-4
California Proposition 65 Warning....................... 5-4
Canadian Owners................................................ ii
Capacities and Specifications..........................5-111
Carbon Monoxide...................................2-30, 4-16
Care of
Safety Belts..............................................5-100
Cargo Door Relocking....................................... 2-7
CD, MP3 .......................................................3-77
Center High-Mounted Stoplamp (CHMSL)...........5-51
Chains, Tire...................................................5-78
Charging System Light....................................3-30
Check
Engine Lamp..............................................3-34
Checking Things Under the Hood......................5-12
Chemical Paint Spotting.................................5-103
Child Restraints
Child Restraint Systems...............................1-37
Infants and Young Children...........................1-33
Lower Anchors and Tethers for Children..........1-41
Older Children.............................................1-30
Securing a Child Restraint in a Rear Seat
Position..................................................1-48
2