CHEVROLET EXPRESS PASSANGER 2006 1.G Owners Manual
Manufacturer: CHEVROLET, Model Year: 2006, Model line: EXPRESS PASSANGER, Model: CHEVROLET EXPRESS PASSANGER 2006 1.GPages: 406, PDF Size: 2.51 MB
Page 121 of 406
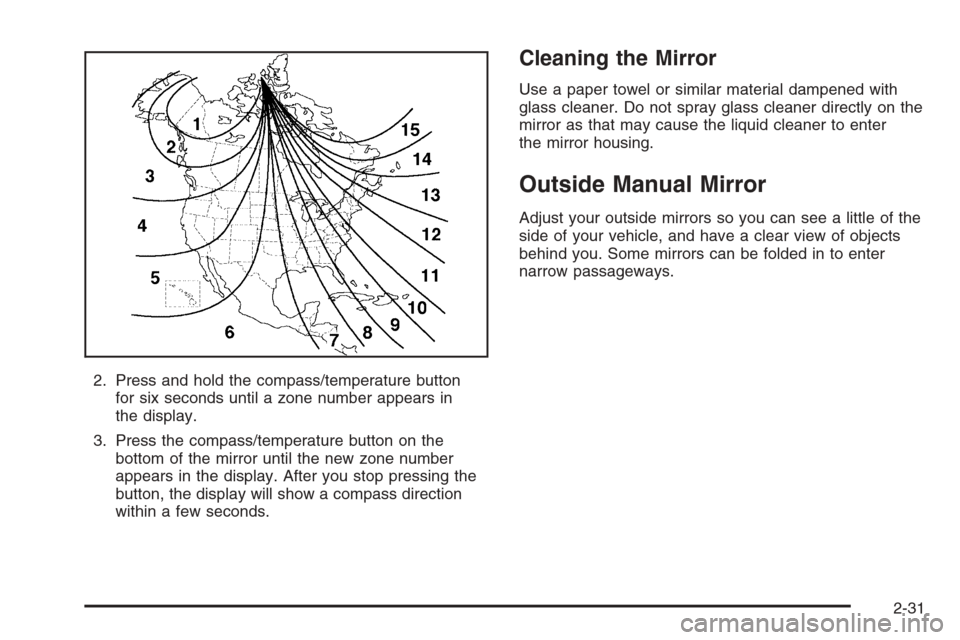
2. Press and hold the compass/temperature button
for six seconds until a zone number appears in
the display.
3. Press the compass/temperature button on the
bottom of the mirror until the new zone number
appears in the display. After you stop pressing the
button, the display will show a compass direction
within a few seconds.
Cleaning the Mirror
Use a paper towel or similar material dampened with
glass cleaner. Do not spray glass cleaner directly on the
mirror as that may cause the liquid cleaner to enter
the mirror housing.
Outside Manual Mirror
Adjust your outside mirrors so you can see a little of the
side of your vehicle, and have a clear view of objects
behind you. Some mirrors can be folded in to enter
narrow passageways.
2-31
Page 122 of 406
Outside Camper-Type Mirrors
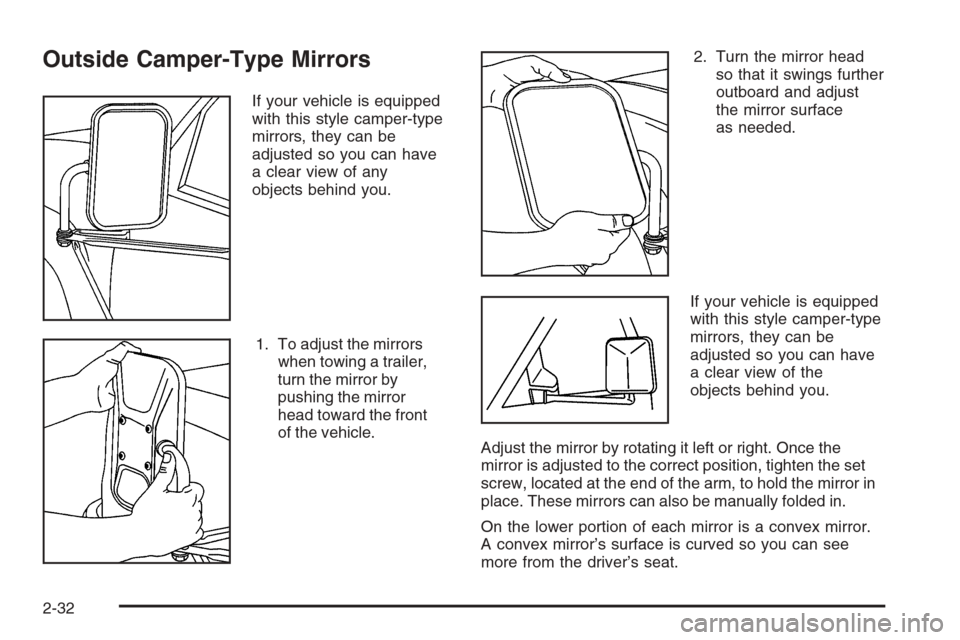
If your vehicle is equipped
with this style camper-type
mirrors, they can be
adjusted so you can have
a clear view of any
objects behind you.
1. To adjust the mirrors
when towing a trailer,
turn the mirror by
pushing the mirror
head toward the front
of the vehicle.2. Turn the mirror head
so that it swings further
outboard and adjust
the mirror surface
as needed.
If your vehicle is equipped
with this style camper-type
mirrors, they can be
adjusted so you can have
a clear view of the
objects behind you.
Adjust the mirror by rotating it left or right. Once the
mirror is adjusted to the correct position, tighten the set
screw, located at the end of the arm, to hold the mirror in
place. These mirrors can also be manually folded in.
On the lower portion of each mirror is a convex mirror.
A convex mirror’s surface is curved so you can see
more from the driver’s seat.
2-32
Page 123 of 406
Outside Power Mirrors
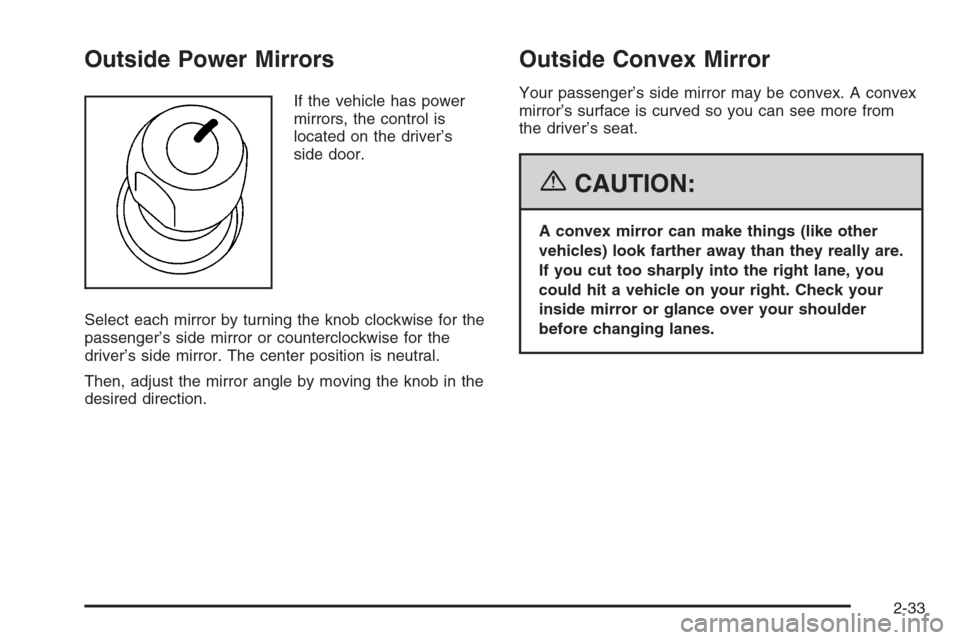
If the vehicle has power
mirrors, the control is
located on the driver’s
side door.
Select each mirror by turning the knob clockwise for the
passenger’s side mirror or counterclockwise for the
driver’s side mirror. The center position is neutral.
Then, adjust the mirror angle by moving the knob in the
desired direction.
Outside Convex Mirror
Your passenger’s side mirror may be convex. A convex
mirror’s surface is curved so you can see more from
the driver’s seat.
{CAUTION:
A convex mirror can make things (like other
vehicles) look farther away than they really are.
If you cut too sharply into the right lane, you
could hit a vehicle on your right. Check your
inside mirror or glance over your shoulder
before changing lanes.
2-33
Page 124 of 406
Outside Heated Mirrors
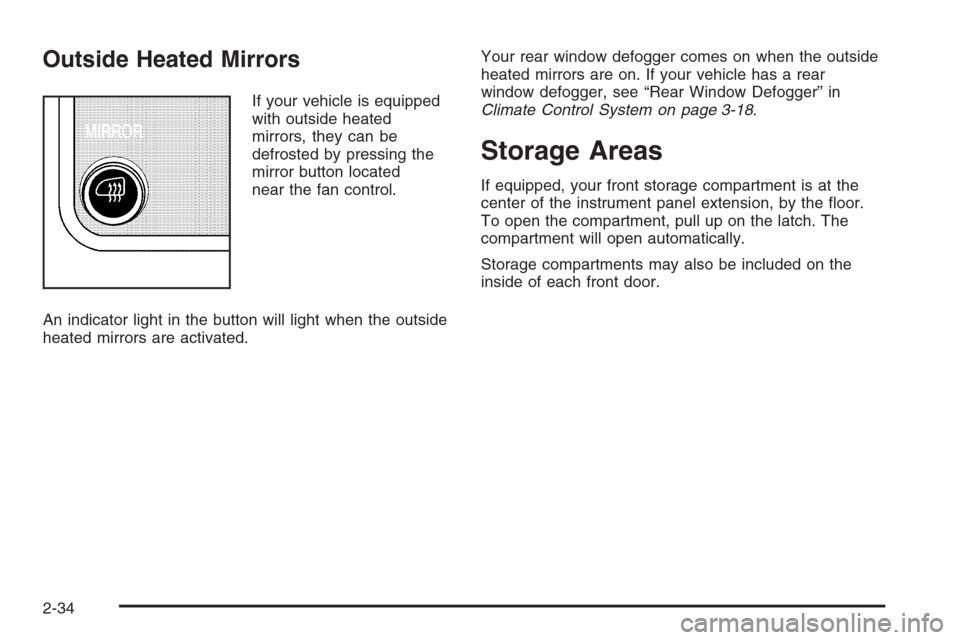
If your vehicle is equipped
with outside heated
mirrors, they can be
defrosted by pressing the
mirror button located
near the fan control.
An indicator light in the button will light when the outside
heated mirrors are activated.Your rear window defogger comes on when the outside
heated mirrors are on. If your vehicle has a rear
window defogger, see “Rear Window Defogger” in
Climate Control System on page 3-18.
Storage Areas
If equipped, your front storage compartment is at the
center of the instrument panel extension, by the floor.
To open the compartment, pull up on the latch. The
compartment will open automatically.
Storage compartments may also be included on the
inside of each front door.
2-34
Page 125 of 406
Instrument Panel Overview...............................3-4
Hazard Warning Flashers................................3-6
Other Warning Devices...................................3-6
Horn .............................................................3-6
Tilt Wheel.....................................................3-6
Turn Signal/Multifunction Lever.........................3-7
Turn and Lane-Change Signals........................3-8
Headlamp High/Low-Beam Changer..................3-8
Flash-to-Pass.................................................3-9
Windshield Wipers..........................................3-9
Windshield Washer.......................................3-10
Cruise Control..............................................3-10
Exterior Lamps.............................................3-13
Headlamps on Reminder................................3-14
Daytime Running Lamps (DRL).......................3-14
Instrument Panel Brightness...........................3-15
Dome Lamps ...............................................3-15
Dome Lamp Override....................................3-15
Entry Lighting...............................................3-16
Exit Lighting.................................................3-16
Reading Lamps............................................3-16
Battery Run-Down Protection..........................3-16
Accessory Power Outlet(s).............................3-16
Ashtray(s) and Cigarette Lighter......................3-17Climate Controls............................................3-18
Climate Control System.................................3-18
Outlet Adjustment.........................................3-20
Rear Heating System....................................3-21
Rear Air Conditioning and Heating System.......3-21
Warning Lights, Gages, and Indicators............3-23
Instrument Panel Cluster................................3-24
Speedometer and Odometer...........................3-25
Trip Odometer..............................................3-25
Safety Belt Reminder Light.............................3-26
Passenger Safety Belt Reminder Light.............3-26
Airbag Readiness Light..................................3-27
Airbag Off Light............................................3-28
Passenger Airbag Status Indicator...................3-29
Charging System Light..................................3-32
Voltmeter Gage............................................3-32
Brake System Warning Light..........................3-33
Anti-Lock Brake System Warning Light.............3-34
StabiliTrak
®Not Ready Light..........................3-35
StabiliTrak®Indicator Light..............................3-35
Engine Coolant Temperature Gage..................3-36
Malfunction Indicator Lamp.............................3-36
Section 3 Instrument Panel
3-1
Page 126 of 406
Oil Pressure Gage........................................3-39
Change Engine Oil Light................................3-40
Security Light...............................................3-40
Cruise Control Light......................................3-41
Reduced Engine Power Light.........................3-41
Highbeam On Light.......................................3-42
Daytime Running Lamps (DRL)
Indicator Light...........................................3-42
Tow/Haul Mode Light....................................3-42
Check Gages Warning Light...........................3-42
Fuel Gage...................................................3-43
Audio System(s).............................................3-44
Setting the Time for Radios without
Radio Data Systems (RDS)........................3-45
Setting the Time for Radios with
Radio Data Systems (RDS)........................3-45AM-FM Radio...............................................3-46
Radio with CD..............................................3-48
Radio with Cassette and CD..........................3-53
Radio with Six-Disc CD.................................3-65
Theft-Deterrent Feature (Non-RDS Radios).......3-76
Theft-Deterrent Feature (RDS Radios).............3-76
Radio Reception...........................................3-77
Care of the Cassette Tape Player...................3-77
Care of Your CDs.........................................3-78
Care of the CD Player...................................3-79
Fixed Mast Antenna......................................3-79
Chime Level Adjustment................................3-79
Section 3 Instrument Panel
3-2
Page 127 of 406
✍NOTES
3-3
Page 128 of 406
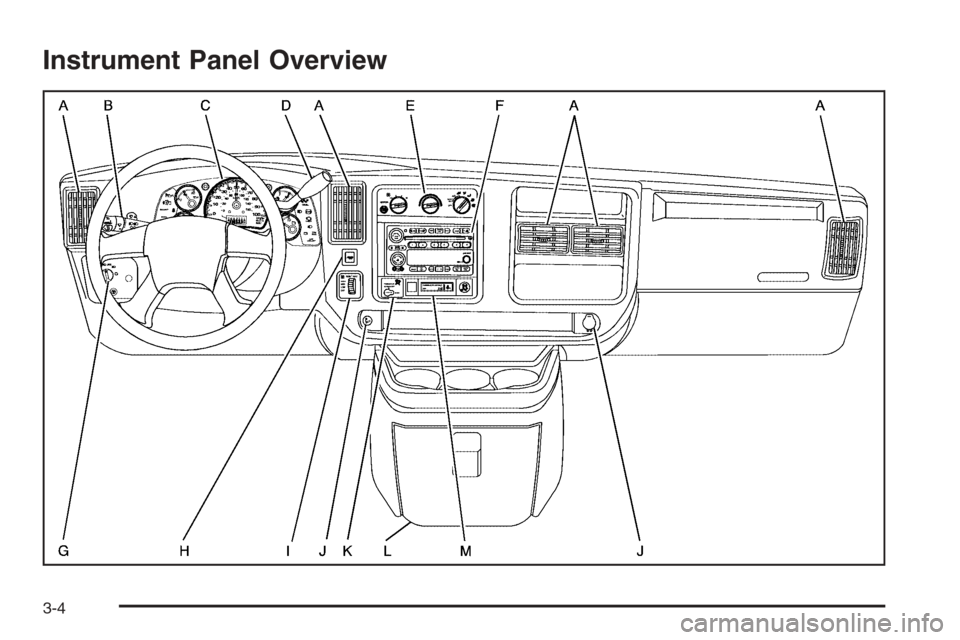
Instrument Panel Overview
3-4
Page 129 of 406
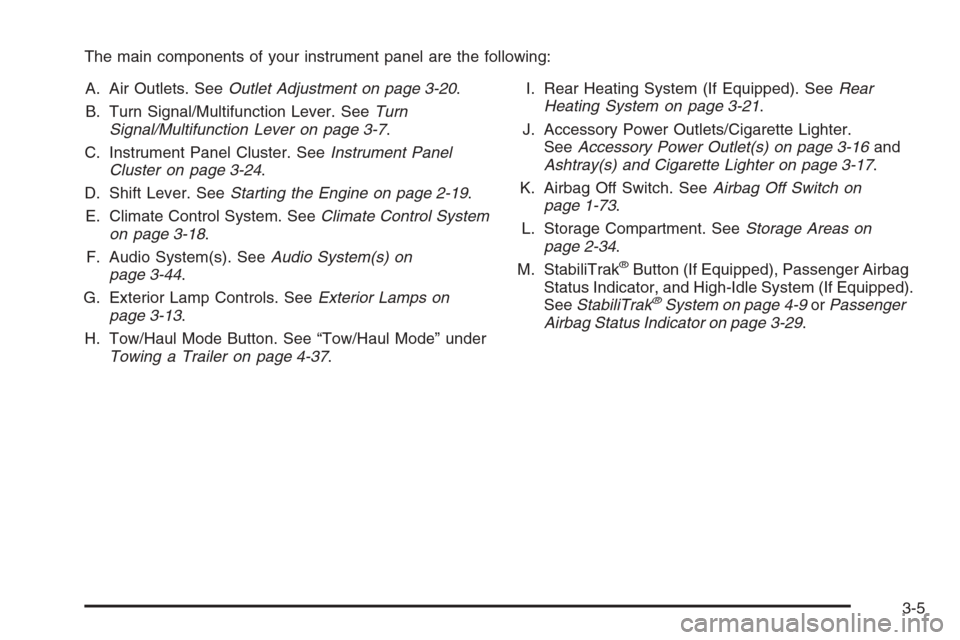
The main components of your instrument panel are the following:
A. Air Outlets. SeeOutlet Adjustment on page 3-20.
B. Turn Signal/Multifunction Lever. SeeTurn
Signal/Multifunction Lever on page 3-7.
C. Instrument Panel Cluster. SeeInstrument Panel
Cluster on page 3-24.
D. Shift Lever. SeeStarting the Engine on page 2-19.
E. Climate Control System. SeeClimate Control System
on page 3-18.
F. Audio System(s). SeeAudio System(s) on
page 3-44.
G. Exterior Lamp Controls. SeeExterior Lamps on
page 3-13.
H. Tow/Haul Mode Button. See “Tow/Haul Mode” under
Towing a Trailer on page 4-37.I. Rear Heating System (If Equipped). SeeRear
Heating System on page 3-21.
J. Accessory Power Outlets/Cigarette Lighter.
SeeAccessory Power Outlet(s) on page 3-16and
Ashtray(s) and Cigarette Lighter on page 3-17.
K. Airbag Off Switch. SeeAirbag Off Switch on
page 1-73.
L. Storage Compartment. SeeStorage Areas on
page 2-34.
M. StabiliTrak
®Button (If Equipped), Passenger Airbag
Status Indicator, and High-Idle System (If Equipped).
SeeStabiliTrak
®System on page 4-9orPassenger
Airbag Status Indicator on page 3-29.
3-5
Page 130 of 406
Hazard Warning Flashers
The hazard warning flashers warn others. They also let
police know you have a problem. Your front and rear
turn signal lamps will flash on and off.
The hazard warning
flasher button is located
on top of the steering
column.
The hazard warning flashers work no matter what
ignition position the key is in, and even if the key is
not in the ignition.
Press the button to make the front and rear turn signal
lamps flash on and off. Press the button again to turn
the flashers off.
When the hazard warning flashers are on, your turn
signals will not work.
Other Warning Devices
If you carry reflective triangles, you can set them up at
the side of the road about 300 feet (100 m) behind
your vehicle.
Horn
Press the horn symbol in the middle of the steering
wheel to sound the horn.
Tilt Wheel
A tilt steering wheel allows you to adjust the steering
wheel before you drive. You can also raise it to the
highest level to give your legs more room when
you enter and exit the vehicle.
The lever is located on the lower left side of the
steering column.
3-6