stop start CHEVROLET EXPRESS PASSANGER 2006 1.G Owner's Manual
[x] Cancel search | Manufacturer: CHEVROLET, Model Year: 2006, Model line: EXPRESS PASSANGER, Model: CHEVROLET EXPRESS PASSANGER 2006 1.GPages: 406, PDF Size: 2.51 MB
Page 226 of 406
At the entrance, there is usually a ramp that leads to
the freeway. If you have a clear view of the freeway as
you drive along the entrance ramp, you should begin
to check traffic. Try to determine where you expect
to blend with the flow. Try to merge into the gap at close
to the prevailing speed. Switch on your turn signal,
check your mirrors, and glance over your shoulder as
often as necessary. Try to blend smoothly with the
traffic flow.
Once you are on the freeway, adjust your speed to the
posted limit or to the prevailing rate if it is slower.
Stay in the right lane unless you want to pass.
Before changing lanes, check your mirrors. Then use
your turn signal.
Just before you leave the lane, glance quickly over your
shoulder to make sure there is not another vehicle in
your blind spot.
Once you are moving on the freeway, make certain
you allow a reasonable following distance. Expect
to move slightly slower at night.When you want to leave the freeway, move to the
proper lane well in advance. If you miss your exit,
do not, under any circumstances, stop and back up.
Drive on to the next exit.
The exit ramp can be curved, sometimes quite sharply.
The exit speed is usually posted.
Reduce your speed according to your speedometer, not
to your sense of motion. After driving for any distance
at higher speeds, you may tend to think you are
going slower than you actually are.
Before Leaving on a Long Trip
Make sure you are ready. Try to be well rested. If you
must start when you are not fresh — such as after
a day’s work — do not plan to make too many miles that
first part of the journey. Wear comfortable clothing
and shoes you can easily drive in.
Is your vehicle ready for a long trip? If you keep it
serviced and maintained, it is ready to go. If it needs
service, have it done before starting out. Of course,
you will find experienced and able service experts in
GM dealerships all across North America. They will be
ready and willing to help if you need it.
4-22
Page 242 of 406
Trailering is different than just driving your vehicle by
itself. Trailering means changes in acceleration, braking,
handling, durability and fuel economy. Successful, safe
trailering takes correct equipment, and it has to be
used properly.
That’s the reason for this part. In it are many time-tested,
important trailering tips and safety rules. Many of
these are important for your safety and that of your
passengers. So please read this section carefully before
you pull a trailer.
If You Do Decide To Pull A Trailer
If you do, here are some important points:
•There are many different laws, including speed limit
restrictions, having to do with trailering. Make sure
your rig will be legal, not only where you live but
also where you’ll be driving. A good source for this
information can be state or provincial police.
•Consider using a sway control. See “Hitches” later
in this section.
•Don’t tow a trailer at all during the first 500 miles
(800 km) your new vehicle is driven. Your engine,
axle or other parts could be damaged.
•Then, during the first 500 miles (800 km) that you
tow a trailer, don’t drive over 50 mph (80 km/h)
and don’t make starts at full throttle. This helps your
engine and other parts of your vehicle wear in at
the heavier loads.
•See also “Driving on Grades” later in this section.
Three important considerations have to do with weight:
•the weight of the trailer
•the weight of the trailer tongue
•and the weight on your vehicle’s tires
Tow/Haul Mode
Tow/haul is designed to assist while your vehicle is
pulling a large or heavy load or trailer. Tow/haul is most
useful while pulling such a load in rolling terrain, in
stop-and-go traffic, or when you need improved
low-speed control, such as when parking. The purpose
of the tow/haul mode is to:
•Reduce the frequency and improve the predictability
of transmission shifts,
•provide the same solid shift feel when pulling a
heavy load as when the vehicle is unloaded,
•improve control of vehicle speed while requiring
less throttle pedal activity.
4-38
Page 254 of 406
Making Turns
Notice:Making very sharp turns while trailering
could cause the trailer to come in contact with the
vehicle. Your vehicle could be damaged. Avoid
making very sharp turns while trailering.
When you’re turning with a trailer, make wider turns
than normal. Do this so your trailer won’t strike soft
shoulders, curbs, road signs, trees or other objects.
Avoid jerky or sudden maneuvers. Signal well in
advance.
Turn Signals When Towing a Trailer
When you tow a trailer, your vehicle has to have extra
wiring and a heavy-duty turn signal flasher (included
in the optional trailering package).
The arrows on your instrument panel will flash whenever
you signal a turn or lane change. Properly hooked up,
the trailer lamps will also flash, telling other drivers
you’re about to turn, change lanes or stop.
When towing a trailer, the arrows on your instrument
panel will flash for turns even if the bulbs on the trailer
are burned out. Thus, you may think drivers behind
you are seeing your signal when they are not. It’s
important to check occasionally to be sure the trailer
bulbs are still working.
Driving On Grades
Reduce speed and shift to a lower gearbeforeyou start
down a long or steep downgrade. If you don’t shift
down, you might have to use your brakes so much that
they would get hot and no longer work well.
You can tow in DRIVE (D). You may want to shift the
transmission to THIRD (3) or a lower gear under heavy
loads and/or hilly conditions.
When towing at high altitude on steep uphill grades,
consider the following: Engine coolant will boil at a lower
temperature than at normal altitudes. If you turn your
engine off immediately after towing at high altitude
on steep uphill grades, your vehicle may show signs
similar to engine overheating. To avoid this, let the
engine run while parked (preferably on level ground)
with the automatic transmission in PARK (P) for a
few minutes before turning the engine off. If you do
get the overheat warning, seeEngine Overheating
on page 5-25.
4-50
Page 255 of 406
Parking on Hills
{CAUTION:
You really should not park your vehicle, with a
trailer attached, on a hill. If something goes
wrong, your rig could start to move. People
can be injured, and both your vehicle and the
trailer can be damaged.
But if you ever have to park your rig on a hill, here’s
how to do it:
1. Apply your regular brakes, but don’t shift into
PARK (P) yet. Then turn your wheels into the curb
if facing downhill or into traffic if facing uphill.
2. Have someone place chocks under the trailer
wheels.
3. When the wheel chocks are in place, release the
regular brakes until the chocks absorb the load.
4. Reapply the regular brakes. Then apply your
parking brake and then shift to PARK (P).
5. Release the regular brakes.
When You Are Ready to Leave After
Parking on a Hill
1. Apply your regular brakes and hold the pedal down
while you:
•start your engine,
•shift into a gear, and
•release the parking brake.
2. Let up on the brake pedal.
3. Drive slowly until the trailer is clear of the chocks.
4. Stop and have someone pick up and store
the chocks.
Maintenance When Trailer Towing
Your vehicle will need service more often when you’re
pulling a trailer. See the Maintenance Schedule for more
on this. Things that are especially important in trailer
operation are automatic transmission fluid (don’t overfill),
engine oil, axle lubricant, belt, cooling system and
brake system. Each of these is covered in this manual,
and the Index will help you find them quickly. If you’re
trailering, it’s a good idea to review these sections
before you start your trip.
Check periodically to see that all hitch nuts and bolts
are tight.
4-51
Page 257 of 406
Service............................................................5-3
Accessories and Modifications..........................5-3
California Proposition 65 Warning.....................5-3
Doing Your Own Service Work.........................5-4
Adding Equipment to the Outside
of Your Vehicle...........................................5-5
Fuel................................................................5-5
Gasoline Octane............................................5-5
Gasoline Specifications....................................5-5
California Fuel...............................................5-6
Additives.......................................................5-6
Fuels in Foreign Countries...............................5-7
Filling the Tank..............................................5-8
Filling a Portable Fuel Container.....................5-10
Checking Things Under the Hood....................5-10
Hood Release..............................................5-11
Engine Compartment Overview.......................5-12
Engine Oil (Gasoline Engine)..........................5-13
Engine Oil Life System (Gasoline Engine)........5-16
Engine Air Cleaner/Filter................................5-18
Automatic Transmission Fluid.........................5-19
Engine Coolant.............................................5-22
Radiator Pressure Cap..................................5-25
Engine Overheating.......................................5-25Cooling System............................................5-26
Engine Fan Noise.........................................5-32
Power Steering Fluid.....................................5-32
Windshield Washer Fluid................................5-33
Brakes........................................................5-34
Battery........................................................5-38
Jump Starting...............................................5-39
All-Wheel Drive..............................................5-43
Rear Axle.......................................................5-44
Front Axle......................................................5-44
Noise Control System.....................................5-45
Tampering with Noise Control System
Prohibited.................................................5-45
Bulb Replacement..........................................5-46
Halogen Bulbs..............................................5-47
Headlamps..................................................5-47
Front Turn Signal, Sidemarker and
Parking Lamps..........................................5-49
Center High-Mounted Stoplamp (CHMSL).........5-50
Taillamps.....................................................5-50
Replacement Bulbs.......................................5-51
Windshield Wiper Blade Replacement..............5-52
Section 5 Service and Appearance Care
5-1
Page 265 of 406
{CAUTION:
If you spill fuel and then something ignites it,
you could be badly burned. Fuel can spray out
on you if you open the fuel cap too quickly.
This spray can happen if your tank is nearly
full, and is more likely in hot weather. Open
the fuel cap slowly and wait for any hiss noise
to stop. Then unscrew the cap all the way.
Be careful not to spill fuel. Do not top off or overfill the
tank and wait a few seconds after you have finished
pumping before removing the nozzle. Clean fuel from
painted surfaces as soon as possible. SeeWashing
Your Vehicle on page 5-88.
When replacing the fuel cap, turn it clockwise
until it clicks. Make sure the cap is fully installed.
The diagnostic system can determine if the fuel cap has
been left off or improperly installed. This would allow
fuel to evaporate into the atmosphere. SeeMalfunction
Indicator Lamp on page 3-36.
{CAUTION:
If a �re starts while you are refueling, do not
remove the nozzle. Shut off the �ow of fuel by
shutting off the pump or by notifying the
station attendant. Leave the area immediately.
Notice:If you need a new fuel cap, be sure to get
the right type. Your dealer can get one for you.
If you get the wrong type, it may not �t properly.
This may cause your malfunction indicator lamp to
light and may damage your fuel tank and emissions
system. SeeMalfunction Indicator Lamp on
page 3-36.
5-9
Page 294 of 406
Brake Adjustment
Every time you make a brake stop, your disc brakes
adjust for wear.
Replacing Brake System Parts
The braking system on a vehicle is complex. Its many
parts have to be of top quality and work well together if
the vehicle is to have really good braking. Your vehicle
was designed and tested with top-quality GM brake parts.
When you replace parts of your braking system — for
example, when your brake linings wear down and you
need new ones put in — be sure you get new approved
GM replacement parts. If you do not, your brakes may no
longer work properly. For example, if someone puts in
brake linings that are wrong for your vehicle, the balance
between your front and rear brakes can change — for the
worse. The braking performance you have come to
expect can change in many other ways if someone puts
in the wrong replacement brake parts.
Battery
Your vehicle has a maintenance free battery. When
it is time for a new battery, get one that has the
replacement number shown on the original battery’s
label. We recommend an ACDelco
®replacement battery.
SeeEngine Compartment Overview on page 5-12for
battery location.
Warning:Battery posts, terminals, and related
accessories contain lead and lead compounds,
chemicals known to the State of California to cause
cancer and reproductive harm. Wash hands after
handling.
Vehicle Storage
If you are not going to drive your vehicle for 25 days
or more, remove the black, negative (−) cable from
the battery. This will help keep your battery from
running down.
{CAUTION:
Batteries have acid that can burn you and
gas that can explode. You can be badly hurt if
you are not careful. SeeJump Starting on
page 5-39for tips on working around a battery
without getting hurt.
5-38
Page 336 of 406
Secondary Latch System
Your vehicle has an underbody-mounted tire hoist
assembly equipped with a secondary latch system. It is
designed to stop the spare tire from suddenly falling
off the vehicle if the cable holding the spare tire is
damaged. For the secondary latch to work, the tire must
be stowed with the valve stem pointing down.
SeeStoring a Flat or Spare Tire and Tools on page 5-82
for instructions on storing the spare tire correctly.
{CAUTION:
Before beginning this procedure read all the
instructions. Failure to read and follow the
instructions could damage the hoist assembly
and you and others could get hurt. Read and
follow the instructions listed below.To release the spare tire from the secondary latch,
do the following:
{CAUTION:
Someone standing too close during the
procedure could be injured by the jack.
If the spare tire does not slide off the jack
completely, make sure no one is behind you or
on either side of you as you pull the jack out
from the spare.
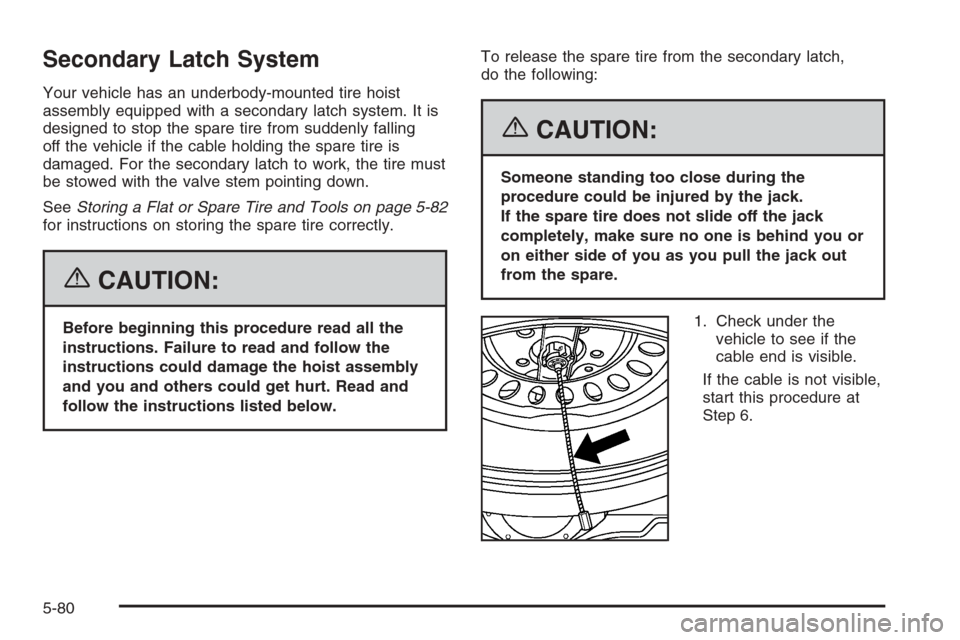
1. Check under the
vehicle to see if the
cable end is visible.
If the cable is not visible,
start this procedure at
Step 6.
5-80