tire type CHEVROLET EXPRESS PASSANGER 2007 1.G Owners Manual
[x] Cancel search | Manufacturer: CHEVROLET, Model Year: 2007, Model line: EXPRESS PASSANGER, Model: CHEVROLET EXPRESS PASSANGER 2007 1.GPages: 458, PDF Size: 2.62 MB
Page 216 of 458
Setting Preset PTYs (RDS Only)
These pushbuttons have factory PTY presets. Up
to 12 PTYs (six FM1 and six FM2), can be
programmed on the six numbered pushbuttons, by
performing the following steps:
1. Press BAND to select FM1 or FM2.
2. Press the TYPE button to activate program
type select mode. P-TYPE and the last
selected PTY appears on the display.
3. Turn the TYPE knob or press and release the
TYPE button to select a PTY.
4. Press and hold one of the six numbered
pushbuttons until you hear a beep.
Whenever that numbered pushbutton is
pressed, the PTY that was set returns.
5. Repeat the steps for each pushbutton.
RDS Messages
INFO (Information):If the current station has a
message, INFO appears on the display. Press this
button to see the message. The message may
display the artist, song title, call in phone
numbers, etc.If the entire message is not displayed, parts of the
message appears every three seconds. To scroll
through the message, press and release the INFO
button. A new group of words appears on the
display after every press of this button. Once the
complete message has been displayed, INFO
disappears from the display until another new
message is received. The last message can be
displayed by pressing the INFO button. You can
view the last message until a new message is
received or a different station is tuned to.
Radio Messages
CAL ERR (Calibration Error):The audio system
has been calibrated for your vehicle from the
factory. If CAL ERR appears on the display, it
means that the radio has not been configured
properly for the vehicle and must be returned to
your dealer for service.
LOCKED:This message is displayed when the
THEFTLOCK
®system has locked up. Take
the vehicle to your dealer for service.
If any error occurs repeatedly, or if an error cannot
be corrected, contact your dealer.
216
Page 222 of 458
To delete tracks from the song list, perform the
following steps:
1. Turn the CD player on.
2. Press the SONG LIST button to turn song list
on. S-LIST appears on the display.
3. Press either SEEK or TYPE arrow to select
the desired track to be deleted.
4. Press and hold the SONG LIST button for
two seconds. When SONG LIST is pressed,
one beep will sound. After two seconds
of continuously pressing the SONG LIST
button, two beeps will sound to confirm that
the track has been deleted.
After a track has been deleted, the remaining
tracks are moved up the list. When another track
is added to the song list, the track is added to
the end of the list.To delete the entire song list, perform the
following steps:
1. Turn the CD player on.
2. Press the SONG LIST button to turn song list
on. S-LIST appears on the display.
3. Press and hold the SONG LIST button for more
than four seconds. One beep will sound,
followed by two beeps after two seconds, and a
final beep will sound after four seconds. S-LIST
EMPTY appears on the display indicating the
song list has been deleted.
If a CD is ejected, and the song list contains
saved tracks from that CD, those tracks are
automatically deleted from the song list. Any tracks
saved to the song list again are added to the
bottom of the list.
To end song list mode, press the SONG LIST
button. One beep will sound and S-LIST is
removed from the display.
222
Page 243 of 458
•Try not to pass more than one vehicle at a time
on two-lane roads. Reconsider before passing
the next vehicle.
•Do not overtake a slowly moving vehicle too
rapidly. Even though the brake lamps are not
flashing, it might be slowing down or starting
to turn.
•If you are being passed, make it easy for the
following driver to get ahead of you. Perhaps
you can ease a little to the right.
Loss of Control
Let us review what driving experts say about what
happens when the three control systems — brakes,
steering, and acceleration — do not have enough
friction where the tires meet the road to do what the
driver has asked.
In any emergency, do not give up. Keep trying to
steer and constantly seek an escape route or
area of less danger.
Skidding
In a skid, a driver can lose control of the vehicle.
Defensive drivers avoid most skids by taking
reasonable care suited to existing conditions, and
by not overdriving those conditions. But skids
are always possible.
The three types of skids correspond to your
vehicle’s three control systems. In the braking skid,
the wheels are not rolling. In the steering or
cornering skid, too much speed or steering in a
curve causes tires to slip and lose cornering force.
And in the acceleration skid, too much throttle
causes the driving wheels to spin.
A cornering skid is best handled by easing your
foot off the accelerator pedal.
If your vehicle starts to slide, ease your foot off
the accelerator pedal and quickly steer the
way you want the vehicle to go. If you start
steering quickly enough, your vehicle may
straighten out. Always be ready for a second skid
if it occurs.
243
Page 280 of 458

Total Weight on Your Vehicle’s Tires
Be sure your vehicle’s tires are inflated to the
upper limit for cold tires. You’ll find these numbers
on the Certification label at the rear edge of the
driver’s door or seeLoading Your Vehicle on
page 261. Then be sure you don’t go over
the GVW limit for your vehicle, or the GAWR,
including the weight of the trailer tongue. If you use
a weight distributing hitch, make sure you don’t
go over the rear axle limit before you apply
the weight distribution spring bars.
Hitches
It’s important to have the correct hitch equipment.
Crosswinds, large trucks going by and rough roads
are a few reasons why you’ll need the right hitch.
The rear bumper on your vehicle is not intended
for hitches. Do not attach rental hitches or
other bumper-type hitches to it. Use only a
frame-mounted hitch that does not attach to
the bumper.
Weight-Distributing Hitches and Weight
Carrying Hitches
When using a weight-distributing hitch, the hitch
must be adjusted so that the distance (A) remains
the same both before and after coupling the
trailer to the tow vehicle.
If you use a step-bumper hitch, your bumper could
be damaged in sharp turns. Make sure you
have ample room when turning to avoid contact
between the trailer and the bumper.
(A) Body to Ground Distance, (B) Front of Vehicle
280
Page 347 of 458
Tire Sidewall Labeling
Useful information about a tire is molded into the
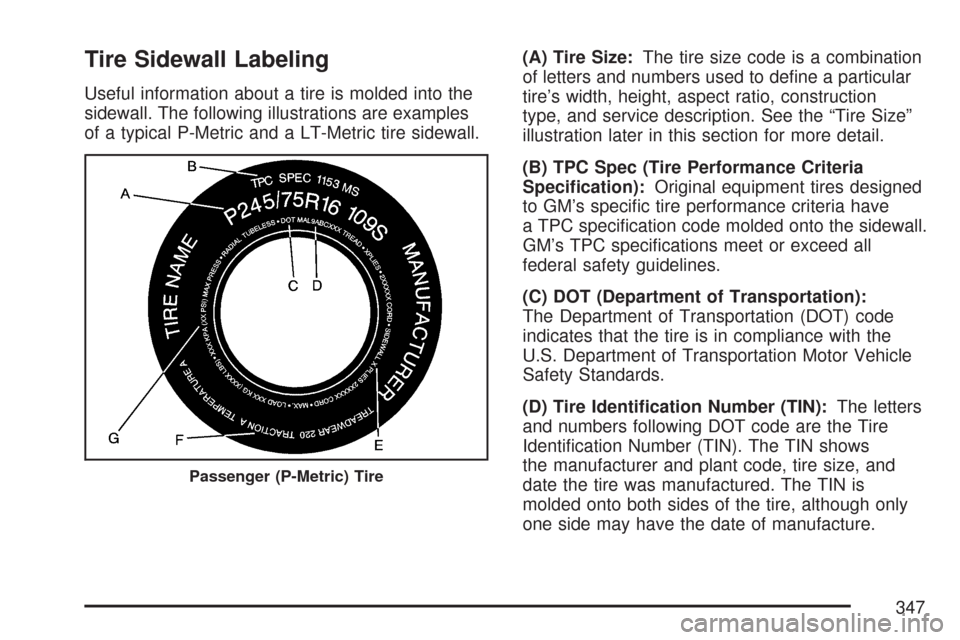
sidewall. The following illustrations are examples
of a typical P-Metric and a LT-Metric tire sidewall.(A) Tire Size:The tire size code is a combination
of letters and numbers used to define a particular
tire’s width, height, aspect ratio, construction
type, and service description. See the “Tire Size”
illustration later in this section for more detail.
(B) TPC Spec (Tire Performance Criteria
Speci�cation):Original equipment tires designed
to GM’s specific tire performance criteria have
a TPC specification code molded onto the sidewall.
GM’s TPC specifications meet or exceed all
federal safety guidelines.
(C) DOT (Department of Transportation):
The Department of Transportation (DOT) code
indicates that the tire is in compliance with the
U.S. Department of Transportation Motor Vehicle
Safety Standards.
(D) Tire Identi�cation Number (TIN):The letters
and numbers following DOT code are the Tire
Identification Number (TIN). The TIN shows
the manufacturer and plant code, tire size, and
date the tire was manufactured. The TIN is
molded onto both sides of the tire, although only
one side may have the date of manufacture.
Passenger (P-Metric) Tire
347
Page 348 of 458
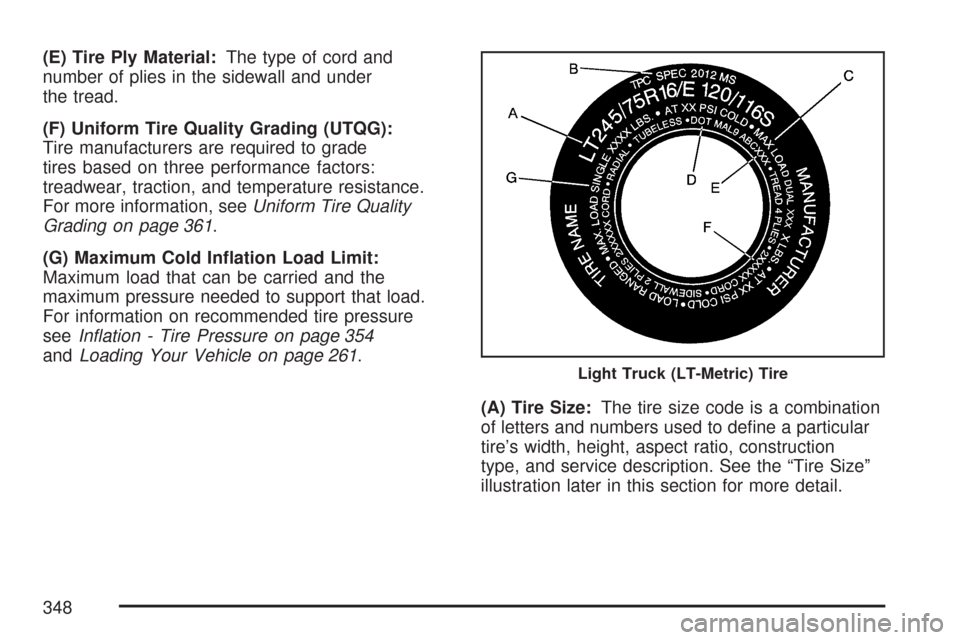
(E) Tire Ply Material:The type of cord and
number of plies in the sidewall and under
the tread.
(F) Uniform Tire Quality Grading (UTQG):
Tire manufacturers are required to grade
tires based on three performance factors:
treadwear, traction, and temperature resistance.
For more information, seeUniform Tire Quality
Grading on page 361.
(G) Maximum Cold In�ation Load Limit:
Maximum load that can be carried and the
maximum pressure needed to support that load.
For information on recommended tire pressure
seeIn�ation - Tire Pressure on page 354
andLoading Your Vehicle on page 261.
(A) Tire Size:The tire size code is a combination
of letters and numbers used to define a particular
tire’s width, height, aspect ratio, construction
type, and service description. See the “Tire Size”
illustration later in this section for more detail.
Light Truck (LT-Metric) Tire
348
Page 349 of 458
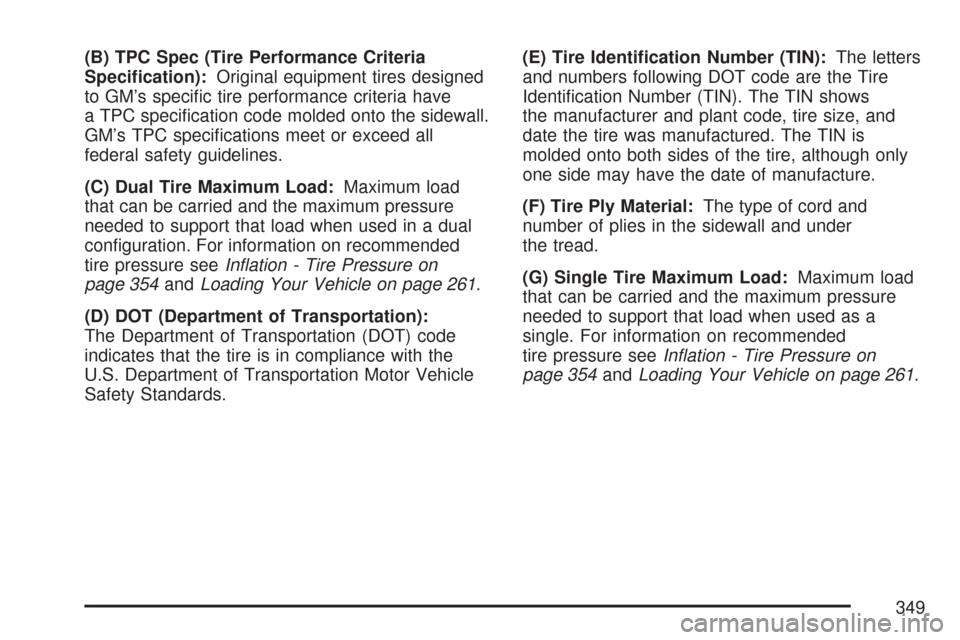
(B) TPC Spec (Tire Performance Criteria
Speci�cation):Original equipment tires designed
to GM’s specific tire performance criteria have
a TPC specification code molded onto the sidewall.
GM’s TPC specifications meet or exceed all
federal safety guidelines.
(C) Dual Tire Maximum Load:Maximum load
that can be carried and the maximum pressure
needed to support that load when used in a dual
configuration. For information on recommended
tire pressure seeIn�ation - Tire Pressure on
page 354andLoading Your Vehicle on page 261.
(D) DOT (Department of Transportation):
The Department of Transportation (DOT) code
indicates that the tire is in compliance with the
U.S. Department of Transportation Motor Vehicle
Safety Standards.(E) Tire Identi�cation Number (TIN):The letters
and numbers following DOT code are the Tire
Identification Number (TIN). The TIN shows
the manufacturer and plant code, tire size, and
date the tire was manufactured. The TIN is
molded onto both sides of the tire, although only
one side may have the date of manufacture.
(F) Tire Ply Material:The type of cord and
number of plies in the sidewall and under
the tread.
(G) Single Tire Maximum Load:Maximum load
that can be carried and the maximum pressure
needed to support that load when used as a
single. For information on recommended
tire pressure seeIn�ation - Tire Pressure on
page 354andLoading Your Vehicle on page 261.
349
Page 350 of 458
Tire Size
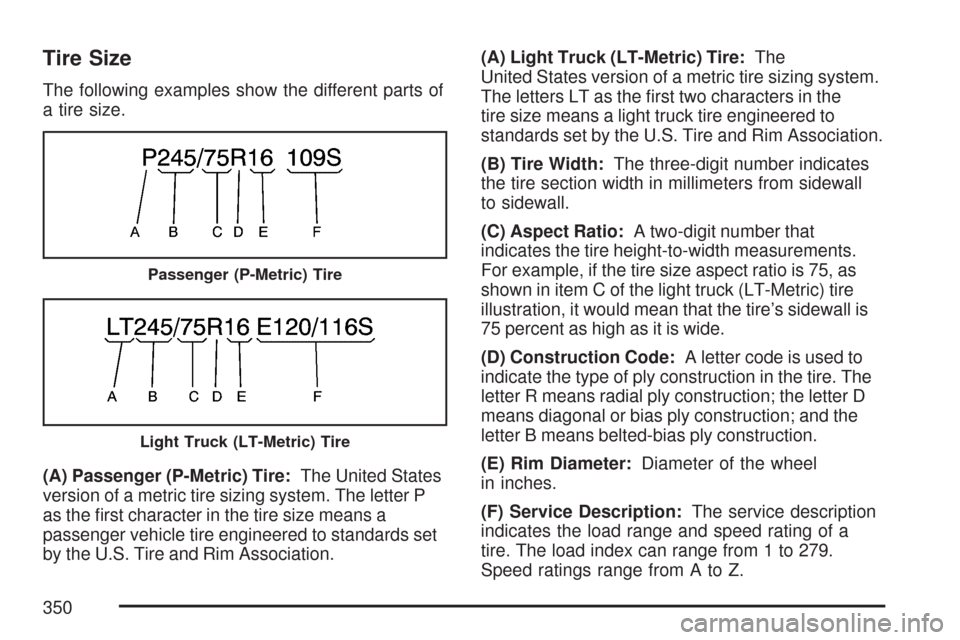
The following examples show the different parts of
a tire size.
(A) Passenger (P-Metric) Tire:The United States
version of a metric tire sizing system. The letter P
as the first character in the tire size means a
passenger vehicle tire engineered to standards set
by the U.S. Tire and Rim Association.(A) Light Truck (LT-Metric) Tire:The
United States version of a metric tire sizing system.
The letters LT as the first two characters in the
tire size means a light truck tire engineered to
standards set by the U.S. Tire and Rim Association.
(B) Tire Width:The three-digit number indicates
the tire section width in millimeters from sidewall
to sidewall.
(C) Aspect Ratio:A two-digit number that
indicates the tire height-to-width measurements.
For example, if the tire size aspect ratio is 75, as
shown in item C of the light truck (LT-Metric) tire
illustration, it would mean that the tire’s sidewall is
75 percent as high as it is wide.
(D) Construction Code:A letter code is used to
indicate the type of ply construction in the tire. The
letter R means radial ply construction; the letter D
means diagonal or bias ply construction; and the
letter B means belted-bias ply construction.
(E) Rim Diameter:Diameter of the wheel
in inches.
(F) Service Description:The service description
indicates the load range and speed rating of a
tire. The load index can range from 1 to 279.
Speed ratings range from A to Z.
Passenger (P-Metric) Tire
Light Truck (LT-Metric) Tire
350
Page 354 of 458
In�ation - Tire Pressure
Tires need the correct amount of air pressure to
operate effectively.
Notice:Do not let anyone tell you that
under-in�ation or over-in�ation is all right.
It is not. If your tires do not have enough air
(under-in�ation), you can get the following:
Too much �exing
Too much heat
Tire overloading
Premature or irregular wear
Poor handling
Reduced fuel economy
If your tires have too much air (over-in�ation),
you can get the following:
Unusual wear
Poor handling
Rough ride
Needless damage from road hazardsA vehicle specific Tire and Loading Information
label is attached to your vehicle. This label shows
your vehicle’s original equipment tires and the
correct inflation pressures for your tires when they
are cold. The recommended cold tire inflation
pressure, shown on the label, is the minimum
amount of air pressure needed to support
your vehicle’s maximum load carrying capacity.
For additional information regarding how much
weight your vehicle can carry, and an example of
the Tire and Loading Information label, see
Loading Your Vehicle on page 261. How you load
your vehicle affects vehicle handling and ride
comfort. Never load your vehicle with more weight
than it was designed to carry.
When to Check
Check your tires once a month or more.
Do not forget to check the pressure of the spare
tire. SeeSpare Tire on page 382for additional
information.
How to Check
Use a good quality pocket-type gage to check
tire pressure. You cannot tell if your tires are
properly inflated simply by looking at them.
354
Page 356 of 458
Tire Inspection and Rotation
Tires should be rotated every 5,000 to 8,000 miles
(8 000 to 13 000 km).
Any time you notice unusual wear, rotate your
tires as soon as possible and check wheel
alignment. Also check for damaged tires or wheels.
SeeWhen It Is Time for New Tires on page 358
andWheel Replacement on page 362for
more information.
Make sure the spare tire is stored securely. Push,
pull, and then try to rotate or turn the tire. If it
moves, use the ratchet/wheel wrench to tighten the
cable. SeeChanging a Flat Tire on page 366.
If your vehicle has dual rear wheels, also see
Dual Tire Operation on page 355.
The purpose of regular rotation is to achieve more
uniform wear for all tires on the vehicle. The
first rotation is the most important. SeeScheduled
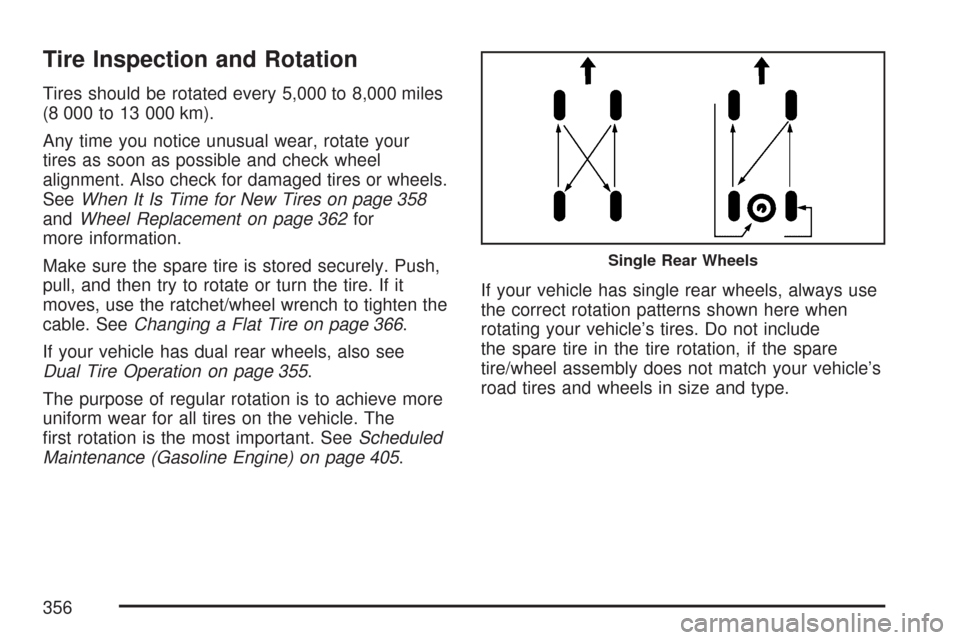
Maintenance (Gasoline Engine) on page 405.If your vehicle has single rear wheels, always use
the correct rotation patterns shown here when
rotating your vehicle’s tires. Do not include
the spare tire in the tire rotation, if the spare
tire/wheel assembly does not match your vehicle’s
road tires and wheels in size and type.
Single Rear Wheels
356