engine CHEVROLET EXPRESS PASSANGER 2012 1.G Owners Manual
[x] Cancel search | Manufacturer: CHEVROLET, Model Year: 2012, Model line: EXPRESS PASSANGER, Model: CHEVROLET EXPRESS PASSANGER 2012 1.GPages: 430, PDF Size: 6.35 MB
Page 297 of 430
Black plate (33,1)Chevrolet Express Owner Manual - 2012
Vehicle Care 10-33
Starter Switch Check
{WARNING
When you are doing this
inspection, the vehicle could
move suddenly. If the vehicle
moves, you or others could be
injured.
1. Before starting this check, be sure there is enough room
around the vehicle.
2. Firmly apply both the parking brake and the regular brake.
See Parking Brake on
page 9‑34.
Do not use the accelerator
pedal, and be ready to turn off
the engine immediately if it
starts.
3. Try to start the engine in each gear. The vehicle should start
only in P (Park) or N (Neutral). If the vehicle starts in any other
position, contact your dealer
for service.Automatic Transmission
Shift Lock Control
Function Check
{WARNING
When you are doing this
inspection, the vehicle could
move suddenly. If the vehicle
moves, you or others could be
injured.
1. Before starting this check, be sure there is enough room
around the vehicle. It should be
parked on a level surface.
2. Firmly apply the parking brake. See Parking Brake on
page 9‑34.
Be ready to apply the regular
brake immediately if the vehicle
begins to move. 3. With the engine off, turn the
ignition on, but do not start the
engine. Without applying the
regular brake, try to move the
shift lever out of P (Park) with
normal effort. If the shift lever
moves out of P (Park), contact
your dealer for service.
Ignition Transmission
Lock Check
While parked, and with the parking
brake set, try to turn the ignition to
LOCK/OFF in each shift lever
position.
.The ignition should turn to
LOCK/OFF only when the shift
lever is in P (Park).
.The ignition key should come
out only in LOCK/OFF.
Contact your dealer if service is
required.
Page 298 of 430
Black plate (34,1)Chevrolet Express Owner Manual - 2012
10-34 Vehicle Care
Park Brake and P (Park)
Mechanism Check
{WARNING
When you are doing this check,
the vehicle could begin to move.
You or others could be injured
and property could be damaged.
Make sure there is room in front
of the vehicle in case it begins to
roll. Be ready to apply the regular
brake at once should the vehicle
begin to move.
Park on a fairly steep hill, with the
vehicle facing downhill. Keeping
your foot on the regular brake, set
the parking brake.
.To check the parking brake's
holding ability: With the engine
running and the transmission in
N (Neutral), slowly remove foot
pressure from the regular brake
pedal. Do this until the vehicle is
held by the parking brake only.
.To check the P (Park)
mechanism's holding ability:
With the engine running, shift to
P (Park). Then release the
parking brake followed by the
regular brake.
Contact your dealer if service is
required.
Wiper Blade Replacement
Windshield wiper blades should be
inspected for wear and cracking.
See Maintenance Schedule on
page 11‑3 for more information.
Replacement blades come in
different types and are removed
in different ways. For proper type
and length, see Maintenance
Replacement Parts on page 11‑14.
Notice: Allowing the wiper blade
arm to touch the windshield when
no wiper blade is installed could
damage the windshield. Any
damage that occurs would not be
covered by your warranty. Do not
allow the wiper blade arm to
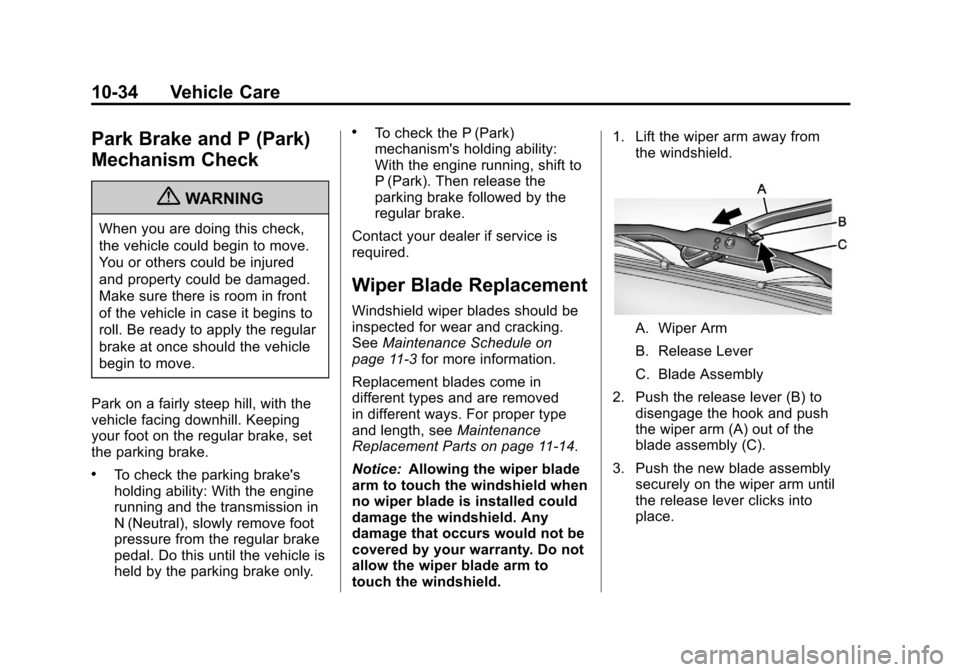
touch the windshield. 1. Lift the wiper arm away from
the windshield.
A. Wiper Arm
B. Release Lever
C. Blade Assembly
2. Push the release lever (B) to disengage the hook and push
the wiper arm (A) out of the
blade assembly (C).
3. Push the new blade assembly securely on the wiper arm until
the release lever clicks into
place.
Page 306 of 430
Black plate (42,1)Chevrolet Express Owner Manual - 2012
10-42 Vehicle Care
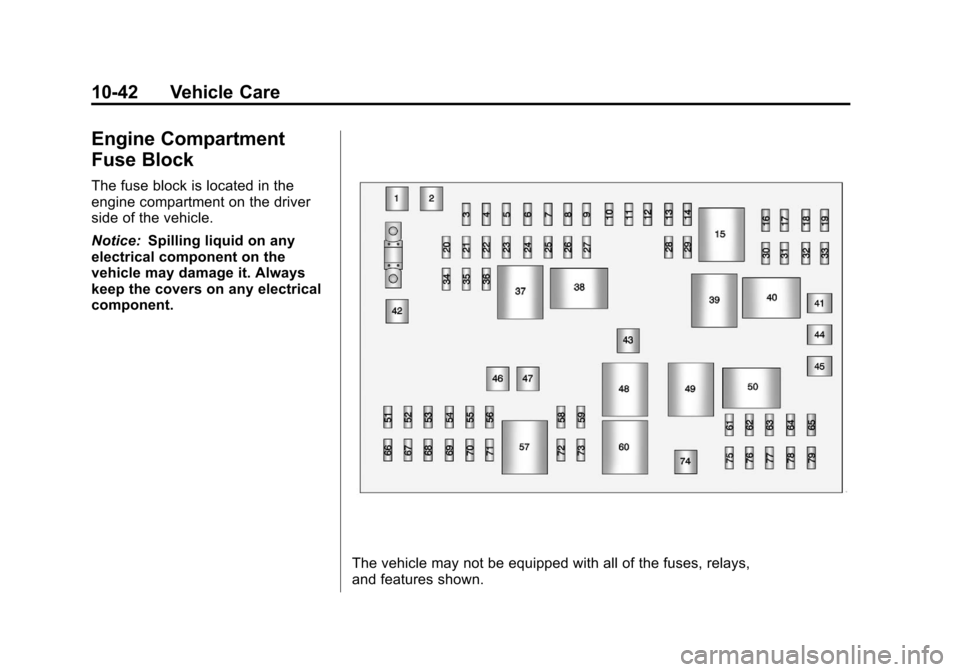
Engine Compartment
Fuse Block
The fuse block is located in the
engine compartment on the driver
side of the vehicle.
Notice:Spilling liquid on any
electrical component on the
vehicle may damage it. Always
keep the covers on any electrical
component.
The vehicle may not be equipped with all of the fuses, relays,
and features shown.
Page 307 of 430
Black plate (43,1)Chevrolet Express Owner Manual - 2012
Vehicle Care 10-43
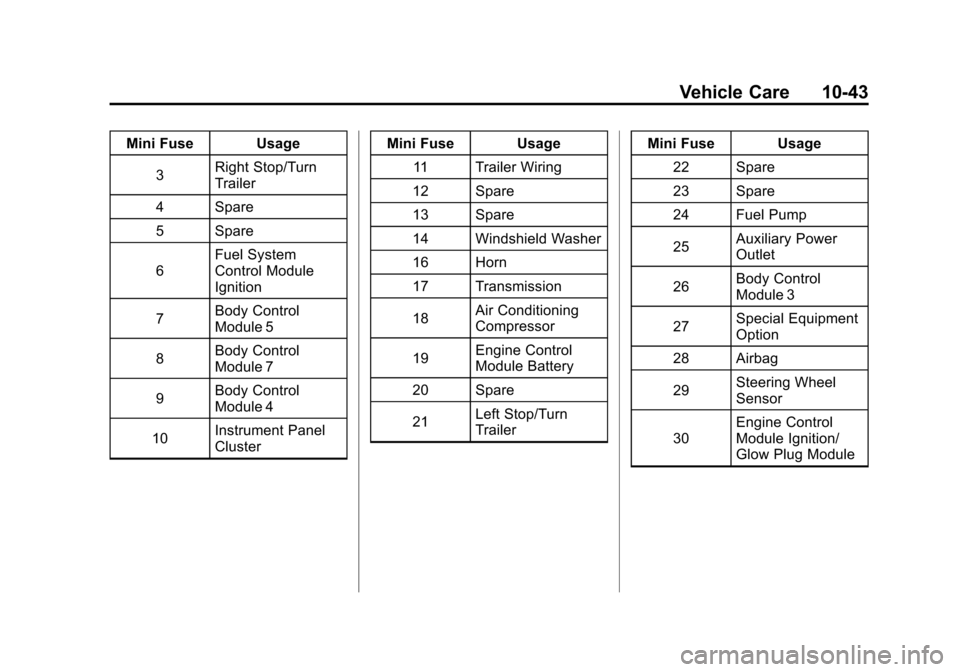
Mini Fuse Usage3 Right Stop/Turn
Trailer
4 Spare
5 Spare
6 Fuel System
Control Module
Ignition
7 Body Control
Module 5
8 Body Control
Module 7
9 Body Control
Module 4
10 Instrument Panel
Cluster Mini Fuse Usage
11 Trailer Wiring
12 Spare
13 Spare
14 Windshield Washer
16 Horn
17 Transmission
18 Air Conditioning
Compressor
19 Engine Control
Module Battery
20 Spare
21 Left Stop/Turn
Trailer Mini Fuse Usage
22 Spare
23 Spare
24 Fuel Pump
25 Auxiliary Power
Outlet
26 Body Control
Module 3
27 Special Equipment
Option
28 Airbag
29 Steering Wheel
Sensor
30 Engine Control
Module Ignition/
Glow Plug Module
Page 309 of 430
Black plate (45,1)Chevrolet Express Owner Manual - 2012
Vehicle Care 10-45
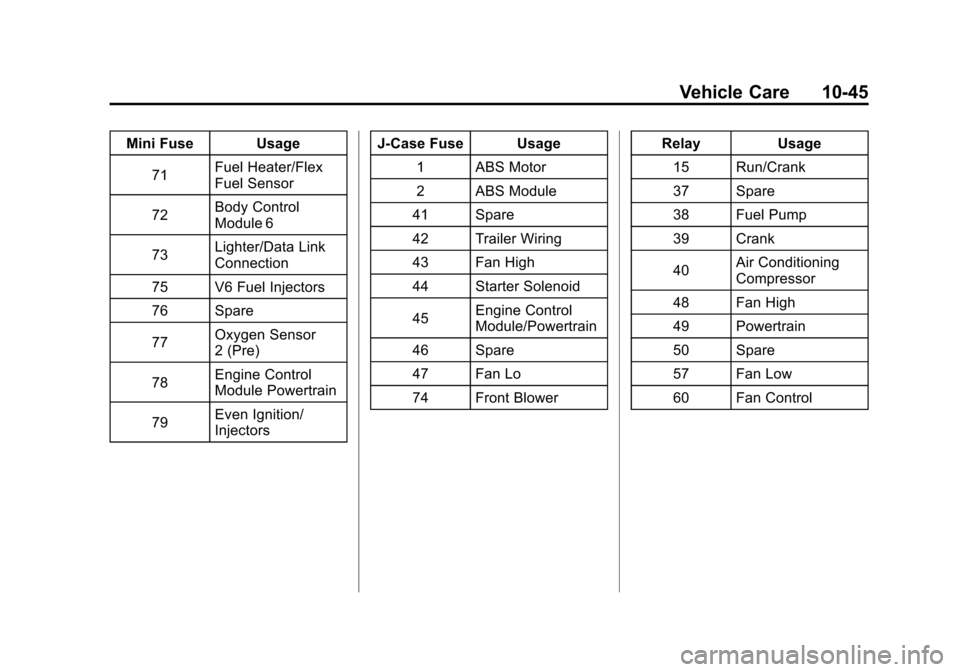
Mini Fuse Usage71 Fuel Heater/Flex
Fuel Sensor
72 Body Control
Module 6
73 Lighter/Data Link
Connection
75 V6 Fuel Injectors
76 Spare
77 Oxygen Sensor
2 (Pre)
78 Engine Control
Module Powertrain
79 Even Ignition/
Injectors J‐Case Fuse Usage
1 ABS Motor
2 ABS Module
41 Spare
42 Trailer Wiring
43 Fan High
44 Starter Solenoid
45 Engine Control
Module/Powertrain
46 Spare
47 Fan Lo
74 Front Blower Relay Usage
15 Run/Crank
37 Spare
38 Fuel Pump
39 Crank
40 Air Conditioning
Compressor
48 Fan High
49 Powertrain
50 Spare
57 Fan Low
60 Fan Control
Page 316 of 430
Black plate (52,1)Chevrolet Express Owner Manual - 2012
10-52 Vehicle Care
(D) DOT (Department of
Transportation)
:The
Department of Transportation
(DOT) code indicates that
the tire is in compliance with
the U.S. Department of
Transportation Motor Vehicle
Safety Standards.
(E) Tire Identification
Number (TIN)
:The letters and
numbers following the DOT code
are the Tire Identification
Number (TIN). The TIN shows
the manufacturer and plant
code, tire size, and date the tire
was manufactured. The TIN is
molded onto both sides of the
tire, although only one side may
have the date of manufacture.
(F) Tire Ply Material
:The type
of cord and number of plies in
the sidewall and under the tread. (G) Single Tire Maximum
Load
:Maximum load that can
be carried and the maximum
pressure needed to support that
load when used as a single. For
information on recommended
tire pressure see Tire Pressure
on page 10‑56 andVehicle Load
Limits on page 9‑11.
Tire Designations
Tire Size
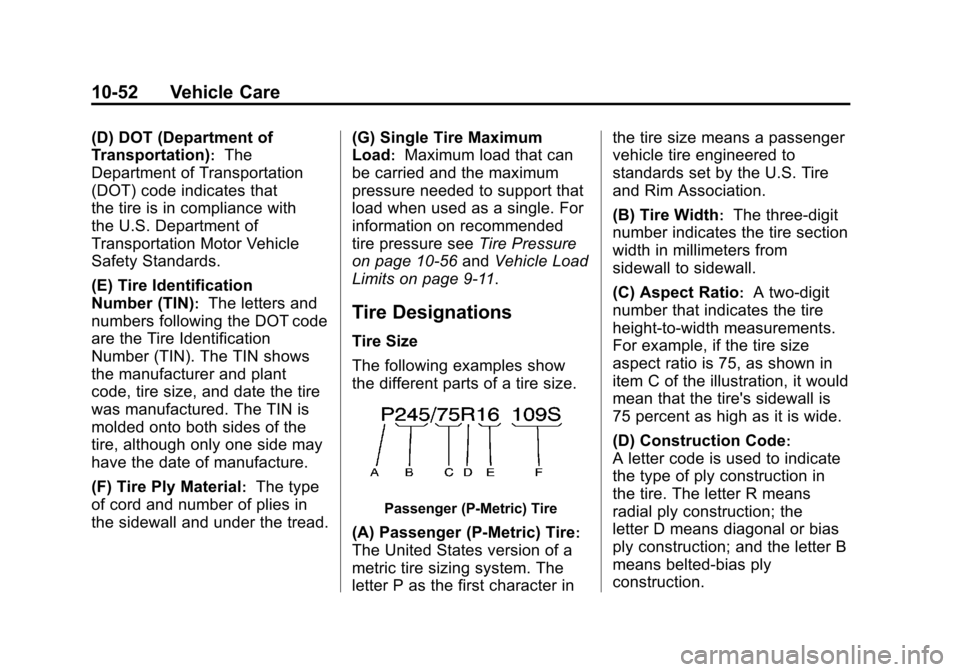
The following examples show
the different parts of a tire size.
Passenger (P‐Metric) Tire
(A) Passenger (P‐Metric) Tire:
The United States version of a
metric tire sizing system. The
letter P as the first character in the tire size means a passenger
vehicle tire engineered to
standards set by the U.S. Tire
and Rim Association.
(B) Tire Width
:The three‐digit
number indicates the tire section
width in millimeters from
sidewall to sidewall.
(C) Aspect Ratio
:A two‐digit
number that indicates the tire
height‐to‐width measurements.
For example, if the tire size
aspect ratio is 75, as shown in
item C of the illustration, it would
mean that the tire's sidewall is
75 percent as high as it is wide.
(D) Construction Code
:
A letter code is used to indicate
the type of ply construction in
the tire. The letter R means
radial ply construction; the
letter D means diagonal or bias
ply construction; and the letter B
means belted‐bias ply
construction.
Page 317 of 430
Black plate (53,1)Chevrolet Express Owner Manual - 2012
Vehicle Care 10-53
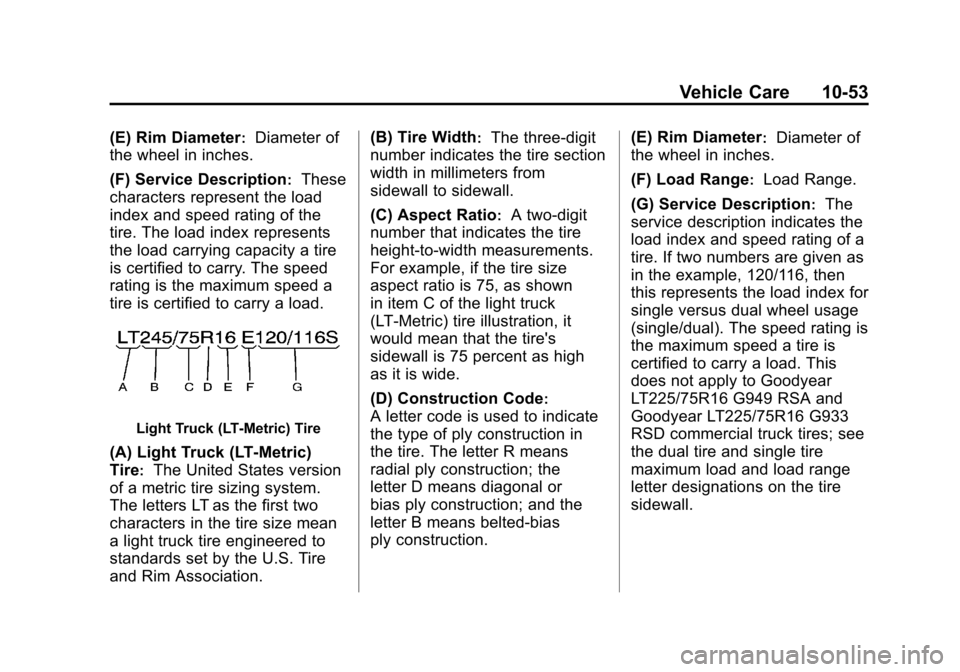
(E) Rim Diameter:Diameter of
the wheel in inches.
(F) Service Description
:These
characters represent the load
index and speed rating of the
tire. The load index represents
the load carrying capacity a tire
is certified to carry. The speed
rating is the maximum speed a
tire is certified to carry a load.
Light Truck (LT‐Metric) Tire
(A) Light Truck (LT‐Metric)
Tire
:The United States version
of a metric tire sizing system.
The letters LT as the first two
characters in the tire size mean
a light truck tire engineered to
standards set by the U.S. Tire
and Rim Association. (B) Tire Width
:The three‐digit
number indicates the tire section
width in millimeters from
sidewall to sidewall.
(C) Aspect Ratio
:A two‐digit
number that indicates the tire
height‐to‐width measurements.
For example, if the tire size
aspect ratio is 75, as shown
in item C of the light truck
(LT‐Metric) tire illustration, it
would mean that the tire's
sidewall is 75 percent as high
as it is wide.
(D) Construction Code
:
A letter code is used to indicate
the type of ply construction in
the tire. The letter R means
radial ply construction; the
letter D means diagonal or
bias ply construction; and the
letter B means belted‐bias
ply construction. (E) Rim Diameter
:Diameter of
the wheel in inches.
(F) Load Range
:Load Range.
(G) Service Description
:The
service description indicates the
load index and speed rating of a
tire. If two numbers are given as
in the example, 120/116, then
this represents the load index for
single versus dual wheel usage
(single/dual). The speed rating is
the maximum speed a tire is
certified to carry a load. This
does not apply to Goodyear
LT225/75R16 G949 RSA and
Goodyear LT225/75R16 G933
RSD commercial truck tires; see
the dual tire and single tire
maximum load and load range
letter designations on the tire
sidewall.
Page 325 of 430
Black plate (61,1)Chevrolet Express Owner Manual - 2012
Vehicle Care 10-61
.Operating electronic devices or
being near facilities using radio
wave frequencies similar to the
TPMS could cause the TPMS
sensors to malfunction.
If the TPMS is not functioning
properly, it cannot detect or signal a
low tire condition. See your dealer
for service if the TPMS malfunction
light and DIC message come on
and stay on.
TPMS Sensor Matching
Process
Each TPMS sensor has a unique
identification code. The identification
code needs to be matched to a
new tire/wheel position after rotating
the vehicle’ s tires or replacing one
or more of the TPMS sensors. Also,
the TPMS sensor matching process
should be performed after replacing
a spare tire with a road tire
containing the TPMS sensor.
The malfunction light and the DIC
message should go off at the next
ignition cycle. The sensors are
matched to the tire/wheel positions, using a TPMS relearn tool, in the
following order: driver side front tire,
passenger side front tire, passenger
side rear tire, and driver side rear.
See your dealer for service or to
purchase a relearn tool.
There are two minutes to match
the first tire/wheel position, and
five minutes overall to match all
four tire/wheel positions. If it takes
longer, the matching process stops
and must be restarted.
The TPMS sensor matching
process is:
1. Set the parking brake.
2. Turn the ignition to ON/RUN with
the engine off.
3. Press the Remote Keyless Entry (RKE) transmitter's LOCK
and UNLOCK buttons at the
same time for approximately
five seconds. The horn sounds
twice to signal the receiver is
in relearn mode and TIRE
LEARNING ACTIVE message
displays on the DIC screen. If the vehicle does not have
RKE, press the Driver
Information Center (DIC) vehicle
information button until the
PRESS
VTO RELEARN TIRE
POSITIONS message displays.
The horn sounds twice to signal
the receiver is in relearn mode
and TIRE LEARNING ACTIVE
message displays on the DIC
screen.
If the vehicle does not have RKE
or DIC buttons, press the trip
odometer reset stem located on
the instrument panel cluster until
the PRESS
VTO RELEARN
TIRE POSITIONS message
displays. The horn sounds twice
to signal the receiver is in
relearn mode and TIRE
LEARNING ACTIVE message
displays on the DIC screen.
4. Start with the driver side front tire.
Page 337 of 430
Black plate (73,1)Chevrolet Express Owner Manual - 2012
Vehicle Care 10-73
{WARNING
Changing a tire can be
dangerous. The vehicle can slip
off the jack and roll over or fall
causing injury or death. Find a
level place to change the tire.
To help prevent the vehicle
from moving:1. Set the parking brake firmly.
2. Put an automatic transmission in P (Park) or a
manual transmission in
1 (First) or R (Reverse).
(Continued)
WARNING (Continued)
3. Turn off the engine and donot restart while the vehicle
is raised.
4. Do not allow passengers to remain in the vehicle.
5. Place wheel blocks on both sides of the tire at the
opposite corner of the tire
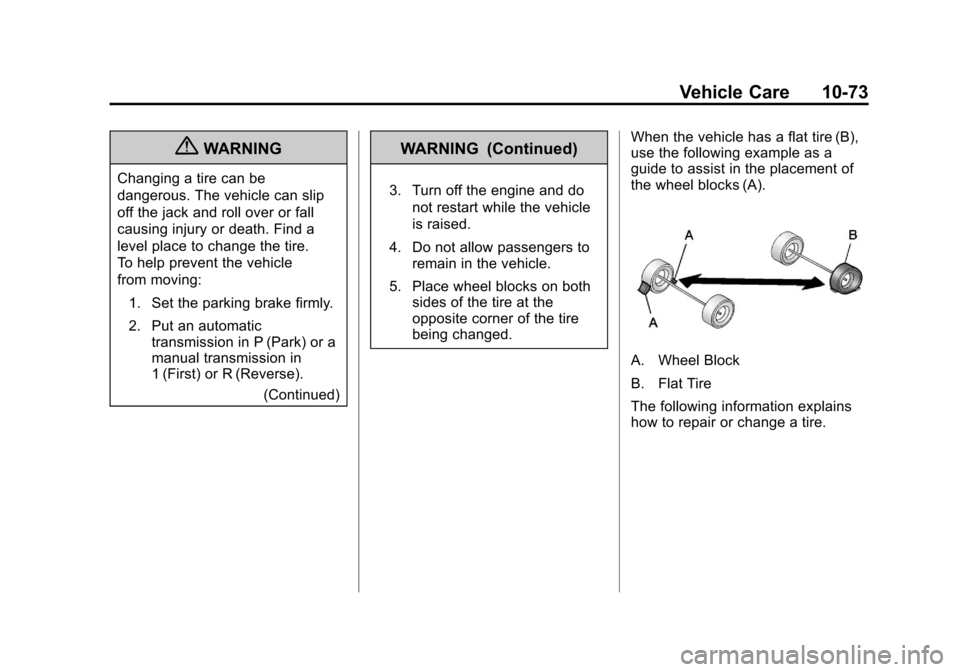
being changed. When the vehicle has a flat tire (B),
use the following example as a
guide to assist in the placement of
the wheel blocks (A).
A. Wheel Block
B. Flat Tire
The following information explains
how to repair or change a tire.
Page 351 of 430
Black plate (87,1)Chevrolet Express Owner Manual - 2012
Vehicle Care 10-87
needed. This will avoid sparks
and help save both batteries.
And it could save the radio!
4. Open the hoods and locate the positive (+) and negative (−)
terminal locations of the other
vehicle.
On your van, use the unpainted
radio antenna bracket as a
remote negative (−) terminal.
{WARNING
Using an open flame near a
battery can cause battery gas to
explode. People have been hurt
doing this, and some have been
blinded. Use a flashlight if you
need more light.
Be sure the battery has enough
water. You do not need to add
water to the battery installed in
your new vehicle. But if a battery
has filler caps, be sure the right
amount of fluid is there.
(Continued)
WARNING (Continued)
If it is low, add water to take
care of that first. If you do not,
explosive gas could be present.
Battery fluid contains acid that
can burn you. Do not get it on
you. If you accidentally get it in
your eyes or on your skin, flush
the place with water and get
medical help immediately.
{WARNING
Fans or other moving engine
parts can injure you badly. Keep
your hands away from moving
parts once the engine is running.
5. Check that the jumper cables do not have loose or missing
insulation. If they do, you could
get a shock. The vehicles could
be damaged too. Before you connect the cables,
here are some basic things you
should know. Positive (+) will go
to positive (+) or to a remote
positive (+) terminal if the vehicle
has one. Negative (−) will go to
an unpainted metal part or to a
remote negative (−) terminal if
the vehicle has one. On your
van, use the unpainted radio
antenna bracket as a remote
negative (−) terminal.
Do not connect positive (+) to
negative (−) or you will get a
short that would damage the
battery and maybe other parts
too. And do not connect the
negative (−) cable to the
negative (−) terminal on the
dead battery because this can
cause sparks.