ECU CHEVROLET EXPRESS PASSANGER 2012 1.G Owners Manual
[x] Cancel search | Manufacturer: CHEVROLET, Model Year: 2012, Model line: EXPRESS PASSANGER, Model: CHEVROLET EXPRESS PASSANGER 2012 1.GPages: 430, PDF Size: 6.35 MB
Page 1 of 430

Black plate (1,1)Chevrolet Express Owner Manual - 2012
2012 Chevrolet Express Owner ManualM
In Brief. . . . . . . . . . . . . . . . . . . . . . . . 1-1
Instrument Panel . . . . . . . . . . . . . . 1-2
Initial Drive Information . . . . . . . . 1-4
Vehicle Features . . . . . . . . . . . . . 1-16
Performance and Maintenance . . . . . . . . . . . . . . . . 1-20
Keys, Doors, and Windows . . . . . . . . . . . . . . . . . . . . 2-1
Keys and Locks . . . . . . . . . . . . . . . 2-2
Doors . . . . . . . . . . . . . . . . . . . . . . . . . . 2-9
Vehicle Security . . . . . . . . . . . . . . 2-12
Exterior Mirrors . . . . . . . . . . . . . . . 2-14
Interior Mirrors . . . . . . . . . . . . . . . . 2-15
Windows . . . . . . . . . . . . . . . . . . . . . 2-16 Seats and Restraints
. . . . . . . . . 3-1
Head Restraints . . . . . . . . . . . . . . . 3-2
Front Seats . . . . . . . . . . . . . . . . . . . . 3-2
Rear Seats . . . . . . . . . . . . . . . . . . . . 3-5
Safety Belts . . . . . . . . . . . . . . . . . . . . 3-8
Airbag System . . . . . . . . . . . . . . . . 3-18
Child Restraints . . . . . . . . . . . . . . 3-38
Storage . . . . . . . . . . . . . . . . . . . . . . . 4-1
Storage Compartments . . . . . . . . 4-1
Instruments and Controls . . . . 5-1
Controls . . . . . . . . . . . . . . . . . . . . . . . 5-2
Warning Lights, Gauges, and Indicators . . . . . . . . . . . . . . . . . . . 5-11
Information Displays . . . . . . . . . . 5-28
Vehicle Messages . . . . . . . . . . . . 5-34
Vehicle Personalization . . . . . . . 5-42 Lighting
. . . . . . . . . . . . . . . . . . . . . . . 6-1
Exterior Lighting . . . . . . . . . . . . . . . 6-1
Interior Lighting . . . . . . . . . . . . . . . . 6-6
Lighting Features . . . . . . . . . . . . . . 6-7
Infotainment System . . . . . . . . . 7-1
Introduction . . . . . . . . . . . . . . . . . . . . 7-1
Radio . . . . . . . . . . . . . . . . . . . . . . . . . . 7-8
Audio Players . . . . . . . . . . . . . . . . 7-13
Phone . . . . . . . . . . . . . . . . . . . . . . . . 7-24
Climate Controls . . . . . . . . . . . . . 8-1
Climate Control Systems . . . . . . 8-1
Air Vents . . . . . . . . . . . . . . . . . . . . . . . 8-8
Page 28 of 430
Black plate (22,1)Chevrolet Express Owner Manual - 2012
1-22 In Brief
.Avoid idling the engine for long
periods of time.
.When road and weather
conditions are appropriate, use
cruise control.
.Always follow posted speed
limits or drive more slowly when
conditions require.
.Keep vehicle tires properly
inflated.
.Combine several trips into a
single trip.
.Replace the vehicle's tires with
the same TPC Spec number
molded into the tire's sidewall
near the size.
.Follow recommended scheduled
maintenance.
Roadside Assistance
Program
U.S.:1-800-243-8872
TTY Users (U.S.): 1-888-889-2438
Canada: 1-800-268-6800
Mexico: 01-800-466-0800
As the owner of a new Chevrolet,
you are automatically enrolled in
the Roadside Assistance program.
See Roadside Assistance Program
(U.S. and Canada) on page 13‑8 or
Roadside Assistance Program
(Mexico) on page 13‑10 for
more information.
Roadside Assistance and OnStar
(U.S. and Canada)
If you have an active OnStar
subscription, press the
Qbutton
and the current GPS location will be
sent to an OnStar advisor who will
assess your problem, contact
Roadside Assistance, and relay
your exact location to get the
help you need. Online Owner Center
(U.S. and Canada)
The Online Owner Center is a
complimentary service that includes
online service reminders, vehicle
maintenance tips, online owner
manual, special privileges,
and more.
Sign up today at:
www.chevyownercenter.com
(U.S.) or
www.gm.ca (Canada).
OnStar®
If equipped, this vehicle has a
comprehensive, in-vehicle system
that can connect to a live Advisor
for Emergency, Security, Navigation,
Connection, and Diagnostic
Services. See OnStar Overview on
page 14‑1 for more information.
Page 29 of 430
Black plate (1,1)Chevrolet Express Owner Manual - 2012
Keys, Doors, and Windows 2-1
Keys, Doors, and
Windows
Keys and Locks
Keys . . . . . . . . . . . . . . . . . . . . . . . . . . 2-2
Remote Keyless Entry (RKE)System . . . . . . . . . . . . . . . . . . . . . . 2-3
Remote Keyless Entry (RKE) System Operation . . . . . . . . . . . 2-3
Remote Vehicle Start . . . . . . . . . 2-5
Door Locks . . . . . . . . . . . . . . . . . . . 2-7
Power Door Locks . . . . . . . . . . . . 2-7
Cargo Door Relocking . . . . . . . . 2-7
Delayed Locking . . . . . . . . . . . . . . 2-8
Automatic Door Locks . . . . . . . . . 2-8
Lockout Protection . . . . . . . . . . . . 2-8
Safety Locks . . . . . . . . . . . . . . . . . . 2-8
Doors
Side Door (60/40 Swing-Out) . . . . . . . . . . . . . . . . . . 2-9
Sliding Door . . . . . . . . . . . . . . . . . 2-10
Rear Doors . . . . . . . . . . . . . . . . . . 2-11
Vehicle Security
Vehicle Security . . . . . . . . . . . . . . 2-12
Immobilizer . . . . . . . . . . . . . . . . . . 2-12
Immobilizer Operation . . . . . . . 2-12
Exterior Mirrors
Convex Mirrors . . . . . . . . . . . . . . 2-14
Manual Mirrors . . . . . . . . . . . . . . . 2-14
Trailer-Tow Mirrors . . . . . . . . . . . 2-14
Power Mirrors . . . . . . . . . . . . . . . . 2-15
Heated Mirrors . . . . . . . . . . . . . . . 2-15
Interior Mirrors
Manual Rearview Mirror . . . . . . 2-15
Windows
Windows . . . . . . . . . . . . . . . . . . . . . 2-16
Manual Windows . . . . . . . . . . . . 2-16
Power Windows . . . . . . . . . . . . . 2-16
Swing-Out Windows . . . . . . . . . 2-18
Enhanced Technology Glass . . . . . . . . . . . . . . . . . . . . . . . 2-19
Sun Visors . . . . . . . . . . . . . . . . . . . 2-19
Page 36 of 430
Black plate (8,1)Chevrolet Express Owner Manual - 2012
2-8 Keys, Doors, and Windows
Delayed Locking
When locking the doors with the
power lock switch and a door open,
the doors will lock five seconds after
the last door is closed. You will hear
three chimes to signal that the
delayed locking feature is in use.
Pressing
etwice orQon the
RKE transmitter twice will override
the delayed locking feature and
immediately lock all the doors.
This feature will not operate if the
key is in the ignition.
This feature can be programmed
using the Driver Information
Center (DIC). See “Delay Door
Lock” inVehicle Personalization on
page 5‑42.
Automatic Door Locks
The vehicle may have an automatic
lock/unlock feature. This feature can
be programmed using the Driver
Information Center (DIC).
See Vehicle Personalization on
page 5‑42 for more information on
DIC programming.
Lockout Protection
This feature protects you from
locking the key in the vehicle when
the key is in the ignition and a door
is open.
If the power lock switch is pressed
when either the driver, passenger,
or rear door is open, all the doors
will lock and then the driver door will
unlock. This feature does not
include the side cargo door.
If the vehicle has an ambulance
package, this feature is disabled.
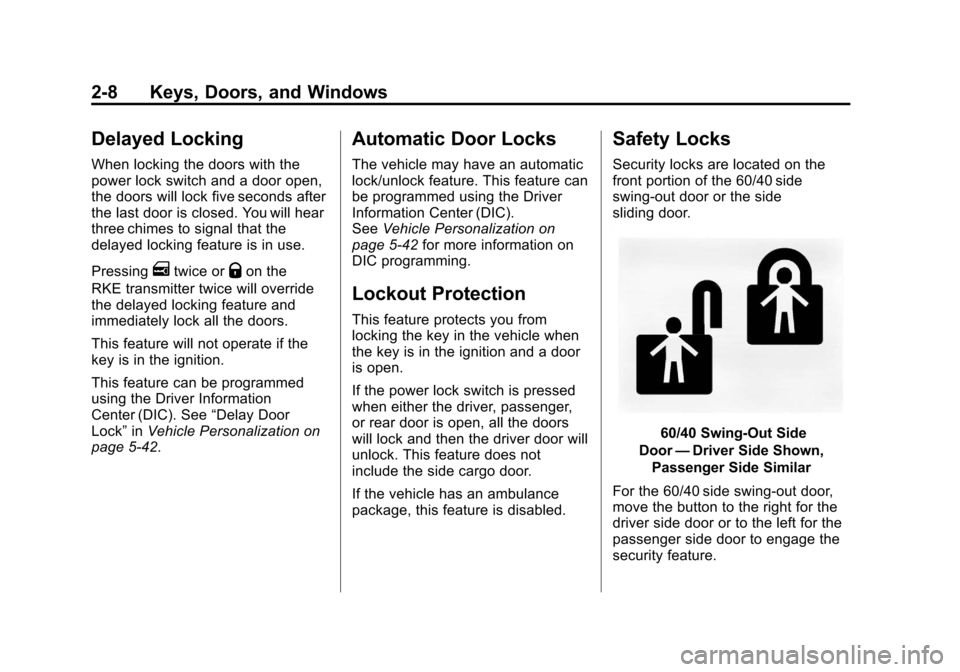
Safety Locks
Security locks are located on the
front portion of the 60/40 side
swing-out door or the side
sliding door.
60/40 Swing-Out Side
Door —Driver Side Shown,
Passenger Side Similar
For the 60/40 side swing-out door,
move the button to the right for the
driver side door or to the left for the
passenger side door to engage the
security feature.
Page 37 of 430
Black plate (9,1)Chevrolet Express Owner Manual - 2012
Keys, Doors, and Windows 2-9
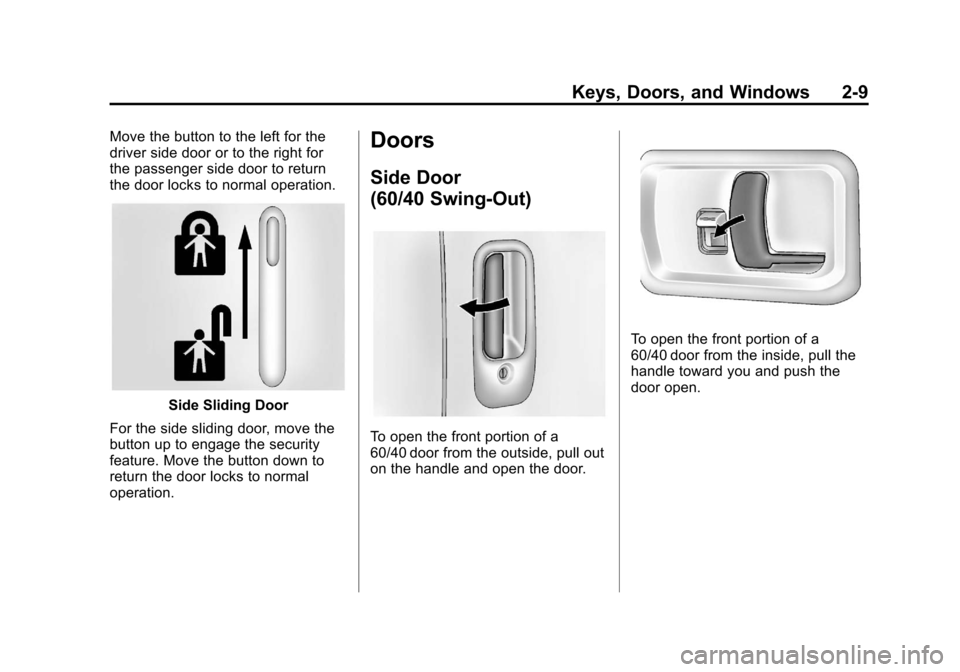
Move the button to the left for the
driver side door or to the right for
the passenger side door to return
the door locks to normal operation.
Side Sliding Door
For the side sliding door, move the
button up to engage the security
feature. Move the button down to
return the door locks to normal
operation.
Doors
Side Door
(60/40 Swing-Out)
To open the front portion of a
60/40 door from the outside, pull out
on the handle and open the door.
To open the front portion of a
60/40 door from the inside, pull the
handle toward you and push the
door open.
Page 40 of 430
Black plate (12,1)Chevrolet Express Owner Manual - 2012
2-12 Keys, Doors, and Windows
Vehicle Security
This vehicle has theft-deterrent
features; however, they do not
make it impossible to steal.
Immobilizer
SeeRadio Frequency Statement on
page 13‑22 for information
regarding Part 15 of the Federal
Communications Commission (FCC)
rules and Industry Canada
Standards RSS-GEN/210/220/310.
Immobilizer Operation
This vehicle is equipped with the
PASS-Key®III+ (Personalized
Automotive Security System)
theft-deterrent system.
PASS-Key III+ is a passive
theft deterrent system.
The system is automatically armed
when the key is removed from the
ignition. You do not have to manually arm or
disarm the system.
The security light will come on if
there is a problem with arming or
disarming the theft-deterrent
system.
When the PASS-Key III+ system
senses that someone is using the
wrong key, it shuts down the
vehicle's starter and fuel systems.
The starter will not work and fuel will
stop being delivered to the engine.
Anyone using a trial-and-error
method to start the vehicle will be
discouraged because of the high
number of electrical key codes.
If the engine does not start and the
security message comes on, the
key may have a damaged
transponder. Turn the ignition off
and try again.
If the engine still does not start, and
the key appears to be undamaged,
try another ignition key. At this time,
you may also want to check the
instrument panel PASS KEY fuse.
If the engine still does not start with
the other key, the vehicle needs
service. If the vehicle does start, the
first key may be faulty. See your
dealer or a locksmith who can
service the PASS-Key III+ to have a
new key made. See
Fuses and
Circuit Breakers on page 10‑41.
It is possible for the PASS-Key III+
decoder to learn the transponder
value of a new or replacement key.
Up to 10 keys may be programmed
for the vehicle. This procedure is for
learning additional keys only. If all
the currently programmed keys are
lost or do not operate, you must see
your dealer or a locksmith who can
service PASS-Key III+ to have keys
made and programmed to the
system.
Page 41 of 430
Black plate (13,1)Chevrolet Express Owner Manual - 2012
Keys, Doors, and Windows 2-13
See your dealer or a locksmith who
can service PASS-Key III+ to get a
new key blank that is cut exactly as
the ignition key that operates the
system.
To program the new key:
1. Verify the new key has
1
stamped on it.
2. Insert the original, already programmed key into the ignition
lock cylinder and start the
engine. If the engine will not
start, see your dealer for service.
3. After the engine has started, turn the key to LOCK/OFF and
remove the key. 4. Insert the key to be programmed
and turn it to ON/RUN within
10 seconds of removing the
previous key.
The security message will turn
off once the key has been
programmed. It may not be
apparent that the security
message went on due to how
quickly the key is programmed.
5. Repeat Steps 1 through 4 if additional keys are to be
programmed. If you lose or damage a
PASS-Key III+ key, see your dealer
or a locksmith who can service
PASS-Key III+ to have a new
key made.
Do not leave the key or device
that disarms or deactivates the
theft-deterrent system in
the vehicle.
Page 49 of 430
Black plate (1,1)Chevrolet Express Owner Manual - 2012
Seats and Restraints 3-1
Seats and
Restraints
Head Restraints
Head Restraints . . . . . . . . . . . . . . . 3-2
Front Seats
Seat Adjustment . . . . . . . . . . . . . . 3-2
Power Seat Adjustment . . . . . . . 3-3
Reclining Seatbacks . . . . . . . . . . 3-3
Rear Seats
Rear Seats . . . . . . . . . . . . . . . . . . . . 3-5
Safety Belts
Safety Belts . . . . . . . . . . . . . . . . . . . 3-8
How to Wear Safety BeltsProperly . . . . . . . . . . . . . . . . . . . . 3-10
Lap-Shoulder Belt . . . . . . . . . . . . 3-11
Safety Belt Use During Pregnancy . . . . . . . . . . . . . . . . . . 3-16 Safety Belt Extender . . . . . . . . . 3-16
Safety System Check . . . . . . . . 3-16
Safety Belt Care . . . . . . . . . . . . . 3-17
Replacing Safety Belt System
Parts after a Crash . . . . . . . . . 3-17
Airbag System
Airbag System . . . . . . . . . . . . . . . 3-18
Where Are the Airbags? . . . . . 3-20
When Should an Airbag
Inflate? . . . . . . . . . . . . . . . . . . . . . 3-22
What Makes an Airbag Inflate? . . . . . . . . . . . . . . . . . . . . . 3-23
How Does an Airbag Restrain? . . . . . . . . . . . . . . . . . . . 3-24
What Will You See after an Airbag Inflates? . . . . . . . . . . . . 3-24
Airbag On-Off Switch . . . . . . . . 3-26
Passenger Sensing System . . . . . . . . . . . . . . . . . . . . . 3-30
Servicing the Airbag-Equipped Vehicle . . . . . . . . . . . . . . . . . . . . . 3-35
Adding Equipment to the Airbag-Equipped Vehicle . . . 3-35
Airbag System Check . . . . . . . . 3-37
Replacing Airbag System Parts after a Crash . . . . . . . . . 3-37
Child Restraints
Older Children . . . . . . . . . . . . . . . 3-38
Infants and YoungChildren . . . . . . . . . . . . . . . . . . . . 3-40
Child Restraint Systems . . . . . 3-42
Where to Put the Restraint . . . 3-45
Lower Anchors and Tethers for Children (LATCH
System) . . . . . . . . . . . . . . . . . . . . 3-46
Replacing LATCH System Parts After a Crash . . . . . . . . . 3-52
Securing Child Restraints (Rear Seat Position) . . . . . . . . 3-53
Securing Child Restraints (Front Seat-Passenger
Sensing System) . . . . . . . . . . . 3-55
Securing Child Restraints (Front Seat-Airbag On/Off
Switch) . . . . . . . . . . . . . . . . . . . . . 3-58
Page 60 of 430
Black plate (12,1)Chevrolet Express Owner Manual - 2012
3-12 Seats and Restraints
3. Push the latch plate into thebuckle until it clicks.
Pull up on the latch plate to
make sure it is secure. If the belt
is not long enough, see Safety
Belt Extender on page 3‑16.
Position the release button on
the buckle so that the safety belt
could be quickly unbuckled if
necessary. 4. If equipped with a shoulder belt
height adjuster, move it to the
height that is right for you.
See “Safety Belt Height Adjuster”
later in this section for
instructions on use and
important safety information.
5. To make the lap part tight, pull up on the shoulder belt.
It may be necessary to pull
stitching on the safety belt
through the latch plate to fully
tighten the lap belt on smaller
occupants.
To unlatch the belt, push the button
on the buckle. The belt should
return to its stowed position. Slide
the latch plate up the safety belt
webbing when the safety belt is not
in use. The latch plate should rest
on the stitching on the safety belt,
near the guide loop on the side wall.
Before a door is closed, be sure the
safety belt is out of the way. If a
door is slammed against a safety
belt, damage can occur to both the
safety belt and the vehicle.
Page 64 of 430
Black plate (16,1)Chevrolet Express Owner Manual - 2012
3-16 Seats and Restraints
Safety Belt Use During
Pregnancy
Safety belts work for everyone,
including pregnant women. Like all
occupants, they are more likely to
be seriously injured if they do not
wear safety belts.
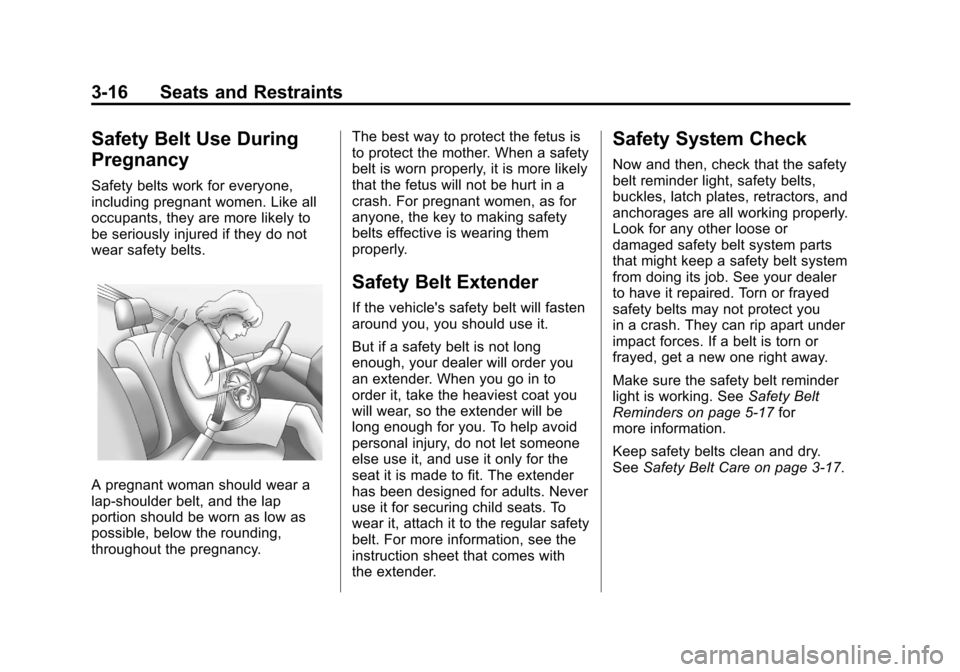
A pregnant woman should wear a
lap-shoulder belt, and the lap
portion should be worn as low as
possible, below the rounding,
throughout the pregnancy.The best way to protect the fetus is
to protect the mother. When a safety
belt is worn properly, it is more likely
that the fetus will not be hurt in a
crash. For pregnant women, as for
anyone, the key to making safety
belts effective is wearing them
properly.
Safety Belt Extender
If the vehicle's safety belt will fasten
around you, you should use it.
But if a safety belt is not long
enough, your dealer will order you
an extender. When you go in to
order it, take the heaviest coat you
will wear, so the extender will be
long enough for you. To help avoid
personal injury, do not let someone
else use it, and use it only for the
seat it is made to fit. The extender
has been designed for adults. Never
use it for securing child seats. To
wear it, attach it to the regular safety
belt. For more information, see the
instruction sheet that comes with
the extender.
Safety System Check
Now and then, check that the safety
belt reminder light, safety belts,
buckles, latch plates, retractors, and
anchorages are all working properly.
Look for any other loose or
damaged safety belt system parts
that might keep a safety belt system
from doing its job. See your dealer
to have it repaired. Torn or frayed
safety belts may not protect you
in a crash. They can rip apart under
impact forces. If a belt is torn or
frayed, get a new one right away.
Make sure the safety belt reminder
light is working. See
Safety Belt
Reminders on page 5‑17 for
more information.
Keep safety belts clean and dry.
See Safety Belt Care on page 3‑17.