keyless CHEVROLET EXPRESS PASSANGER 2013 1.G User Guide
[x] Cancel search | Manufacturer: CHEVROLET, Model Year: 2013, Model line: EXPRESS PASSANGER, Model: CHEVROLET EXPRESS PASSANGER 2013 1.GPages: 402, PDF Size: 6.46 MB
Page 143 of 402
Black plate (41,1)Chevrolet Express Owner Manual - 2013 - 1stPrintReady - 6/19/12
Instruments and Controls 5-41
To select a setting, pressVwhile
the desired setting is displayed on
the DIC.
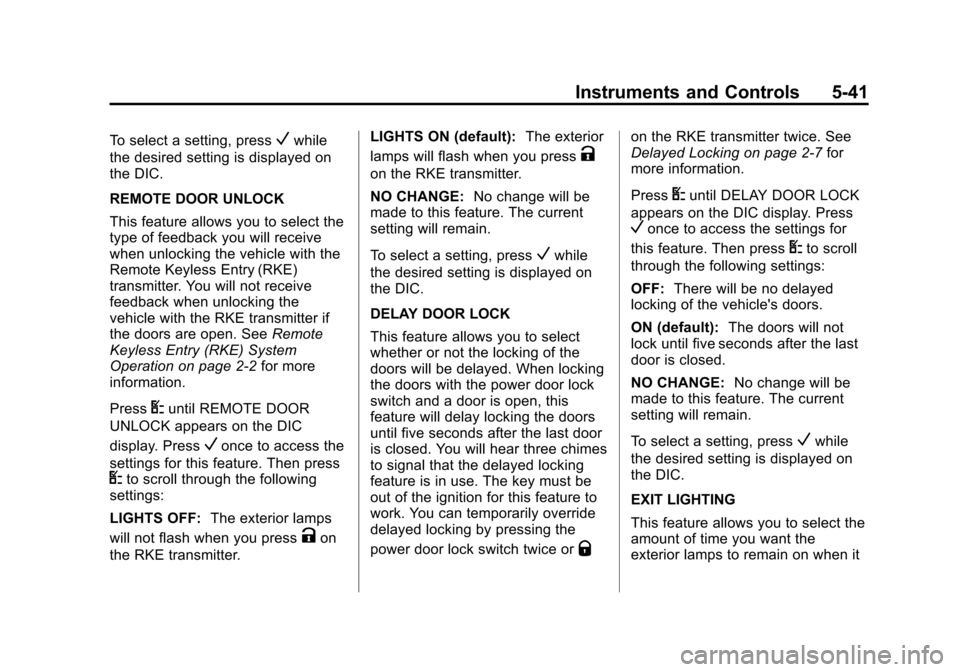
REMOTE DOOR UNLOCK
This feature allows you to select the
type of feedback you will receive
when unlocking the vehicle with the
Remote Keyless Entry (RKE)
transmitter. You will not receive
feedback when unlocking the
vehicle with the RKE transmitter if
the doors are open. See Remote
Keyless Entry (RKE) System
Operation on page 2‑2 for more
information.
Press
Uuntil REMOTE DOOR
UNLOCK appears on the DIC
display. Press
Vonce to access the
settings for this feature. Then press
Uto scroll through the following
settings:
LIGHTS OFF: The exterior lamps
will not flash when you press
Kon
the RKE transmitter. LIGHTS ON (default):
The exterior
lamps will flash when you press
K
on the RKE transmitter.
NO CHANGE: No change will be
made to this feature. The current
setting will remain.
To select a setting, press
Vwhile
the desired setting is displayed on
the DIC.
DELAY DOOR LOCK
This feature allows you to select
whether or not the locking of the
doors will be delayed. When locking
the doors with the power door lock
switch and a door is open, this
feature will delay locking the doors
until five seconds after the last door
is closed. You will hear three chimes
to signal that the delayed locking
feature is in use. The key must be
out of the ignition for this feature to
work. You can temporarily override
delayed locking by pressing the
power door lock switch twice or
Q
on the RKE transmitter twice. See
Delayed Locking on page 2‑7 for
more information.
Press
Uuntil DELAY DOOR LOCK
appears on the DIC display. Press
Vonce to access the settings for
this feature. Then press
Uto scroll
through the following settings:
OFF: There will be no delayed
locking of the vehicle's doors.
ON (default): The doors will not
lock until five seconds after the last
door is closed.
NO CHANGE: No change will be
made to this feature. The current
setting will remain.
To select a setting, press
Vwhile
the desired setting is displayed on
the DIC.
EXIT LIGHTING
This feature allows you to select the
amount of time you want the
exterior lamps to remain on when it
Page 144 of 402
Black plate (42,1)Chevrolet Express Owner Manual - 2013 - 1stPrintReady - 6/19/12
5-42 Instruments and Controls
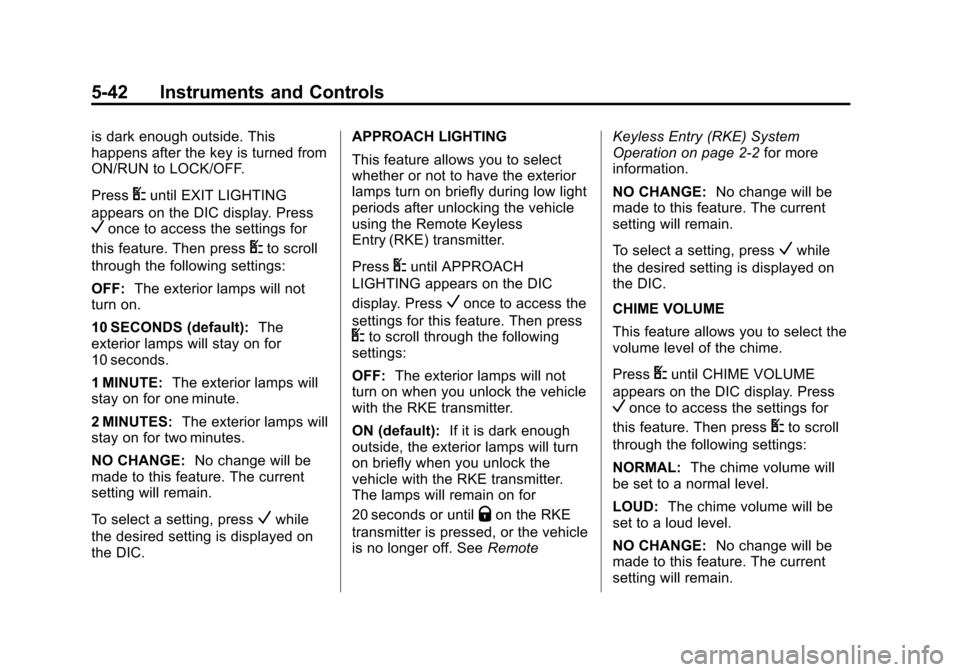
is dark enough outside. This
happens after the key is turned from
ON/RUN to LOCK/OFF.
Press
Uuntil EXIT LIGHTING
appears on the DIC display. Press
Vonce to access the settings for
this feature. Then press
Uto scroll
through the following settings:
OFF: The exterior lamps will not
turn on.
10 SECONDS (default): The
exterior lamps will stay on for
10 seconds.
1 MINUTE: The exterior lamps will
stay on for one minute.
2 MINUTES: The exterior lamps will
stay on for two minutes.
NO CHANGE: No change will be
made to this feature. The current
setting will remain.
To select a setting, press
Vwhile
the desired setting is displayed on
the DIC. APPROACH LIGHTING
This feature allows you to select
whether or not to have the exterior
lamps turn on briefly during low light
periods after unlocking the vehicle
using the Remote Keyless
Entry (RKE) transmitter.
Press
Uuntil APPROACH
LIGHTING appears on the DIC
display. Press
Vonce to access the
settings for this feature. Then press
Uto scroll through the following
settings:
OFF: The exterior lamps will not
turn on when you unlock the vehicle
with the RKE transmitter.
ON (default): If it is dark enough
outside, the exterior lamps will turn
on briefly when you unlock the
vehicle with the RKE transmitter.
The lamps will remain on for
20 seconds or until
Qon the RKE
transmitter is pressed, or the vehicle
is no longer off. See RemoteKeyless Entry (RKE) System
Operation on page 2‑2
for more
information.
NO CHANGE: No change will be
made to this feature. The current
setting will remain.
To select a setting, press
Vwhile
the desired setting is displayed on
the DIC.
CHIME VOLUME
This feature allows you to select the
volume level of the chime.
Press
Uuntil CHIME VOLUME
appears on the DIC display. Press
Vonce to access the settings for
this feature. Then press
Uto scroll
through the following settings:
NORMAL: The chime volume will
be set to a normal level.
LOUD: The chime volume will be
set to a loud level.
NO CHANGE: No change will be
made to this feature. The current
setting will remain.
Page 251 of 402
Black plate (3,1)Chevrolet Express Owner Manual - 2013 - 1stPrintReady - 6/19/12
Vehicle Care 10-3
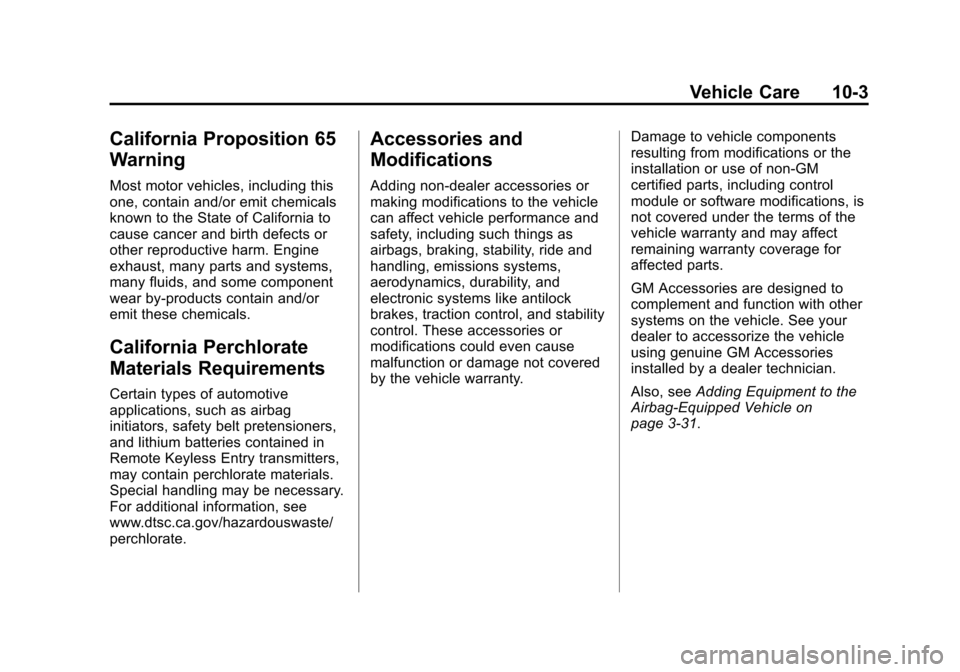
California Proposition 65
Warning
Most motor vehicles, including this
one, contain and/or emit chemicals
known to the State of California to
cause cancer and birth defects or
other reproductive harm. Engine
exhaust, many parts and systems,
many fluids, and some component
wear by-products contain and/or
emit these chemicals.
California Perchlorate
Materials Requirements
Certain types of automotive
applications, such as airbag
initiators, safety belt pretensioners,
and lithium batteries contained in
Remote Keyless Entry transmitters,
may contain perchlorate materials.
Special handling may be necessary.
For additional information, see
www.dtsc.ca.gov/hazardouswaste/
perchlorate.
Accessories and
Modifications
Adding non‐dealer accessories or
making modifications to the vehicle
can affect vehicle performance and
safety, including such things as
airbags, braking, stability, ride and
handling, emissions systems,
aerodynamics, durability, and
electronic systems like antilock
brakes, traction control, and stability
control. These accessories or
modifications could even cause
malfunction or damage not covered
by the vehicle warranty.Damage to vehicle components
resulting from modifications or the
installation or use of non‐GM
certified parts, including control
module or software modifications, is
not covered under the terms of the
vehicle warranty and may affect
remaining warranty coverage for
affected parts.
GM Accessories are designed to
complement and function with other
systems on the vehicle. See your
dealer to accessorize the vehicle
using genuine GM Accessories
installed by a dealer technician.
Also, see
Adding Equipment to the
Airbag-Equipped Vehicle on
page 3‑31.
Page 305 of 402
Black plate (57,1)Chevrolet Express Owner Manual - 2013 - 1stPrintReady - 6/19/12
Vehicle Care 10-57
.Operating electronic devices or
being near facilities using radio
wave frequencies similar to the
TPMS could cause the TPMS
sensors to malfunction.
If the TPMS is not functioning
properly, it cannot detect or signal a
low tire condition. See your dealer
for service if the TPMS malfunction
light and DIC message come on
and stay on.
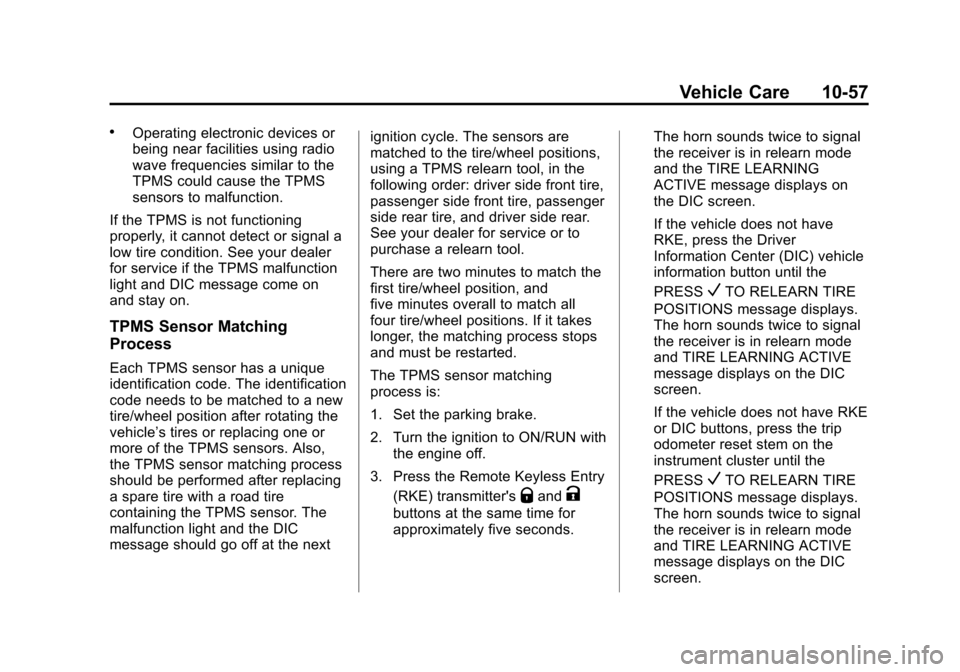
TPMS Sensor Matching
Process
Each TPMS sensor has a unique
identification code. The identification
code needs to be matched to a new
tire/wheel position after rotating the
vehicle’s tires or replacing one or
more of the TPMS sensors. Also,
the TPMS sensor matching process
should be performed after replacing
a spare tire with a road tire
containing the TPMS sensor. The
malfunction light and the DIC
message should go off at the next ignition cycle. The sensors are
matched to the tire/wheel positions,
using a TPMS relearn tool, in the
following order: driver side front tire,
passenger side front tire, passenger
side rear tire, and driver side rear.
See your dealer for service or to
purchase a relearn tool.
There are two minutes to match the
first tire/wheel position, and
five minutes overall to match all
four tire/wheel positions. If it takes
longer, the matching process stops
and must be restarted.
The TPMS sensor matching
process is:
1. Set the parking brake.
2. Turn the ignition to ON/RUN with
the engine off.
3. Press the Remote Keyless Entry (RKE) transmitter's
QandK
buttons at the same time for
approximately five seconds. The horn sounds twice to signal
the receiver is in relearn mode
and the TIRE LEARNING
ACTIVE message displays on
the DIC screen.
If the vehicle does not have
RKE, press the Driver
Information Center (DIC) vehicle
information button until the
PRESS
VTO RELEARN TIRE
POSITIONS message displays.
The horn sounds twice to signal
the receiver is in relearn mode
and TIRE LEARNING ACTIVE
message displays on the DIC
screen.
If the vehicle does not have RKE
or DIC buttons, press the trip
odometer reset stem on the
instrument cluster until the
PRESS
VTO RELEARN TIRE
POSITIONS message displays.
The horn sounds twice to signal
the receiver is in relearn mode
and TIRE LEARNING ACTIVE
message displays on the DIC
screen.
Page 382 of 402
Black plate (20,1)Chevrolet Express Owner Manual - 2013 - 1stPrintReady - 6/19/12
13-20 Customer Information
destinations, addresses, telephone
numbers, and other trip information.
See the navigation manual for
information on stored data and for
deletion instructions.
Radio Frequency
Identification (RFID)
RFID technology is used in some
vehicles for functions such as tire
pressure monitoring and ignition
system security, as well as in
connection with conveniences such
as Remote Keyless Entry (RKE)
transmitters for remote door locking/
unlocking and starting, and
in-vehicle transmitters for garage
door openers. RFID technology in
GM vehicles does not use or record
personal information or link with any
other GM system containing
personal information.
Radio Frequency
Statement
This vehicle has systems that
operate on a radio frequency that
comply with Part 15 of the Federal
Communications Commission (FCC)
rules and with Industry Canada
Standards RSS‐GEN/210/220/310.
Operation is subject to the following
two conditions:
1. The device may not causeharmful interference.
2. The device must accept any interference received, including
interference that may cause
undesired operation of the
device.
Changes or modifications to any of
these systems by other than an
authorized service facility could void
authorization to use this equipment.
Page 396 of 402

Black plate (6,1)Chevrolet Express Owner Manual - 2013 - 1stPrintReady - 6/19/12
i-6 INDEX
J
Jump Starting . . . . . . . . . . . . . . . . . 10-78
K
Key and Lock Messages . . . . . . . 5-33
Keyless EntryRemote (RKE) System . . . . . . . . 2-2
Keys . . . . . . . . . . . . . . . . . . . . . . . . . . . . 2-1
L
Labeling, Tire Sidewall . . . . . . . . 10-46
Lamps Daytime Running (DRL) . . . . . . . 6-2
Dome . . . . . . . . . . . . . . . . . . . . . . . . . . 6-5
Exterior Controls . . . . . . . . . . . . . . . 6-1
Exterior Lamps OffReminder . . . . . . . . . . . . . . . . . . . . 6-2
License Plate . . . . . . . . . . . . . . . 10-37
Malfunction Indicator . . . . . . . . . 5-17
Messages . . . . . . . . . . . . . . . . . . . . 5-33
Reading . . . . . . . . . . . . . . . . . . . . . . . 6-6
Taillamps . . . . . . . . . . . . . . . . . . . 10-35 Lamps, Bulb Replacement . . . . 10-34
Lap-Shoulder Belt . . . . . . . . . . . . . 3-10
LATCH System
Replacing Parts after aCrash . . . . . . . . . . . . . . . . . . . . . . . 3-47
LATCH, Lower Anchors and Tethers for Children . . . . . . . . . . 3-41
Lighter, Cigarette . . . . . . . . . . . . . . . 5-7
Lighting Entry/Exit . . . . . . . . . . . . . . . . . . . . . . 6-6
Illumination Control . . . . . . . . . . . . 6-5
Lights Airbag On-Off . . . . . . . . . . . . . . . . . 5-15
Airbag Readiness . . . . . . . . . . . . . 5-14
Antilock Brake System(ABS) Warning . . . . . . . . . . . . . . 5-21
Brake System Warning . . . . . . . 5-20
Charging System . . . . . . . . . . . . . 5-17
Cruise Control . . . . . . . . . . . . . . . . 5-24
Engine Oil Pressure . . . . . . . . . . 5-23
Flash-to-Pass . . . . . . . . . . . . . . . . . . 6-2
High-Beam On . . . . . . . . . . . . . . . . 5-24
High/Low Beam Changer . . . . . . 6-2
Low Fuel Warning . . . . . . . . . . . . 5-23 Lights (cont'd)
Safety Belt Reminders . . . . . . . . 5-14
Security . . . . . . . . . . . . . . . . . . . . . . 5-23
StabiliTrak
®OFF . . . . . . . . . . . . . 5-21
Tire Pressure . . . . . . . . . . . . . . . . . 5-22
Tow/Haul Mode . . . . . . . . . . . . . . . 5-21
Traction Control System (TCS)/StabiliTrak
®. . . . . . . . . . 5-22
Locking Rear Axle . . . . . . . . . . . . . 9-34
Locks
Automatic Door . . . . . . . . . . . . . . . . 2-8
Cargo Door Relocking . . . . . . . . . 2-7
Delayed Locking . . . . . . . . . . . . . . . 2-7
Door . . . . . . . . . . . . . . . . . . . . . . . . . . . 2-6
Lockout Protection . . . . . . . . . . . . . 2-8
Power Door . . . . . . . . . . . . . . . . . . . . 2-7
Safety . . . . . . . . . . . . . . . . . . . . . . . . . 2-8
Loss of Control . . . . . . . . . . . . . . . . . 9-5
Low Fuel Warning Light . . . . . . . . 5-23
Lower Anchors and Tethers
for Children (LATCH
System) . . . . . . . . . . . . . . . . . . . . . . 3-41
Page 399 of 402

Black plate (9,1)Chevrolet Express Owner Manual - 2013 - 1stPrintReady - 6/19/12
INDEX i-9
Recreational VehicleTowing . . . . . . . . . . . . . . . . . . . . . . 10-81
Reimbursement Program, GM Mobility . . . . . . . . . . . . . . . . . . 13-7
Remote Keyless Entry (RKE) System . . . . . . . . . . . . . . . . . . . . . . . . 2-2
Remote Vehicle Start . . . . . . . . . . . 2-4
Replacement Bulbs . . . . . . . . . . . 10-37
Replacement Parts
Airbags . . . . . . . . . . . . . . . . . . . . . . . 3-33
Maintenance . . . . . . . . . . . . . . . . .11-14
Replacing Airbag System . . . . . . 3-33
Replacing LATCH System Parts after a Crash . . . . . . . . . . . 3-47
Replacing Safety Belt System Parts after a Crash . . . 3-15
Reporting Safety Defects Canadian Government . . . . . . 13-18
General Motors . . . . . . . . . . . . . 13-18
U.S. Government . . . . . . . . . . . 13-17
Restraints
Where to Put . . . . . . . . . . . . . . . . . 3-39
Retained Accessory Power (RAP) . . . . . . . . . . . . . . . . . 9-19
Ride Control Systems
Messages . . . . . . . . . . . . . . . . . . . . 5-34 Roads
Driving, Wet . . . . . . . . . . . . . . . . . . . 9-5
Roadside Assistance Program . . . . . . . . . . . . . . . 13-7, 13-11
Rotation, Tires . . . . . . . . . . . . . . . . 10-58
Routing, Engine Drive Belt . . . . . 12-5
Running the Vehicle While Parked . . . . . . . . . . . . . . . . . . . . . . . 9-22
S
Safety Belts . . . . . . . . . . . . . . . . . . . . 3-8Care . . . . . . . . . . . . . . . . . . . . . . . . . . 3-15
Extender . . . . . . . . . . . . . . . . . . . . . . 3-15
How to Wear Safety BeltsProperly . . . . . . . . . . . . . . . . . . . . . . 3-9
Lap-Shoulder Belt . . . . . . . . . . . . 3-10
Reminders . . . . . . . . . . . . . . . . . . . . 5-14
Replacing after a Crash . . . . . . 3-15
Use During Pregnancy . . . . . . . . 3-14
Safety Defects Reporting Canadian Government . . . . . . 13-18
General Motors . . . . . . . . . . . . . 13-18
U.S. Government . . . . . . . . . . . 13-17
Safety Locks . . . . . . . . . . . . . . . . . . . . 2-8
Safety System Check . . . . . . . . . . 3-15
Satellite Radio . . . . . . . . . . . . . . . . . . 7-9 Scheduling Appointments . . . . . 13-12
Seats
Adjustment, Front . . . . . . . . . . . . . . 3-2
Head Restraints . . . . . . . . . . . . . . . 3-2
Power Adjustment, Front . . . . . . 3-3
Rear . . . . . . . . . . . . . . . . . . . . . . . . . . . 3-4
Reclining Seatbacks . . . . . . . . . . . 3-3
Secondary Latch System . . . . . 10-75
Securing Child Restraints . . . . . . . . 3-48, 3-50, 3-53
Security
Light . . . . . . . . . . . . . . . . . . . . . . . . . . 5-23
Messages . . . . . . . . . . . . . . . . . . . . 5-35
OnStar
®. . . . . . . . . . . . . . . . . . . . . . 14-2
Vehicle . . . . . . . . . . . . . . . . . . . . . . . 2-11
Service
Accessories andModifications . . . . . . . . . . . . . . . . 10-3
Doing Your Own Work . . . . . . . . 10-4
Engine Soon Light . . . . . . . . . . . . 5-17
Maintenance Records . . . . . . .11-15
Maintenance, General Information . . . . . . . . . . . . . . . . . . 11-1
Parts Identification Label . . . . . 12-1