battery CHEVROLET EXPRESS PASSANGER 2013 1.G Owner's Guide
[x] Cancel search | Manufacturer: CHEVROLET, Model Year: 2013, Model line: EXPRESS PASSANGER, Model: CHEVROLET EXPRESS PASSANGER 2013 1.GPages: 402, PDF Size: 6.46 MB
Page 328 of 402
Black plate (80,1)Chevrolet Express Owner Manual - 2013 - 1stPrintReady - 6/19/12
10-80 Vehicle Care
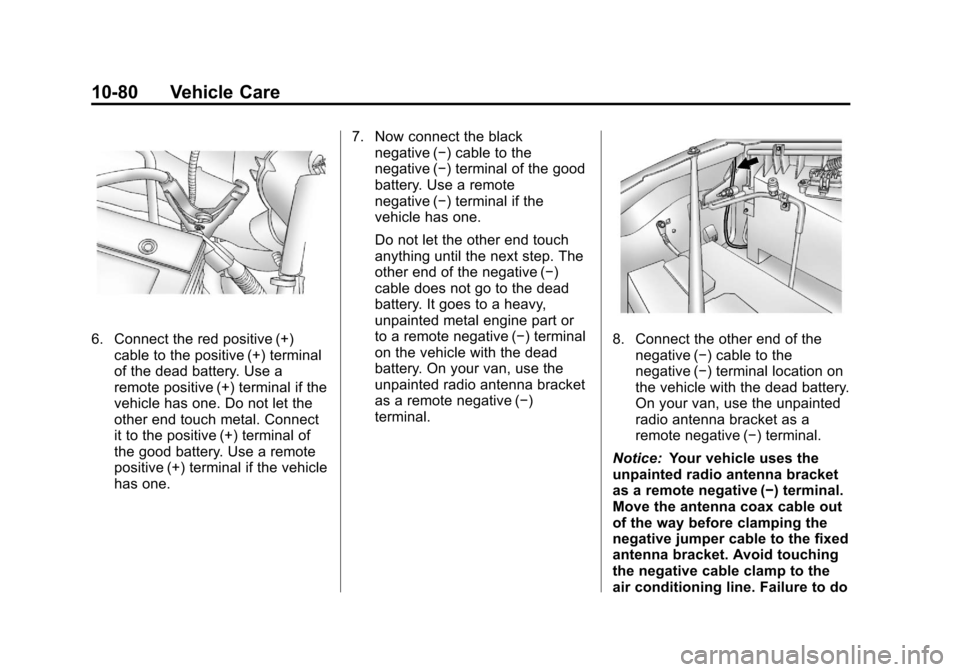
6. Connect the red positive (+)cable to the positive (+) terminal
of the dead battery. Use a
remote positive (+) terminal if the
vehicle has one. Do not let the
other end touch metal. Connect
it to the positive (+) terminal of
the good battery. Use a remote
positive (+) terminal if the vehicle
has one. 7. Now connect the black
negative (−) cable to the
negative (−) terminal of the good
battery. Use a remote
negative (−) terminal if the
vehicle has one.
Do not let the other end touch
anything until the next step. The
other end of the negative (−)
cable does not go to the dead
battery. It goes to a heavy,
unpainted metal engine part or
to a remote negative (−) terminal
on the vehicle with the dead
battery. On your van, use the
unpainted radio antenna bracket
as a remote negative (−)
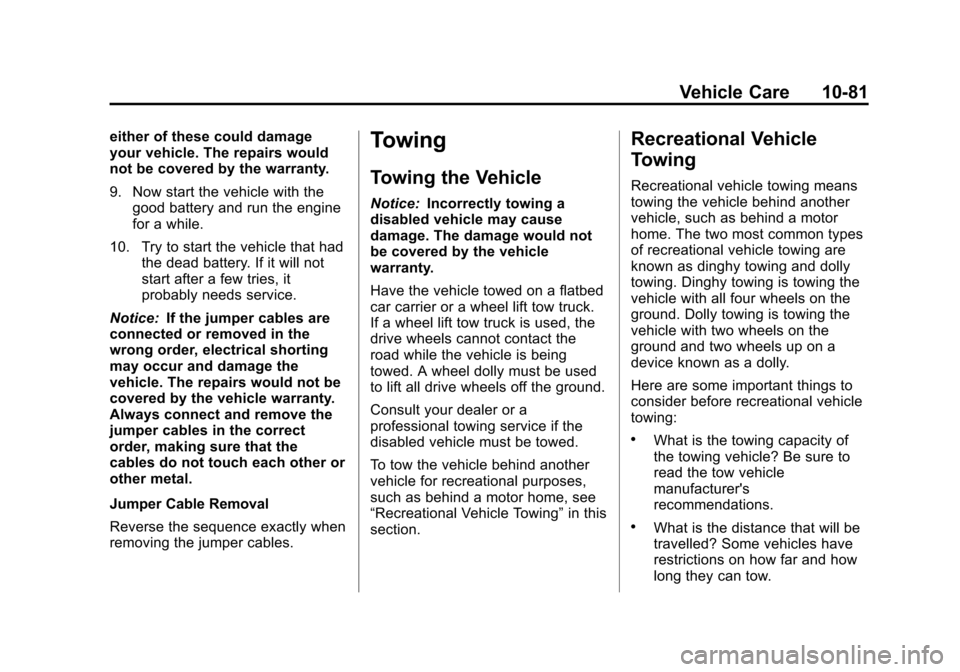
terminal.8. Connect the other end of the
negative (−) cable to the
negative (−) terminal location on
the vehicle with the dead battery.
On your van, use the unpainted
radio antenna bracket as a
remote negative (−) terminal.
Notice: Your vehicle uses the
unpainted radio antenna bracket
as a remote negative (−) terminal.
Move the antenna coax cable out
of the way before clamping the
negative jumper cable to the fixed
antenna bracket. Avoid touching
the negative cable clamp to the
air conditioning line. Failure to do
Page 329 of 402
Black plate (81,1)Chevrolet Express Owner Manual - 2013 - 1stPrintReady - 6/19/12
Vehicle Care 10-81
either of these could damage
your vehicle. The repairs would
not be covered by the warranty.
9. Now start the vehicle with thegood battery and run the engine
for a while.
10. Try to start the vehicle that had the dead battery. If it will not
start after a few tries, it
probably needs service.
Notice: If the jumper cables are
connected or removed in the
wrong order, electrical shorting
may occur and damage the
vehicle. The repairs would not be
covered by the vehicle warranty.
Always connect and remove the
jumper cables in the correct
order, making sure that the
cables do not touch each other or
other metal.
Jumper Cable Removal
Reverse the sequence exactly when
removing the jumper cables.Towing
Towing the Vehicle
Notice: Incorrectly towing a
disabled vehicle may cause
damage. The damage would not
be covered by the vehicle
warranty.
Have the vehicle towed on a flatbed
car carrier or a wheel lift tow truck.
If a wheel lift tow truck is used, the
drive wheels cannot contact the
road while the vehicle is being
towed. A wheel dolly must be used
to lift all drive wheels off the ground.
Consult your dealer or a
professional towing service if the
disabled vehicle must be towed.
To tow the vehicle behind another
vehicle for recreational purposes,
such as behind a motor home, see
“Recreational Vehicle Towing” in this
section.
Recreational Vehicle
Towing
Recreational vehicle towing means
towing the vehicle behind another
vehicle, such as behind a motor
home. The two most common types
of recreational vehicle towing are
known as dinghy towing and dolly
towing. Dinghy towing is towing the
vehicle with all four wheels on the
ground. Dolly towing is towing the
vehicle with two wheels on the
ground and two wheels up on a
device known as a dolly.
Here are some important things to
consider before recreational vehicle
towing:
.What is the towing capacity of
the towing vehicle? Be sure to
read the tow vehicle
manufacturer's
recommendations.
.What is the distance that will be
travelled? Some vehicles have
restrictions on how far and how
long they can tow.
Page 331 of 402
Black plate (83,1)Chevrolet Express Owner Manual - 2013 - 1stPrintReady - 6/19/12
Vehicle Care 10-83
Use the following procedure to tow
the vehicle from the rear:
1. Attach the dolly to the towvehicle following the dolly
manufacturer's instructions.
2. Drive the rear wheels onto the dolly.
3. Firmly set the parking brake. See Parking Brake on page 9‑31
for more information.
4. Put the transmission in P (Park).
5. Secure the vehicle to the dolly following the manufacturer's
instructions.
6. Use an adequate clamping device designed for towing to
ensure that the front wheels are
locked into the straight position.
7. Turn the ignition to LOCK/OFF. If the tow vehicle will not be
started or driven for six weeks or
more, remove the battery cable
from the negative terminal (post) of the battery to prevent the
battery from draining while
towing.
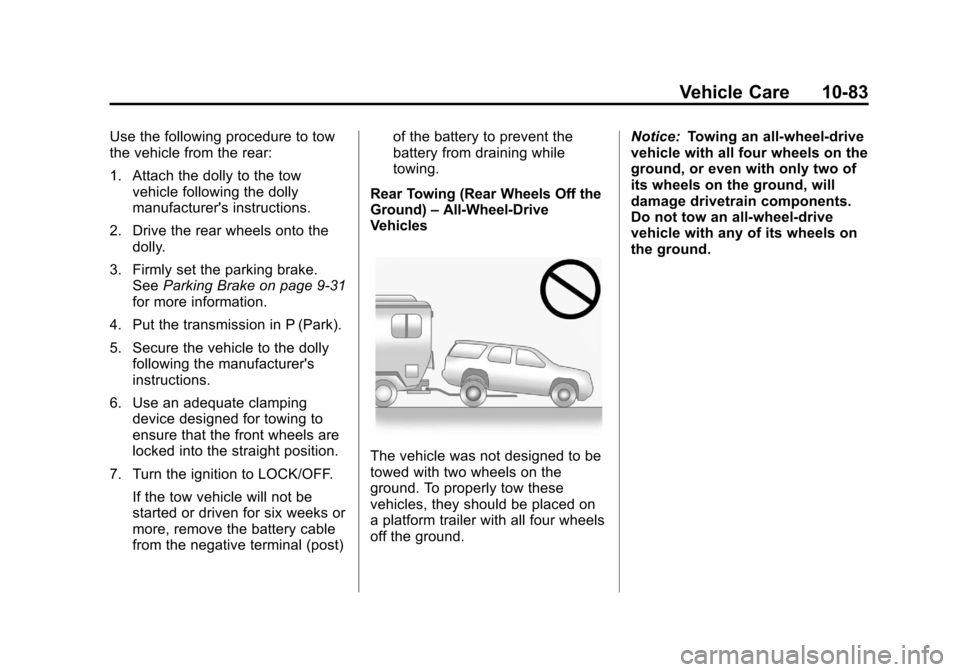
Rear Towing (Rear Wheels Off the
Ground) –All-Wheel-Drive
Vehicles
The vehicle was not designed to be
towed with two wheels on the
ground. To properly tow these
vehicles, they should be placed on
a platform trailer with all four wheels
off the ground. Notice:
Towing an all-wheel-drive
vehicle with all four wheels on the
ground, or even with only two of
its wheels on the ground, will
damage drivetrain components.
Do not tow an all-wheel-drive
vehicle with any of its wheels on
the ground.
Page 347 of 402
Black plate (9,1)Chevrolet Express Owner Manual - 2013 - 1stPrintReady - 6/19/12
Service and Maintenance 11-9
Battery
The battery supplies power to start
the engine and operate any
additional electrical accessories.
.To avoid break‐down or failure to
start the vehicle, maintain a
battery with full cranking power.
.Trained dealer technicians have
the diagnostic equipment to test
the battery and ensure that the
connections and cables are
corrosion‐free.
Belts
.Belts may need replacing if they
squeak or show signs of
cracking or splitting.
.Trained dealer technicians can
inspect the belts and
recommend replacement when
necessary. Brakes
Brakes stop the vehicle and are
crucial to safe driving.
.Signs of brake wear may include
chirping, grinding, or squealing
noises, or difficulty stopping.
.Trained dealer technicians have
access to tools and equipment
to inspect the brakes and
recommend quality parts
engineered for the vehicle.
Fluids
Proper fluid levels and approved
fluids protect the vehicle’s systems
and components. See
Recommended Fluids and
Lubricants on page 11‑12 for GM
approved fluids.
.Engine oil and windshield
washer fluid levels should be
checked at every fuel fill.
.Instrument cluster lights may
come on to indicate that fluids
may be low and need to be
filled. Hoses
Hoses transport fluids and should
be regularly inspected to ensure
that there are no cracks or leaks.
With a multi‐point inspection, your
dealer can inspect the hoses and
advise if replacement is needed.
Lamps
Properly working headlamps,
taillamps, and brake lamps are
important to see and be seen on
the road.
.Signs that the headlamps need
attention include dimming, failure
to light, cracking, or damage.
The brake lamps need to be
checked periodically to ensure
that they light when braking.
.With a multi‐point inspection,
your dealer can check the lamps
and note any concerns.
Page 370 of 402
Black plate (8,1)Chevrolet Express Owner Manual - 2013 - 1stPrintReady - 6/19/12
13-8 Customer Information
Services are subject to the
limitations described in the following
pages. Program coverage varies by
country.
Roadside Assistance is available
24 hours a day, 365 days of
the year.
This program expires two years
from the date of the invoice for the
vehicle, regardless of vehicle
mileage and changes in vehicle
ownership.
For more information about the
renewal of this program at the end
of its term, contact the Chevrolet
Customer Assistance Center
at 01-800-466-0800.
Services Provided
.Flat Tire Change: If unable to
change a flat tire, Roadside
Assistance will provide towing
service to the nearest authorized
Chevrolet dealership. It is the
owner's responsibility for the
repair or replacement of the tire.This service is limited to the
transfer of the vehicle to the
repair facility.
.Emergency Fuel Delivery:
Delivery of enough fuel for the
vehicle to get to the nearest
service station.
.Lock-Out Service: Service to
unlock the vehicle if you are
locked out.
.Battery Jump Start: Service to
jump start a dead battery.
.*Emergency Messages:
Transmission of urgent phone
messages.
.*Emergency Calls: Call for
emergency services.
.*Dealership Location
Assistance: Information
regarding addresses and
telephone numbers for Chevrolet
dealers.
.Emergency Towing: Tow to the
nearest dealer for warranty
service if the vehicle cannot be
driven.
If the vehicle is involved in an
accident during the commission
of a crime, administrative
violation, or breach of traffic
regulations, Roadside
Assistance will not provide
service. When the vehicle is not
accessible to be towed, all
maneuvers required to access it
will be at the owner's expense.
If the vehicle is in another city
outside of your residence,
Roadside Assistance is limited
to moving the vehicle to the
nearest dealer. If you would like
the vehicle moved to a different
dealer, you will be asked to
cover the difference in cost at
the time of the move.
If the vehicle cannot be received
by the nearest Chevrolet dealer
due to scheduling conflicts, the
vehicle will be taken to a safe
place where it will remain for up
Page 374 of 402
Black plate (12,1)Chevrolet Express Owner Manual - 2013 - 1stPrintReady - 6/19/12
13-12 Customer Information
must be in good condition and
properly inflated. It is the owner's
responsibility for the repair or
replacement of the tire if it is not
covered by the warranty.
.Battery Jump Start:Service to
jump start a dead battery.
Services Not Included in
Roadside Assistance
.Impound towing caused by
violation of any laws.
.Legal fines.
.Mounting, dismounting,
or changing of snow tires,
chains, or other traction devices.
.Towing or services for vehicles
driven on a non-public road or
highway.
Services Specific to
Canadian-Purchased Vehicles
.Fuel Delivery: Reimbursement
is approximately $5 Canadian.
Diesel fuel delivery may be restricted. Propane and other
fuels are not provided through
this service.
.Lock-Out Service:
Vehicle
registration is required.
.Trip Interruption Benefits and
Assistance: Must be over
250 kilometers from where your
trip was started to qualify.
General Motors of Canada
Limited requires
pre-authorization, original
detailed receipts, and a copy of
the repair orders. Once
authorization has been received,
the Roadside Assistance advisor
will help to make arrangements
and explain how to receive
payment.
.Alternative Service: If
assistance cannot be provided
right away, the Roadside
Assistance advisor may give
permission to get local
emergency road service. You will
receive payment, up to $100,
after sending the original receipt to Roadside Assistance.
Mechanical failures may be
covered, however any cost for
parts and labor for repairs not
covered by the warranty are the
owner responsibility.
Scheduling Service
Appointments (U.S. and
Canada)
When the vehicle requires warranty
service, contact your dealer and
request an appointment. By
scheduling a service appointment
and advising the service consultant
of your transportation needs, your
dealer can help minimize your
inconvenience.
If the vehicle cannot be scheduled
into the service department
immediately, keep driving it until it
can be scheduled for service,
unless, of course, the problem is
safety related. If it is, please call
your dealership, let them know this,
and ask for instructions.
Page 388 of 402
Black plate (6,1)Chevrolet Express Owner Manual - 2013 - CRC - 6/19/12
14-6 OnStar
How OnStar Service Works
Automatic Crash Response,
Emergency Services, Crisis Assist,
Stolen Vehicle Assistance, Vehicle
Diagnostics, Remote Door Unlock,
Roadside Assistance, Turn-by-Turn
Navigation, and Hands-Free Calling
are available on most vehicles. Not
all OnStar services are available
everywhere or on all vehicles. For
more information, a full description
of OnStar services, system
limitations, and OnStar terms and
conditions, see www.onstar.com
(U.S.) or www.onstar.ca (Canada);
contact OnStar at 1-888-4ONSTAR
(1-888-466-7827) or TTY
1-877-248-2080; or push
Qor|to
speak with an Advisor. OnStar
services require a vehicle electrical
system, wireless service, and GPS
satellite technologies to be available
and operating for features to
function properly. These systems
may not operate if the battery is
discharged or disconnected. OnStar service cannot work unless
your vehicle is in a place where
OnStar has an agreement with a
wireless service provider for service
in that area, and the wireless
service provider has coverage,
network capacity, reception, and
technology compatible with OnStar
service. Service involving location
information about the vehicle cannot
work unless GPS signals are
available, unobstructed, and
compatible with the OnStar
hardware. OnStar service may not
work if the OnStar equipment is not
properly installed or it has not been
properly maintained. If equipment or
software is added, connected,
or modified, OnStar service may not
work. Other problems beyond the
control of OnStar may prevent
service such as hills, tall buildings,
tunnels, weather, electrical system
design and architecture of the
vehicle, damage to the vehicle in a
crash, or wireless phone network
congestion or jamming.See
Radio Frequency Statement on
page 13‑20 for information
regarding Part 15 of the Federal
Communications Commission (FCC)
rules and Industry Canada
Standards RSS-GEN/210/220/310.
Services for People with
Disabilities
Advisors provide services to help
subscribers with physical disabilities
and medical conditions.
Push
Qor|for help with:
.Locating a gas station with an
attendant to pump gas.
.Finding a hotel, restaurant, etc.,
that meets accessibility needs.
.Providing directions to the
closest hospital or pharmacy in
urgent situations.
Page 390 of 402
Black plate (8,1)Chevrolet Express Owner Manual - 2013 - CRC - 6/19/12
14-8 OnStar
route or may ask for a call back
after the vehicle is driven into an
open area.
Cellular and GPS Antennas
Avoid placing items over or near the
antenna to prevent blocking cellular
and GPS signal reception. Cellular
reception is required for OnStar to
send remote signals to the vehicle.
Unable to Connect to OnStar
Message
If there is limited cellular coverage
or the cellular network has reached
maximum capacity, this message
may come on. Push
Qor|to try
the call again or try again after
driving a few miles into another
cellular area.
Vehicle and Power Issues
OnStar services require a vehicle
electrical system, wireless service,
and GPS satellite technologies to be
available and operating for features to function properly. These systems
may not operate if the battery is
discharged or disconnected.
Add-on Electrical Equipment
The OnStar system is integrated
into the electrical architecture of the
vehicle. Do not add any electrical
equipment. See
Add-On Electrical
Equipment on page 9‑57. Added
electrical equipment may interfere
with the operation of the OnStar
system and cause it to not operate.
Privacy
The complete OnStar Privacy
Statement may be found at
www.onstar.com. Privacy-sensitive
users of wireless communications
are cautioned that the privacy of any
information sent via wireless cellular
communications cannot be assured.
Third parties may unlawfully
intercept or access transmissions
and private communications without
consent.
Page 392 of 402

Black plate (2,1)Chevrolet Express Owner Manual - 2013 - 1stPrintReady - 6/19/12
i-2 INDEX
B
Battery . . . . . . . . . . . . . . . . . . . . . . . 10-27Jump Starting . . . . . . . . . . . . . . . 10-78
Load Management . . . . . . . . . . . . . 6-6
Power Protection . . . . . . . . . . . . . . 6-7
Voltage and ChargingMessages . . . . . . . . . . . . . . . . . . . 5-30
Blade Replacement, Wiper . . . 10-31
Bluetooth . . . . . . . . . . . . . . . . . . . . . . 7-21
Brake System Warning Light . . . . . . . . 5-20
Brakes . . . . . . . . . . . . . . . . . . . . . . . . 10-24 Antilock . . . . . . . . . . . . . . . . . . . . . . . 9-30
Fluid . . . . . . . . . . . . . . . . . . . . . . . . 10-25
Parking . . . . . . . . . . . . . . . . . . . . . . . 9-31
System Messages . . . . . . . . . . . . 5-30
Braking . . . . . . . . . . . . . . . . . . . . . . . . . 9-3
Break-In, New Vehicle . . . . . . . . . 9-14
Bulb Replacement . . . . . . . . . . . . 10-37 Center High-Mounted
Stoplamp (CHMSL) . . . . . . . 10-36
Front Turn Signal, Sidemarker, and
Parking Lamps . . . . . . . . . . . . 10-34
Halogen Bulbs . . . . . . . . . . . . . . 10-32
Headlamp Aiming . . . . . . . . . . . 10-32 Bulb Replacement (cont'd)
Headlamps . . . . . . . . . . 10-32, 10-33
License Plate Lamps . . . . . . . 10-37
Taillamps . . . . . . . . . . . . . . . . . . . 10-35
Buying New Tires . . . . . . . . . . . . . 10-61
C
Calibration . . . . . . . . . . . . . . . . . . . . . . 5-4
California Fuel Requirements . . . . . . . . . . . 9-42
Perchlorate MaterialsRequirements . . . . . . . . . . . . . . . 10-3
Warning . . . . . . . . . . . . . . . . . . . . . . 10-3
Camera, Rear Vision . . . . . . . . . . 9-38
Canadian Vehicle Owners . . . . . . . . iii
Capacities and Specifications . . . . . . . . . . . . . . . . 12-2
Carbon Monoxide Engine Exhaust . . . . . . . . . . . . . . . 9-21
Winter Driving . . . . . . . . . . . . . . . . . 9-7
Cargo Door Relocking . . . . . . . . . . 2-7
Cautions, Danger, and Warnings . . . . . . . . . . . . . . . . . . . . . . . . iv
CD Player . . . . . . . . . . . . . . . . . . . . . 7-12
Center High-Mounted Stoplamp (CHMSL) . . . . . . . . . 10-36 Chains, Tire . . . . . . . . . . . . . . . . . . 10-65
Charging System Light . . . . . . . . 5-17
Check
Engine Light . . . . . . . . . . . . . . . . . . 5-17
IgnitionTransmission Lock . . . . . . . . 10-31
Child Restraints
Infants and YoungChildren . . . . . . . . . . . . . . . . . . . . . 3-35
Lower Anchors and Tethers for Children . . . . . . . . . 3-41
Older Children . . . . . . . . . . . . . . . . 3-33
Securing . . . . . . . . . . 3-48, 3-50, 3-53
Systems . . . . . . . . . . . . . . . . . . . . . . 3-38
Cigarette Lighter . . . . . . . . . . . . . . . . 5-7
Circuit Breakers . . . . . . . . . . . . . . 10-38
Cleaning Exterior Care . . . . . . . . . . . . . . . 10-84
Interior Care . . . . . . . . . . . . . . . . 10-87
Climate Control Systems . . . . . . . 8-1 Air Conditioning . . . . . . . . . . . . . . . 8-1
Heating . . . . . . . . . . . . . . . . . . . . . . . . 8-1
Rear . . . . . . . . . . . . . . . . . . . . . . . . . . . 8-5
Rear Heating System . . . . . . . . . . 8-4
Clock . . . . . . . . . . . . . . . . . . . . . . . . . . . 5-6
Page 397 of 402

Black plate (7,1)Chevrolet Express Owner Manual - 2013 - 1stPrintReady - 6/19/12
INDEX i-7
M
MaintenanceRecords . . . . . . . . . . . . . . . . . . . . .11-15
Maintenance Schedule Recommended Fluidsand Lubricants . . . . . . . . . . . . .11-12
Malfunction Indicator Lamp . . . . 5-17
Manual Mirrors . . . . . . . . . . . . . . . . 2-13
Manual Mode . . . . . . . . . . . . . . . . . . 9-28
Manual Windows . . . . . . . . . . . . . . 2-15
Messages
Airbag System . . . . . . . . . . . . . . . . 5-35
Battery Voltage andCharging . . . . . . . . . . . . . . . . . . . . 5-30
Brake System . . . . . . . . . . . . . . . . 5-30
Compass . . . . . . . . . . . . . . . . . . . . . 5-30
Door Ajar . . . . . . . . . . . . . . . . . . . . . 5-30
Engine Cooling System . . . . . . . 5-31
Engine Oil . . . . . . . . . . . . . . . . . . . . 5-32
Engine Power . . . . . . . . . . . . . . . . 5-32
Fuel System . . . . . . . . . . . . . . . . . . 5-33
Key and Lock . . . . . . . . . . . . . . . . . 5-33
Lamp . . . . . . . . . . . . . . . . . . . . . . . . . 5-33
Object Detection System . . . . . 5-33
Ride Control System . . . . . . . . . . 5-34
Security . . . . . . . . . . . . . . . . . . . . . . 5-35 Messages (cont'd)
Service Vehicle . . . . . . . . . . . . . . . 5-36
Tire . . . . . . . . . . . . . . . . . . . . . . . . . . . 5-36
Transmission . . . . . . . . . . . . . . . . . 5-37
Vehicle . . . . . . . . . . . . . . . . . . . . . . . 5-29
Vehicle Reminder . . . . . . . . . . . . . 5-38
Mirrors Convex . . . . . . . . . . . . . . . . . . . . . . . 2-13
Heated . . . . . . . . . . . . . . . . . . . . . . . 2-14
Manual . . . . . . . . . . . . . . . . . . . . . . . 2-13
Manual Rearview . . . . . . . . . . . . . 2-15
Power . . . . . . . . . . . . . . . . . . . . . . . . 2-14
Trailer Tow . . . . . . . . . . . . . . . . . . . . 2-14
Monitor System, Tire
Pressure . . . . . . . . . . . . . . . . . . . . 10-54
N
NavigationOnStar®. . . . . . . . . . . . . . . . . . . . . . 14-2
Vehicle Data Recording
and Privacy . . . . . . . . . . . . . . . 13-19
New Vehicle Break-In . . . . . . . . . . 9-14
Noise Control System . . . . . . . . 10-29
O
Object Detection System Messages . . . . . . . . . . . . . . . . . . . . 5-33
Odometer . . . . . . . . . . . . . . . . . . . . . . 5-10 Trip . . . . . . . . . . . . . . . . . . . . . . . . . . . 5-10
Off-Road Recovery . . . . . . . . . . . . . . . . . . . . . . 9-4
Oil Engine . . . . . . . . . . . . . . . . . . . . . . . . 10-7
Engine Oil Life System . . . . . . . 10-9
Engine Oil PressureGauge . . . . . . . . . . . . . . . . . . . . . . 5-11
Messages . . . . . . . . . . . . . . . . . . . . 5-32
Pressure Light . . . . . . . . . . . . . . . . 5-23
Older Children, Restraints . . . . . 3-33
Online Owner Center . . . . . . . . . . 13-6
OnStar
®
System, In Brief . . . . . . . . . . . . . . 1-20
OnStar®Additional
Information . . . . . . . . . . . . . . . . . . . 14-5
OnStar
®Connections . . . . . . . . . . 14-4
OnStar®Diagnostics . . . . . . . . . . . 14-5
OnStar®Emergency . . . . . . . . . . . 14-2
OnStar®Navigation . . . . . . . . . . . . 14-2
OnStar®Overview . . . . . . . . . . . . . 14-1
OnStar®Security . . . . . . . . . . . . . . 14-2