spare tire CHEVROLET EXPRESS PASSANGER 2014 1.G User Guide
[x] Cancel search | Manufacturer: CHEVROLET, Model Year: 2014, Model line: EXPRESS PASSANGER, Model: CHEVROLET EXPRESS PASSANGER 2014 1.GPages: 406, PDF Size: 5.29 MB
Page 321 of 406
Black plate (71,1)Chevrolet Express Owner Manual (GMNA-Localizing-U.S./Canada/Mexico-
6014662) - 2014 - crc - 8/26/13
Vehicle Care 10-71
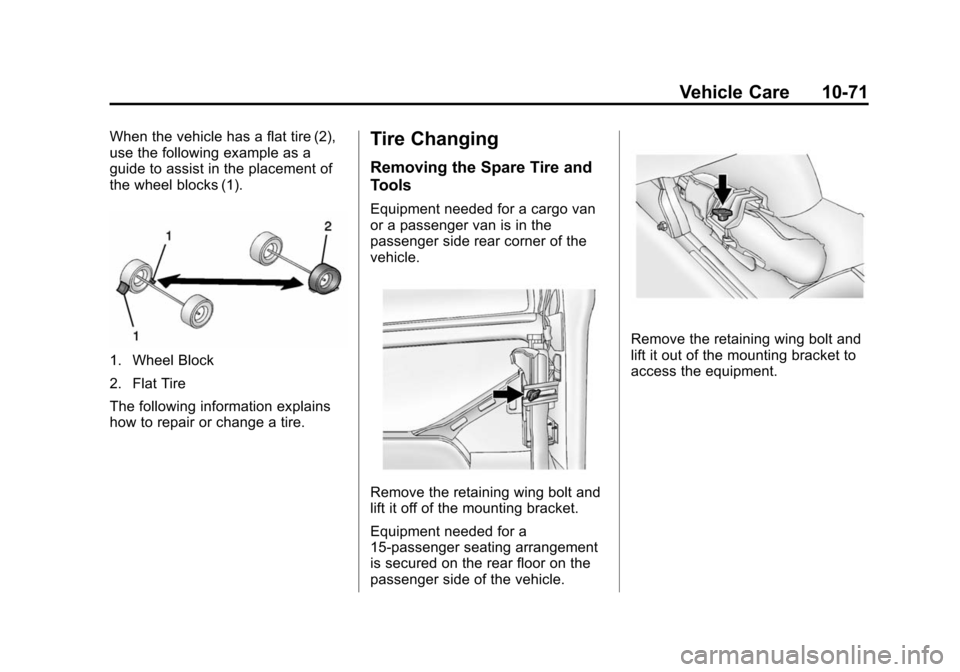
When the vehicle has a flat tire (2),
use the following example as a
guide to assist in the placement of
the wheel blocks (1).
1. Wheel Block
2. Flat Tire
The following information explains
how to repair or change a tire.
Tire Changing
Removing the Spare Tire and
Tools
Equipment needed for a cargo van
or a passenger van is in the
passenger side rear corner of the
vehicle.
Remove the retaining wing bolt and
lift it off of the mounting bracket.
Equipment needed for a
15-passenger seating arrangement
is secured on the rear floor on the
passenger side of the vehicle.
Remove the retaining wing bolt and
lift it out of the mounting bracket to
access the equipment.
Page 322 of 406
Black plate (72,1)Chevrolet Express Owner Manual (GMNA-Localizing-U.S./Canada/Mexico-
6014662) - 2014 - crc - 8/26/13
10-72 Vehicle Care
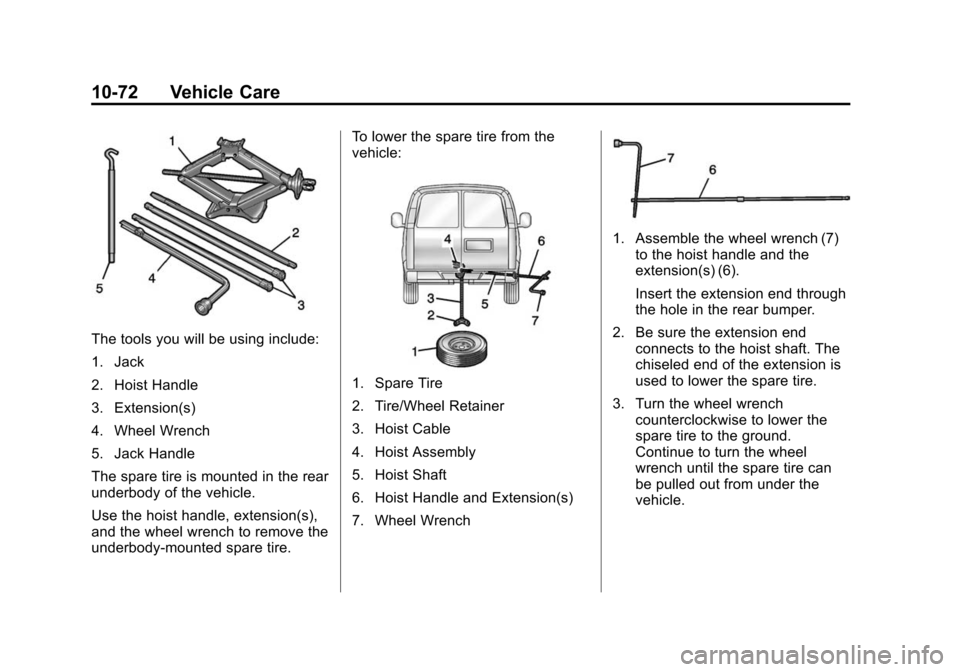
The tools you will be using include:
1. Jack
2. Hoist Handle
3. Extension(s)
4. Wheel Wrench
5. Jack Handle
The spare tire is mounted in the rear
underbody of the vehicle.
Use the hoist handle, extension(s),
and the wheel wrench to remove the
underbody-mounted spare tire.To lower the spare tire from the
vehicle:
1. Spare Tire
2. Tire/Wheel Retainer
3. Hoist Cable
4. Hoist Assembly
5. Hoist Shaft
6. Hoist Handle and Extension(s)
7. Wheel Wrench
1. Assemble the wheel wrench (7)
to the hoist handle and the
extension(s) (6).
Insert the extension end through
the hole in the rear bumper.
2. Be sure the extension end connects to the hoist shaft. The
chiseled end of the extension is
used to lower the spare tire.
3. Turn the wheel wrench counterclockwise to lower the
spare tire to the ground.
Continue to turn the wheel
wrench until the spare tire can
be pulled out from under the
vehicle.
Page 323 of 406
Black plate (73,1)Chevrolet Express Owner Manual (GMNA-Localizing-U.S./Canada/Mexico-
6014662) - 2014 - crc - 8/26/13
Vehicle Care 10-73
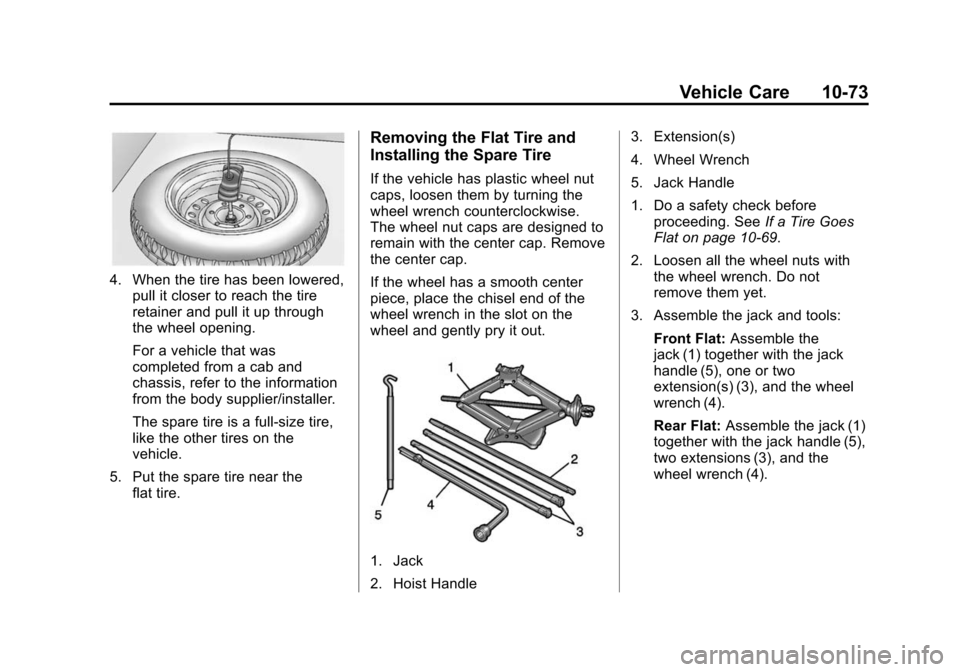
4. When the tire has been lowered,pull it closer to reach the tire
retainer and pull it up through
the wheel opening.
For a vehicle that was
completed from a cab and
chassis, refer to the information
from the body supplier/installer.
The spare tire is a full-size tire,
like the other tires on the
vehicle.
5. Put the spare tire near the flat tire.
Removing the Flat Tire and
Installing the Spare Tire
If the vehicle has plastic wheel nut
caps, loosen them by turning the
wheel wrench counterclockwise.
The wheel nut caps are designed to
remain with the center cap. Remove
the center cap.
If the wheel has a smooth center
piece, place the chisel end of the
wheel wrench in the slot on the
wheel and gently pry it out.
1. Jack
2. Hoist Handle 3. Extension(s)
4. Wheel Wrench
5. Jack Handle
1. Do a safety check before
proceeding. See If a Tire Goes
Flat on page 10-69.
2. Loosen all the wheel nuts with the wheel wrench. Do not
remove them yet.
3. Assemble the jack and tools: Front Flat: Assemble the
jack (1) together with the jack
handle (5), one or two
extension(s) (3), and the wheel
wrench (4).
Rear Flat: Assemble the jack (1)
together with the jack handle (5),
two extensions (3), and the
wheel wrench (4).
Page 325 of 406
Black plate (75,1)Chevrolet Express Owner Manual (GMNA-Localizing-U.S./Canada/Mexico-
6014662) - 2014 - crc - 8/26/13
Vehicle Care 10-75
{Warning
Raising the vehicle with the jack
improperly positioned can
damage the vehicle and even
make the vehicle fall. To help
avoid personal injury and vehicle
damage, be sure to fit the jack lift
head into the proper location
before raising the vehicle.
5. Turn the wheel wrench clockwise to raise the vehicle.
Raise the vehicle far enough off
the ground so there is enough
room for the spare tire to fit.
6. Remove all the wheel nuts.
7. Take the flat tire off of themounting surface.
{Warning
Rust or dirt on a wheel, or on the
parts to which it is fastened, can
make wheel nuts become loose
after time. The wheel could come
off and cause an accident. When
changing a wheel, remove any
rust or dirt from places where the
(Continued)
Warning (Continued)
wheel attaches to the vehicle. In
an emergency, a cloth or a paper
towel can be used; however, use
a scraper or wire brush later to
remove all rust or dirt.
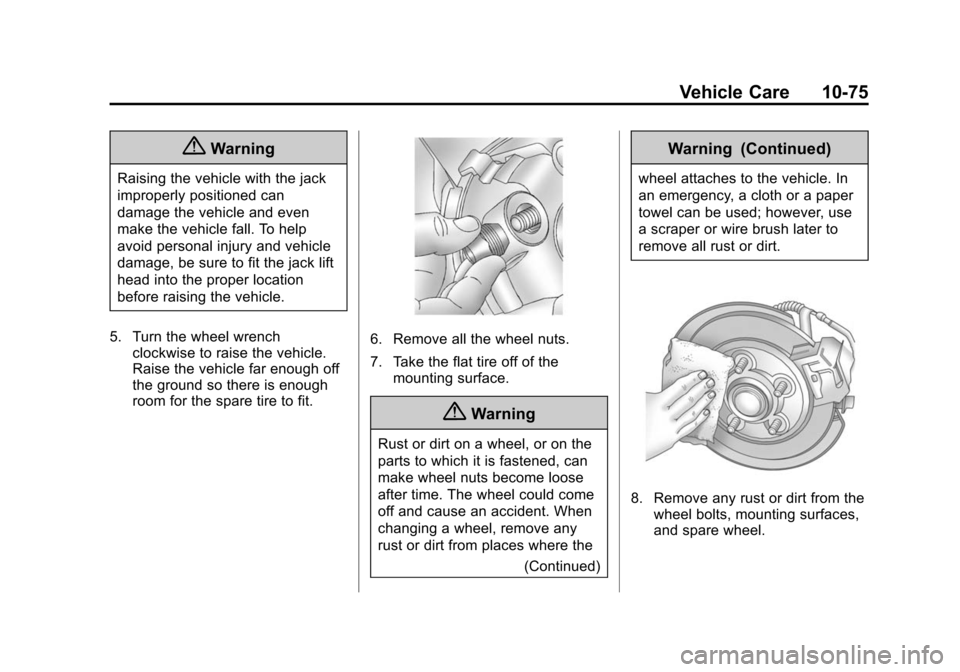
8. Remove any rust or dirt from thewheel bolts, mounting surfaces,
and spare wheel.
Page 328 of 406
Black plate (78,1)Chevrolet Express Owner Manual (GMNA-Localizing-U.S./Canada/Mexico-
6014662) - 2014 - crc - 8/26/13
10-78 Vehicle Care
Storing a Flat or Spare Tire
and Tools
{Warning
Storing a jack, a tire, or other
equipment in the passenger
compartment of the vehicle could
cause injury. In a sudden stop or
collision, loose equipment could
strike someone. Store all these in
the proper place.
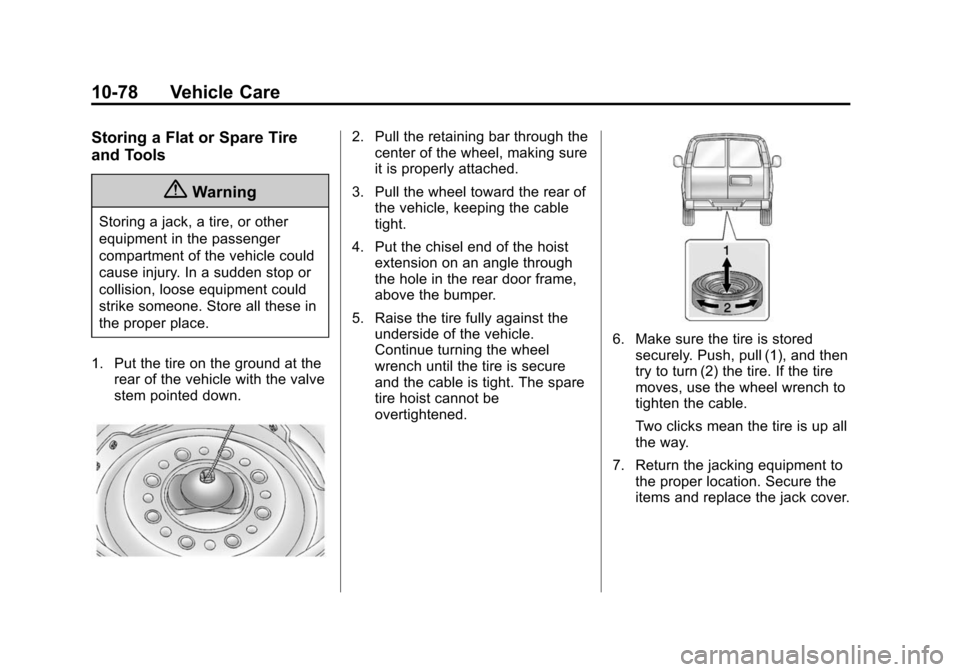
1. Put the tire on the ground at the rear of the vehicle with the valve
stem pointed down.
2. Pull the retaining bar through thecenter of the wheel, making sure
it is properly attached.
3. Pull the wheel toward the rear of the vehicle, keeping the cable
tight.
4. Put the chisel end of the hoist extension on an angle through
the hole in the rear door frame,
above the bumper.
5. Raise the tire fully against the underside of the vehicle.
Continue turning the wheel
wrench until the tire is secure
and the cable is tight. The spare
tire hoist cannot be
overtightened.
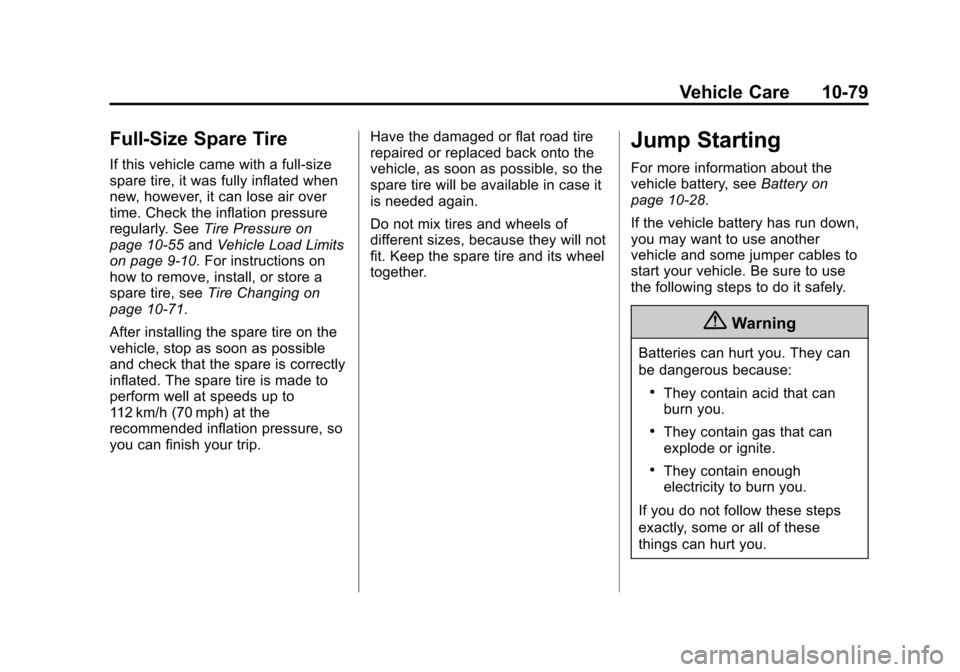
6. Make sure the tire is storedsecurely. Push, pull (1), and then
try to turn (2) the tire. If the tire
moves, use the wheel wrench to
tighten the cable.
Two clicks mean the tire is up all
the way.
7. Return the jacking equipment to the proper location. Secure the
items and replace the jack cover.
Page 329 of 406
Black plate (79,1)Chevrolet Express Owner Manual (GMNA-Localizing-U.S./Canada/Mexico-
6014662) - 2014 - crc - 8/26/13
Vehicle Care 10-79
Full-Size Spare Tire
If this vehicle came with a full-size
spare tire, it was fully inflated when
new, however, it can lose air over
time. Check the inflation pressure
regularly. SeeTire Pressure on
page 10-55 andVehicle Load Limits
on page 9-10. For instructions on
how to remove, install, or store a
spare tire, see Tire Changing on
page 10-71.
After installing the spare tire on the
vehicle, stop as soon as possible
and check that the spare is correctly
inflated. The spare tire is made to
perform well at speeds up to
112 km/h (70 mph) at the
recommended inflation pressure, so
you can finish your trip. Have the damaged or flat road tire
repaired or replaced back onto the
vehicle, as soon as possible, so the
spare tire will be available in case it
is needed again.
Do not mix tires and wheels of
different sizes, because they will not
fit. Keep the spare tire and its wheel
together.
Jump Starting
For more information about the
vehicle battery, see
Battery on
page 10-28.
If the vehicle battery has run down,
you may want to use another
vehicle and some jumper cables to
start your vehicle. Be sure to use
the following steps to do it safely.
{Warning
Batteries can hurt you. They can
be dangerous because:
.They contain acid that can
burn you.
.They contain gas that can
explode or ignite.
.They contain enough
electricity to burn you.
If you do not follow these steps
exactly, some or all of these
things can hurt you.
Page 374 of 406
Black plate (6,1)Chevrolet Express Owner Manual (GMNA-Localizing-U.S./Canada/Mexico-
6014662) - 2014 - crc - 8/26/13
13-6 Customer Information
.Model, year, color, and license
plate number of the vehicle.
.Odometer reading, Vehicle
Identification Number (VIN), and
delivery date of the vehicle.
.Description of the problem.
Coverage
Services are provided up to 5 years/
160 000 km (100,000 mi), whichever
comes first.
In the U.S., anyone driving the
vehicle is covered. In Canada, a
person driving the vehicle without
permission from the owner is not
covered.
Roadside Assistance is not a part of
the New Vehicle Limited Warranty.
Chevrolet and General Motors of
Canada Limited reserve the right to
make any changes or discontinue
the Roadside Assistance program at
any time without notification.Chevrolet and General Motors of
Canada Limited reserve the right to
limit services or payment to an
owner or driver if they decide the
claims are made too often, or the
same type of claim is made many
times.
Services Provided
.Emergency Fuel Delivery:
Delivery of enough fuel for the
vehicle to get to the nearest
service station.
.Lock-Out Service:
Service to
unlock the vehicle if you are
locked out. A remote unlock may
be available if you have OnStar.
For security reasons, the driver
must present identification
before this service is given.
.Emergency Tow from a Public
Road or Highway: Tow to the
nearest Chevrolet dealer for
warranty service, or if the vehicle
was in a crash and cannot be
driven. Assistance is also given
when the vehicle is stuck in the
sand, mud, or snow.
.Flat Tire Change: Service to
change a flat tire with the spare
tire. The spare tire, if equipped,
must be in good condition and
properly inflated. It is the owner's
responsibility for the repair or
replacement of the tire if it is not
covered by the warranty.
.Battery Jump Start: Service to
jump start a dead battery.
Services Not Included in
Roadside Assistance
.Impound towing caused by
violation of any laws.
.Legal fines.
.Mounting, dismounting,
or changing of snow tires,
chains, or other traction devices.
.Towing or services for vehicles
driven on a non-public road or
highway.
Page 399 of 406

Black plate (5,1)Chevrolet Express Owner Manual (GMNA-Localizing-U.S./Canada/Mexico-
6014662) - 2014 - crc - 8/26/13
INDEX i-5
Fuel . . . . . . . . . . . . . . . . . . . . . . . . . . . 9-42Additives . . . . . . . . . . . . . . . . . . . . . 9-44
Economy Driving . . . . . . . . . . . . . 1-19
Filling a Portable Fuel
Container . . . . . . . . . . . . . . . . . . . 9-47
Filling the Tank . . . . . . . . . . . . . . . 9-45
Foreign Countries . . . . . . . . . . . . 9-44
Gasoline Specifications . . . . . . . 9-44
Gauge . . . . . . . . . . . . . . . . . . . . . . . . 5-11
Low Fuel Warning Light . . . . . . . 5-24
Recommended . . . . . . . . . . . . . . . 9-43
Requirements, California . . . . . 9-44
System Messages . . . . . . . . . . . . 5-33
Full-Size Spare Tire . . . . . . . . . . 10-79
Fuses Engine Compartment
Fuse Block . . . . . . . . . . . . . . . . 10-40
Floor Console Fuse Block . . 10-43
Fuses and Circuit Breakers . . . . . . . . . . . . . . . . . . 10-40G
GasolineSpecifications . . . . . . . . . . . . . . . . . 9-44
Gauges Engine CoolantTemperature . . . . . . . . . . . . . . . . 5-13
Engine Oil Pressure . . . . . . . . . . 5-12
Fuel . . . . . . . . . . . . . . . . . . . . . . . . . . 5-11
Odometer . . . . . . . . . . . . . . . . . . . . . 5-11
Speedometer . . . . . . . . . . . . . . . . . 5-11
Trip Odometer . . . . . . . . . . . . . . . . 5-11
Voltmeter . . . . . . . . . . . . . . . . . . . . . 5-14
Warning Lights and
Indicators . . . . . . . . . . . . . . . . . . . . 5-9
General Information Service and Maintenance . . . . . 11-1
Towing . . . . . . . . . . . . . . . . . . . . . . . . 9-48
Vehicle Care . . . . . . . . . . . . . . . . . . 10-2
Glass, Enhanced Technology . . . . . . . . . . . . . . . . . . . 2-16
GM Mobility Reimbursement Program . . . . . . . . . . . . . . . . . . . . . . 13-5
H
Halogen Bulbs . . . . . . . . . . . . . . . . 10-34
Hazard Warning Flashers . . . . . . . 6-4
Head Restraints . . . . . . . . . . . . . . . . 3-2
Headlamps . . . . . . . . . . . . . . . . . . . 10-34Aiming . . . . . . . . . . . . . . . . . . . . . . 10-33
Automatic . . . . . . . . . . . . . . . . . . . . . . 6-3
Bulb Replacement . . . . . . . . . . 10-34
Daytime RunningLamps (DRL) . . . . . . . . . . . . . . . . . 6-2
Flash-to-Pass . . . . . . . . . . . . . . . . . . 6-2
High-Beam On Light . . . . . . . . . . 5-25
High/Low Beam Changer . . . . . . 6-2
Heated Mirrors . . . . . . . . . . . . . . . . . 2-13
Heater Engine . . . . . . . . . . . . . . . . . . . . . . . . 9-19
Heating and Air Conditioning . . . 8-1
High-Beam On Light . . . . . . . . . . . 5-25
Highway Hypnosis . . . . . . . . . . . . . . 9-6
Hill and Mountain Roads . . . . . . . . 9-7
Hood . . . . . . . . . . . . . . . . . . . . . . . . . . 10-4
Horn . . . . . . . . . . . . . . . . . . . . . . . . . . . . 5-3
How to Wear Safety Belts Properly . . . . . . . . . . . . . . . . . . . . . . . 3-9
Page 404 of 406

Black plate (10,1)Chevrolet Express Owner Manual (GMNA-Localizing-U.S./Canada/Mexico-
6014662) - 2014 - crc - 8/26/13
i-10 INDEX
ServiceAccessories and
Modifications . . . . . . . . . . . . . . . . 10-3
Doing Your Own Work . . . . . . . . 10-4
Engine Soon Light . . . . . . . . . . . . 5-19
Maintenance Records . . . . . . .11-15
Maintenance, General Information . . . . . . . . . . . . . . . . . . 11-1
Parts Identification Label . . . . . 12-1
Publications Ordering Information . . . . . . . . . . . . . . . . .13-11
Scheduling Appointments . . . . . 13-7
Vehicle Messages . . . . . . . . . . . . 5-36
Servicing the Airbag . . . . . . . . . . . 3-30
Shift Lock Control Function Check, Automatic
Transmission . . . . . . . . . . . . . . . . 10-32
Shifting Into Park . . . . . . . . . . . . . . . . . . . . . . 9-20
Out of Park . . . . . . . . . . . . . . . . . . . 9-21
Side Door . . . . . . . . . . . . . . . . . . . . . . 2-8
Sidemarker
Bulb Replacement . . . . . . . . . . 10-36
Signals, Turn and Lane-Change . . . . . . . . . . . . . . . . . 6-4
Sliding Door . . . . . . . . . . . . . . . . . . . . 2-9 Specifications and
Capacities . . . . . . . . . . . . . . . . . . . . 12-2
Speedometer . . . . . . . . . . . . . . . . . . 5-11
StabiliTrak OFF Light . . . . . . . . . . . . . . . . . . . . . 5-22
Start Vehicle, Remote . . . . . . . . . . 2-4
Starter Switch Check . . . . . . . . . 10-31
Starting the Engine . . . . . . . . . . . . 9-17
Steering . . . . . . . . . . . . . . . . . . . . . . . . 9-4 Fluid, Power . . . . . . . . . . . . . . . . 10-24
Wheel Adjustment . . . . . . . . . . . . . 5-2
Wheel Controls . . . . . . . . . . . . . . . . 5-2
Storage Areas Front . . . . . . . . . . . . . . . . . . . . . . . . . . 4-1
Storage Compartments . . . . . . . . . 4-1
Stuck Vehicle . . . . . . . . . . . . . . . . . . . 9-9
Sun Visors . . . . . . . . . . . . . . . . . . . . . 2-17
Swing-out Windows . . . . . . . . . . . . 2-15
Switches Airbag On-Off . . . . . . . . . . . . . . . . . 3-22
Symbols . . . . . . . . . . . . . . . . . . . . . . . . . . iv
System
Infotainment . . . . . . . . . . . . . . . . . . . 7-1
Noise Control . . . . . . . . . . . . . . . 10-30T
Taillamps . . . . . . . . . . . . . . . . . . . . . 10-36
Text Telephone (TTY) Users . . . 13-4
Theft-Deterrent Systems . . . . . . . 2-11Immobilizer . . . . . . . . . . . . . . . . . . . 2-11
Time . . . . . . . . . . . . . . . . . . . . . . . . . . . . 5-6
Tires All-Terrain . . . . . . . . . . . . . . . . . . 10-48
Buying New Tires . . . . . . . . . . . 10-64
Chains . . . . . . . . . . . . . . . . . . . . . . 10-68
Changing . . . . . . . . . . . . . . . . . . . 10-71
Designations . . . . . . . . . . . . . . . 10-51
Different Size . . . . . . . . . . . . . . . 10-65
Dual Rotation . . . . . . . . . . . . . . . 10-62
Full-Size Spare . . . . . . . . . . . . . 10-79
If a Tire Goes Flat . . . . . . . . . . 10-69
Inflation Monitor System . . . . 10-57
Inspection . . . . . . . . . . . . . . . . . . 10-61
Messages . . . . . . . . . . . . . . . . . . . . 5-37
Pressure Light . . . . . . . . . . . . . . . . 5-23
Pressure Monitor System . . . 10-56
Rotation . . . . . . . . . . . . . . . . . . . . 10-61
Sidewall Labeling . . . . . . . . . . . 10-48
Terminology andDefinitions . . . . . . . . . . . . . . . . . 10-52