air condition CHEVROLET EXPRESS PASSANGER 2016 1.G Owner's Manual
[x] Cancel search | Manufacturer: CHEVROLET, Model Year: 2016, Model line: EXPRESS PASSANGER, Model: CHEVROLET EXPRESS PASSANGER 2016 1.GPages: 379, PDF Size: 5.15 MB
Page 223 of 379
Black plate (44,1)Chevrolet Express Owner Manual (GMNA-Localizing-U.S./Canada/Mexico-
7707481) - 2015 - CRC - 4/30/14
9-44 Driving and Operating
Trailer Towing
General Towing
Information
Only use towing equipment that has
been designed for the vehicle.
Contact your dealer or trailering
dealer for assistance with preparing
the vehicle for towing a trailer. Read
the entire section before towing a
trailer.
For towing a disabled vehicle, see
Towing the Vehicle on page 10-78.
For towing the vehicle behind
another vehicle such as a motor
home, seeRecreational Vehicle
Towing on page 10-78.
Driving Characteristics
and Towing Tips
Driving with a Trailer
When towing a trailer:
.Become familiar with the state
and local laws that apply to
trailer towing.
.Do not tow a trailer during the
first 800 km (500 mi) to prevent
damage to the engine, axle,
or other parts.
.Then during the first 800 km
(500 mi) of trailer towing, do not
drive over 80 km/h (50 mph) and
do not make starts at full throttle.
.Vehicles can tow in D (Drive).
Shift the transmission to a lower
gear if the transmission shifts
too often under heavy loads and/
or hilly conditions.
.Turn off Park Assist when
towing.
{Warning
When towing a trailer, exhaust
gases may collect at the rear of
the vehicle and enter if the
liftgate, trunk/hatch, or rear-most
window is open.
When towing a trailer:
.Do not drive with the liftgate,
trunk/hatch, or rear-most
window open.
.Fully open the air outlets on
or under the instrument
panel.
.Also adjust the climate
control system to a setting
that brings in only outside air.
See “Climate Control
Systems” in the Index.
For more information about
Carbon Monoxide, see Engine
Exhaust on page 9-21.
Page 242 of 379
Black plate (9,1)Chevrolet Express Owner Manual (GMNA-Localizing-U.S./Canada/Mexico-
7707481) - 2015 - CRC - 4/30/14
Vehicle Care 10-9
For the oil life system to work
properly, the system must be reset
every time the oil is changed.
When the system has calculated
that oil life has been diminished, it
indicates that an oil change is
necessary. A CHANGE ENGINE
OIL SOON message comes on. See
Engine Oil Messages on page 5-31.
Change the oil as soon as possible
within the next 1 000 km (600 mi).
It is possible that, if driving under
the best conditions, the oil life
system might indicate that an oil
change is not necessary for up to a
year. The engine oil and filter must
be changed at least once a year
and, at this time, the system must
be reset. Your dealer has trained
service people who will perform this
work and reset the system. It is also
important to check the oil regularly
over the course of an oil drain
interval and keep it at the proper
level.If the system is ever reset
accidentally, the oil must be
changed at 5 000 km (3,000 mi)
since the last oil change.
Remember to reset the oil life
system whenever the oil is changed.
How to Reset the Engine Oil
Life System
Reset the system whenever the
engine oil is changed so that the
system can calculate the next
engine oil change. To reset the
system:
1. Turn the ignition key to ON/RUN
with the engine off.
2. Fully press and release the accelerator pedal slowly three
times within five seconds.
3. Turn the key to LOCK/OFF.
If the CHANGE ENGINE OIL SOON
message comes back on when the
vehicle is started, the engine oil life
system has not reset. Repeat the
procedure.
Automatic Transmission
Fluid
When to Check and Change
Automatic Transmission Fluid
It is usually not necessary to check
the transmission fluid level. The only
reason for fluid loss is a
transmission leak or overheated
transmission. If a small leak is
suspected, use the following
procedures to check the fluid level.
However, if there is a large leak, it
may be necessary to have the
vehicle towed to a dealer and have
it repaired before driving the vehicle
further.
Change the fluid and filter at the
intervals listed in Maintenance
Schedule on page 11-3, and be sure
to use the transmission fluid listed in
Recommended Fluids and
Lubricants on page 11-11.
Page 244 of 379
Black plate (11,1)Chevrolet Express Owner Manual (GMNA-Localizing-U.S./Canada/Mexico-
7707481) - 2015 - CRC - 4/30/14
Vehicle Care 10-11
Because the vehicle is equipped
with a high-efficiency air-to-oil
cooler, the transmission fluid
temperature may not reach the
required hot fluid level checking
temperature under normal lightly
loaded driving vehicle conditions.
Checking the Fluid Level
Prepare the vehicle:
1. Park the vehicle on a levelplace. Keep the engine running.
2. With the parking brake applied, place the shift lever in P (Park).
3. With a foot on the brake pedal, move the shift lever through
each gear range, pausing for
about three seconds in each
range. When M is reached,
move the selector from M1
through M3. Then, position the
shift lever in P (Park).
4. Let the engine run at idle for two minutes or more.
Then, without shutting off the
engine, use the steps that follow.
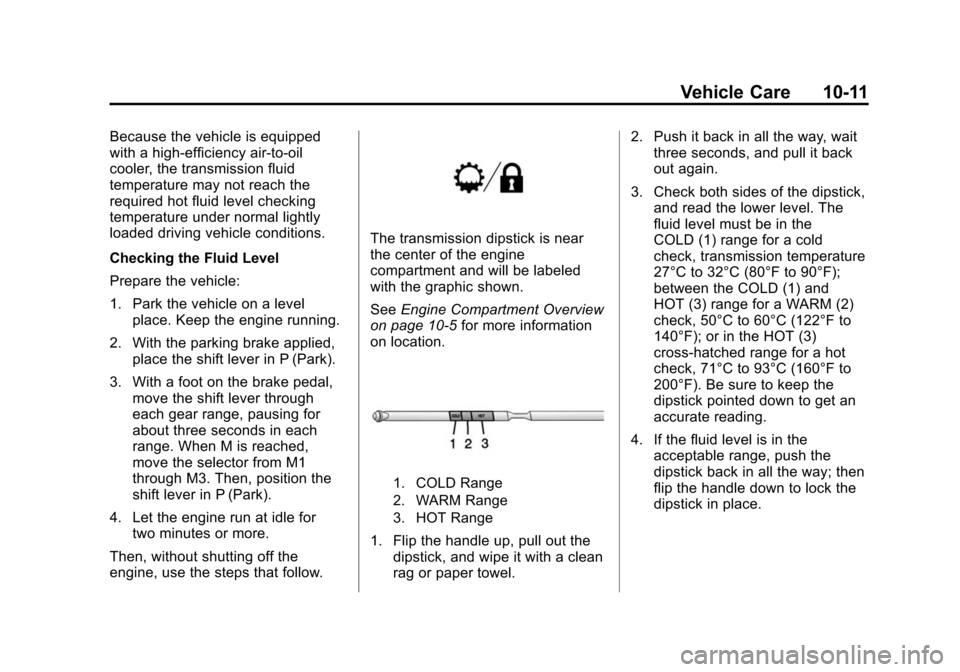
The transmission dipstick is near
the center of the engine
compartment and will be labeled
with the graphic shown.
See Engine Compartment Overview
on page 10-5 for more information
on location.
1. COLD Range
2. WARM Range
3. HOT Range
1. Flip the handle up, pull out the dipstick, and wipe it with a clean
rag or paper towel. 2. Push it back in all the way, wait
three seconds, and pull it back
out again.
3. Check both sides of the dipstick, and read the lower level. The
fluid level must be in the
COLD (1) range for a cold
check, transmission temperature
27°C to 32°C (80°F to 90°F);
between the COLD (1) and
HOT (3) range for a WARM (2)
check, 50°C to 60°C (122°F to
140°F); or in the HOT (3)
cross-hatched range for a hot
check, 71°C to 93°C (160°F to
200°F). Be sure to keep the
dipstick pointed down to get an
accurate reading.
4. If the fluid level is in the acceptable range, push the
dipstick back in all the way; then
flip the handle down to lock the
dipstick in place.
Page 245 of 379
Black plate (12,1)Chevrolet Express Owner Manual (GMNA-Localizing-U.S./Canada/Mexico-
7707481) - 2015 - CRC - 4/30/14
10-12 Vehicle Care
How to Add Automatic
Transmission Fluid
Refer toRecommended Fluids and
Lubricants on page 11-11 to
determine what kind of transmission
fluid to use.
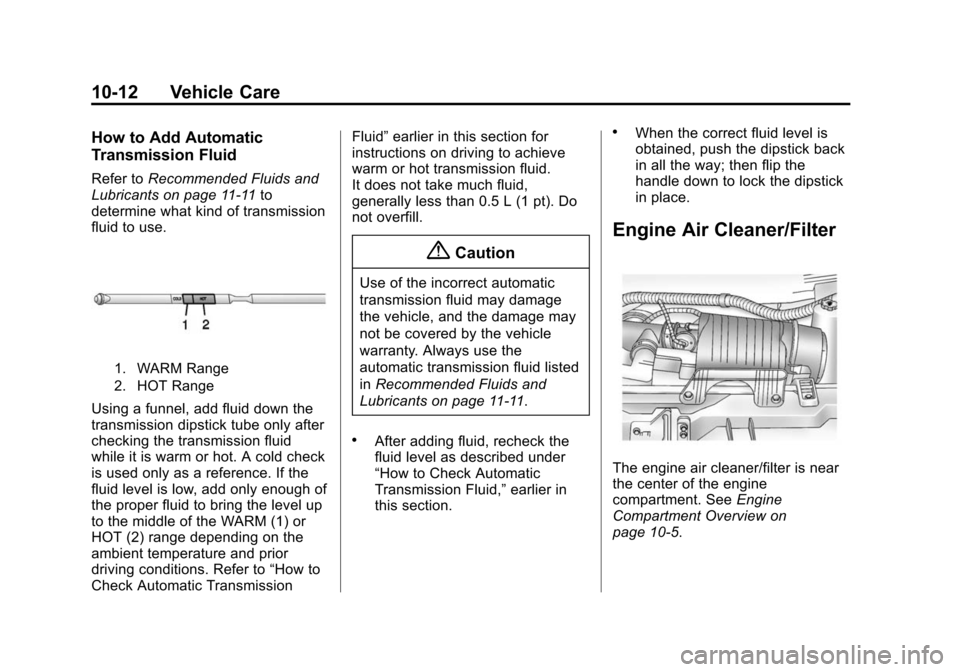
1. WARM Range
2. HOT Range
Using a funnel, add fluid down the
transmission dipstick tube only after
checking the transmission fluid
while it is warm or hot. A cold check
is used only as a reference. If the
fluid level is low, add only enough of
the proper fluid to bring the level up
to the middle of the WARM (1) or
HOT (2) range depending on the
ambient temperature and prior
driving conditions. Refer to “How to
Check Automatic Transmission Fluid”
earlier in this section for
instructions on driving to achieve
warm or hot transmission fluid.
It does not take much fluid,
generally less than 0.5 L (1 pt). Do
not overfill.
{Caution
Use of the incorrect automatic
transmission fluid may damage
the vehicle, and the damage may
not be covered by the vehicle
warranty. Always use the
automatic transmission fluid listed
in Recommended Fluids and
Lubricants on page 11-11.
.After adding fluid, recheck the
fluid level as described under
“How to Check Automatic
Transmission Fluid,” earlier in
this section.
.When the correct fluid level is
obtained, push the dipstick back
in all the way; then flip the
handle down to lock the dipstick
in place.
Engine Air Cleaner/Filter
The engine air cleaner/filter is near
the center of the engine
compartment. See Engine
Compartment Overview on
page 10-5.
Page 246 of 379
Black plate (13,1)Chevrolet Express Owner Manual (GMNA-Localizing-U.S./Canada/Mexico-
7707481) - 2015 - CRC - 4/30/14
Vehicle Care 10-13
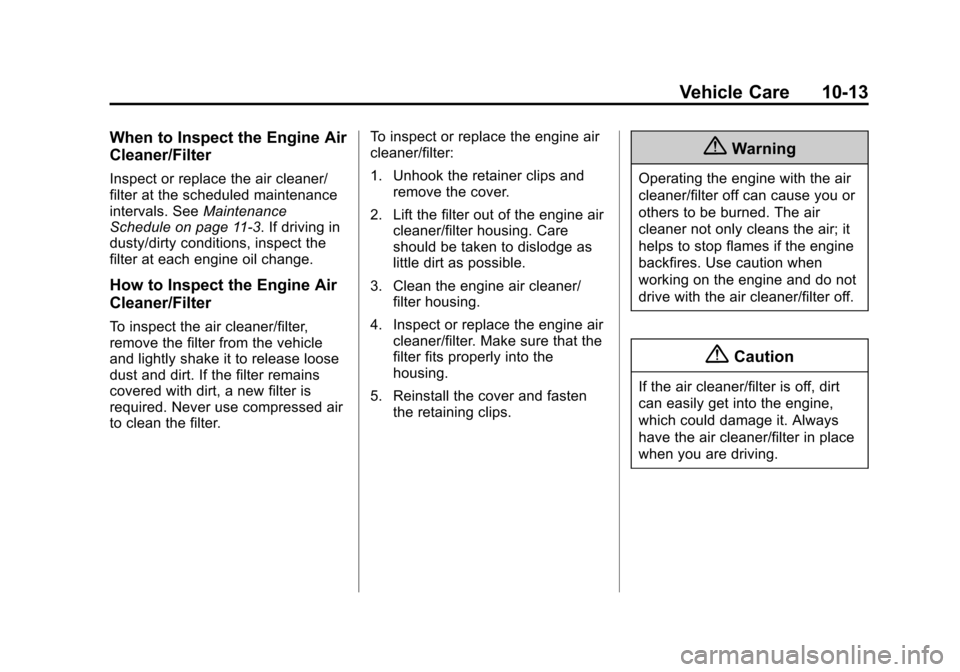
When to Inspect the Engine Air
Cleaner/Filter
Inspect or replace the air cleaner/
filter at the scheduled maintenance
intervals. SeeMaintenance
Schedule on page 11-3. If driving in
dusty/dirty conditions, inspect the
filter at each engine oil change.
How to Inspect the Engine Air
Cleaner/Filter
To inspect the air cleaner/filter,
remove the filter from the vehicle
and lightly shake it to release loose
dust and dirt. If the filter remains
covered with dirt, a new filter is
required. Never use compressed air
to clean the filter. To inspect or replace the engine air
cleaner/filter:
1. Unhook the retainer clips and
remove the cover.
2. Lift the filter out of the engine air cleaner/filter housing. Care
should be taken to dislodge as
little dirt as possible.
3. Clean the engine air cleaner/ filter housing.
4. Inspect or replace the engine air cleaner/filter. Make sure that the
filter fits properly into the
housing.
5. Reinstall the cover and fasten the retaining clips.
{Warning
Operating the engine with the air
cleaner/filter off can cause you or
others to be burned. The air
cleaner not only cleans the air; it
helps to stop flames if the engine
backfires. Use caution when
working on the engine and do not
drive with the air cleaner/filter off.
{Caution
If the air cleaner/filter is off, dirt
can easily get into the engine,
which could damage it. Always
have the air cleaner/filter in place
when you are driving.
Page 253 of 379
Black plate (20,1)Chevrolet Express Owner Manual (GMNA-Localizing-U.S./Canada/Mexico-
7707481) - 2015 - CRC - 4/30/14
10-20 Vehicle Care
If there is still no sign of steam,
push down the accelerator until the
engine speed is about twice as fast
as normal idle speed for at least
three minutes while parked. If the
warning is still on, turn off the
engine until it cools down.
If the decision is made not to lift the
hood, get service help right away.
Engine Fan
The vehicle has a clutched engine
cooling fan. When the clutch is
engaged, the fan spins faster to
provide more air to cool the engine.
In most everyday driving conditions,
the fan is spinning slower and the
clutch is not fully engaged. This
improves fuel economy and reduces
fan noise. Under heavy vehicle
loading, trailer towing, and/or high
outside temperatures, the fan speed
increases as the clutch more fully
engages, so an increase in fan
noise may be heard. This is normal
and should not be mistaken as the
transmission slipping or makingextra shifts. It is merely the cooling
system functioning properly. The fan
will slow down when additional
cooling is not required and the
clutch partially disengages.
This fan noise may be heard when
starting the engine. It will go away
as the fan clutch partially
disengages.
Power Steering Fluid
The power steering fluid reservoir is
in the engine compartment on the
driver side of the vehicle. See
Engine Compartment Overview on
page 10-5
for reservoir location.
When to Check Power Steering
Fluid
It is not necessary to regularly
check power steering fluid unless
there is a leak suspected in the
system or an unusual noise is
heard. A fluid loss in this system
could indicate a problem. Have the
system inspected and repaired.
How to Check Power Steering
Fluid
To check the power steering fluid:
1. Turn the key off and let the
engine compartment cool down.
2. Wipe the cap and the top of the reservoir clean.
3. Unscrew the cap and wipe the dipstick with a clean rag.
4. Replace the cap and completely tighten it.
5. Remove the cap again and look at the fluid level on the dipstick.
Page 255 of 379
Black plate (22,1)Chevrolet Express Owner Manual (GMNA-Localizing-U.S./Canada/Mexico-
7707481) - 2015 - CRC - 4/30/14
10-22 Vehicle Care
Brakes
This vehicle has disc brakes. Disc
brake pads have built-in wear
indicators that make a high-pitched
warning sound when the brake pads
are worn and new pads are needed.
The sound can come and go or be
heard all the time when the vehicle
is moving, except when applying the
brake pedal firmly.
{Warning
The brake wear warning sound
means that soon the brakes will
not work well. That could lead to
a crash. When the brake wear
warning sound is heard, have the
vehicle serviced.
{Caution
Continuing to drive with worn-out
brake pads could result in costly
brake repair.Some driving conditions or climates
can cause a brake squeal when the
brakes are first applied or lightly
applied. This does not mean
something is wrong with the brakes.
Properly torqued wheel nuts are
necessary to help prevent brake
pulsation. When tires are rotated,
inspect brake pads for wear and
evenly tighten wheel nuts in the
proper sequence to torque
specifications. See
Capacities and
Specifications on page 12-2.
Brake pads should be replaced as
complete sets.
Brake Pedal Travel
See your dealer if the brake pedal
does not return to normal height,
or if there is a rapid increase in
pedal travel. This could be a sign
that brake service might be
required.
Brake Adjustment
Every time the brakes are applied,
with or without the vehicle moving,
the brakes adjust for wear.
Replacing Brake System Parts
The braking system on a vehicle is
complex. Its many parts have to be
of top quality and work well together
if the vehicle is to have really good
braking. The vehicle was designed
and tested with top-quality brake
parts. When parts of the braking
system are replaced, be sure to get
new, approved replacement parts.
If this is not done, the brakes might
not work properly. For example,
installing disc brake pads that are
wrong for the vehicle, can change
the balance between the front and
rear brakes —for the worse. The
braking performance expected can
change in many other ways if the
wrong replacement brake parts are
installed.
Page 270 of 379
Black plate (37,1)Chevrolet Express Owner Manual (GMNA-Localizing-U.S./Canada/Mexico-
7707481) - 2015 - CRC - 4/30/14
Vehicle Care 10-37
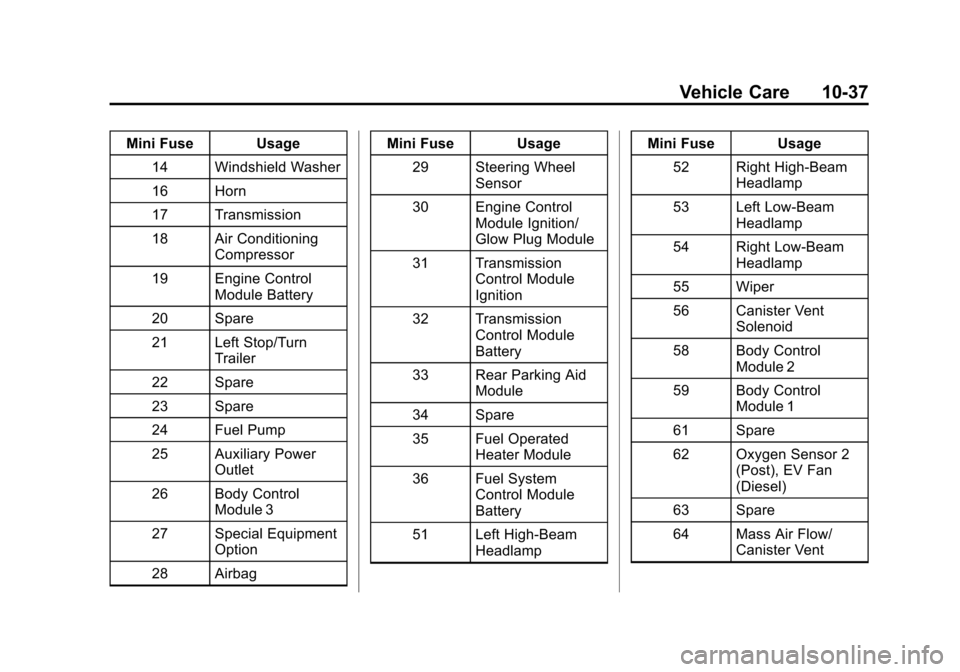
Mini Fuse Usage14 Windshield Washer
16 Horn
17 Transmission
18 Air Conditioning Compressor
19 Engine Control Module Battery
20 Spare
21 Left Stop/Turn Trailer
22 Spare
23 Spare
24 Fuel Pump
25 Auxiliary Power Outlet
26 Body Control Module 3
27 Special Equipment Option
28 Airbag Mini Fuse Usage
29 Steering Wheel Sensor
30 Engine Control Module Ignition/
Glow Plug Module
31 Transmission Control Module
Ignition
32 Transmission Control Module
Battery
33 Rear Parking Aid Module
34 Spare
35 Fuel Operated Heater Module
36 Fuel System Control Module
Battery
51 Left High-Beam Headlamp Mini Fuse Usage
52 Right High-Beam Headlamp
53 Left Low-Beam Headlamp
54 Right Low-Beam Headlamp
55 Wiper
56 Canister Vent Solenoid
58 Body Control Module 2
59 Body Control Module 1
61 Spare
62 Oxygen Sensor 2 (Post), EV Fan
(Diesel)
63 Spare
64 Mass Air Flow/ Canister Vent
Page 271 of 379
Black plate (38,1)Chevrolet Express Owner Manual (GMNA-Localizing-U.S./Canada/Mexico-
7707481) - 2015 - CRC - 4/30/14
10-38 Vehicle Care
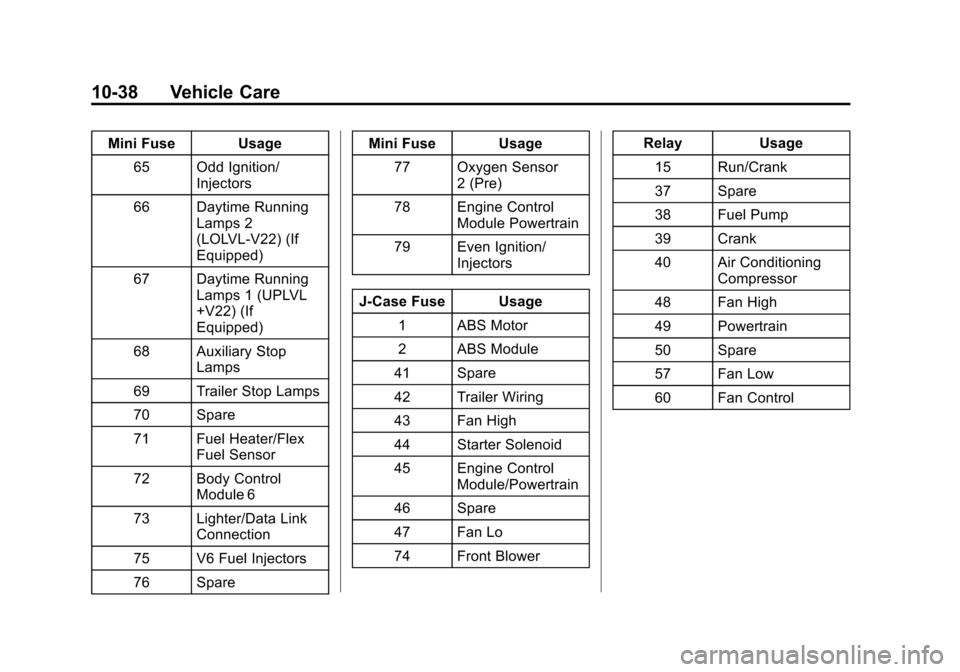
Mini Fuse Usage65 Odd Ignition/ Injectors
66 Daytime Running Lamps 2
(LOLVL-V22) (If
Equipped)
67 Daytime Running Lamps 1 (UPLVL
+V22) (If
Equipped)
68 Auxiliary Stop Lamps
69 Trailer Stop Lamps
70 Spare
71 Fuel Heater/Flex Fuel Sensor
72 Body Control Module 6
73 Lighter/Data Link Connection
75 V6 Fuel Injectors
76 Spare Mini Fuse Usage
77 Oxygen Sensor 2 (Pre)
78 Engine Control Module Powertrain
79 Even Ignition/ Injectors
J-Case Fuse Usage 1 ABS Motor
2 ABS Module
41 Spare
42 Trailer Wiring
43 Fan High
44 Starter Solenoid
45 Engine Control Module/Powertrain
46 Spare
47 Fan Lo
74 Front Blower Relay Usage
15 Run/Crank
37 Spare
38 Fuel Pump
39 Crank
40 Air Conditioning Compressor
48 Fan High
49 Powertrain
50 Spare
57 Fan Low
60 Fan Control
Page 273 of 379
Black plate (40,1)Chevrolet Express Owner Manual (GMNA-Localizing-U.S./Canada/Mexico-
7707481) - 2015 - CRC - 4/30/14
10-40 Vehicle Care
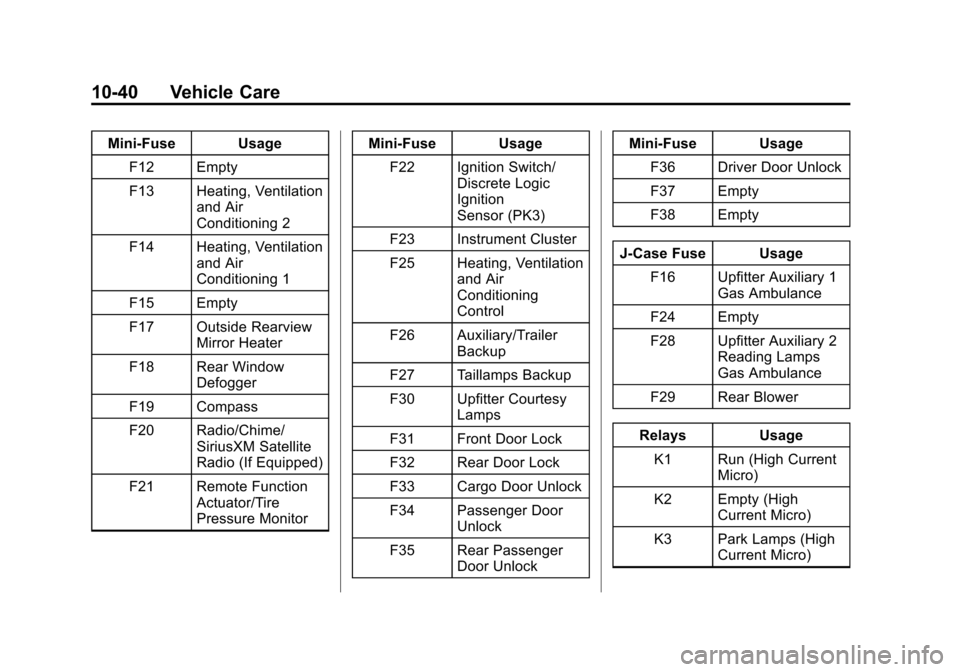
Mini-Fuse UsageF12 Empty
F13 Heating, Ventilation and Air
Conditioning 2
F14 Heating, Ventilation and Air
Conditioning 1
F15 Empty
F17 Outside Rearview Mirror Heater
F18 Rear Window Defogger
F19 Compass
F20 Radio/Chime/ SiriusXM Satellite
Radio (If Equipped)
F21 Remote Function Actuator/Tire
Pressure Monitor Mini-Fuse Usage
F22 Ignition Switch/ Discrete Logic
Ignition
Sensor (PK3)
F23 Instrument Cluster
F25 Heating, Ventilation and Air
Conditioning
Control
F26 Auxiliary/Trailer Backup
F27 Taillamps Backup
F30 Upfitter Courtesy Lamps
F31 Front Door Lock
F32 Rear Door Lock
F33 Cargo Door Unlock
F34 Passenger Door Unlock
F35 Rear Passenger Door Unlock Mini-Fuse Usage
F36 Driver Door Unlock
F37 Empty
F38 Empty
J-Case Fuse Usage F16 Upfitter Auxiliary 1 Gas Ambulance
F24 Empty
F28 Upfitter Auxiliary 2 Reading Lamps
Gas Ambulance
F29 Rear Blower
Relays Usage K1 Run (High Current Micro)
K2 Empty (High Current Micro)
K3 Park Lamps (High Current Micro)