air conditioning CHEVROLET HHR 2006 1.G Owners Manual
[x] Cancel search | Manufacturer: CHEVROLET, Model Year: 2006, Model line: HHR, Model: CHEVROLET HHR 2006 1.GPages: 394, PDF Size: 2.33 MB
Page 90 of 394
Remote Vehicle Start
Your vehicle may have a remote start feature. This
feature allows you to start the engine from outside the
vehicle. It may also start the vehicle’s heating or air
conditioning systems. SeeClimate Control System on
page 3-19for additional information.
Laws in some local communities may restrict the use of
remote starters. For example, some laws may require
a person using remote start to have the vehicle in
view when doing so. Check local regulations for any
requirements on remote starting of vehicles.
/(Remote Vehicle Start):If your vehicle has the
remote vehicle start feature, the remote keyless entry
transmitter will have a button with this symbol on it.
An increased range of operation is provided with
the remote keyless entry transmitter that has the remote
vehicle start button. The vehicle can be started from
approximately 197 feet (60 m) away. However, the
operating range may be less while the engine is running
and you will need to be closer to your vehicle to turn
it off than you were to turn it on.Do not use the remote start feature if your vehicle is
low on fuel. Your vehicle may run out of fuel.
To start the engine using the remote start feature,
do the following:
1. Aim the remote keyless entry transmitter at the
vehicle.
2. Press and release the transmitter’s lock button,
then immediately press and hold the remote
vehicle start button for four seconds or until the
vehicle’s turn signal lamps �ash. The vehicle’s
doors will be locked.
3. When the vehicle’s engine starts, the parking lamps
will turn on and remain on while the engine is
running.
After a remote start, the engine will automatically shut
off after 10 minutes unless a time extension has
been done or the vehicle’s key is inserted into the
ignition switch and turned to RUN.
The maximum number of remote starts between ignition
cycles with the key is two.
2-8
Page 151 of 394
Climate Controls
Climate Control System
With this system you can control the heating, cooling,
and ventilation for your vehicle.
If your vehicle has remote start and you want to warm
up or cool down the interior before you get in, leave your
climate control system on with the settings adjusted
where you want them. The next time the vehicle
is started with remote start, the climate control system
will come on and adjust the interior to the temperature
settings.
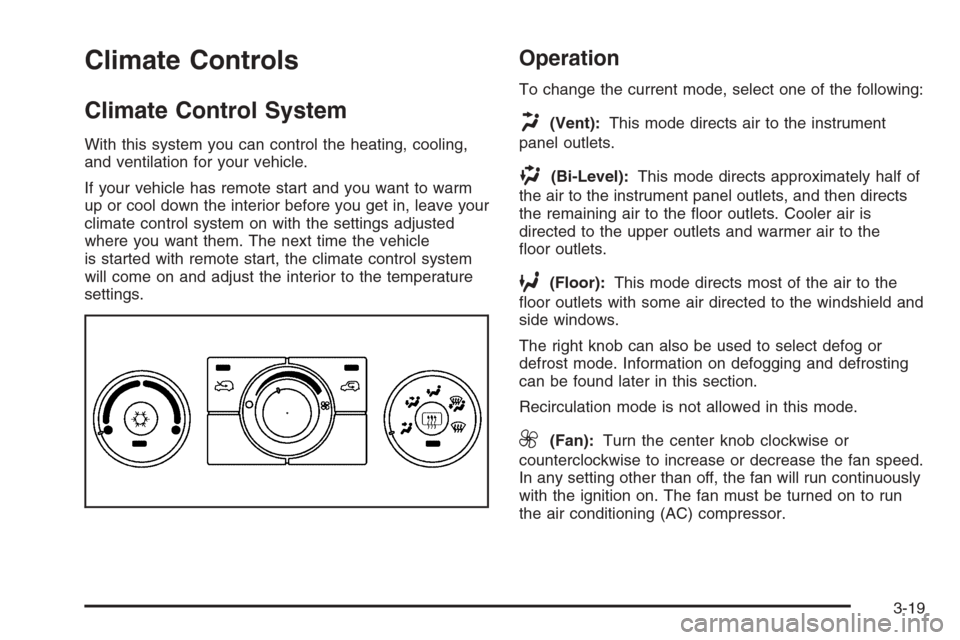
Operation
To change the current mode, select one of the following:
H(Vent):This mode directs air to the instrument
panel outlets.
)(Bi-Level):This mode directs approximately half of
the air to the instrument panel outlets, and then directs
the remaining air to the �oor outlets. Cooler air is
directed to the upper outlets and warmer air to the
�oor outlets.
6(Floor):This mode directs most of the air to the
�oor outlets with some air directed to the windshield and
side windows.
The right knob can also be used to select defog or
defrost mode. Information on defogging and defrosting
can be found later in this section.
Recirculation mode is not allowed in this mode.
9(Fan):Turn the center knob clockwise or
counterclockwise to increase or decrease the fan speed.
In any setting other than off, the fan will run continuously
with the ignition on. The fan must be turned on to run
the air conditioning (AC) compressor.
3-19
Page 152 of 394
9(Off):To turn the fan off, turn the knob all the way
counterclockwise to the off position.
Temperature Control:Turn the left knob clockwise or
counterclockwise to increase or decrease the
temperature inside your vehicle.
@(Recirculate):Press this button to prevent outside
air and odors from entering your vehicle or to help heat or
cool the air inside your vehicle more quickly. An indicator
light above the symbol will come on in this mode. The air
conditioning compressor also comes on. This mode is not
available for �oor, defog and defrost modes. When the
recirculation button is pressed, the recirculation indicator
light will �ash �ve times and outside air will be delivered.
Operation in this mode during periods of high humidity
and cool outside temperatures may result in increased
window fogging. If window fogging is experienced, select
the defrost mode.
;(Outside Air):Press this button to allow outside air
to circulate through your vehicle. An indicator light above
the symbol will come on in this mode.
#(Air Conditioning):Press this button to turn the
air conditioning system on or off. When this button
is pressed, an indicator light below the symbol will come
on to let you know the air conditioning is activated.On hot days, open the windows to let hot inside air
escape; then close them. This helps to reduce the time
it takes for your vehicle to cool down. It also helps
the system to operate more efficiently.
For quick cool down on hot days:
1. Select the vent mode.
2. Select the recirculation mode.
3. Select air conditioning.
4. Select the coolest temperature.
5. Select the highest fan speed.
Using these settings together for long periods of time
may cause the air inside of your vehicle to become too
dry. To prevent this from happening, after the air in
your vehicle has cooled, turn off the recirculation
by pressing the outside air button.
The air conditioning system removes moisture from the
air, so you may sometimes notice a small amount of
water dripping underneath your vehicle while idling
or after turning off the engine. This is normal.
The air conditioning compressor cannot be turned on
when the fan is off.
3-20
Page 153 of 394
Defogging and Defrosting
Fog on the inside of windows is a result of high humidity
(moisture) condensing on the cool window glass.
This can be minimized if the climate control system is
used properly. There are two modes to clear fog or
frost from your windshield and side windows. Use the
defog mode to clear the windows of fog or moisture
and warm the passengers. Use the defrost mode
to remove fog or frost from the windshield more quickly.
For best results, clear all snow and ice from the
windshield before defrosting.
Turn the right knob to select the defog or defrost mode.
-(Defog):This mode directs approximately half of
the air to the windshield and the side window outlets and
half to the �oor outlets. When you select this mode
the system runs the air conditioning compressor.
To defog the windows faster, turn the temperature
control knob clockwise to the warmest setting.
Recirculation mode is not available in defog mode.
0(Defrost):This mode directs most of the air to the
windshield, with some air directed to the side window
outlets and the �oor outlets. When you select this mode
the system runs the air conditioning compressor.
To defrost the windows faster, turn the temperature
control knob clockwise to the warmest setting.
Recirculation mode is not available in defog mode.
Rear Window Defogger
The rear window defogger uses a warming grid to
remove fog from the rear window.
The rear window defogger will only work when the
ignition is in RUN.
<(Rear):Press the button to turn the rear window
defogger on or off. Be sure to clear as much snow from
the rear window as possible. An indicator light below
the symbol will come on to let you know that the
rear window defogger is activated.
The rear window defogger will turn off approximately
15 minutes after the button is pressed. If turned on again,
the defogger will only run for approximately seven
minutes before turning off. If turned on again, the
defogger will only run for approximately seven minutes
before turning off. If vehicle speed is greater than
50 mph (80 km/h) and the rear defogger is active,
it will remain on as long as the speed is greater than
50 mph (80 km/h). The defogger can also be turned off by
pressing the button again or by turning off the engine.
Notice:Do not use anything sharp on the inside
of the rear window. If you do, you could cut or
damage the warming grid, and the repairs would not
be covered by your warranty. Do not attach a
temporary vehicle license, tape, a decal or anything
similar to the defogger grid.
3-21
Page 258 of 394
Driving on Grades
Notice:Do not tow on steep continuous grades
exceeding 6 miles (9.6 km). Extended, higher
than normal engine and transaxle temperatures may
result and damage your vehicle. Frequent stops
are very important to allow the engine and transaxle
to cool.
Reduce speed and shift to a lower gearbeforeyou start
down a long or steep downgrade. If you do not shift
down, you might have to use your brakes so much that
they would get hot and no longer work well.
Pay attention to the engine coolant gage. If the indicator
is in the red area, turn off the air conditioning to
reduce engine load. SeeEngine Overheating on
page 5-23.
Parking on Hills
{CAUTION:
You really should not park your vehicle, with a
trailer attached, on a hill. If something goes
wrong, your rig could start to move. People
can be injured, and both your vehicle and the
trailer can be damaged.
But if you ever have to park your rig on a hill, here is
how to do it:
1. Apply your regular brakes, but do not shift into
PARK (P) for an automatic transaxle, or into
gear for a manual transaxle. When parking uphill,
turn your wheels away from the curb. When parking
downhill, turn your wheels into the curb.
2. Have someone place chocks under the trailer
wheels.
4-46
Page 309 of 394
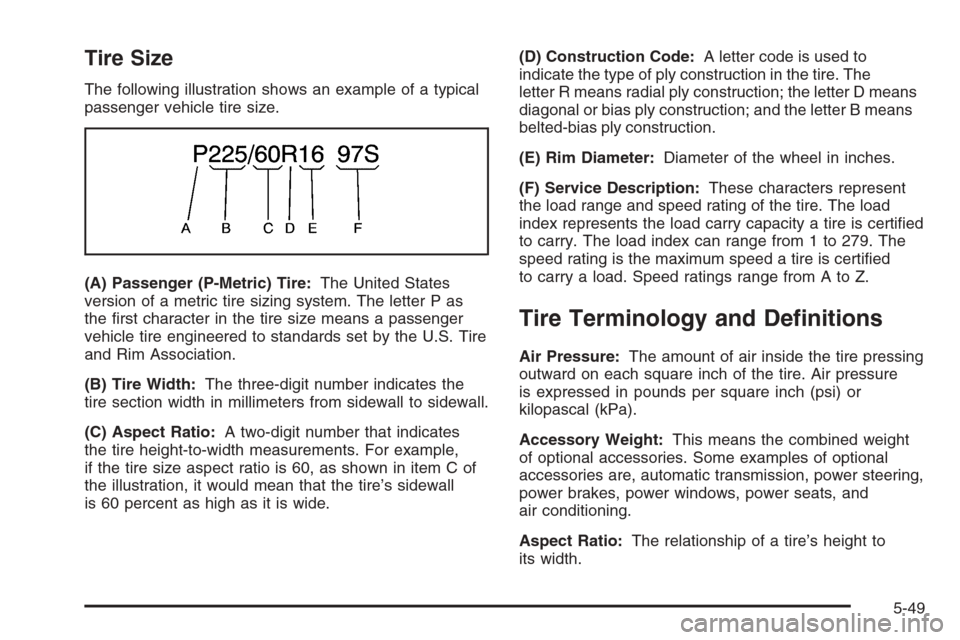
Tire Size
The following illustration shows an example of a typical
passenger vehicle tire size.
(A) Passenger (P-Metric) Tire:The United States
version of a metric tire sizing system. The letter P as
the �rst character in the tire size means a passenger
vehicle tire engineered to standards set by the U.S. Tire
and Rim Association.
(B) Tire Width:The three-digit number indicates the
tire section width in millimeters from sidewall to sidewall.
(C) Aspect Ratio:A two-digit number that indicates
the tire height-to-width measurements. For example,
if the tire size aspect ratio is 60, as shown in item C of
the illustration, it would mean that the tire’s sidewall
is 60 percent as high as it is wide.(D) Construction Code:A letter code is used to
indicate the type of ply construction in the tire. The
letter R means radial ply construction; the letter D means
diagonal or bias ply construction; and the letter B means
belted-bias ply construction.
(E) Rim Diameter:Diameter of the wheel in inches.
(F) Service Description:These characters represent
the load range and speed rating of the tire. The load
index represents the load carry capacity a tire is certi�ed
to carry. The load index can range from 1 to 279. The
speed rating is the maximum speed a tire is certi�ed
to carry a load. Speed ratings range from A to Z.
Tire Terminology and De�nitions
Air Pressure:The amount of air inside the tire pressing
outward on each square inch of the tire. Air pressure
is expressed in pounds per square inch (psi) or
kilopascal (kPa).
Accessory Weight:This means the combined weight
of optional accessories. Some examples of optional
accessories are, automatic transmission, power steering,
power brakes, power windows, power seats, and
air conditioning.
Aspect Ratio:The relationship of a tire’s height to
its width.
5-49
Page 346 of 394
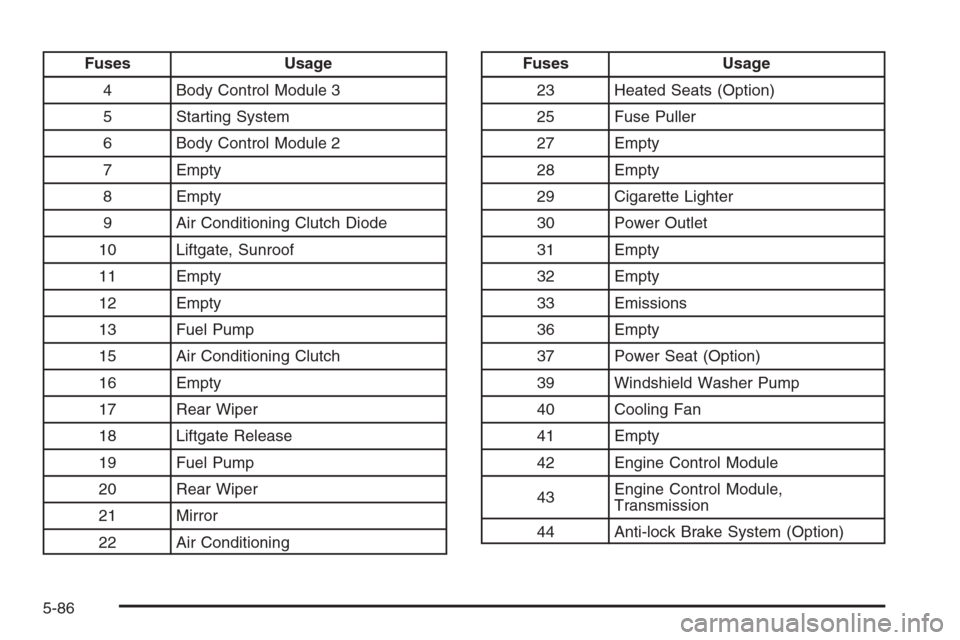
Fuses Usage
4 Body Control Module 3
5 Starting System
6 Body Control Module 2
7 Empty
8 Empty
9 Air Conditioning Clutch Diode
10 Liftgate, Sunroof
11 Empty
12 Empty
13 Fuel Pump
15 Air Conditioning Clutch
16 Empty
17 Rear Wiper
18 Liftgate Release
19 Fuel Pump
20 Rear Wiper
21 Mirror
22 Air ConditioningFuses Usage
23 Heated Seats (Option)
25 Fuse Puller
27 Empty
28 Empty
29 Cigarette Lighter
30 Power Outlet
31 Empty
32 Empty
33 Emissions
36 Empty
37 Power Seat (Option)
39 Windshield Washer Pump
40 Cooling Fan
41 Empty
42 Engine Control Module
43Engine Control Module,
Transmission
44 Anti-lock Brake System (Option)
5-86
Page 348 of 394
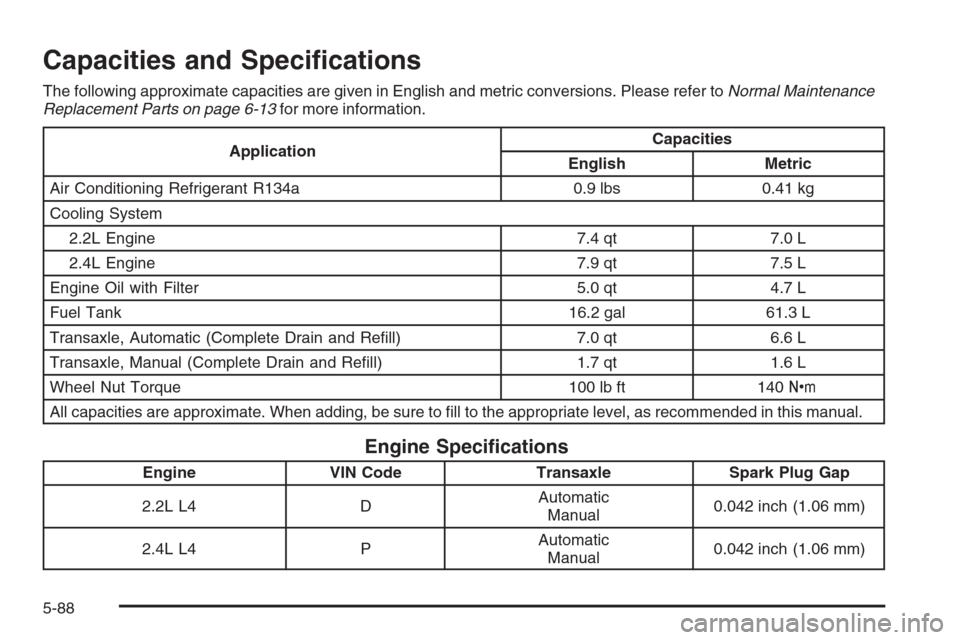
Capacities and Speci�cations
The following approximate capacities are given in English and metric conversions. Please refer toNormal Maintenance
Replacement Parts on page 6-13for more information.
ApplicationCapacities
English Metric
Air Conditioning Refrigerant R134a 0.9 lbs 0.41 kg
Cooling System
2.2L Engine 7.4 qt 7.0 L
2.4L Engine 7.9 qt 7.5 L
Engine Oil with Filter 5.0 qt 4.7 L
Fuel Tank 16.2 gal 61.3 L
Transaxle, Automatic (Complete Drain and Re�ll) 7.0 qt 6.6 L
Transaxle, Manual (Complete Drain and Re�ll) 1.7 qt 1.6 L
Wheel Nut Torque 100 lb ft 140Y
All capacities are approximate. When adding, be sure to �ll to the appropriate level, as recommended in this manual.
Engine Speci�cations
Engine VIN Code Transaxle Spark Plug Gap
2.2L L4 DAutomatic
Manual0.042 inch (1.06 mm)
2.4L L4 PAutomatic
Manual0.042 inch (1.06 mm)
5-88
Page 355 of 394

Maintenance Footnotes
(a)Visually inspect brake lines and hoses for proper
hook-up, binding, leaks, cracks, chafing, etc. Inspect
disc brake pads for wear and rotors for surface
condition. Inspect drum brake linings/shoes for wear
or cracks. Inspect other brake parts, including drums,
wheel cylinders, calipers, parking brake, etc.
(b)Visually inspect front and rear suspension and
steering system for damaged, loose, or missing parts
or signs of wear. Inspect power steering cables for
proper hook-up, binding, cracks, chafing, etc.
(c)Visually inspect hoses and have them replaced if they
are cracked, swollen, or deteriorated. Inspect all pipes,
fittings, and clamps; replace with genuine GM parts as
needed. To help ensure proper operation, a pressure
test of the cooling system and pressure cap and cleaning
the outside of the radiator and air conditioning condenser
is recommended at least once a year.
(d)Visually inspect wiper blades for wear or cracking.
Replace wiper blades that appear worn or damaged
or that streak or miss areas of the windshield.
(e)Make sure the safety belt reminder light and all
belts, buckles, latch plates, retractors, and anchorages
are working properly. Look for any other loose or
damaged safety belt system parts. If you see anything
that might keep a safety belt system from doing its
job, have it repaired. Have any torn or frayed safety
belts replaced.Also look for any opened or broken airbag coverings,
and have them repaired or replaced. The airbag system
does not need regular maintenance.
(f)Lubricate all key lock cylinders, door hinges and
latches, hood hinges and latches, and trunk lid hinges
and latches. More frequent lubrication may be required
when exposed to a corrosive environment. Applying
silicone grease on weatherstrips with a clean cloth will
make them last longer, seal better, and not stick or
squeak.
(g)Check system for interference or binding and for
damaged or missing parts. Replace parts as needed.
Replace any components that have high effort or
excessive wear. Do not lubricate accelerator or cruise
control cables.
(h)Change automatic transaxle fluid and filter if the
vehicle is mainly driven under one or more of these
conditions:
�In heavy city traffic where the outside temperature
regularly reaches 90°F (32°C) or higher.
�In hilly or mountainous terrain.
�When doing frequent trailer towing.
�Uses such as found in taxi, police, or delivery
service.
If you do not use your vehicle under any of these
conditions, the fluid and filter do not require changing.
6-7
Page 381 of 394
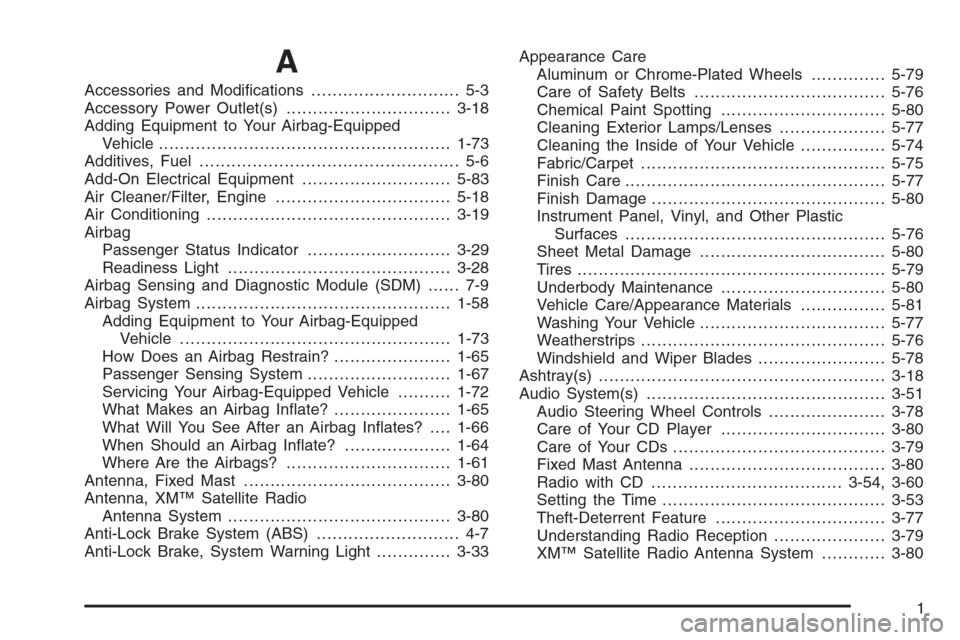
A
Accessories and Modi�cations............................ 5-3
Accessory Power Outlet(s)...............................3-18
Adding Equipment to Your Airbag-Equipped
Vehicle.......................................................1-73
Additives, Fuel................................................. 5-6
Add-On Electrical Equipment............................5-83
Air Cleaner/Filter, Engine.................................5-18
Air Conditioning..............................................3-19
Airbag
Passenger Status Indicator...........................3-29
Readiness Light..........................................3-28
Airbag Sensing and Diagnostic Module (SDM)...... 7-9
Airbag System................................................1-58
Adding Equipment to Your Airbag-Equipped
Vehicle...................................................1-73
How Does an Airbag Restrain?......................1-65
Passenger Sensing System...........................1-67
Servicing Your Airbag-Equipped Vehicle..........1-72
What Makes an Airbag In�ate?......................1-65
What Will You See After an Airbag In�ates?....1-66
When Should an Airbag In�ate?....................1-64
Where Are the Airbags?...............................1-61
Antenna, Fixed Mast.......................................3-80
Antenna, XM™ Satellite Radio
Antenna System..........................................3-80
Anti-Lock Brake System (ABS)........................... 4-7
Anti-Lock Brake, System Warning Light..............3-33Appearance Care
Aluminum or Chrome-Plated Wheels..............5-79
Care of Safety Belts....................................5-76
Chemical Paint Spotting...............................5-80
Cleaning Exterior Lamps/Lenses....................5-77
Cleaning the Inside of Your Vehicle................5-74
Fabric/Carpet..............................................5-75
Finish Care.................................................5-77
Finish Damage............................................5-80
Instrument Panel, Vinyl, and Other Plastic
Surfaces.................................................5-76
Sheet Metal Damage...................................5-80
Tires..........................................................5-79
Underbody Maintenance...............................5-80
Vehicle Care/Appearance Materials................5-81
Washing Your Vehicle...................................5-77
Weatherstrips..............................................5-76
Windshield and Wiper Blades........................5-78
Ashtray(s)......................................................3-18
Audio System(s).............................................3-51
Audio Steering Wheel Controls......................3-78
Care of Your CD Player...............................3-80
Care of Your CDs ........................................3-79
Fixed Mast Antenna.....................................3-80
Radio with CD....................................3-54, 3-60
Setting the Time..........................................3-53
Theft-Deterrent Feature................................3-77
Understanding Radio Reception.....................3-79
XM™ Satellite Radio Antenna System............3-80
1