belt CHEVROLET HHR 2008 1.G Repair Manual
[x] Cancel search | Manufacturer: CHEVROLET, Model Year: 2008, Model line: HHR, Model: CHEVROLET HHR 2008 1.GPages: 430, PDF Size: 5.63 MB
Page 254 of 430
3. When the wheel chocks are in place, release the
regular brakes until the chocks absorb the load.
4. Reapply the regular brakes. Then apply your
parking brake, and then shift into PARK (P) for
an automatic transmission or REVERSE (R) for a
manual transmission.
5. Release the regular brakes.
When You Are Ready to Leave After
Parking on a Hill
1. Apply your regular brakes and hold the pedal down
while you:
Start your engine.
Shift into a gear.
Release the parking brake.
2. Let up on the brake pedal.
3. Drive slowly until the trailer is clear of the chocks.
4. Stop and have someone pick up and store the
chocks.
Maintenance When Trailer Towing
Your vehicle will need service more often when you are
pulling a trailer. SeeScheduled Maintenance on
page 6-4for more on this. Things that are especially
important in trailer operation are automatic transmission
uid (do not overll), engine oil, drive belt, cooling
system and brake system.
Each of these is covered in this manual, and the Index
will help you nd them quickly. If you are trailering,
it is a good idea to review this information before you
start your trip.
Check periodically to see that all hitch nuts and bolts
are tight.
Engine Cooling When Trailer Towing
Your cooling system may temporarily overheat during
severe operating conditions. SeeEngine Overheating on
page 5-26.
4-42
Page 256 of 430
Buying New Tires.........................................5-69
Different Size Tires and Wheels......................5-71
Uniform Tire Quality Grading..........................5-71
Wheel Alignment and Tire Balance..................5-73
Wheel Replacement......................................5-73
Tire Chains..................................................5-74
If a Tire Goes Flat........................................5-75
Tire Sealant and Compressor Kit....................5-76
Changing a Flat Tire.....................................5-86
Removing the Spare Tire and Tools................5-87
Removing the Flat Tire and Installing the
Spare Tire (SS Model)...............................5-90
Removing the Flat Tire and Installing the
Spare Tire (All Models Except SS).............5-101
Storing a Flat or Spare Tire and Tools...........5-106
Compact Spare Tire....................................5-109
Appearance Care..........................................5-110
Interior Cleaning.........................................5-110
Fabric/Carpet..............................................5-111
Instrument Panel, Vinyl, and Other Plastic
Surfaces.................................................5-112
Care of Safety Belts....................................5-112
Weatherstrips.............................................5-113
Washing Your Vehicle..................................5-113Cleaning Exterior Lamps/Lenses....................5-113
Finish Care................................................5-114
Windshield and Wiper Blades.......................5-114
Aluminum or Chrome-Plated Wheels
and Trim................................................5-115
Tires.........................................................5-116
Sheet Metal Damage...................................5-116
Finish Damage...........................................5-116
Underbody Maintenance...............................5-116
Chemical Paint Spotting...............................5-116
Vehicle Care/Appearance Materials................5-117
Vehicle Identication.....................................5-118
Vehicle Identication Number (VIN)
................5-118
Service Parts Identication Label...................5-118
Electrical System..........................................5-118
Add-On Electrical Equipment.........................5-118
Headlamp Wiring........................................5-119
Windshield Wiper Fuses...............................5-119
Power Windows and Other Power Options......5-119
Fuses and Circuit Breakers..........................5-119
Floor Console Fuse Block............................5-120
Engine Compartment Fuse Block...................5-122
Capacities and Specications........................5-125
Section 5 Service and Appearance Care
5-2
Page 258 of 430
California Perchlorate Materials
Requirements
Certain types of automotive applications, such as airbag
initiators, seat belt pretensioners, and lithium batteries
contained in remote keyless entry transmitters, may
contain perchlorate materials. Special handling
may be necessary. For additional information, see
www.dtsc.ca.gov/hazardouswaste/perchlorate.
Doing Your Own Service Work
{CAUTION:
You can be injured and your vehicle could be
damaged if you try to do service work on a
vehicle without knowing enough about it.
Be sure you have sufficient knowledge,
experience, the proper replacement parts,
and tools before you attempt any vehicle
maintenance task.
Be sure to use the proper nuts, bolts,
and other fasteners. English and metric
fasteners can be easily confused. If you
use the wrong fasteners, parts can later
break or fall off. You could be hurt.If you want to do some of your own service work, you
should use the proper service manual. It tells you much
more about how to service your vehicle than this
manual can. To order the proper service manual, see
Service Publications Ordering Information on page 7-15.
Your vehicle has an airbag system. Before attempting
to do your own service work, seeServicing Your
Airbag-Equipped Vehicle on page 1-70.
You should keep a record with all parts receipts and list
the mileage and the date of any service work you
perform. SeeMaintenance Record on page 6-16.
Adding Equipment to the Outside of
Your Vehicle
Things you might add to the outside of your vehicle can
affect the airow around it. This can cause wind
noise and can affect fuel economy and windshield
washer performance. Check with your dealer/retailer
before adding equipment to the outside of your vehicle.
5-4
Page 310 of 430
Tire Size
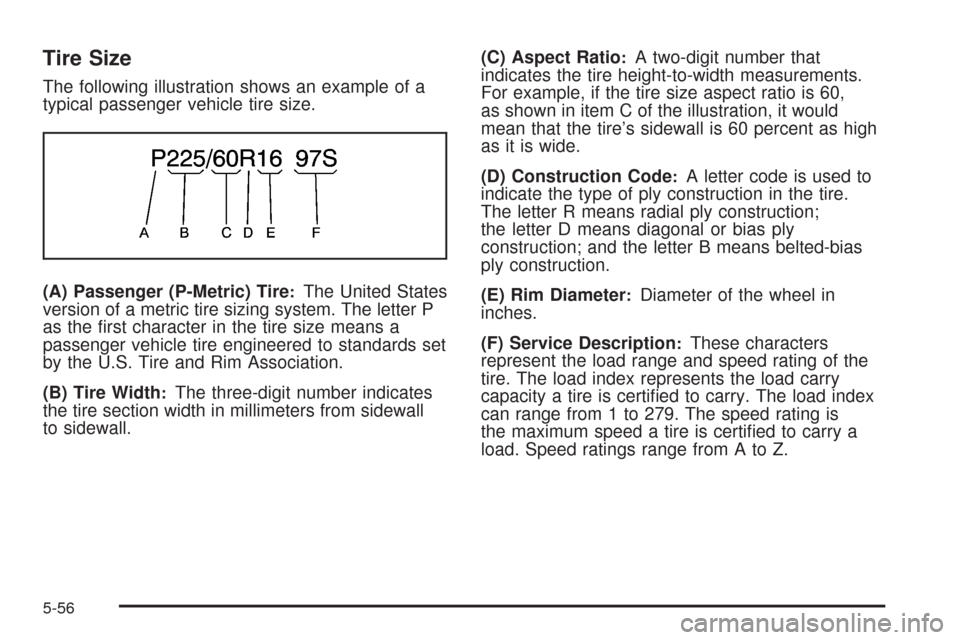
The following illustration shows an example of a
typical passenger vehicle tire size.
(A) Passenger (P-Metric) Tire
:The United States
version of a metric tire sizing system. The letter P
as the rst character in the tire size means a
passenger vehicle tire engineered to standards set
by the U.S. Tire and Rim Association.
(B) Tire Width
:The three-digit number indicates
the tire section width in millimeters from sidewall
to sidewall.(C) Aspect Ratio
:A two-digit number that
indicates the tire height-to-width measurements.
For example, if the tire size aspect ratio is 60,
as shown in item C of the illustration, it would
mean that the tire’s sidewall is 60 percent as high
as it is wide.
(D) Construction Code
:A letter code is used to
indicate the type of ply construction in the tire.
The letter R means radial ply construction;
the letter D means diagonal or bias ply
construction; and the letter B means belted-bias
ply construction.
(E) Rim Diameter
:Diameter of the wheel in
inches.
(F) Service Description
:These characters
represent the load range and speed rating of the
tire. The load index represents the load carry
capacity a tire is certied to carry. The load index
can range from 1 to 279. The speed rating is
the maximum speed a tire is certied to carry a
load. Speed ratings range from A to Z.
5-56
Page 311 of 430
Tire Terminology and Denitions
Air Pressure:The amount of air inside the
tire pressing outward on each square inch of the
tire. Air pressure is expressed in pounds per
square inch (psi) or kilopascal (kPa).
Accessory Weight
:This means the combined
weight of optional accessories. Some examples of
optional accessories are, automatic transmission,
power steering, power brakes, power windows,
power seats, and air conditioning.
Aspect Ratio
:The relationship of a tire’s height
to its width.
Belt
:A rubber coated layer of cords that is located
between the plies and the tread. Cords may be
made from steel or other reinforcing materials.
Bead
:The tire bead contains steel wires wrapped
by steel cords that hold the tire onto the rim.
Bias Ply Tire
:A pneumatic tire in which the plies
are laid at alternate angles less than 90 degrees
to the centerline of the tread.Cold Tire Pressure
:The amount of air pressure
in a tire, measured in pounds per square inch
(psi) or kilopascals (kPa) before a tire has built up
heat from driving. SeeInflation - Tire Pressure
on page 5-60.
Curb Weight
:The weight of a motor vehicle with
standard and optional equipment including the
maximum capacity of fuel, oil, and coolant,
but without passengers and cargo.
DOT Markings
:A code molded into the sidewall
of a tire signifying that the tire is in compliance
with the U.S. Department of Transportation (DOT)
motor vehicle safety standards. The DOT code
includes the Tire Identication Number (TIN),
an alphanumeric designator which can also identify
the tire manufacturer, production plant, brand,
and date of production.
GVWR
:Gross Vehicle Weight Rating.
SeeLoading Your Vehicle on page 4-27.
GAWR FRT
:Gross Axle Weight Rating for
the front axle. SeeLoading Your Vehicle on
page 4-27.
5-57
Page 323 of 430
Buying New Tires
GM has developed and matched specic tires
for your vehicle. The original equipment tires
installed on your vehicle, when it was new,
were designed to meet General Motors Tire
Performance Criteria Specication (TPC Spec)
system rating. If you need replacement tires,
GM strongly recommends that you get tires with
the same TPC Spec rating. This way, your vehicle
will continue to have tires that are designed to
give the same performance and vehicle safety,
during normal use, as the original tires.
GM’s exclusive TPC Spec system considers over
a dozen critical specications that impact the
overall performance of your vehicle, including
brake system performance, ride and handling,
traction control, and tire pressure monitoring
performance. GM’s TPC Spec number is molded
onto the tire’s sidewall near the tire size. If the
tires have an all-season tread design, the
TPC Spec number will be followed by an MS for
mud and snow. SeeTire Sidewall Labeling on
page 5-53for additional information.GM recommends replacing tires in sets of four.
This is because uniform tread depth on all tires will
help keep your vehicle performing most like it
did when the tires were new. Replacing less than
a full set of tires can affect the braking and
handling performance of your vehicle. SeeTire
Inspection and Rotation on page 5-66for
information on proper tire rotation.
{CAUTION:
Mixing tires could cause you to lose
control while driving. If you mix tires of
different sizes, brands, or types (radial and
bias-belted tires), the vehicle may not
handle properly, and you could have a
crash. Using tires of different sizes,
brands, or types may also cause damage to
your vehicle. Be sure to use the correct
size, brand, and type of tires on all wheels.
It is all right to drive with your compact
spare temporarily, as it was developed for
use on your vehicle. SeeCompact Spare
Tire on page 5-109.
5-69
Page 324 of 430
{CAUTION:
If you use bias-ply tires on your vehicle,
the wheel rim anges could develop
cracks after many miles of driving. A tire
and/or wheel could fail suddenly, causing
a crash. Use only radial-ply tires with the
wheels on your vehicle.
If you must replace your vehicle’s tires with
those that do not have a TPC Spec number,
make sure they are the same size, load range,
speed rating, and construction type (radial
and bias-belted tires) as your vehicle’s
original tires.Vehicles that have a tire pressure monitoring
system could give an inaccurate low-pressure
warning if non-TPC Spec rated tires are installed
on your vehicle. Non-TPC Spec rated tires
may give a low-pressure warning that is higher or
lower than the proper warning level you would
get with TPC Spec rated tires. SeeTire Pressure
Monitor System on page 5-61.
Your vehicle’s original equipment tires are listed
on the Tire and Loading Information Label.
SeeLoading Your Vehicle on page 4-27, for
more information about the Tire and Loading
Information Label and its location on your vehicle.
5-70
Page 366 of 430
If any of the soil remains, a commercial fabric cleaner or
spot lifter may be necessary. When a commercial
upholstery cleaner or spot lifter is to be used, test a
small hidden area for colorfastness rst. If the locally
cleaned area gives any impression that a ring formation
may result, clean the entire surface.
After the cleaning process has been completed, a paper
towel can be used to blot excess moisture from the
fabric or carpet.
Instrument Panel, Vinyl, and Other
Plastic Surfaces
A soft cloth dampened with water may be used to
remove dust. If a more thorough cleaning is
necessary, a clean soft cloth dampened with a mild
soap solution can be used to gently remove dust and
dirt. Never use spot lifters or removers on plastic
surfaces. Many commercial cleaners and coatings that
are sold to preserve and protect soft plastic surfaces
may permanently change the appearance and feel
of your interior and are not recommended. Do not use
silicone or wax-based products, or those containing
organic solvents to clean your vehicle’s interior because
they can alter the appearance by increasing the gloss
in a non-uniform manner.Some commercial products may increase gloss on your
instrument panel. The increase in gloss may cause
annoying reections in the windshield and even make it
difficult to see through the windshield under certain
conditions.
Care of Safety Belts
Keep belts clean and dry.
{CAUTION:
Do not bleach or dye safety belts. If you do,
it may severely weaken them. In a crash,
they might not be able to provide adequate
protection. Clean safety belts only with mild
soap and lukewarm water.
5-112
Page 381 of 430
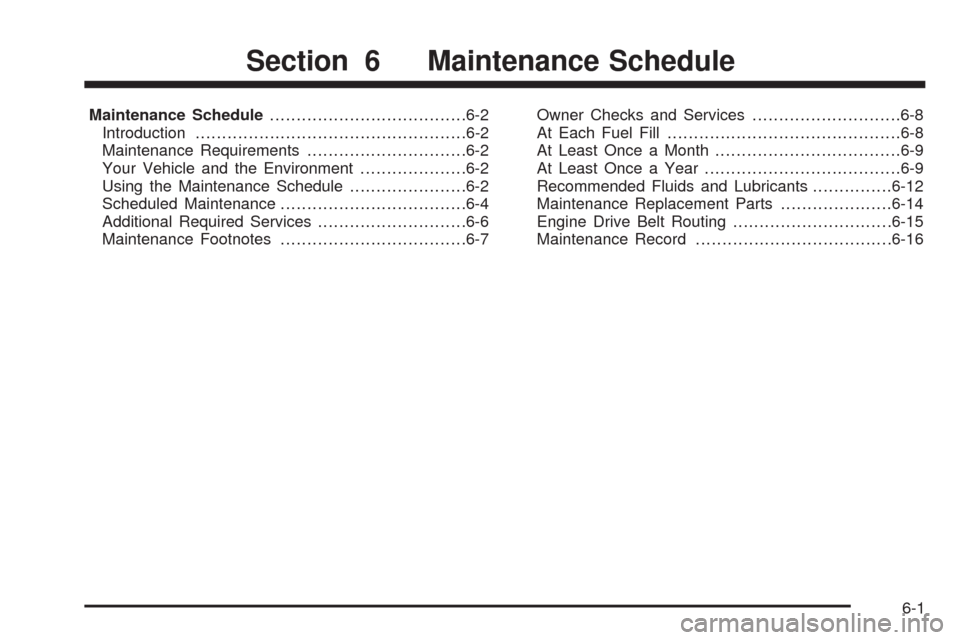
Maintenance Schedule.....................................6-2
Introduction...................................................6-2
Maintenance Requirements..............................6-2
Your Vehicle and the Environment....................6-2
Using the Maintenance Schedule......................6-2
Scheduled Maintenance...................................6-4
Additional Required Services............................6-6
Maintenance Footnotes...................................6-7Owner Checks and Services............................6-8
At Each Fuel Fill............................................6-8
At Least Once a Month...................................6-9
At Least Once a Year.....................................6-9
Recommended Fluids and Lubricants...............6-12
Maintenance Replacement Parts.....................6-14
Engine Drive Belt Routing..............................6-15
Maintenance Record.....................................6-16
Section 6 Maintenance Schedule
6-1
Page 386 of 430
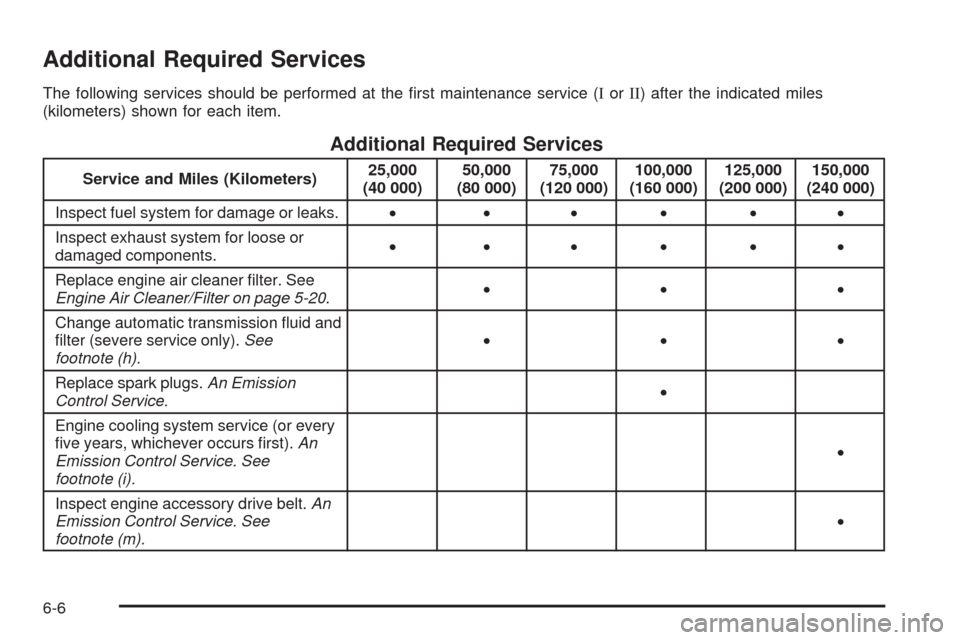
Additional Required Services
The following services should be performed at the rst maintenance service (IorII) after the indicated miles
(kilometers) shown for each item.
Additional Required Services
Service and Miles (Kilometers)25,000
(40 000)50,000
(80 000)75,000
(120 000)100,000
(160 000)125,000
(200 000)150,000
(240 000)
Inspect fuel system for damage or leaks.• •••••
Inspect exhaust system for loose or
damaged components.• •••••
Replace engine air cleaner lter. See
Engine Air Cleaner/Filter on page 5-20.•••
Change automatic transmission uid and
lter (severe service only).See
footnote (h).•••
Replace spark plugs.An Emission
Control Service.•
Engine cooling system service (or every
ve years, whichever occurs rst).An
Emission Control Service. See
footnote (i).•
Inspect engine accessory drive belt.An
Emission Control Service. See
footnote (m).•
6-6