child lock CHEVROLET HHR 2009 1.G Owners Manual
[x] Cancel search | Manufacturer: CHEVROLET, Model Year: 2009, Model line: HHR, Model: CHEVROLET HHR 2009 1.GPages: 450, PDF Size: 2.49 MB
Page 1 of 450
Seats and Restraint System............................. 1-1
Front Seats
............................................... 1-2
Rear Seats
..............................................1-10
Safety Belts
.............................................1-13
Child Restraints
.......................................1-32
Airbag System
.........................................1-58
Restraint System Check
............................1-79
Features and Controls..................................... 2-1
Keys
........................................................ 2-3
Doors and Locks
....................................... 2-9
Windows
.................................................2-16
Theft-Deterrent Systems
............................2-18
Starting and Operating Your Vehicle
...........2-22
Mirrors
....................................................2-39
Object Detection Systems
..........................2-44
OnStar
®System
......................................2-47
Storage Areas
.........................................2-51
Sunroof
..................................................2-56
Instrument Panel............................................. 3-1
Instrument Panel Overview
.......................... 3-4
Climate Controls
......................................3-21
Warning Lights, Gages, and Indicators
........3-26
Driver Information Center (DIC)
..................3-48
Audio System(s)
.......................................3-61Driving Your Vehicle....................................... 4-1
Your Driving, the Road, and the Vehicle
....... 4-2
Towing
...................................................4-31
Service and Appearance Care.......................... 5-1
Service
..................................................... 5-3
Fuel
......................................................... 5-5
Checking Things Under the Hood
...............5-12
Headlamp Aiming
.....................................5-44
Bulb Replacement
....................................5-47
Windshield Wiper Blade Replacement
.........5-52
Tires
......................................................5-53
Appearance Care
.....................................5-99
Vehicle Identication
...............................5-107
Electrical System
....................................5-108
Capacities and Specications
...................5-114
Maintenance Schedule..................................... 6-1
Maintenance Schedule
................................ 6-2
Customer Assistance Information.................... 7-1
Customer Assistance and Information
........... 7-2
Reporting Safety Defects
...........................7-16
Vehicle Data Recording and Privacy
...........7-18
Index................................................................ 1
2009 Chevrolet HHR Owner ManualM
Page 4 of 450
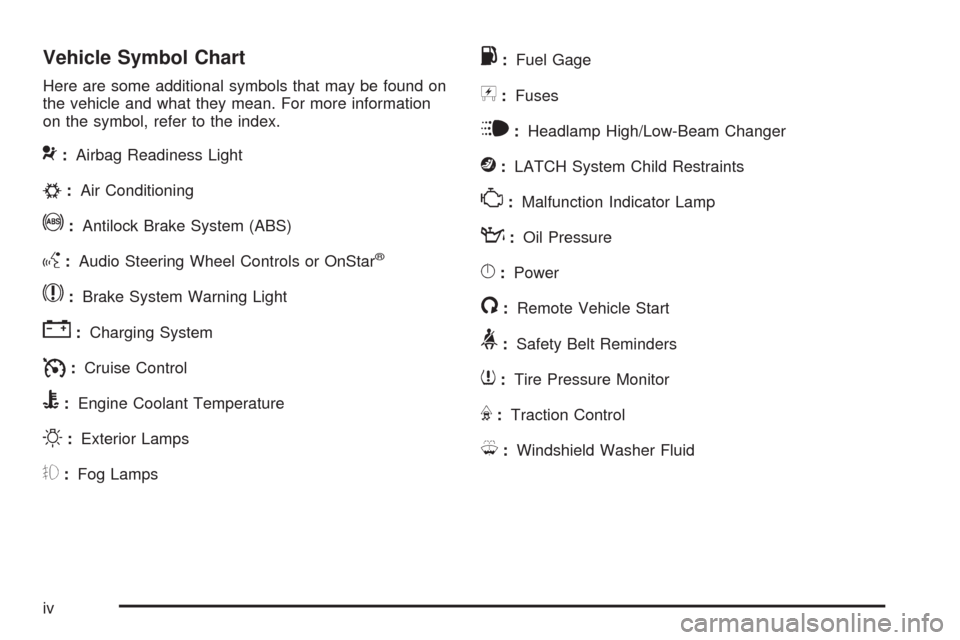
Vehicle Symbol Chart
Here are some additional symbols that may be found on
the vehicle and what they mean. For more information
on the symbol, refer to the index.
9:Airbag Readiness Light
#:Air Conditioning
!:Antilock Brake System (ABS)
g:Audio Steering Wheel Controls or OnStar®
$:Brake System Warning Light
":Charging System
I:Cruise Control
B:Engine Coolant Temperature
O:Exterior Lamps
#:Fog Lamps
.:Fuel Gage
+:Fuses
i:Headlamp High/Low-Beam Changer
j:LATCH System Child Restraints
*:Malfunction Indicator Lamp
::Oil Pressure
}:Power
/:Remote Vehicle Start
>:Safety Belt Reminders
7:Tire Pressure Monitor
F:Traction Control
M:Windshield Washer Fluid
iv
Page 22 of 450

How to Wear Safety Belts Properly
This section is only for people of adult size.
Be aware that there are special things to know about
safety belts and children. And there are different rules for
smaller children and infants. If a child will be riding in the
vehicle, seeOlder Children on page 1-32orInfants and
Young Children on page 1-35. Follow those rules for
everyone’s protection.
It is very important for all occupants to buckle up.
Statistics show that unbelted people are hurt more often
in crashes than those who are wearing safety belts.
Occupants who are not buckled up can be thrown out of
the vehicle in a crash. And they can strike others in
the vehicle who are wearing safety belts.
First, before you or your passenger(s) wear a safety
belt, there is important information you should know.
Sit up straight and always keep your feet on the oor
in front of you. The lap part of the belt should be worn
low and snug on the hips, just touching the thighs. In a
crash, this applies force to the strong pelvic bones and
you would be less likely to slide under the lap belt. If you
slid under it, the belt would apply force on your abdomen.
This could cause serious or even fatal injuries. The
shoulder belt should go over the shoulder and across the
chest. These parts of the body are best able to take belt
restraining forces.
The shoulder belt locks if there is a sudden stop or
crash.
1-18
Page 30 of 450
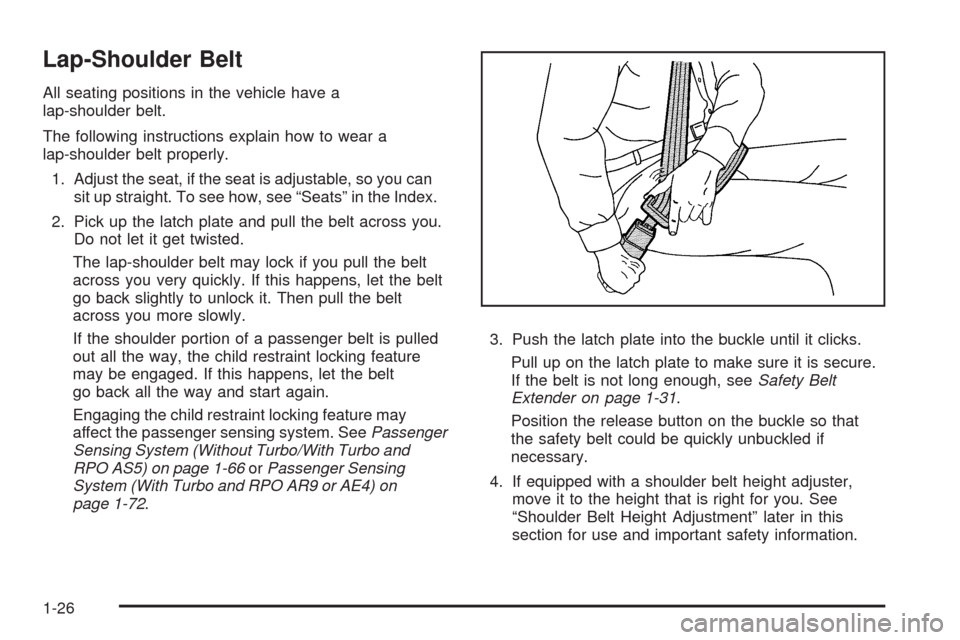
Lap-Shoulder Belt
All seating positions in the vehicle have a
lap-shoulder belt.
The following instructions explain how to wear a
lap-shoulder belt properly.
1. Adjust the seat, if the seat is adjustable, so you can
sit up straight. To see how, see “Seats” in the Index.
2. Pick up the latch plate and pull the belt across you.
Do not let it get twisted.
The lap-shoulder belt may lock if you pull the belt
across you very quickly. If this happens, let the belt
go back slightly to unlock it. Then pull the belt
across you more slowly.
If the shoulder portion of a passenger belt is pulled
out all the way, the child restraint locking feature
may be engaged. If this happens, let the belt
go back all the way and start again.
Engaging the child restraint locking feature may
affect the passenger sensing system. SeePassenger
Sensing System (Without Turbo/With Turbo and
RPO AS5) on page 1-66orPassenger Sensing
System (With Turbo and RPO AR9 or AE4) on
page 1-72.3. Push the latch plate into the buckle until it clicks.
Pull up on the latch plate to make sure it is secure.
If the belt is not long enough, seeSafety Belt
Extender on page 1-31.
Position the release button on the buckle so that
the safety belt could be quickly unbuckled if
necessary.
4. If equipped with a shoulder belt height adjuster,
move it to the height that is right for you. See
“Shoulder Belt Height Adjustment” later in this
section for use and important safety information.
1-26
Page 32 of 450
Shoulder Belt Height Adjuster
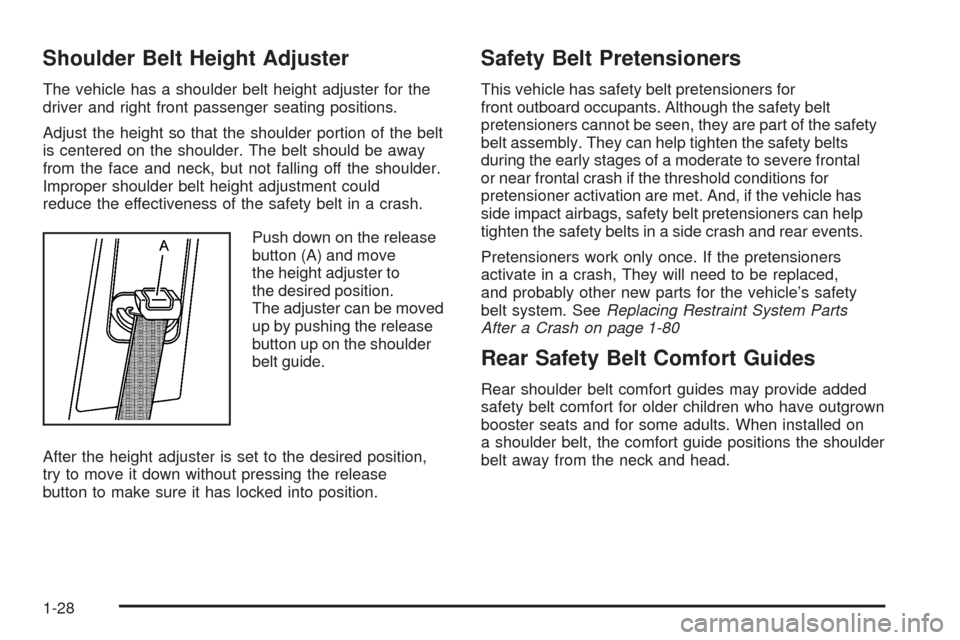
The vehicle has a shoulder belt height adjuster for the
driver and right front passenger seating positions.
Adjust the height so that the shoulder portion of the belt
is centered on the shoulder. The belt should be away
from the face and neck, but not falling off the shoulder.
Improper shoulder belt height adjustment could
reduce the effectiveness of the safety belt in a crash.
Push down on the release
button (A) and move
the height adjuster to
the desired position.
The adjuster can be moved
up by pushing the release
button up on the shoulder
belt guide.
After the height adjuster is set to the desired position,
try to move it down without pressing the release
button to make sure it has locked into position.
Safety Belt Pretensioners
This vehicle has safety belt pretensioners for
front outboard occupants. Although the safety belt
pretensioners cannot be seen, they are part of the safety
belt assembly. They can help tighten the safety belts
during the early stages of a moderate to severe frontal
or near frontal crash if the threshold conditions for
pretensioner activation are met. And, if the vehicle has
side impact airbags, safety belt pretensioners can help
tighten the safety belts in a side crash and rear events.
Pretensioners work only once. If the pretensioners
activate in a crash, They will need to be replaced,
and probably other new parts for the vehicle’s safety
belt system. SeeReplacing Restraint System Parts
After a Crash on page 1-80
Rear Safety Belt Comfort Guides
Rear shoulder belt comfort guides may provide added
safety belt comfort for older children who have outgrown
booster seats and for some adults. When installed on
a shoulder belt, the comfort guide positions the shoulder
belt away from the neck and head.
1-28
Page 52 of 450
Securing a Child Restraint Designed for
the LATCH System
{CAUTION:
If a LATCH-type child restraint is not attached to
anchors, the child restraint will not be able to
protect the child correctly. In a crash, the child
could be seriously injured or killed. Install a
LATCH-type child restraint properly using the
anchors, or use the vehicle’s safety belts to secure
the restraint, following the instructions that came
with the child restraint and the instructions in this
manual.
{CAUTION:
Do not attach more than one child restraint to a
single anchor. Attaching more than one child
restraint to a single anchor could cause the anchor
or attachment to come loose or even break during
a crash. A child or others could be injured. To
reduce the risk of serious or fatal injuries during a
crash, attach only one child restraint per anchor.
{CAUTION:
Children can be seriously injured or strangled if a
shoulder belt is wrapped around their neck and
the safety belt continues to tighten. Buckle any
unused safety belts behind the child restraint so
children cannot reach them. Pull the shoulder belt
all the way out of the retractor to set the lock, if
your vehicle has one, after the child restraint has
been installed.
1-48
Page 56 of 450

If more than one child restraint needs to be installed in
the rear seat, be sure to readWhere to Put the
Restraint on page 1-42.
1. Put the child restraint on the seat.
2. Pick up the latch plate, and run the lap and shoulder
portions of the vehicle’s safety belt through or
around the restraint. The child restraint instructions
will show you how.
3. Push the latch plate into the buckle until it clicks.
Position the release button on the buckle so that
the safety belt could be quickly unbuckled if
necessary.4. Pull the rest of the shoulder belt all the way out of
the retractor to set the lock.
1-52
Page 87 of 450

Keys
{CAUTION:
Leaving children in a vehicle with the ignition key
is dangerous for many reasons, children or others
could be badly injured or even killed. They could
operate the power windows or other controls or
even make the vehicle move. The windows will
function with the keys in the ignition and children
could be seriously injured or killed if caught in the
path of a closing window. Do not leave the keys in
a vehicle with children.
The key can be used for the ignition and the driver’s
door lock.
The key has a transponder in the key head that
matches a decoder in the vehicle’s steering column.
If a replacement key or any additional keys are needed,
you must purchase it from your dealer/retailer.
2-3
Page 93 of 450

Doors and Locks
Door Locks
{CAUTION:
Unlocked doors can be dangerous.
Passengers, especially children, can easily
open the doors and fall out of a moving vehicle.
When a door is locked, the handle will not
open it. The chance of being thrown out of the
vehicle in a crash is increased if the doors are
not locked. So, all passengers should wear
safety belts properly and the doors should be
locked whenever the vehicle is driven.
Young children who get into unlocked vehicles
may be unable to get out. A child can be
overcome by extreme heat and can suffer
permanent injuries or even death from heat
stroke. Always lock the vehicle whenever
leaving it.
Outsiders can easily enter through an unlocked
door when you slow down or stop your vehicle.
Locking your doors can help prevent this from
happening.There are several ways to lock and unlock your vehicle.
To lock the driver’s door from the outside, turn the
key clockwise. To unlock the door, turn the key
counterclockwise.
You can also use the remote keyless entry transmitter
to lock and unlock the doors.
From the inside, use the manual lock knobs on each door
or the power door lock switch to lock and unlock all doors.
Power Door Locks
The power door lock
switches are located on
the driver’s and front
passenger’s door next
to the door handle.
Press the top of the switch to unlock the doors.
Press the bottom of the switch to lock the doors.Driver’s side shown,
Passenger’s side similar
2-9
Page 101 of 450

Power Windows
{CAUTION:
Leaving children in a vehicle with the keys is
dangerous for many reasons, children or others
could be badly injured or even killed. They could
operate the power windows or other controls or
even make the vehicle move. The windows will
function and they could be seriously injured or
killed if caught in the path of a closing window.
Do not leave keys in a vehicle with children.
When there are children in the rear seat use the
window lockout button to prevent unintentional
operation of the windows.The power window controls are located on each of the
side doors. The driver’s door also has switches that
control the passenger and rear windows.
Press the switch to lower the window. Pull up on the
front edge of the switch to raise the window.
The power windows work when the ignition has been
turned to ACC/ACCESSORY or ON/RUN or when
Retained Accessory Power (RAP) is active. See
Retained Accessory Power (RAP) on page 2-25. Driver’s Side Shown
2-17