battery CHEVROLET HHR 2010 1.G Owners Manual
[x] Cancel search | Manufacturer: CHEVROLET, Model Year: 2010, Model line: HHR, Model: CHEVROLET HHR 2010 1.GPages: 480, PDF Size: 5.25 MB
Page 7 of 480
Section 1 In Brief
Instrument Panel. . . . . . . . . . . . . . . . . . . . . . . . . . . . . . . . . . . 1-2
Initial Drive Information . . . . . . . . . . . . . . . . . . . . . . . . . . . 1-4
Remote Keyless Entry (RKE) System . . . . . . . . . . . 1-4
Remote Vehicle Start . . . . . . . . . . . . . . . . . . . . . . . . . . . 1-4
Door Locks . . . . . . . . . . . . . . . . . . . . . . . . . . . . . . . . . . . . . 1-5
Liftgate . . . . . . . . . . . . . . . . . . . . . . . . . . . . . . . . . . . . . . . . . . 1-5
Windows . . . . . . . . . . . . . . . . . . . . . . . . . . . . . . . . . . . . . . . . 1-6
Seat Adjustment . . . . . . . . . . . . . . . . . . . . . . . . . . . . . . . . 1-6
Second Row Seats . . . . . . . . . . . . . . . . . . . . . . . . . . . . . 1-8
Heated Seats . . . . . . . . . . . . . . . . . . . . . . . . . . . . . . . . . . . 1-9
Head Restraint Adjustment . . . . . . . . . . . . . . . . . . . . . . 1-9
Safety Belt . . . . . . . . . . . . . . . . . . . . . . . . . . . . . . . . . . . . . . 1-9
Sensing System for Passenger Airbag . . . . . . . . . 1-10
Mirror Adjustment . . . . . . . . . . . . . . . . . . . . . . . . . . . . . . 1-10
Steering Wheel Adjustment . . . . . . . . . . . . . . . . . . . . 1-11
Interior Lighting . . . . . . . . . . . . . . . . . . . . . . . . . . . . . . . . 1-12
Exterior Lighting . . . . . . . . . . . . . . . . . . . . . . . . . . . . . . . 1-12
Windshield Wiper/Washer . . . . . . . . . . . . . . . . . . . . . . 1-13
Climate Controls . . . . . . . . . . . . . . . . . . . . . . . . . . . . . . . 1-14 Vehicle Features
. . . . . . . . . . . . . . . . . . . . . . . . . . . . . . . . . . 1-15
Radio(s) . . . . . . . . . . . . . . . . . . . . . . . . . . . . . . . . . . . . . . . 1-15
Satellite Radio . . . . . . . . . . . . . . . . . . . . . . . . . . . . . . . . . 1-16
Portable Audio Devices (Auxiliary Input or USB Port) . . . . . . . . . . . . . . . . 1-16
Steering Wheel Controls . . . . . . . . . . . . . . . . . . . . . . . 1-17
Bluetooth
®. . . . . . . . . . . . . . . . . . . . . . . . . . . . . . . . . . . . . 1-17
Driver Information Center (DIC) . . . . . . . . . . . . . . . . 1-18
Cruise Control . . . . . . . . . . . . . . . . . . . . . . . . . . . . . . . . . 1-19
Storage Compartments . . . . . . . . . . . . . . . . . . . . . . . . 1-19
Power Outlets . . . . . . . . . . . . . . . . . . . . . . . . . . . . . . . . . 1-20
Performance and Maintenance . . . . . . . . . . . . . . . . . . 1-21
Traction Control System (TCS) . . . . . . . . . . . . . . . . 1-21
Electronic Stability Control (ESC) . . . . . . . . . . . . . . 1-21
Tire Pressure Monitor . . . . . . . . . . . . . . . . . . . . . . . . . . 1-22
Tire Sealant and Compressor Kit . . . . . . . . . . . . . . 1-22
Engine Oil Life System . . . . . . . . . . . . . . . . . . . . . . . . 1-23
Fuel E85 (85% Ethanol) . . . . . . . . . . . . . . . . . . . . . . . 1-23
Driving for Better Fuel Economy . . . . . . . . . . . . . . . 1-24
Battery . . . . . . . . . . . . . . . . . . . . . . . . . . . . . . . . . . . . . . . . . 1-24
Roadside Assistance Program . . . . . . . . . . . . . . . . . 1-24
OnStar
®. . . . . . . . . . . . . . . . . . . . . . . . . . . . . . . . . . . . . . . 1-25
1-1
Page 30 of 480
Driving for Better Fuel Economy
Driving habits can affect fuel mileage. Here are some
driving tips to get the best fuel economy possible.
.Avoid fast starts and accelerate smoothly.
.Brake gradually and avoid abrupt stops.
.Avoid idling the engine for long periods of time.
.When road and weather conditions are
appropriate, use cruise control, if equipped.
.Always follow posted speed limits or drive more
slowly when conditions require.
.Keep vehicle tires properly inflated.
.Combine several trips into a single trip.
.Replace the vehicle's tires with the same TPC
Spec number molded into the tire's sidewall near
the size.
.Follow recommended scheduled maintenance.
Battery
This vehicle has a maintenance free battery located in
the cargo area. Access to the battery is not necessary
to jump start the vehicle. There are positive (+) and
negative (−) terminals in the engine compartment.
SeeBattery
on page 6‑40andJump Startingon
page 6‑41.
Roadside Assistance Program
U.S.: 1-800-CHEV-USA (1-800-243-8872)
TTY Users: 1-888-889-2438
Canada: 1-800-268-6800
As the owner of a new Chevrolet, you are automatically
enrolled in the Roadside Assistance program. This
program provides technically trained advisors who are
available 24 hours a day, 365 days a year, minor repair
information or towing arrangements.
Roadside Assistance and OnStar
If you have a current OnStar subscription, press the
OnStar button and the current GPS location will be sent
to an OnStar Advisor who will assess your problem,
contact Roadside Assistance, and relay exact location
to get you the help you need.
Online Owner Center
The Online Owner Center is a complimentary service
that includes online service reminders, vehicle
maintenance tips, online owner manual, special
privileges and more.
Sign up today at: www.gmownercenter.com/chevrolet
(U.S.) or www.gm.ca (Canada).
1-24
Page 32 of 480
![CHEVROLET HHR 2010 1.G Owners Manual The OnStar system can record and transmit vehicle
information. This information is automatically sent to an
OnStar call center when
Qis pressed,]is pressed,
or if the airbags or ACR system deploy. Thi CHEVROLET HHR 2010 1.G Owners Manual The OnStar system can record and transmit vehicle
information. This information is automatically sent to an
OnStar call center when
Qis pressed,]is pressed,
or if the airbags or ACR system deploy. Thi](/img/24/8190/w960_8190-31.png)
The OnStar system can record and transmit vehicle
information. This information is automatically sent to an
OnStar call center when
Qis pressed,]is pressed,
or if the airbags or ACR system deploy. This information
usually includes the vehicle's GPS location and, in the
event of a crash, additional information regarding the
crash that the vehicle was involved in (e.g. the direction
from which the vehicle was hit). When the virtual
advisor feature of OnStar hands-free calling is used, the
vehicle also sends OnStar the vehicle's GPS location
so they can provide services where it is located.
Location information about the vehicle is only available
if the GPS satellite signals are unobstructed and
available.
The vehicle must have a working electrical system,
including adequate battery power, for the OnStar
equipment to operate. There are other problems OnStar
cannot control that may prevent OnStar from providing
OnStar service at any particular time or place. Some
examples are damage to important parts of the vehicle
in a crash, hills, tall buildings, tunnels, weather or
wireless phone network congestion.
OnStar Steering Wheel Controls
This vehicle may have a Talk/Mute button that can be
used to interact with OnStar hands-free calling. See
Audio Steering Wheel Controls
on page 4‑92for more
information.
On some vehicles, the mute button can be used to dial
numbers into voice mail systems, or to dial phone
extensions. See the OnStar Owner's Guide for more
information.
Your Responsibility
Increase the volume of the radio if the OnStar advisor
cannot be heard.
If the light next to the OnStar buttons is red, the system
may not be functioning properly. Press
Qand request a
vehicle diagnostic. If the light appears clear (no light is
appearing), your OnStar subscription has expired and
all services have been deactivated. Press
Qto confirm
that the OnStar equipment is active.
1-26
Page 108 of 480
If the passenger seat gets wet, dry the seat
immediately. If the airbag readiness light is lit, do
not install a child restraint or allow anyone to occupy
the seat. SeeAirbag Readiness Light
on page 4‑27for
important safety information.
The on indicator may be lit if an object, such as a
briefcase, handbag, grocery bag, laptop or other
electronic device, is put on an unoccupied seat. If this
is not desired, remove the object from the seat.
{WARNING:
Stowing of articles under the passenger seat or
between the passenger seat cushion and
seatback may interfere with the proper operation
of the passenger sensing system.
Servicing Your Airbag-Equipped
Vehicle
Airbags affect how the vehicle should be serviced.
There are parts of the airbag system in several places
around the vehicle. Your dealer/retailer and the service
manual have information about servicing the vehicle
and the airbag system. To purchase a service manual,
see Service Publications Ordering Information
on
page 8‑14.
{WARNING:
For up to 10 seconds after the ignition is turned off
and the battery is disconnected, an airbag can still
inflate during improper service. You can be injured
if you are close to an airbag when it inflates. Avoid
yellow connectors. They are probably part of the
airbag system. Be sure to follow proper service
procedures, and make sure the person performing
work for you is qualified to do so.
2-76
Page 116 of 480
The key has a bar-coded key tag that the dealer/retailer
or qualified locksmith can use to make new keys. Store
this information in a safe place, not in your vehicle.
Notice:If you ever lock your keys in the vehicle,
you may have to damage the vehicle to get in.
Be sure you have spare keys.
If you are locked out of your vehicle, contact Roadside
Assistance. See Roadside Assistance Program
on
page 8‑6for more information.
Remote Keyless Entry (RKE) System
See Radio Frequency Statementon page 8‑17for
information regarding Part 15 of the Federal
Communications Commission (FCC) Rules and
RSS-210/211 of Industry Canada.
Changes or modifications to this system by other than
an authorized service facility could void authorization to
use this equipment. If there is a decrease in the RKE operating range,
try this:
.Check the distance. The transmitter may be too
far from the vehicle. Stand closer during rainy or
snowy weather.
.Check the location. Other vehicles or objects may
be blocking the signal. Take a few steps to the left
or right, hold the transmitter higher, and try again.
.Check the transmitter's battery. See
“Battery
Replacement” later in this section.
.If the transmitter is still not working correctly, see
your dealer/retailer or a qualified technician for
service.
Remote Keyless Entry (RKE) System
Operation
The Remote Keyless Entry (RKE) transmitter functions
work up to 60 feet (18 m) away from the vehicle.
There are other conditions which can affect the
performance of the transmitter. See Remote Keyless
Entry (RKE) System on page 3‑4.
3-4
Page 118 of 480
Remote Rear Door Operation (Panel)
*:Press and hold for about one second to open the
rear driver side door.
+: Press and hold for about one second to open the
rear passenger side door.
Programming Transmitters to the
Vehicle
Only RKE transmitters programmed to the vehicle will
work. If a transmitter is lost or stolen, a replacement
can be purchased and programmed through your
dealer/retailer. When the replacement transmitter is
programmed to the vehicle, all remaining transmitters
must also be programmed. Any lost or stolen
transmitters no longer work once the new transmitter
is programmed. Each vehicle can have up to four
transmitters programmed to it.
Battery Replacement
Replace the battery if the KEY FOB BATT LOW
message displays in the DIC. See “KEY FOB BATT
LOW” underDIC Warnings and Messages
on
page 4‑48for additional information.
Notice: When replacing the battery, do not touch
any of the circuitry on the transmitter. Static from
your body could damage the transmitter.
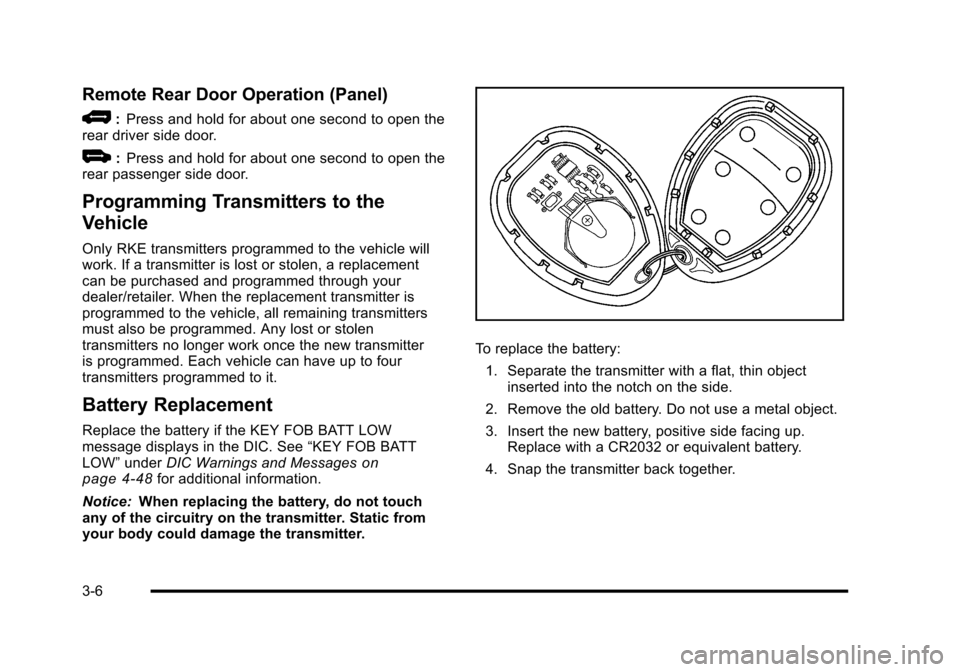
To replace the battery:
1. Separate the transmitter with a flat, thin object inserted into the notch on the side.
2. Remove the old battery. Do not use a metal object.
3. Insert the new battery, positive side facing up. Replace with a CR2032 or equivalent battery.
4. Snap the transmitter back together.
3-6
Page 136 of 480
R(ON/RUN): This is the position in which you can
operate the electrical accessories and to display some
instrument panel cluster warning and indicator lights.
The switch stays in this position when the engine is
running.
If you leave the key in the ACC/ACCESSORY or
ON/RUN position with the engine off, the battery could
be drained. You may not be able to start the vehicle if
the battery is allowed to drain for an extended period
of time.
/ (START): This position starts the engine. When the
engine starts, release the key. The ignition switch will
return to ON/RUN for driving.
A warning tone will sound when the driver door is
opened, the ignition is in LOCK/OFF or ACC/
ACCESSORY and the key is in the ignition.Column Lock Release
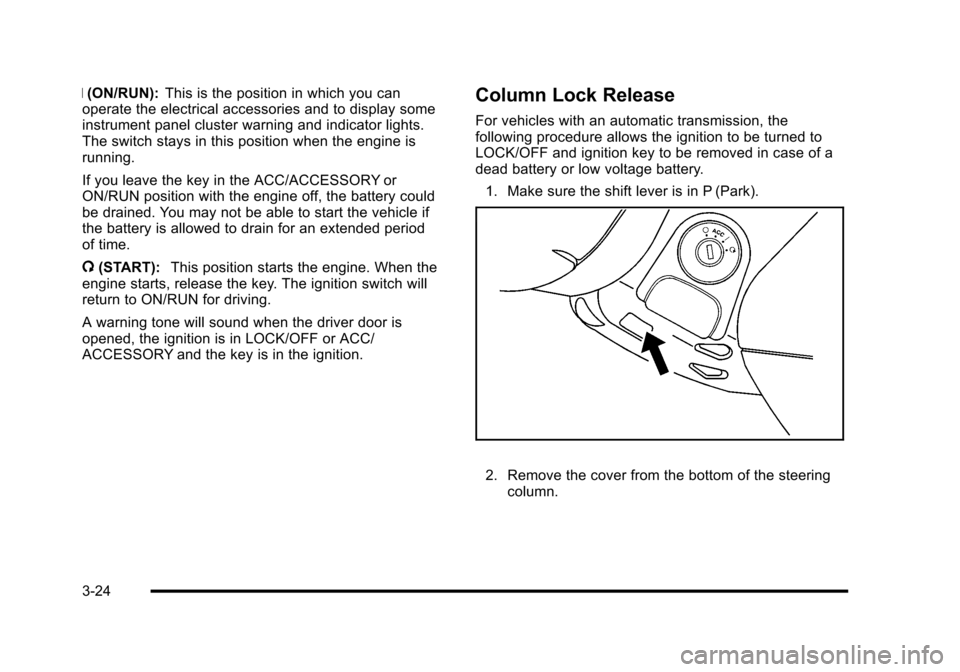
For vehicles with an automatic transmission, the
following procedure allows the ignition to be turned to
LOCK/OFF and ignition key to be removed in case of a
dead battery or low voltage battery.
1. Make sure the shift lever is in P (Park).
2. Remove the cover from the bottom of the steering column.
3-24
Page 138 of 480
Manual Transmission
The shift lever should be in N (Neutral) and the parking
brake engaged. Hold the clutch pedal down to the floor
and start the engine. The vehicle will not start if the
clutch pedal is not all the way down.
Starting Procedure
1. With your foot off the accelerator pedal, turn theignition key to START. When the engine starts, let
go of the key. The idle speed will go down as the
engine warms. Do not race the engine immediately
after starting it. Operate the engine and
transmission gently to allow the oil to warm up and
lubricate all moving parts.
The vehicle has a Computer-Controlled Cranking
System. This feature assists in starting the engine
and protects components. If the ignition key is
turned to the START position, and then released
when the engine begins cranking, the engine will
continue cranking for a few seconds or until the
vehicle starts. If the engine does not start and the
key is held in START for many seconds, cranking
will be stopped after 15 seconds to prevent
cranking motor damage. To prevent gear damage,
this system also prevents cranking if the engine is
already running. Engine cranking can be stopped
by turning the ignition switch to ACC/ACCESSORY
or LOCK/OFF. Notice:
Cranking the engine for long periods of
time, by returning the key to the START position
immediately after cranking has ended, can overheat
and damage the cranking motor, and drain the
battery. Wait at least 15 seconds between each try,
to let the cranking motor cool down.
2. If the engine does not start after 5‐10 seconds, especially in very cold weather (below 0°F or
−18°C), it could be flooded with too much gasoline.
Push the accelerator pedal all the way to the floor
and holding it there as you hold the key in START
for a maximum of 15 seconds. Wait at least
15 seconds between each try, to allow the cranking
motor to cool. When the engine starts, let go of the
key and accelerator. If the vehicle starts briefly but
then stops again, repeat the procedure. This clears
the extra gasoline from the engine. Do not race the
engine immediately after starting it. Operate the
engine and transmission gently until the oil warms
up and lubricates all moving parts.
Notice: The engine is designed to work with the
electronics in the vehicle. If you add electrical parts
or accessories, you could change the way the
engine operates. Before adding electrical
equipment, check with your dealer/retailer. If you
do not, the engine might not perform properly.
Any resulting damage would not be covered by the
vehicle warranty.
3-26
Page 149 of 480
Torque Lock (Automatic Transmission)
If you are parking on a hill and you do not shift into
P (Park) properly, the weight of the vehicle may put too
much force on the parking pawl in the transmission. You
may find it difficult to pull the shift lever out of P (Park).
This is called“torque lock.” To prevent torque lock, set
the parking brake and then shift into P (Park) properly
before you leave the driver seat. To find out how, see
Shifting Into Park (Automatic Transmission)
on
page 3‑36.
Move the shift lever out of P (Park) before you release
the parking brake.
If torque lock does occur, you may need to have
another vehicle push yours a little uphill to take
some of the pressure from the parking pawl in the
transmission, so you can pull the shift lever out of
P (Park).
Shifting Out of Park
(Automatic Transmission)
This vehicle is equipped with an electronic shift lock
release system. The shift lock release is designed to:
.Prevent ignition key removal unless the shift lever
is in P (Park) with the shift lever button fully
released, and
.Prevent movement of the shift lever out of
P (Park) unless the ignition is in ON/RUN or
ACC/ACCESSORY and the regular brake pedal
is applied.
The shift lock release is always functional except in the
case of a an uncharged or low voltage (less than 9 volt)
battery.
3-37
Page 150 of 480
If the vehicle has an uncharged battery or a battery with
low voltage, try charging or jump starting the battery.
SeeJump Starting
on page 6‑41for more information.
To shift out of P (Park): 1. Apply the brake pedal.
2. Then press the shift lever button.
3. Move the shift lever to the desired position.
If you still are unable to shift out of P (Park): 1. Fully release the shift lever button.
2. While holding down the brake pedal, press the shift lever button again.
3. Move the shift lever to the desired position.
If you still cannot move the shift lever from P (Park),
consult your dealer/retailer or a professional towing
service.
Parking the Vehicle
(Manual Transmission)
Before leaving the vehicle, fully press the clutch pedal
down, move the shift lever into R (Reverse), and firmly
apply the parking brake. Once the shift lever has been
placed in R (Reverse) with the clutch pedal pressed
down, the ignition key can be turned to LOCK/OFF, then
remove the key and release the clutch pedal. See
Manual Transmission Operation on page 3‑31.
Parking Over Things That Burn
{WARNING:
Things that can burn could touch hot exhaust
parts under the vehicle and ignite. Do not park
over papers, leaves, dry grass, or other things that
can burn.
3-38