spare tire CHEVROLET HHR 2010 1.G Owners Manual
[x] Cancel search | Manufacturer: CHEVROLET, Model Year: 2010, Model line: HHR, Model: CHEVROLET HHR 2010 1.GPages: 480, PDF Size: 5.25 MB
Page 28 of 480
Tire Pressure Monitor
This vehicle may have a Tire Pressure Monitor
System (TPMS).
The Tire Pressure Monitor
alerts you when a
significant reduction in
pressure occurs in one or
more of the vehicle’s tires
by illuminating the low tire
pressure warning light on
the instrument cluster.
If the warning light comes on, stop as soon as possible
and inflate the tires to the recommended pressure
shown on the tire loading information label located on
the driver side center pillar (B pillar). See Loading the
Vehicle
on page 5‑24. The warning light will remain on
until the tire pressure is corrected. You may notice during cooler conditions that the low tire
pressure warning light will appear when the vehicle is
first started and then turn off as you drive. This may be
an early indicator that your tire pressures are getting
low and the tires need to be inflated to the proper
pressure.
The Tire Pressure Monitor can alert you about low tire
pressure, but it does not replace normal monthly tire
maintenance. It is the driver
’s responsibility to maintain
correct tire pressures.
See Tire Pressure Monitor System
on page 6‑64and
Tire Pressure Monitor Operation on page 6‑65.
Tire Sealant and Compressor Kit
This vehicle may come with a jack and spare tire or a
tire sealant and compressor kit. The kit can be used to
seal small punctures in the tread area of the tire.
See Tire Sealant and Compressor Kit
on page 6‑78for
complete operating information.
1-22
Page 304 of 480
Section 6 Service and Appearance Care
When It Is Time for New Tires . . . . . . . . . . . . . . . . . 6-71
Buying New Tires . . . . . . . . . . . . . . . . . . . . . . . . . . . . . . 6-72
Different Size Tires and Wheels . . . . . . . . . . . . . . . 6-74
Uniform Tire Quality Grading . . . . . . . . . . . . . . . . . . . 6-74
Wheel Alignment and Tire Balance . . . . . . . . . . . . 6-76
Wheel Replacement . . . . . . . . . . . . . . . . . . . . . . . . . . . 6-76
Tire Chains . . . . . . . . . . . . . . . . . . . . . . . . . . . . . . . . . . . . 6-77
If a Tire Goes Flat . . . . . . . . . . . . . . . . . . . . . . . . . . . . . 6-77
Tire Sealant and Compressor Kit . . . . . . . . . . . . . . 6-78
Tire Sealant and Compressor Kit Storage . . . . . . 6-87
Changing a Flat Tire . . . . . . . . . . . . . . . . . . . . . . . . . . . 6-88
Removing the Spare Tire and Tools . . . . . . . . . . . . 6-89
Removing the Flat Tire and Installing the SpareTire (All Models Except SS) . . . . . . . . . . . . . . . . . 6-92
Removing the Flat Tire and Installing the Spare Tire (SS Model) . . . . . . . . . . . . . . . . . . . . . . . . . . . . . . 6-96
Storing a Flat or Spare Tire and Tools . . . . . . . . 6-106
Compact Spare Tire . . . . . . . . . . . . . . . . . . . . . . . . . . 6-110
Appearance Care . . . . . . . . . . . . . . . . . . . . . . . . . . . . . . . . 6-111
Interior Cleaning . . . . . . . . . . . . . . . . . . . . . . . . . . . . . 6-111
Fabric/Carpet . . . . . . . . . . . . . . . . . . . . . . . . . . . . . . . . . 6-112
Leather . . . . . . . . . . . . . . . . . . . . . . . . . . . . . . . . . . . . . . . 6-113
Instrument Panel, Vinyl, and Other Plastic Surfaces . . . . . . . . . . . . . . . . . . . . . . . . . . . . . . . . . . . . 6-113
Care of Safety Belts . . . . . . . . . . . . . . . . . . . . . . . . . . 6-113 Weatherstrips . . . . . . . . . . . . . . . . . . . . . . . . . . . . . . . . . 6-114
Washing Your Vehicle . . . . . . . . . . . . . . . . . . . . . . . . 6-114
Cleaning Exterior Lamps/Lenses . . . . . . . . . . . . . 6-114
Finish Care . . . . . . . . . . . . . . . . . . . . . . . . . . . . . . . . . . . 6-114
Windshield and Wiper Blades . . . . . . . . . . . . . . . . . 6-115
Aluminum or Chrome-Plated Wheels
and Trim . . . . . . . . . . . . . . . . . . . . . . . . . . . . . . . . . . . . 6-116
Tires . . . . . . . . . . . . . . . . . . . . . . . . . . . . . . . . . . . . . . . . . . 6-117
Sheet Metal Damage . . . . . . . . . . . . . . . . . . . . . . . . . 6-117
Finish Damage . . . . . . . . . . . . . . . . . . . . . . . . . . . . . . . 6-117
Underbody Maintenance . . . . . . . . . . . . . . . . . . . . . . 6-117
Chemical Paint Spotting . . . . . . . . . . . . . . . . . . . . . . 6-117
Vehicle Identification . . . . . . . . . . . . . . . . . . . . . . . . . . . . 6-118
Vehicle Identification Number (VIN) . . . . . . . . . . . 6-118
Service Parts Identification Label . . . . . . . . . . . . . 6-118
Electrical System . . . . . . . . . . . . . . . . . . . . . . . . . . . . . . . . 6-118
Add-On Electrical Equipment . . . . . . . . . . . . . . . . . 6-118
Headlamp Wiring . . . . . . . . . . . . . . . . . . . . . . . . . . . . . 6-119
Windshield Wiper Fuses . . . . . . . . . . . . . . . . . . . . . . 6-119
Power Windows and Other Power Options . . . 6-119
Fuses and Circuit Breakers . . . . . . . . . . . . . . . . . . . 6-119
Floor Console Fuse Block . . . . . . . . . . . . . . . . . . . . 6-120
Engine Compartment Fuse Block . . . . . . . . . . . . . 6-122
Capacities and Specifications . . . . . . . . . . . . . . . . . . 6-125
6-2
Page 347 of 480
To disconnect the jumper cables from both vehicles:1. Disconnect the black negative (−) cable from the vehicle that had the dead battery.
2. Disconnect the black negative (−) cable from the vehicle with the good battery.
3. Disconnect the red positive (+) cable from the vehicle with the good battery.
4. Disconnect the red positive (+) cable from the other vehicle.
5. Return the positive (+) terminal cover to its original position.
Headlamp Aiming
The vehicle has a visual optical headlamp aiming
system. The aim has been preset at the factory and
should need no further adjustment.
However, if the vehicle is damaged in a crash, the
headlamp aim may be affected and adjustment may be
necessary.
If oncoming vehicles flash their high beams at you, this
may also mean the vertical aim needs to be adjusted. It is recommended that the vehicle is taken to your
dealer/retailer for service if the headlamps need to be
re-aimed. It is possible however, to re-aim the
headlamps as described.
The vehicle should:
.Be placed so the headlamps are 25 ft. (7.6 m) from
a light colored wall.
.Have all four tires on a level surface which is level
all the way to the wall.
.Be placed so it is perpendicular to the wall or other
flat surface.
.Not have any snow, ice, or mud on it.
.Be fully assembled and all other work stopped
while headlamp aiming is being performed.
.Normally loaded with a full tank of fuel and one
person or 160 lbs (75 kg) sitting on the driver seat.
.Have all tires properly inflated.
.Have the spare tire is in its original location in the
vehicle.
6-45
Page 358 of 480
Tire Sidewall Labeling
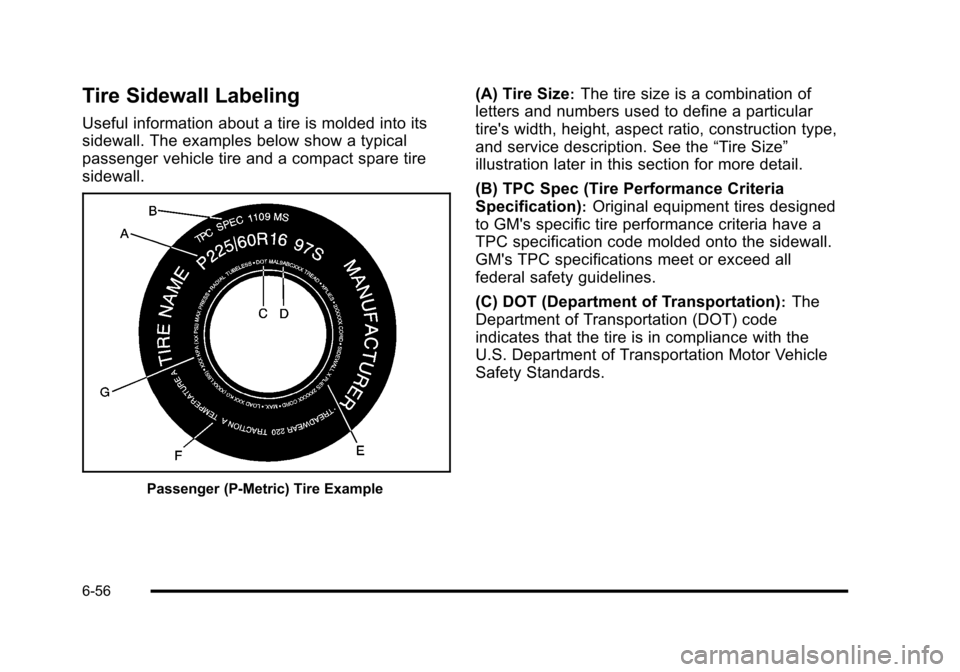
Useful information about a tire is molded into its
sidewall. The examples below show a typical
passenger vehicle tire and a compact spare tire
sidewall.
Passenger (P‐Metric) Tire Example
(A) Tire Size:The tire size is a combination of
letters and numbers used to define a particular
tire's width, height, aspect ratio, construction type,
and service description. See the “Tire Size”
illustration later in this section for more detail.
(B) TPC Spec (Tire Performance Criteria
Specification)
:Original equipment tires designed
to GM's specific tire performance criteria have a
TPC specification code molded onto the sidewall.
GM's TPC specifications meet or exceed all
federal safety guidelines.
(C) DOT (Department of Transportation)
:The
Department of Transportation (DOT) code
indicates that the tire is in compliance with the
U.S. Department of Transportation Motor Vehicle
Safety Standards.
6-56
Page 359 of 480
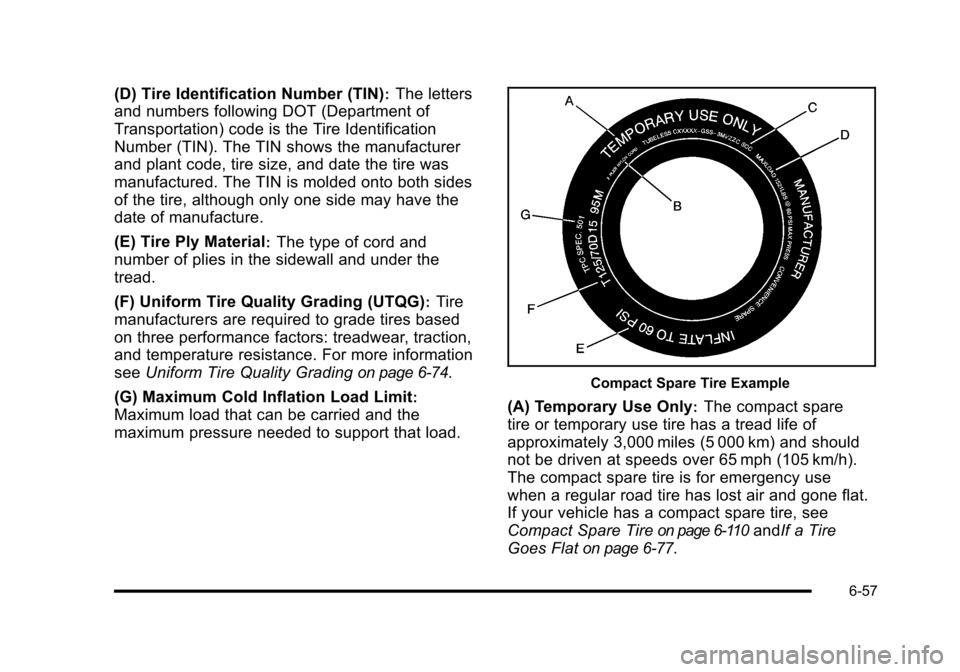
(D) Tire Identification Number (TIN):The letters
and numbers following DOT (Department of
Transportation) code is the Tire Identification
Number (TIN). The TIN shows the manufacturer
and plant code, tire size, and date the tire was
manufactured. The TIN is molded onto both sides
of the tire, although only one side may have the
date of manufacture.
(E) Tire Ply Material
:The type of cord and
number of plies in the sidewall and under the
tread.
(F) Uniform Tire Quality Grading (UTQG)
:Tire
manufacturers are required to grade tires based
on three performance factors: treadwear, traction,
and temperature resistance. For more information
see Uniform Tire Quality Grading
on page 6‑74.
(G) Maximum Cold Inflation Load Limit
:
Maximum load that can be carried and the
maximum pressure needed to support that load.
Compact Spare Tire Example
(A) Temporary Use Only:The compact spare
tire or temporary use tire has a tread life of
approximately 3,000 miles (5 000 km) and should
not be driven at speeds over 65 mph (105 km/h).
The compact spare tire is for emergency use
when a regular road tire has lost air and gone flat.
If your vehicle has a compact spare tire, see
Compact Spare Tire
on page 6‑110andIf a Tire
Goes Flat
on page 6‑77.
6-57
Page 360 of 480

(B) Tire Ply Material:The type of cord and
number of plies in the sidewall and under the
tread.
(C) Tire Identification Number (TIN)
:The letters
and numbers following the DOT (Department of
Transportation) code is the Tire Identification
Number (TIN). The TIN shows the manufacturer
and plant code, tire size, and date the tire was
manufactured. The TIN is molded onto both sides
of the tire, although only one side may have the
date of manufacture.
(D) Maximum Cold Inflation Load Limit
:
Maximum load that can be carried and the
maximum pressure needed to support that load. (E) Tire Inflation
:The temporary use tire or
compact spare tire should be inflated to 60 psi
(420 kPa). For more information on tire pressure
and inflation see Inflation - Tire Pressure
on
page 6‑63
.
(F) Tire Size
:A combination of letters and
numbers define a tire's width, height, aspect ratio,
construction type, and service description. The
letter T as the first character in the tire size means
the tire is for temporary use only.
(G) TPC Spec (Tire Performance Criteria
Specification)
:Original equipment tires designed
to GM's specific tire performance criteria have a
TPC specification code molded onto the sidewall.
GM's TPC specifications meet or exceed all
federal safety guidelines.
6-58
Page 365 of 480
Inflation - Tire Pressure
Tires need the correct amount of air pressure to
operate effectively.
Notice:Do not let anyone tell you that under‐
inflation or over‐inflation is all right. It is not.
If your tires do not have enough air
(under‐inflation), you can get the following:
.Too much flexing
.Too much heat
.Tire overloading
.Premature or irregular wear
.Poor handling
.Reduced fuel economy
If your tires have too much air (over‐inflation),
you can get the following:
.Unusual wear
.Poor handling
.Rough ride
.Needless damage from road hazards A vehicle specific Tire and Loading Information
label is attached to your vehicle. This label shows
your vehicle's original equipment tires and the
correct inflation pressures for your tires when they
are cold. The recommended cold tire inflation
pressure, shown on the label, is the minimum
amount of air pressure needed to support your
vehicle's maximum load carrying capacity.
For additional information regarding how much
weight your vehicle can carry, and an example of
the Tire and Loading Information label, see
Loading the Vehicle
on page 5‑24. How you load
your vehicle affects vehicle handling and ride
comfort. Never load your vehicle with more weight
than it was designed to carry.
When to Check
Check your tires once a month or more. Do not
forget to check the compact spare tire, it should
be at 60 psi (420 kPa). For additional information
regarding the compact spare tire, see Compact
Spare Tire
on page 6‑110.
6-63
Page 366 of 480
How to Check
Use a good quality pocket-type gauge to check
tire pressure. You cannot tell if your tires are
properly inflated simply by looking at them.
Radial tires may look properly inflated even
when they are under‐inflated. Check the tire's
inflation pressure when the tires are cold.
Cold means your vehicle has been sitting for
at least three hours or driven no more than
1 mile (1.6 km).
Remove the valve cap from the tire valve stem.
Press the tire gauge firmly onto the valve to get a
pressure measurement. If the cold tire inflation
pressure matches the recommended pressure on
the Tire and Loading Information label, no further
adjustment is necessary. If the inflation pressure
is low, add air until you reach the recommended
amount.
If you overfill the tire, release air by pushing on
the metal stem in the center of the tire valve.
Re‐check the tire pressure with the tire gauge.
Be sure to put the valve caps back on the valve
stems. They help prevent leaks by keeping out dirt
and moisture.
Tire Pressure Monitor System
The Tire Pressure Monitor System (TPMS) uses radio
and sensor technology to check tire pressure levels.
The TPMS sensors monitor the air pressure in your
vehicle's tires and transmit tire pressure readings to a
receiver located in the vehicle.
Each tire, including the spare (if provided), should be
checked monthly when cold and inflated to the inflation
pressure recommended by the vehicle manufacturer
on the vehicle placard or tire inflation pressure label.
(If your vehicle has tires of a different size than the size
indicated on the vehicle placard or tire inflation pressure
label, you should determine the proper tire inflation
pressure for those tires.)
As an added safety feature, your vehicle has been
equipped with a tire pressure monitoring system
(TPMS) that illuminates a low tire pressure telltale when
one or more of your tires is significantly under‐inflated.
Accordingly, when the low tire pressure telltale
illuminates, you should stop and check your tires as
soon as possible, and inflate them to the proper
pressure. Driving on a significantly under‐inflated tire
causes the tire to overheat and can lead to tire failure.
Under‐inflation also reduces fuel efficiency and tire
tread life, and may affect the vehicle's handling and
stopping ability.
6-64
Page 367 of 480
Please note that the TPMS is not a substitute for proper
tire maintenance, and it is the driver's responsibility to
maintain correct tire pressure, even if under‐inflation
has not reached the level to trigger illumination of the
TPMS low tire pressure telltale.
Your vehicle has also been equipped with a TPMS
malfunction indicator to indicate when the system is
not operating properly. The TPMS malfunction indicator
is combined with the low tire pressure telltale. When
the system detects a malfunction, the telltale will flash
for approximately one minute and then remain
continuously illuminated. This sequence will continue
upon subsequent vehicle start‐ups as long as the
malfunction exists.
When the malfunction indicator is illuminated, the
system may not be able to detect or signal low tire
pressure as intended. TPMS malfunctions may occur
for a variety of reasons, including the installation of
replacement or alternate tires or wheels on the
vehicle that prevent the TPMS from functioning
properly. Always check the TPMS malfunction telltale
after replacing one or more tires or wheels on your
vehicle to ensure that the replacement or alternate tires
and wheels allow the TPMS to continue to function
properly.
SeeTire Pressure Monitor Operation
on page 6‑65for
additional information.
Federal Communications Commission
(FCC) and Industry Canada
See Radio Frequency Statementon page 8‑17for
information regarding Part 15 of the Federal
Communications Commission (FCC) Rules and
RSS-210/211 of Industry Canada.
Tire Pressure Monitor Operation
This vehicle may have a Tire Pressure Monitor System
(TPMS). The TPMS is designed to warn the driver when
a low tire pressure condition exists. If your vehicle has
this feature, TPMS sensors are mounted onto each tire
and wheel assembly, excluding the spare tire and wheel
assembly. The TPMS sensors monitor the air pressure
in the vehicle's tires and transmits the tire pressure
readings to a receiver located in the vehicle.
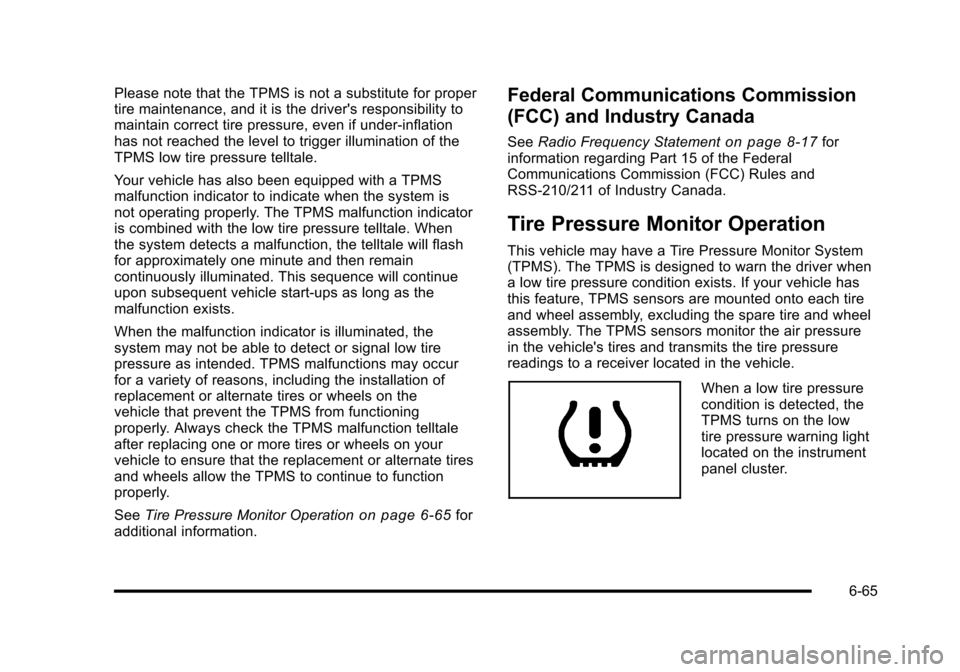
When a low tire pressure
condition is detected, the
TPMS turns on the low
tire pressure warning light
located on the instrument
panel cluster.
6-65
Page 369 of 480
TPMS Malfunction Light and Message
The TPMS will not function properly if one or more of
the TPMS sensors are missing or inoperable. When the
system detects a malfunction, the low tire warning light
flashes for about one minute and then stays on for the
remainder of the ignition cycle. A DIC warning message
is also displayed. The low tire warning light and DIC
warning message come on at each ignition cycle until
the problem is corrected. Some of the conditions that
can cause the malfunction light and DIC message to
come on are:
.One of the road tires has been replaced with the
spare tire. The spare tire does not have a TPMS
sensor. The TPMS malfunction light and DIC
message should go off once you re‐install the
road tire containing the TPMS sensor.
.The TPMS sensor matching process was started
but not completed or not completed successfully
after rotating the vehicle's tires. The DIC message
and TPMS malfunction light should go off once the
TPMS sensor matching process is performed
successfully. See“TPMS Sensor Matching
Process” later in this section.
.One or more TPMS sensors are missing or
damaged. The DIC message and the TPMS
malfunction light should go off when the TPMS
sensors are installed and the sensor matching
process is performed successfully. See your
dealer/retailer for service.
.Replacement tires or wheels do not match your
vehicle's original equipment tires or wheels. Tires
and wheels other than those recommended for
your vehicle could prevent the TPMS from
functioning properly. See Buying New Tires
on
page 6‑72.
.Operating electronic devices or being near facilities
using radio wave frequencies similar to the TPMS
could cause the TPMS sensors to malfunction.
If the TPMS is not functioning it cannot detect or signal
a low tire condition. See your dealer/retailer for service
if the TPMS malfunction light and DIC message comes
on and stays on.
6-67