trunk release CHEVROLET IMPALA 2007 9.G Owners Manual
[x] Cancel search | Manufacturer: CHEVROLET, Model Year: 2007, Model line: IMPALA, Model: CHEVROLET IMPALA 2007 9.GPages: 460, PDF Size: 2.56 MB
Page 93 of 460
V(Remote Trunk Release):Press and hold
this button for about one second to release
the trunk lid. The transaxle must be in PARK (P)
for this feature to operate.
L(Vehicle Locator/Panic Alarm):Press and
release this button to locate your vehicle. The turn
signal lamps will �ash and the horn will sound
three times. Press and hold this button for more
than two seconds to activate the panic alarm.
The turn signal lamps will �ash and the horn will
sound repeatedly for 30 seconds. The alarm
will turn off when the ignition is turned to RUN or
the alarm button is pressed again. The ignition
must be in OFF for the panic alarm to work.
Matching Transmitter(s) to Your
Vehicle
Each remote keyless entry transmitter is coded
to prevent another transmitter from unlocking
your vehicle. If a transmitter is lost or stolen,
a replacement can be purchased through your
GM dealer. Remember to bring any additional
transmitters so they can also be re-coded to match
the new transmitter. Once your dealer has coded
the new transmitter, the lost transmitter will not
unlock your vehicle. The vehicle can have a
maximum of eight transmitters matched to it.
See Remote Key underDIC Operation and
Displays on page 191.
93
Page 94 of 460
Battery Replacement
Under normal use, the battery in your remote
keyless entry transmitter should last about
four years.
You can tell the battery is weak if the transmitter
will not work at the normal range in any location.
If you have to get close to your vehicle before
the transmitter works, it is probably time to change
the battery.
The REPLACE BATTERY IN REMOTE KEY
message in the vehicle’s DIC will display if the
remote keyless entry transmitter battery is
low. See “REPLACE BATTERY IN REMOTE KEY”
underDIC Warnings and Messages on page 199
for additional information.
Notice:When replacing the battery, use
care not to touch any of the circuitry. Static
from your body transferred to these surfaces
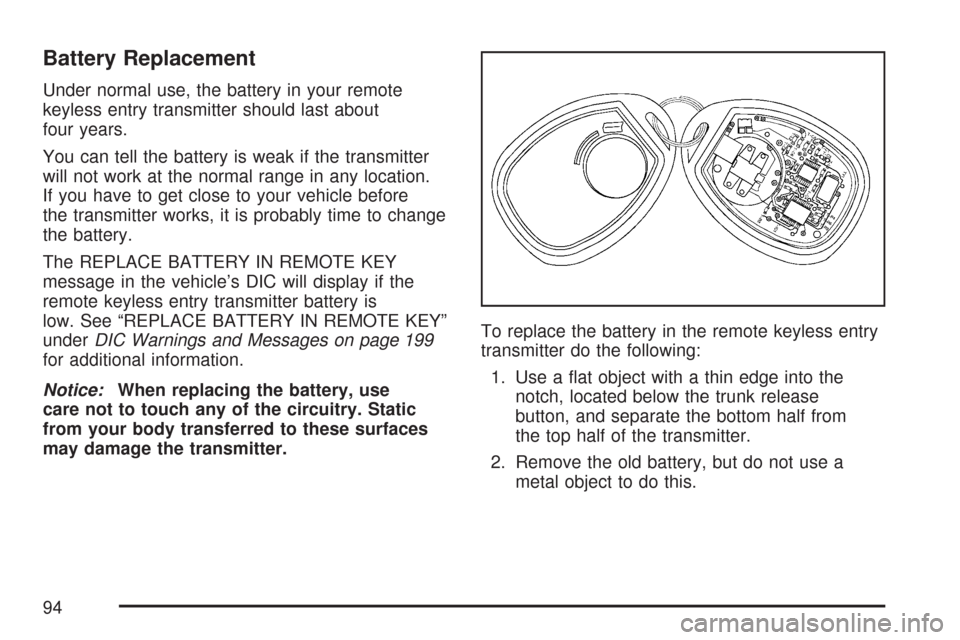
may damage the transmitter.To replace the battery in the remote keyless entry
transmitter do the following:
1. Use a �at object with a thin edge into the
notch, located below the trunk release
button, and separate the bottom half from
the top half of the transmitter.
2. Remove the old battery, but do not use a
metal object to do this.
94
Page 103 of 460
Trunk Release
To open the trunk from the outside, press the
open trunk button on the remote keyless entry
transmitter, if equipped.
Remote Trunk Release
You can also open the trunk from inside the
vehicle.
G(Remote Trunk Release):Press the button
with the open trunk symbol on it. The button is
located next to the exterior lamps control on
the left side of the instrument panel. The shift lever
must be in PARK (P) for the remote trunk
release button to work.
If your vehicle ever loses power, you can open the
trunk by lowering the rear seat and pulling the
emergency trunk release handle located inside the
trunk. SeeSplit Folding Rear Seat on page 15
and “Emergency Trunk Release Handle” following.
Emergency Trunk Release Handle
Notice:Do not use the emergency trunk
release handle as a tie-down or anchor point
when securing items in the trunk as it could
damage the handle. The emergency trunk
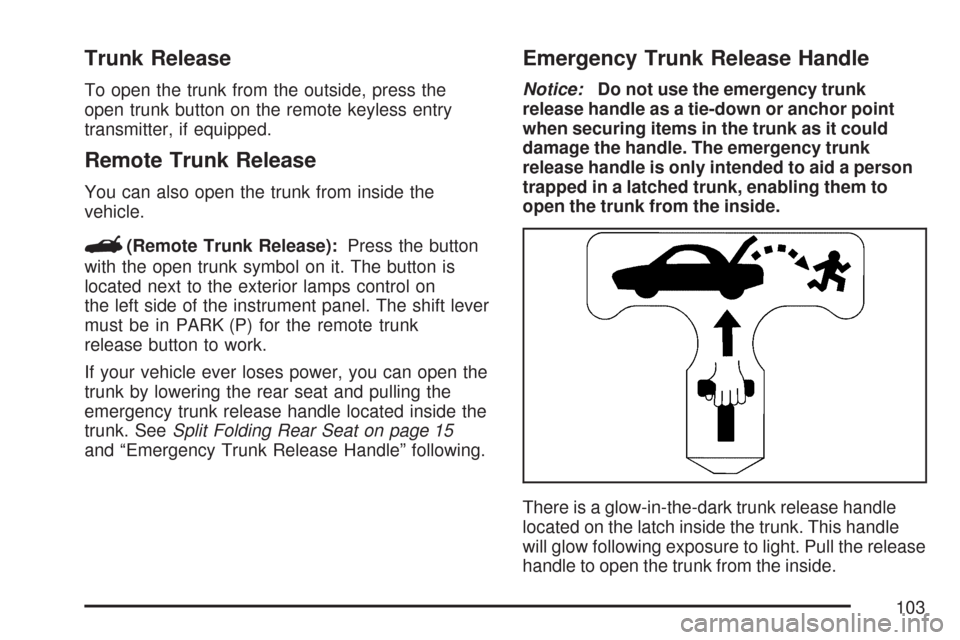
release handle is only intended to aid a person
trapped in a latched trunk, enabling them to
open the trunk from the inside.
There is a glow-in-the-dark trunk release handle
located on the latch inside the trunk. This handle
will glow following exposure to light. Pull the release
handle to open the trunk from the inside.
103
Page 145 of 460
Convenience Net
The vehicle may have a convenience net located
on the back wall of the trunk.
The net is not for larger, heavier loads. Store
those in the trunk as far forward as possible.
Unhook the net so that it will lie �at when
not in use.
Sunroof
If your vehicle is
equipped with a
sunroof, the sunroof
switches are located on
the overhead console.
The sunroof can only be operated when the
ignition is in ACCESSORY, RUN, or when
Retained Accessory Power (RAP) is active. See
Retained Accessory Power (RAP) on page 113.
Q(Vent/Express-Open):To vent the sunroof
when it is closed, press this switch once.
When using the vent, the sunshade should be fully
opened. The sunshade can be opened or closed
manually by sliding it rearward or forward.
From the vent position, press this switch again to
activate the express-open feature. Press the
close switch to stop movement of the sunroof.
The sunshade will automatically open when using
express-open.
A de�ector will automatically pop up when the
sunroof is opened. The de�ector will retract when
the sunroof is closed.
R(Close):To close the sunroof, press and hold
this switch until the sunroof motor stops, or
release the switch when the desired position has
been reached.
145
Page 151 of 460
The main components of your instrument panel are listed here:
A. Air Vent. SeeOutlet Adjustment on page 172.
B. Remote Trunk Release Button. See “Remote
Trunk Release” underTrunk on page 102.
C. Multifunction Lever. SeeTurn
Signal/Multifunction Lever on page 153.
D. Instrument Panel Cluster. SeeInstrument Panel
Cluster on page 175.
E. Hazard Warning Flasher Button. SeeHazard
Warning Flashers on page 152.
F. Driver Information Center. SeeDriver
Information Center (DIC) on page 190.
G. Passenger Air Bag status Indicator. See
Passenger Airbag Status Indicator on page 179.
H. Audio System. SeeAudio System(s) on
page 215.
I. Exterior Lamps Control. SeeExterior Lamps on
page 160.
J. Instrument Panel Brightness. SeeInstrument
Panel Brightness on page 163.
K. Traction Control On/Off Button (If Equipped).
SeeTraction Control System (TCS) on
page 256.L. Tilt Steering Wheel Lever. SeeTilt Wheel on
page 153.
M. Steering Wheel Cruise Control. SeeCruise
Control on page 157.
N. Hood Release. SeeHood Release on
page 305.
O. Horn. SeeHorn on page 152.
P. Audio Steering Wheel Controls (If Equipped).
SeeAudio Steering Wheel Controls on
page 243.
Q. Ignition Switch. SeeIgnition Positions on
page 112.
R. Climate Controls. SeeClimate Control System
on page 168.
S. Accessory Power Outlets. SeeAccessory
Power Outlet(s) on page 167.
T. Center Console Shift Lever (If Equipped).
See “Console Shift Lever” underShifting Into
Park (P) on page 121.
U. Glove Box. SeeGlove Box on page 144.
151