turn signal CHEVROLET IMPALA 2012 9.G User Guide
[x] Cancel search | Manufacturer: CHEVROLET, Model Year: 2012, Model line: IMPALA, Model: CHEVROLET IMPALA 2012 9.GPages: 374, PDF Size: 5.73 MB
Page 154 of 374
Black plate (4,1)Chevrolet Impala Owner Manual - 2012
6-4 Lighting
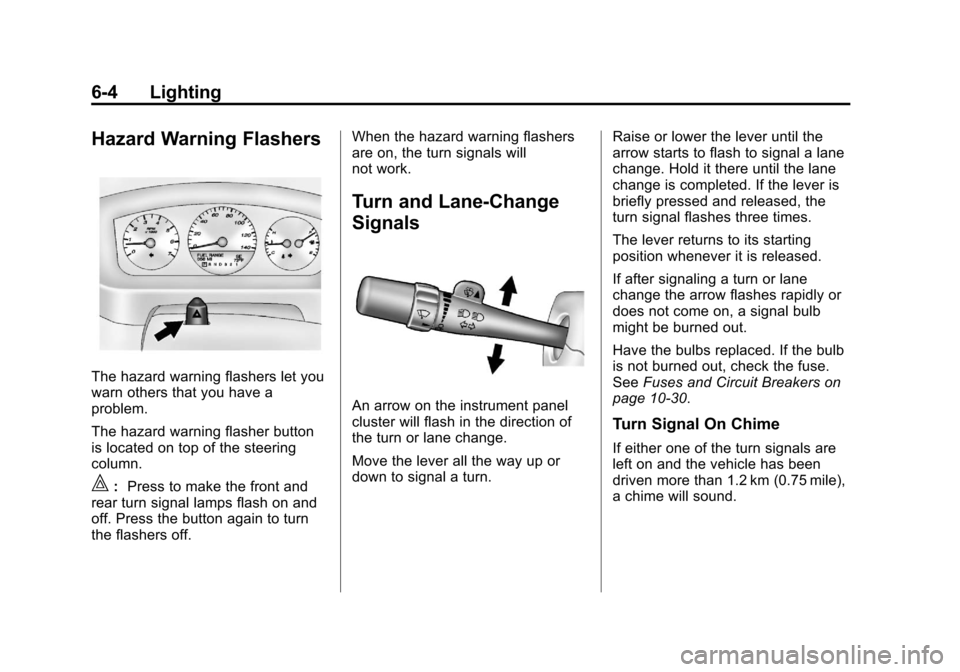
Hazard Warning Flashers
The hazard warning flashers let you
warn others that you have a
problem.
The hazard warning flasher button
is located on top of the steering
column.
|:Press to make the front and
rear turn signal lamps flash on and
off. Press the button again to turn
the flashers off. When the hazard warning flashers
are on, the turn signals will
not work.
Turn and Lane-Change
Signals
An arrow on the instrument panel
cluster will flash in the direction of
the turn or lane change.
Move the lever all the way up or
down to signal a turn.
Raise or lower the lever until the
arrow starts to flash to signal a lane
change. Hold it there until the lane
change is completed. If the lever is
briefly pressed and released, the
turn signal flashes three times.
The lever returns to its starting
position whenever it is released.
If after signaling a turn or lane
change the arrow flashes rapidly or
does not come on, a signal bulb
might be burned out.
Have the bulbs replaced. If the bulb
is not burned out, check the fuse.
See
Fuses and Circuit Breakers on
page 10‑30.
Turn Signal On Chime
If either one of the turn signals are
left on and the vehicle has been
driven more than 1.2 km (0.75 mile),
a chime will sound.
Page 164 of 374
Black plate (6,1)Chevrolet Impala Owner Manual - 2012
7-6 Infotainment System
Radio
AM-FM Radio
Radio Data System (RDS)
The radio may have RDS. The RDS
feature is available for use only on
FM stations that broadcast RDS
information. This system relies upon
receiving specific information from
these stations and only works when
the information is available. While
the radio is tuned to an FM-RDS
station, the station name or call
letters display. In rare cases, a radio
station could broadcast incorrect
information that causes the radio
features to work improperly. If this
happens, contact the radio station.
4(Information) (RDS Features):
For vehicles with RDS features,
press
4to display additional text
information related to the current
FM-RDS station. If information is
available, the song title information
displays on the top line of the
display and artist information displays on the bottom line. When
information is not available,
“NO
INFO” displays.
Auto Text (RDS Features): If
additional information is available
for the current song being played,
Auto Text will automatically page/
scroll the information every
three seconds above the FAV
presets on the radio display. By
default, Auto Text is enabled.
To change the Auto Text setting:
1. Press MENU to display the radio setup menu.
2. Press the softkey under AUTO TXT tab on the radio display.
3. Press the softkey under the ON or OFF tab on the radio display.
If
4is pressed and the song title or
artist information is longer than
what can be displayed, the extra
information will page every
three seconds when Auto Text is
activated.
Finding a Station
BAND: Press to choose between
FM1, FM2, AM, or XM™
(if equipped) on the Radio with CD
(Base). Press to choose between
FM, AM, XM (if equipped) on the
Radio with CD (MP3).
f(Tune): Turn to select radio
stations.
©SEEK: Press to seek or scan
stations with a strong signal in the
selected band.
.To seek stations, press and
release
©SEEK to go to the
previous station and stay there.
.To scan stations, press and hold©SEEK for a few seconds until
the radio beeps once. The radio
goes to a station, plays for a
few seconds, then goes to the
next station. Press
©SEEK
again to stop scanning.
Page 169 of 374
Black plate (11,1)Chevrolet Impala Owner Manual - 2012
Infotainment System 7-11
XM Radio Messages
XL (Explicit Language
Channels):These channels, or any
others, can be blocked at a
customer's request, by calling
1-800-929-2100 in the U.S. and
1-877-438-9677 in Canada.
XM Updating: The encryption code
in the receiver is being updated, and
no action is required. This process
should take no longer than
30 seconds.
No XM Signal: The system is
functioning correctly, but the vehicle
is in a location that is blocking the
XM signal. When the vehicle is
moved into an open area, the signal
should return.
Loading XM: The audio system is
acquiring and processing audio and
text data. No action is needed. This
message should disappear shortly. Channel Off Air:
This channel is
not currently in service. Tune in to
another channel.
Channel Unauth : This channel is
blocked or cannot be received with
your XM subscription package.
Channel Unavail: This previously
assigned channel is no longer
assigned. Tune to another station.
If this station was one of the
presets, choose another station for
that preset button.
No Artist Info: No artist
information is available at this time
on this channel. The system is
working properly.
No Title Info: No song title
information is available at this time
on this channel. The system is
working properly.
No CAT Info: No category
information is available at this time
on this channel. The system is
working properly. No Information:
No text or
informational messages are
available at this time on this
channel. The system is working
properly.
No Subscription Please Renew:
XM subscription needs to be
reactivated. Contact XM at
www.xmradio.com or call
1-800-929-2100 in the U.S. and
www.xmradio.ca or call
1-877-438-9677 in Canada.
CAT Not Found: There are no
channels available for the selected
category. The system is working
properly.
XM Theftlocked: The XM receiver
in the vehicle could have previously
been in another vehicle. For security
purposes, XM receivers cannot be
swapped between vehicles. If this
message is received after having
the vehicle serviced, check with
your dealer.
Page 236 of 374
Black plate (44,1)Chevrolet Impala Owner Manual - 2012
9-44 Driving and Operating
Before starting, check all trailer hitch
parts and attachments, safety
chains, electrical connectors, lamps,
tires and mirror adjustments. If the
trailer has electric brakes, start the
vehicle and trailer moving and then
apply the trailer brake controller by
hand to be sure the brakes are
working. This checks the electrical
connection at the same time.
During the trip, check occasionally
to be sure that the load is secure,
and that the lamps and any trailer
brakes are still working.
Following Distance
Stay at least twice as far behind the
vehicle ahead as you would when
driving the vehicle without a trailer.
This can help to avoid situations
that require heavy braking and
sudden turns.
Passing
More passing distance is needed
when towing a trailer. Because the
rig is longer, it is necessary to go
much farther beyond the passed
vehicle before returning to the lane.
Backing Up
Hold the bottom of the steering
wheel with one hand. Then, to move
the trailer to the left, move that hand
to the left. To move the trailer to the
right, move your hand to the right.
Always back up slowly and,
if possible, have someone
guide you.
Making Turns
Notice:Making very sharp turns
while trailering could cause the
trailer to come in contact with the
vehicle. The vehicle could be
damaged. Avoid making very
sharp turns while trailering. When turning with a trailer, make
wider turns than normal. Do this so
the trailer will not strike soft
shoulders, curbs, road signs, trees
or other objects. Avoid jerky or
sudden maneuvers. Signal well in
advance.
Turn Signals When Towing a
Trailer
The arrows on the instrument panel
flash whenever signaling a turn or
lane change. Properly hooked up,
the trailer lamps also flash, telling
other drivers the vehicle is turning,
changing lanes or stopping.
When towing a trailer, the arrows on
the instrument panel flash for turns
even if the bulbs on the trailer are
burned out. For this reason you may
think other drivers are seeing the
signal when they are not. It is
important to check occasionally to
be sure the trailer bulbs are still
working.
Page 243 of 374
Black plate (1,1)Chevrolet Impala Owner Manual - 2012
Vehicle Care 10-1
Vehicle Care
General Information
General Information . . . . . . . . . . 10-2
California Proposition65 Warning . . . . . . . . . . . . . . . . . 10-3
California Perchlorate Materials Requirements . . . . 10-3
Accessories and Modifications . . . . . . . . . . . . . . . 10-3
Vehicle Checks
Doing Your OwnService Work . . . . . . . . . . . . . . . 10-4
Hood . . . . . . . . . . . . . . . . . . . . . . . . 10-5
Engine Compartment Overview . . . . . . . . . . . . . . . . . . . 10-6
Engine Oil . . . . . . . . . . . . . . . . . . . 10-7
Engine Oil Life System . . . . . 10-10
Automatic Transmission Fluid . . . . . . . . . . . . . . . . . . . . . . 10-11
Engine Air Cleaner/Filter . . . . 10-11
Cooling System . . . . . . . . . . . . 10-12
Engine Coolant . . . . . . . . . . . . . 10-13
Engine Overheating . . . . . . . . 10-16
Overheated Engine Protection
Operating Mode . . . . . . . . . . . 10-17 Power Steering Fluid . . . . . . . 10-17
Washer Fluid . . . . . . . . . . . . . . . 10-18
Brakes . . . . . . . . . . . . . . . . . . . . . 10-19
Brake Fluid . . . . . . . . . . . . . . . . . 10-20
Battery . . . . . . . . . . . . . . . . . . . . . 10-21
Starter Switch Check . . . . . . . 10-22
Automatic Transmission Shift
Lock Control Function
Check . . . . . . . . . . . . . . . . . . . . . 10-22
Ignition Transmission Lock Check . . . . . . . . . . . . . . . . . . . . . 10-23
Park Brake and P (Park) Mechanism Check . . . . . . . . 10-23
Wiper Blade Replacement . . . . . . . . . . . . . . 10-24
Headlamp Aiming
Headlamp Aiming . . . . . . . . . . 10-25
Bulb Replacement
Bulb Replacement . . . . . . . . . . 10-25
Halogen Bulbs . . . . . . . . . . . . . . 10-25
Headlamps, Front TurnSignal, Sidemarker, and
Parking Lamps . . . . . . . . . . . . 10-25 Taillamps, Turn Signal,
Sidemarker, Stoplamps,
and Back-Up Lamps . . . . . . 10-28
License Plate Lamp . . . . . . . . 10-29
Replacement Bulbs . . . . . . . . . 10-29
Electrical System
Electrical System Overload . . . . . . . . . . . . . . . . . . 10-29
Fuses and Circuit Breakers . . . . . . . . . . . . . . . . . . 10-30
Engine Compartment Fuse Block . . . . . . . . . . . . . . . . . . . . . 10-30
Instrument Panel Fuse Block . . . . . . . . . . . . . . . . . . . . . 10-34
Wheels and Tires
Tires . . . . . . . . . . . . . . . . . . . . . . . . 10-35
Tire Sidewall Labeling . . . . . . 10-36
Tire Designations . . . . . . . . . . . 10-38
Tire Terminology andDefinitions . . . . . . . . . . . . . . . . 10-38
Tire Pressure . . . . . . . . . . . . . . . 10-41
Tire Pressure Monitor System . . . . . . . . . . . . . . . . . . . 10-43
Tire Pressure Monitor Operation . . . . . . . . . . . . . . . . . 10-44
Tire Inspection . . . . . . . . . . . . . . 10-47
Tire Rotation . . . . . . . . . . . . . . . 10-47
Page 267 of 374
Black plate (25,1)Chevrolet Impala Owner Manual - 2012
Vehicle Care 10-25
Headlamp Aiming
Headlamp aim has been preset at
the factory and should need no
further adjustment.
However, if the vehicle is damaged
in a crash, the headlamp aim may
be affected. Aim adjustment to the
low-beam headlamps may be
necessary if oncoming drivers flash
their high-beam headlamps at you
(for vertical aim).
If the headlamps need to be
re-aimed, it is recommended that
the vehicle be taken to the dealer
for service.
Bulb Replacement
For the proper type of replacement
bulbs, seeReplacement Bulbs on
page 10‑29.
For any bulb‐changing procedure
not listed in this section, contact
your dealer.
Halogen Bulbs
{WARNING
Halogen bulbs have pressurized
gas inside and can burst if you
drop or scratch the bulb. You or
others could be injured. Be sure
to read and follow the instructions
on the bulb package.
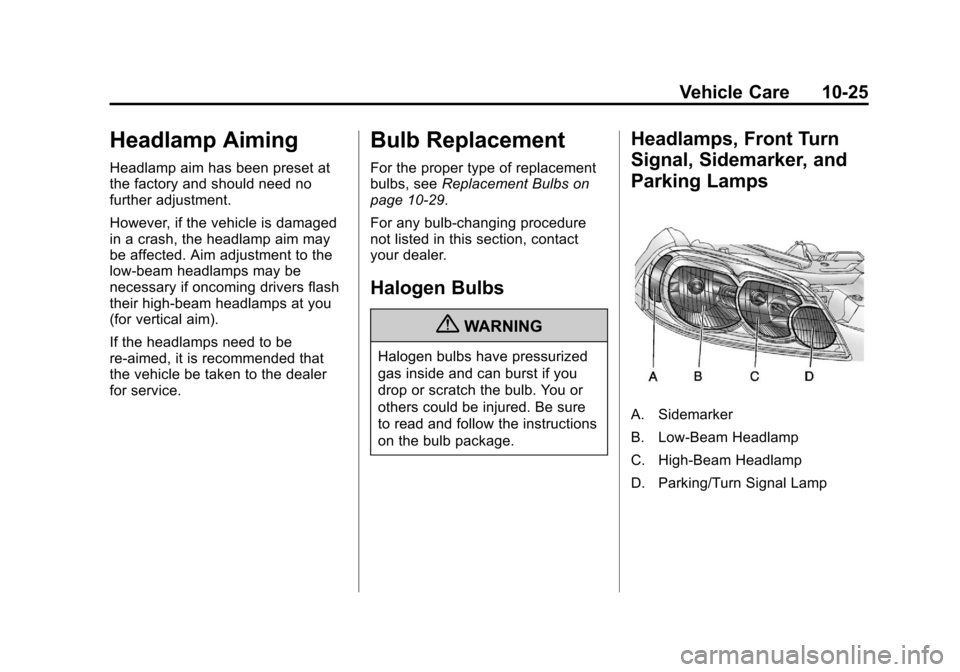
Headlamps, Front Turn
Signal, Sidemarker, and
Parking Lamps
A. Sidemarker
B. Low-Beam Headlamp
C. High-Beam Headlamp
D. Parking/Turn Signal Lamp
Page 270 of 374
Black plate (28,1)Chevrolet Impala Owner Manual - 2012
10-28 Vehicle Care
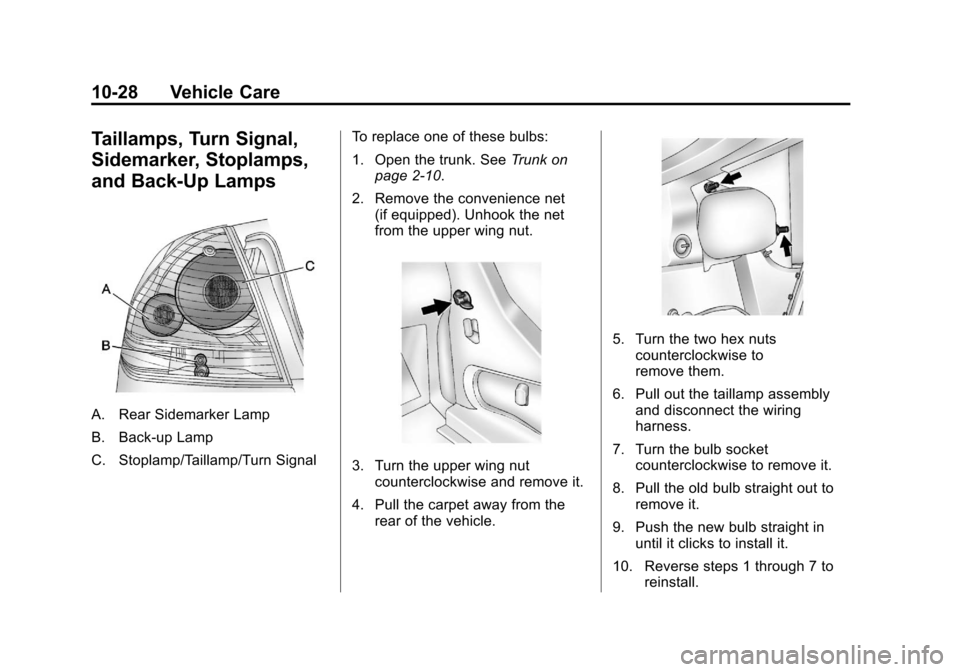
Taillamps, Turn Signal,
Sidemarker, Stoplamps,
and Back-Up Lamps
A. Rear Sidemarker Lamp
B. Back-up Lamp
C. Stoplamp/Taillamp/Turn SignalTo replace one of these bulbs:
1. Open the trunk. See
Trunk on
page 2‑10.
2. Remove the convenience net (if equipped). Unhook the net
from the upper wing nut.
3. Turn the upper wing nutcounterclockwise and remove it.
4. Pull the carpet away from the rear of the vehicle.
5. Turn the two hex nutscounterclockwise to
remove them.
6. Pull out the taillamp assembly and disconnect the wiring
harness.
7. Turn the bulb socket counterclockwise to remove it.
8. Pull the old bulb straight out to remove it.
9. Push the new bulb straight in until it clicks to install it.
10. Reverse steps 1 through 7 to reinstall.
Page 271 of 374
Black plate (29,1)Chevrolet Impala Owner Manual - 2012
Vehicle Care 10-29
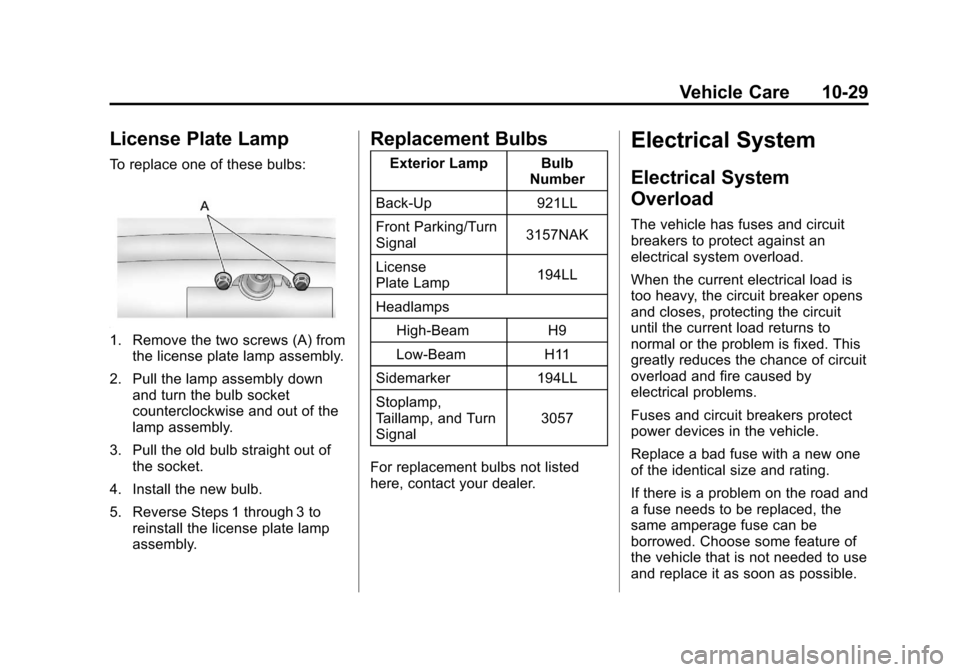
License Plate Lamp
To replace one of these bulbs:
1. Remove the two screws (A) fromthe license plate lamp assembly.
2. Pull the lamp assembly down and turn the bulb socket
counterclockwise and out of the
lamp assembly.
3. Pull the old bulb straight out of the socket.
4. Install the new bulb.
5. Reverse Steps 1 through 3 to reinstall the license plate lamp
assembly.
Replacement Bulbs
Exterior Lamp Bulb Number
Back-Up 921LL
Front Parking/Turn
Signal 3157NAK
License
Plate Lamp 194LL
Headlamps High-Beam H9
Low-Beam H11
Sidemarker 194LL
Stoplamp,
Taillamp, and Turn
Signal 3057
For replacement bulbs not listed
here, contact your dealer.
Electrical System
Electrical System
Overload
The vehicle has fuses and circuit
breakers to protect against an
electrical system overload.
When the current electrical load is
too heavy, the circuit breaker opens
and closes, protecting the circuit
until the current load returns to
normal or the problem is fixed. This
greatly reduces the chance of circuit
overload and fire caused by
electrical problems.
Fuses and circuit breakers protect
power devices in the vehicle.
Replace a bad fuse with a new one
of the identical size and rating.
If there is a problem on the road and
a fuse needs to be replaced, the
same amperage fuse can be
borrowed. Choose some feature of
the vehicle that is not needed to use
and replace it as soon as possible.
Page 274 of 374
Black plate (32,1)Chevrolet Impala Owner Manual - 2012
10-32 Vehicle Care
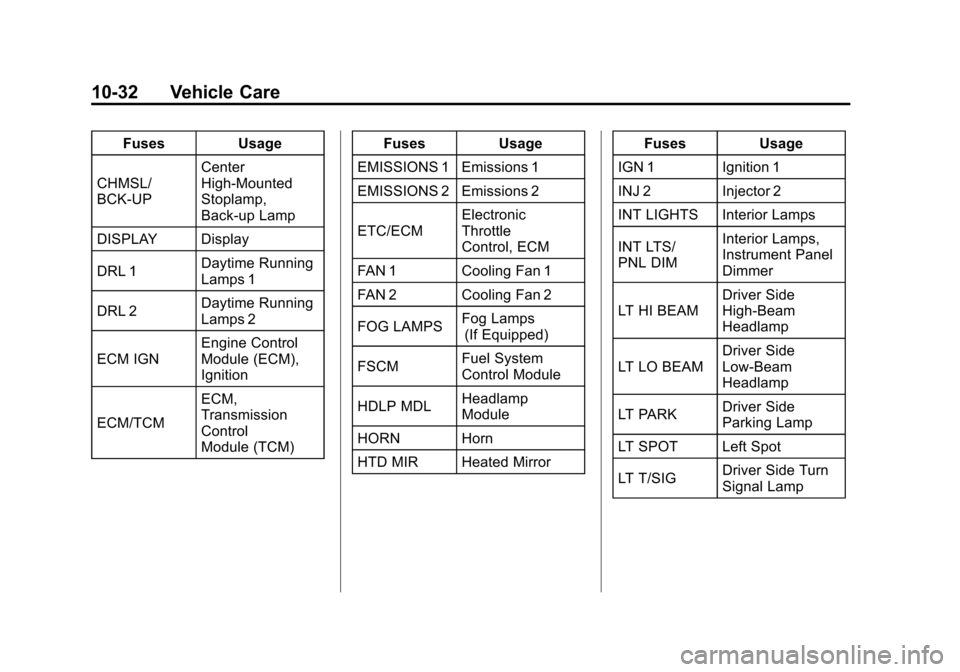
FusesUsage
CHMSL/
BCK‐UP Center
High‐Mounted
Stoplamp,
Back‐up Lamp
DISPLAY Display
DRL 1 Daytime Running
Lamps 1
DRL 2 Daytime Running
Lamps 2
ECM IGN Engine Control
Module (ECM),
Ignition
ECM/TCM ECM,
Transmission
Control
Module (TCM) Fuses
Usage
EMISSIONS 1 Emissions 1
EMISSIONS 2 Emissions 2
ETC/ECM Electronic
Throttle
Control, ECM
FAN 1 Cooling Fan 1
FAN 2 Cooling Fan 2
FOG LAMPS Fog Lamps
(If Equipped)
FSCM Fuel System
Control Module
HDLP MDL Headlamp
Module
HORN Horn
HTD MIR Heated Mirror Fuses
Usage
IGN 1 Ignition 1
INJ 2 Injector 2
INT LIGHTS Interior Lamps
INT LTS/
PNL DIM Interior Lamps,
Instrument Panel
Dimmer
LT HI BEAM Driver Side
High‐Beam
Headlamp
LT LO BEAM Driver Side
Low‐Beam
Headlamp
LT PARK Driver Side
Parking Lamp
LT SPOT Left Spot
LT T/SIG Driver Side Turn
Signal Lamp
Page 275 of 374
Black plate (33,1)Chevrolet Impala Owner Manual - 2012
Vehicle Care 10-33
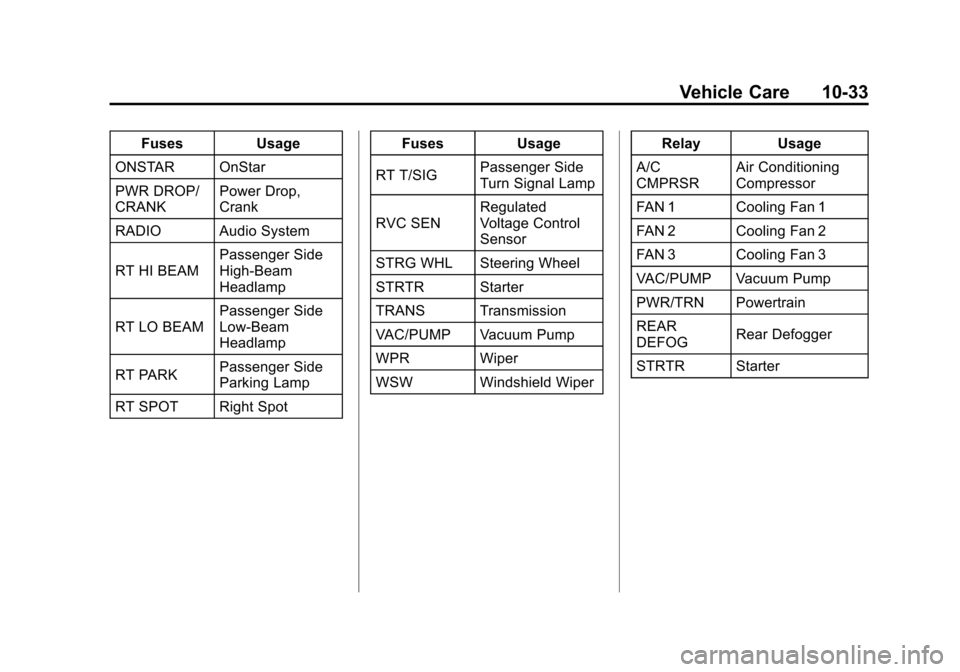
FusesUsage
ONSTAR OnStar
PWR DROP/
CRANK Power Drop,
Crank
RADIO Audio System
RT HI BEAM Passenger Side
High‐Beam
Headlamp
RT LO BEAM Passenger Side
Low‐Beam
Headlamp
RT PARK Passenger Side
Parking Lamp
RT SPOT Right Spot Fuses
Usage
RT T/SIG Passenger Side
Turn Signal Lamp
RVC SEN Regulated
Voltage Control
Sensor
STRG WHL Steering Wheel
STRTR Starter
TRANS Transmission
VAC/PUMP Vacuum Pump
WPR Wiper
WSW Windshield Wiper Relay
Usage
A/C
CMPRSR Air Conditioning
Compressor
FAN 1 Cooling Fan 1
FAN 2 Cooling Fan 2
FAN 3 Cooling Fan 3
VAC/PUMP Vacuum Pump
PWR/TRN Powertrain
REAR
DEFOG Rear Defogger
STRTR Starter