ESP CHEVROLET IMPALA 2015 10.G Owners Manual
[x] Cancel search | Manufacturer: CHEVROLET, Model Year: 2015, Model line: IMPALA, Model: CHEVROLET IMPALA 2015 10.GPages: 413, PDF Size: 5.51 MB
Page 27 of 413
Black plate (20,1)Chevrolet Impala Owner Manual (GMNA-Localizing-U.S./Canada-7576026) -
2015 - crc 2nd edition - 8/21/14
1-20 In Brief
SeeInstrument Cluster on page 5-9
and Driver Information Center (DIC)
on page 5-25.
Forward Collision Alert
(FCA) System
If equipped, FCA may help avoid or
reduce the harm caused by
front-end crashes. FCA provides a
green indicator,
V, when a vehicle
is detected ahead. This indicator
displays amber if you follow a
vehicle much too closely. When
approaching a vehicle ahead too
quickly, FCA provides a red flashing
alert on the windshield and rapidly
beeps.
See Forward Collision Alert (FCA)
System on page 9-46.
Lane Departure
Warning (LDW)
If equipped, LDW may help avoid
unintentional lane departures at
speeds of 56 km/h (35 mph) or
greater. LDW uses a camera sensor to detect the lane markings. The
LDW light,
@, is green if a lane
marking is detected. If the vehicle
departs the lane, the light will
change to amber and flash. In
addition, beeps will sound.
See Lane Departure Warning (LDW)
on page 9-52.
Side Blind Zone
Alert (SBZA)
If equipped, SBZA will detect
vehicles in the next lane over in the
vehicle's side blind zone area.
When this happens, the SBZA
display will light up in the
corresponding outside side mirror
and will flash if the turn signal is on.
See Side Blind Zone Alert (SBZA)
on page 9-50.
Rear Vision
Camera (RVC)
If equipped, RVC displays a view of
the area behind the vehicle on the
center stack display when the
vehicle is shifted into R (Reverse) to
aid with parking and low-speed
backing maneuvers.
See Assistance Systems for Parking
or Backing on page 9-44.
Parking Assist
If equipped, Rear Parking Assist
(RPA) uses sensors on the rear
bumper to assist with parking and
avoiding objects while in
R (Reverse). It operates at speeds
less than 8 km/h (5 mph). RPA may
display a warning triangle on the
Rear Vision Camera screen and/or
a graphic on the instrument cluster
to provide the object distance. In
addition, multiple beeps may occur
if very close to an object.
See Assistance Systems for Parking
or Backing on page 9-44.
Page 44 of 413
Black plate (11,1)Chevrolet Impala Owner Manual (GMNA-Localizing-U.S./Canada-7576026) -
2015 - crc 2nd edition - 8/21/14
Keys, Doors, and Windows 2-11
.The hazard warning flashers
are on.
.The malfunction indicator lamp
is on.
.The engine coolant temperature
is too high.
.The oil pressure is low.
.Two remote vehicle starts, or a
single remote start with an
extension, have already
been used.
.The vehicle is not in P (Park).
Door Locks
{Warning
Unlocked doors can be
dangerous.
.Passengers, especially
children, can easily open the
doors and fall out of a moving
vehicle. The chance of being
thrown out of the vehicle in a(Continued)
Warning (Continued)
crash is increased if the
doors are not locked. So, all
passengers should wear
safety belts properly and the
doors should be locked
whenever the vehicle is
driven.
.Young children who get into
unlocked vehicles may be
unable to get out. A child can
be overcome by extreme heat
and can suffer permanent
injuries or even death from
heat stroke. Always lock the
vehicle whenever leaving it.
.Outsiders can easily enter
through an unlocked door
when slowing or stopping the
vehicle. Lock the doors to
help prevent this from
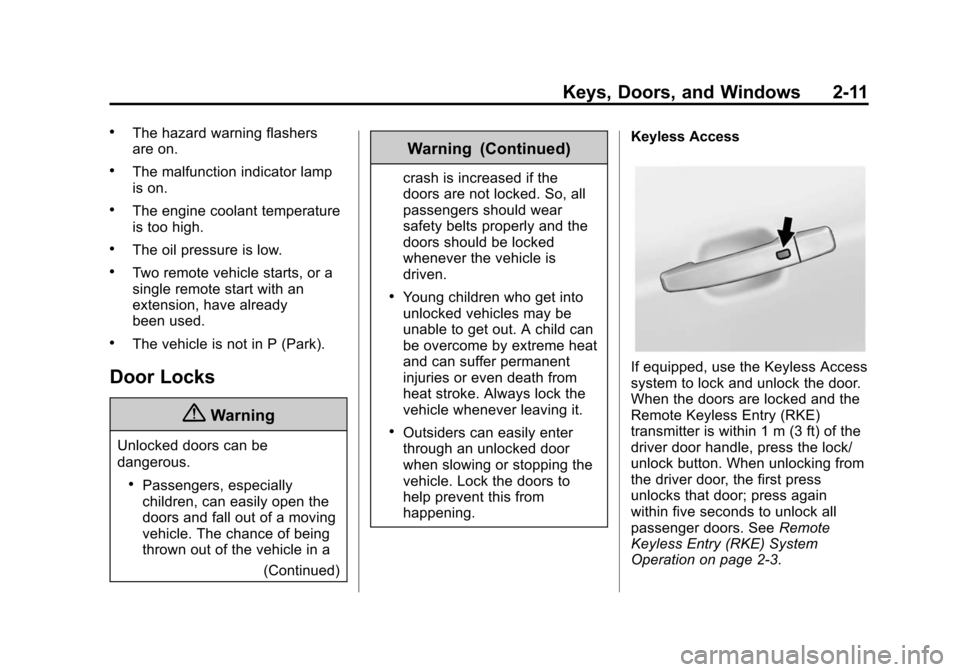
happening. Keyless Access
If equipped, use the Keyless Access
system to lock and unlock the door.
When the doors are locked and the
Remote Keyless Entry (RKE)
transmitter is within 1 m (3 ft) of the
driver door handle, press the lock/
unlock button. When unlocking from
the driver door, the first press
unlocks that door; press again
within five seconds to unlock all
passenger doors. See
Remote
Keyless Entry (RKE) System
Operation on page 2-3.
Page 54 of 413
Black plate (21,1)Chevrolet Impala Owner Manual (GMNA-Localizing-U.S./Canada-7576026) -
2015 - crc 2nd edition - 8/21/14
Keys, Doors, and Windows 2-21
Reverse Tilt Mirrors
If equipped with memory seats, the
passenger and/or driver mirror tilts
to a preselected position when the
vehicle is in R (Reverse). This
allows the curb to be seen when
parallel parking.
The mirror(s) return to the original
position when:
.The vehicle is shifted out of
R (Reverse), or remains in
R (Reverse) for about
30 seconds.
.The ignition is turned off.
.The vehicle is driven in
R (Reverse) above a set speed.
To turn this feature on or off, see
Vehicle Personalization on
page 5-37.
Interior Mirrors
Interior Rearview Mirrors
Adjust the rearview mirror for a clear
view of the area behind your
vehicle.
Do not spray glass cleaner directly
on the mirror. Use a soft towel
dampened with water.
Manual Rearview Mirror
If equipped with a manual rearview
mirror, push the tab forward for
daytime use and pull it for nighttime
use to avoid glare from the
headlamps from behind.
Automatic Dimming
Rearview Mirror
If equipped, automatic dimming
reduces the glare of headlamps
from behind. The dimming feature
comes on when the vehicle is
started.
Windows
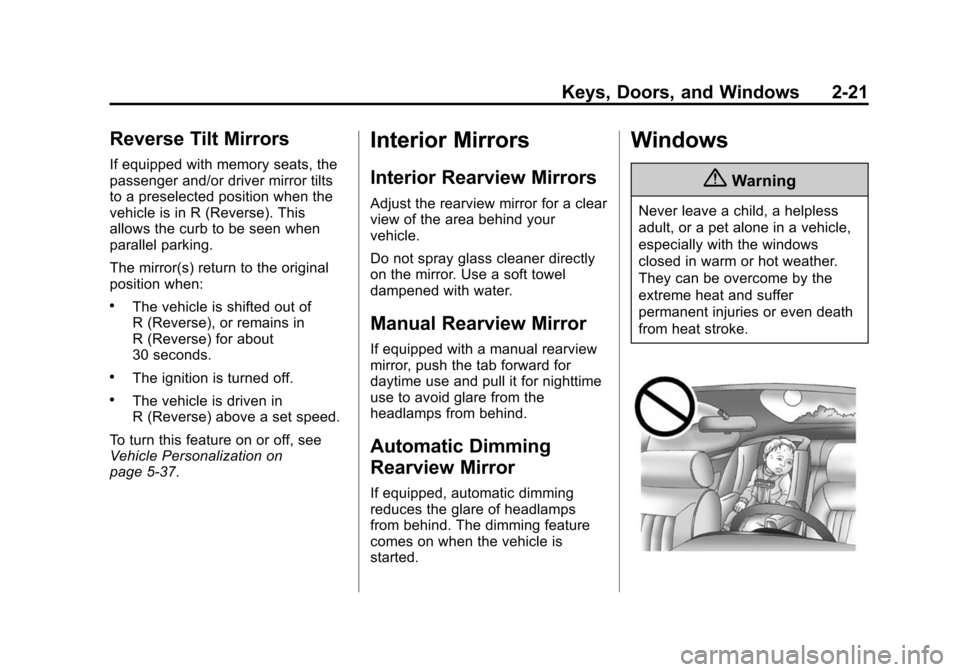
{Warning
Never leave a child, a helpless
adult, or a pet alone in a vehicle,
especially with the windows
closed in warm or hot weather.
They can be overcome by the
extreme heat and suffer
permanent injuries or even death
from heat stroke.
Page 69 of 413
Black plate (10,1)Chevrolet Impala Owner Manual (GMNA-Localizing-U.S./Canada-7576026) -
2015 - crc 2nd edition - 8/21/14
3-10 Seats and Restraints
Heated and Ventilated
Front Seats
{Warning
If you cannot feel temperature
change or pain to the skin, the
seat heater may cause burns. To
reduce the risk of burns, people
with such a condition should use
care when using the seat heater,
especially for long periods of
time. Do not place anything on
the seat that insulates against
heat, such as a blanket, cushion,
cover, or similar item. This may
cause the seat heater to
overheat. An overheated seat
heater may cause a burn or may
damage the seat.
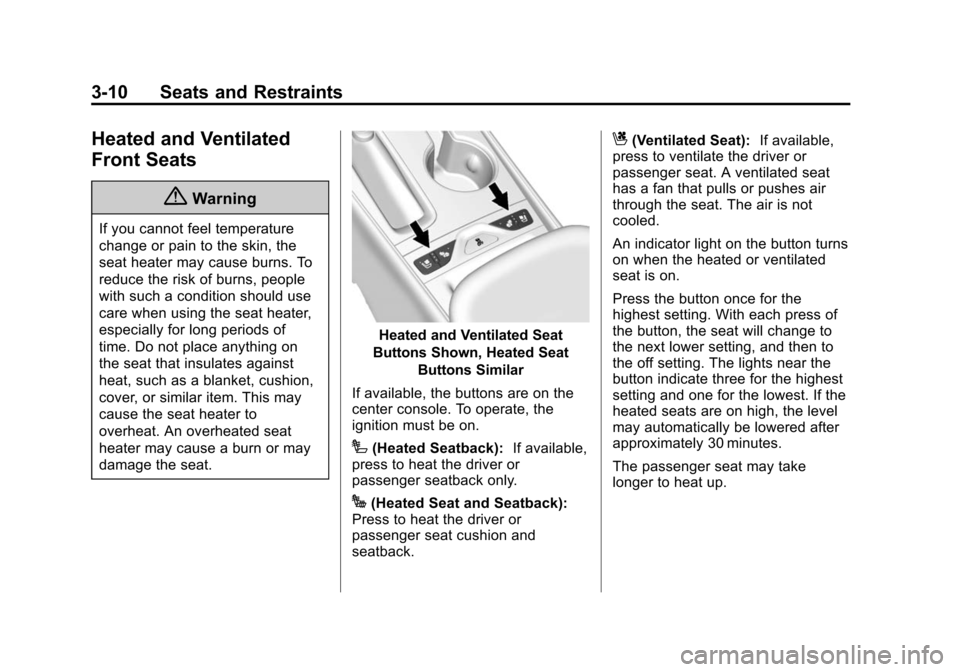
Heated and Ventilated Seat
Buttons Shown, Heated Seat Buttons Similar
If available, the buttons are on the
center console. To operate, the
ignition must be on.
I(Heated Seatback): If available,
press to heat the driver or
passenger seatback only.
J(Heated Seat and Seatback):
Press to heat the driver or
passenger seat cushion and
seatback.
C(Ventilated Seat): If available,
press to ventilate the driver or
passenger seat. A ventilated seat
has a fan that pulls or pushes air
through the seat. The air is not
cooled.
An indicator light on the button turns
on when the heated or ventilated
seat is on.
Press the button once for the
highest setting. With each press of
the button, the seat will change to
the next lower setting, and then to
the off setting. The lights near the
button indicate three for the highest
setting and one for the lowest. If the
heated seats are on high, the level
may automatically be lowered after
approximately 30 minutes.
The passenger seat may take
longer to heat up.
Page 180 of 413
Black plate (9,1)Chevrolet Impala Owner Manual (GMNA-Localizing-U.S./Canada-7576026) -
2015 - crc 2nd edition - 8/21/14
Infotainment System 7-9
Options for SiriusXM Only
XM View:XM view allows the
channel list to be viewed by channel
name, artist playing on channel,
or song playing on channel. Select
to display Channel List in XM views.
Turn the MENU knob to highlight
and press the MENU knob to select.
Press
qBACK to go to the
previous menu.
Channel List: Select to display a
list of SiriusXM channels. Turn the
MENU knob to highlight and press
the MENU knob to select. Press
q
BACK to go to the previous menu.
Also see the radio settings common
for all sources earlier in this section.
Finding a Station
Seeking a Station
Press
gorlto search for the
previous or next strongest station,
or press and hold to quickly search
through stations. Tuning a Station
Turn the MENU knob to manually
find a station.
Storing Radio Station Presets
Up to 25 preset stations from all
bands can be stored in the favorite
lists in any order. Up to five stations
can be stored in each favorite page
and the number of favorites can
be set.
AM, FM, or SiriusXM (If
Equipped):
While on the active
source main page, such as AM, FM,
and SiriusXM (if equipped), press
and hold the corresponding key.
Mixed-Audio Favorites
Favorites can be stored including
radio stations.
To display the favorites page, press
qorron the radio faceplate.
From the Settings menu, press the
MENU knob to select Manage
Favorites. The Manage Favorites
feature has the option of moving or deleting a favorite. See
“Manage
Favorites” underOverview on
page 7-3.
Satellite Radio
SiriusXM®Satellite Radio
Service
Vehicles with a SiriusXM satellite
radio tuner and a valid SiriusXM
satellite radio subscription can
receive SiriusXM programming.
SiriusXM is a satellite radio service
based in the 48 contiguous United
States and 10 Canadian provinces.
SiriusXM satellite radio has a wide
variety of programming and
commercial-free music, coast to
coast, and in digital-quality sound.
A service fee is required to receive
the SiriusXM service. See
www.siriusxmradio.com or call
1-866-635-2349 (U.S.); or see
www.xmradio.ca or call
1-877-209-0079 (Canada).
Page 181 of 413
Black plate (10,1)Chevrolet Impala Owner Manual (GMNA-Localizing-U.S./Canada-7576026) -
2015 - crc 2nd edition - 8/21/14
7-10 Infotainment System
When SiriusXM is active, the
channel name and number,
category name, song title, and artist
display on the screen.
Browsing SiriusXM Channels
To browse the SiriusXM channels:
1. Press the MENU knob.
2. Turn the MENU knob to highlightXM Channel List.
3. Turn the MENU knob to highlight the desired XM Channels.
Radio Reception
Frequency interference and static
can occur during normal radio
reception if items such as phone
chargers, vehicle convenience
accessories, and external electronic
devices are plugged into the
accessory power outlet. If there is
interference or static, unplug the
item from the accessory power
outlet.
FM
FM signals only reach about 16 to
65 km (10 to 40 mi). Although the
radio has a built-in electronic circuit
that automatically works to reduce
interference, some static can occur,
especially around tall buildings or
hills, causing the sound to fade in
and out.
AM
The range for most AM stations is
greater than for FM, especially at
night. The longer range can cause
station frequencies to interfere with
each other. Static can also occur
when things like storms and power
lines interfere with radio reception.
When this happens, try reducing the
treble on the radio.
SiriusXM Satellite Radio
Service
If equipped, SiriusXM Satellite
Radio Service provides digital radio
reception. Tall buildings or hills can
interfere with satellite radio signals,
causing the sound to fade in and out. In addition, traveling or standing
under heavy foliage, bridges,
garages, or tunnels may cause loss
of the SiriusXM signal for a period
of time.
Cell Phone Usage
Cell phone usage, such as making
or receiving phone calls, charging,
or just having the phone on may
cause static interference in the
radio. Unplug the phone or turn it off
if this happens.
Backglass Antenna
The AM-FM antenna is integrated
with the rear window defogger in the
rear window. Do not scratch the
inside surface or damage the lines
in the glass. If the inside surface is
damaged, it could interfere with
radio reception. For proper radio
reception, the antenna connector
needs to be properly attached to the
post on the glass.
Page 192 of 413
Black plate (21,1)Chevrolet Impala Owner Manual (GMNA-Localizing-U.S./Canada-7576026) -
2015 - crc 2nd edition - 8/21/14
Infotainment System 7-21
PHONE:From the Home Page,
select to enter the phone main
menu. See Bluetooth (Overview) on
page 7-19 orBluetooth
(Infotainment Controls - Base
Radio) on page 7-21 orBluetooth
(Voice Recognition - Base Radio) on
page 7-25.
Voice Recognition
The voice recognition system uses
commands to control the system
and dial phone numbers.
Noise: The system may not
recognize voice commands if there
is too much background noise, such
as noise from open windows or loud
talking inside the vehicle.
When to Speak: A tone sounds to
indicate that the system is ready for
a voice command. Wait for the tone
and then speak.
How to Speak: Speak clearly in a
calm and natural voice.
Audio System
When using the Bluetooth system,
sound comes through the vehicle's
front audio system speakers and
overrides the audio system. Use the
Oknob during a call to change the
volume level. The system maintains
a minimum volume level.
Bluetooth Audio Quality
Turn off the Echo and Noise
cancellation feature on your phone,
if supported, for the best hands-free
performance.
See www.gm.com/bluetooth.
Other Information
The Bluetooth®word mark and
logos are owned by the Bluetooth®
SIG, Inc. and any use of such marks
by General Motors is under license.
Other trademarks and trade names
are those of their respective owners.
Bluetooth (Infotainment
Controls - Base Radio)
For information about how to
navigate the menu system using the
infotainment controls, see Overview
on page 7-3.
Switching to Handset or
Hands-Free Mode
To switch between handset mode
and hands-free mode, use the
OnStar command, “transfer call.”
Pairing
A Bluetooth-enabled cell phone
must be paired to the Bluetooth
system and then connected to the
vehicle before it can be used. See
your cell phone manufacturer's user
guide for Bluetooth functions before
pairing the cell phone. If a Bluetooth
phone is not connected, calls can
be made using OnStar Hands-Free
Calling, if available. See OnStar
Overview on page 14-1, if equipped.
Page 197 of 413
Black plate (26,1)Chevrolet Impala Owner Manual (GMNA-Localizing-U.S./Canada-7576026) -
2015 - crc 2nd edition - 8/21/14
7-26 Infotainment System
Pairing
Pairing a Phone
1. Press
g. The system responds
“Ready,” followed by a tone.
2. Say “Bluetooth.”
3. Say “Pair.”The system responds
with instructions and a four-digit
Personal Identification Number
(PIN). The PIN is used in Step 5.
4. Start the pairing process on the cell phone that you want to pair.
For help with this process, see
your cell phone manufacturer's
user guide.
5. Locate the device named “Your
Vehicle” in the list on the cell
phone. Follow the instructions
on the cell phone to enter the
PIN provided in Step 3. The
system may respond with a six
digit code to be confirmed on the
cell phone (instead of entering a
four digit code), check that the
same digits are shown on the
cell phone and say "Yes" to confirm. Select Confirm on the
cell phone as well. After the PIN
is successfully entered, the
system prompts you to provide a
name for the paired cell phone.
This name will be used to
indicate which phones are
paired and connected to the
vehicle. The system responds
with
“
successfully paired” after the
pairing process is complete.
6. Repeat Steps 1−5 to pair additional phones.
Listing All Paired and Connected
Phones
The system can list all cell phones
paired to it. If a paired cell phone is
also connected to the vehicle, the
system responds with “is connected”
after that phone name.
1. Press
g. The system responds
“Ready,” followed by a tone.
2. Say “Bluetooth.”
3. Say “List.” Deleting a Paired Phone
If the phone name to delete is
unknown, see
“Listing All Paired
and Connected Phones.”
1. Press
g. The system responds
“Ready,” followed by a tone.
2. Say “Bluetooth.”
3. Say “Delete.” The system asks
for which phone to delete.
4. Say the name of the phone to delete.
Connecting to a Different Phone
To connect to a different cell phone,
the Bluetooth system looks for the
next available cell phone in the
order in which all available cell
phones were paired. This may need
to be repeated depending on how
many cell phones have been
connected.
1. Press
g. The system responds
“Ready,” followed by a tone.
2. Say “Bluetooth.”
Page 198 of 413
Black plate (27,1)Chevrolet Impala Owner Manual (GMNA-Localizing-U.S./Canada-7576026) -
2015 - crc 2nd edition - 8/21/14
Infotainment System 7-27
3. Say“Change phone.”
.If another cell phone is
found, the response will be
“
connected.”
This can be repeated to
connect any of the up to
five paired phones.
.If another cell phone is not
found, the original phone
remains connected.
Storing and Deleting Phone
Numbers
The following commands are used
to delete and store phone numbers.
Store:This command will store a
phone number, or a group of
numbers as a name tag.
Digit Store: This command allows
a phone number to be stored as a
name tag by entering the digits one
at a time.
Delete: This command is used to
delete individual name tags. Delete All Name Tags:
This
command deletes all stored name
tags in the Hands-Free Calling
Directory and the Destinations
Directory.
Using the “Store”Command
1. Press
g. The system responds
“Ready,” followed by a tone.
2. Say “Store.”
3. Say the entire phone number or a group of digits all at once with
no pauses, then follow the
directions given by the system to
save a name tag for this number.
Using the “Digit Store” Command
If an unwanted number is
recognized by the system, say
“Correction” at any time to clear the
last number.
To hear all of the digits recognized
by the system, say “Verify”at
any time.
1. Press
g. The system responds
“Ready,” followed by a tone. 2. Say
“Digit Store.”
3. Say each digit, one at a time. After each digit is entered, the
system repeats back the digit it
heard followed by a tone. After
the last digit has been entered,
say “Store,” and then follow the
directions given by the system to
save a name tag for this number.
Using the “Delete”Command
1. Press
g. The system responds
“Ready,” followed by a tone.
2. Say “Delete.”
3. Say the name tag you want to delete.
Using the “Delete All Name Tags”
Command
This command deletes all stored
name tags in the Hands-Free
Calling Directory and the
Destinations Directory.
To delete all name tags:
1. Press
g. The system responds
“Ready,” followed by a tone.
Page 199 of 413
Black plate (28,1)Chevrolet Impala Owner Manual (GMNA-Localizing-U.S./Canada-7576026) -
2015 - crc 2nd edition - 8/21/14
7-28 Infotainment System
2. Say“Delete all name tags.”
Listing Stored Numbers
The list command will list all the
stored numbers and name tags.
Using the “List”Command
1. Press
g. The system responds
“Ready,” followed by a tone.
2. Say “Directory.”
3. Say “Hands-Free Calling.”
4. Say “List.”
Making a Call
Calls can be made using the
following commands.
Dial or Call: The dial or call
command can be used
interchangeably to dial a phone
number or a stored name tag.
Digit Dial: This command allows a
phone number to be dialed by
entering the digits one at a time.
Re-dial: This command is used to
dial the last number used on the cell
phone. Using the
“Dial”or“Call”
Command
1. Press
g. The system responds
“Ready,” followed by a tone.
2. Say “Dial”or“Call.”
3. Say the entire number without pausing or say the name tag.
Once connected, the person called
will be heard through the audio
speakers.
Calling 911 Emergency (U.S. and
Canada)
1. Press
g. The system responds
“Ready,” followed by a tone.
2. Say “Dial”or“Call.”
3. Say “911.”
4. Say “Dial”or“Call.”
Calling 066 Emergency (Mexico)
1. Press
g. The system responds
“Ready,” followed by a tone.
2. Say “Dial”or“Call.”
3. Say “066.” 4. Say
“Dial”or“Call.”
Using the “Digit Dial” Command
The digit dial command allows a
phone number to be dialed by
entering the digits one at a time.
After each digit is entered, the
system repeats back the digit it
heard followed by a tone.
If an unwanted number is
recognized by the system, say
“Correction” at any time to clear the
last number.
To hear all of the numbers
recognized by the system, say
“Verify” at any time.
1. Press
g. The system responds
“Ready,” followed by a tone.
2. Say “Digit Dial.”
3. Say each digit, one at a time. After each digit is entered, the
system repeats back the digit it
heard followed by a tone. After
the last digit has been entered,
say “Dial.”