trunk release CHEVROLET IMPALA 2015 10.G Owners Manual
[x] Cancel search | Manufacturer: CHEVROLET, Model Year: 2015, Model line: IMPALA, Model: CHEVROLET IMPALA 2015 10.GPages: 413, PDF Size: 5.51 MB
Page 10 of 413

Black plate (3,1)Chevrolet Impala Owner Manual (GMNA-Localizing-U.S./Canada-7576026) -
2015 - crc 2nd edition - 8/21/14
In Brief 1-3
1.Instrument Panel Illumination
Control on page 6-4.
2. Air Vents on page 8-7.
3. Trunk Release. See Trunk on
page 2-15.
Parking Assist Button. See
Assistance Systems for Parking
or Backing on page 9-44 (If
Equipped).
Lane Departure Warning (LDW)
Button. See Lane Departure
Warning (LDW) on page 9-52.
4. Turn Signal Lever. See Turn and
Lane-Change Signals on
page 6-4.
5. Instrument Cluster on page 5-9.
Driver Information Center (DIC)
on page 5-25.
6. Windshield Wiper/Washer on
page 5-4.
7. Hazard Warning Flashers on
page 6-3.
8. Light Sensor. See Automatic
Headlamp System on page 6-2. 9. Storage Area with USB Port
Inside (If Equipped). See
Instrument Panel Storage on
page 4-1 andUSB Port on
page 7-14.
10. Infotainment on page 7-1.
11. CD Player on page 7-11.
12. Electric Parking Brake. See Parking Brake on page 9-29.
13. Data Link Connector (Out of View). See Malfunction
Indicator Lamp on page 5-17.
14. Hood Release. See Hood on
page 10-4.
15. Instrument Panel Storage on
page 4-1 (If Equipped).
Fuse Cover. See Instrument
Panel Fuse Block on
page 10-35. 16.
Cruise Control on page 9-33 (If
Equipped).
Adaptive Cruise Control on
page 9-35 (If Equipped).
Heated Steering Wheel on
page 5-3 (If Equipped).
Forward Collision Alert (FCA)
System on page 9-46 (If
Equipped).
17. Steering Wheel Controls on
page 5-3 (Out of View).
18. Steering Wheel Adjustment on
page 5-2.
19. Horn on page 5-3.
20. Steering Wheel Controls on
page 5-3.
Driver Information Center
Buttons. See Driver Information
Center (DIC) on page 5-25.
21. Ignition Positions (Keyless
Access) on page 9-14 or
Ignition Positions (Key Access)
on page 9-16.
Page 11 of 413
Black plate (4,1)Chevrolet Impala Owner Manual (GMNA-Localizing-U.S./Canada-7576026) -
2015 - crc 2nd edition - 8/21/14
1-4 In Brief
22. Shift Lever. SeeAutomatic
Transmission on page 9-25.
23. Heated and Ventilated Front
Seats on page 3-10 (If
Equipped).
24. Traction Control/Electronic
Stability Control on page 9-31.
25. Storage Area with Accessory Power Outlet Inside. See
Center Console Storage on
page 4-2 andPower Outlets on
page 5-6.
26. Climate Control Systems on
page 8-1.
Dual Automatic Climate Control
System on page 8-3.Initial Drive
Information
This section provides a brief
overview about some of the
important features that may or may
not be on your specific vehicle.
For more detailed information, refer
to each of the features which can be
found later in this owner manual.
Remote Keyless Entry
(RKE) System
The RKE transmitter may work up to
60 m (197 ft) away from the vehicle.
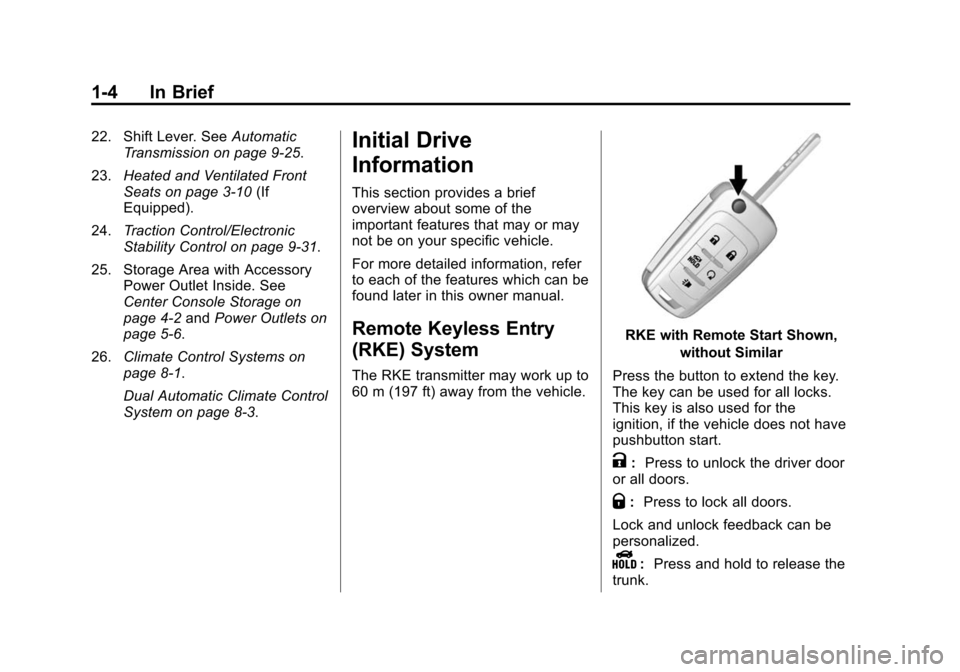
RKE with Remote Start Shown,
without Similar
Press the button to extend the key.
The key can be used for all locks.
This key is also used for the
ignition, if the vehicle does not have
pushbutton start.
K: Press to unlock the driver door
or all doors.
Q: Press to lock all doors.
Lock and unlock feedback can be
personalized.
Y: Press and hold to release the
trunk.
Page 14 of 413
Black plate (7,1)Chevrolet Impala Owner Manual (GMNA-Localizing-U.S./Canada-7576026) -
2015 - crc 2nd edition - 8/21/14
In Brief 1-7
If equipped with Keyless Access,
the RKE transmitter must be within
1 m (3 ft) of the trunk. Press the
touch pad on the underside of the
trunk and lift to open. SeeRemote
Keyless Entry (RKE) System
Operation on page 2-3.
When closing the trunk, use the
pull cup.
See Trunk on page 2-15.
Windows
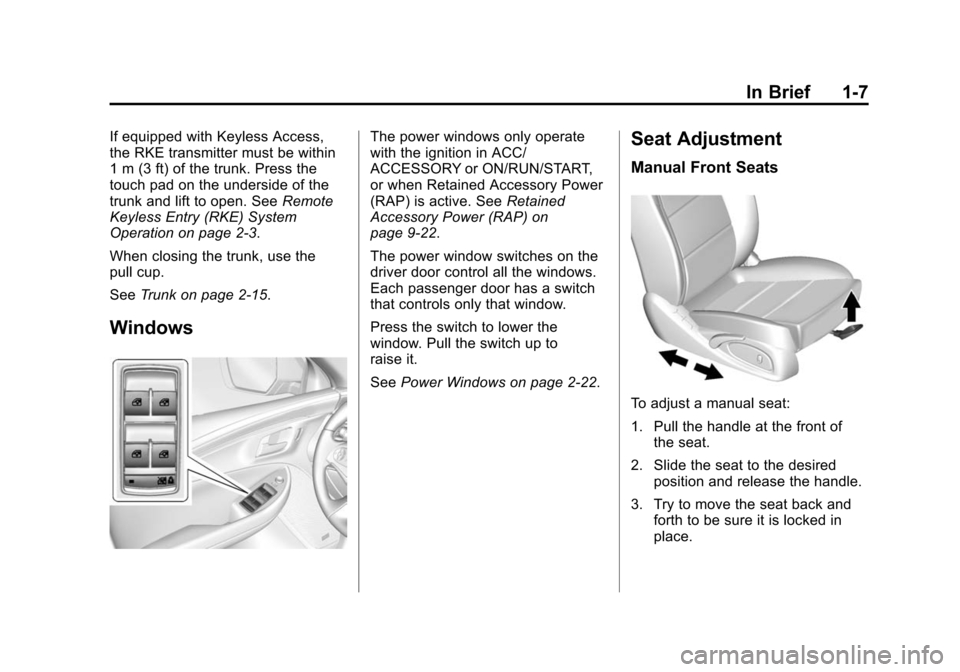
The power windows only operate
with the ignition in ACC/
ACCESSORY or ON/RUN/START,
or when Retained Accessory Power
(RAP) is active. See Retained
Accessory Power (RAP) on
page 9-22.
The power window switches on the
driver door control all the windows.
Each passenger door has a switch
that controls only that window.
Press the switch to lower the
window. Pull the switch up to
raise it.
See Power Windows on page 2-22.Seat Adjustment
Manual Front Seats
To adjust a manual seat:
1. Pull the handle at the front of
the seat.
2. Slide the seat to the desired position and release the handle.
3. Try to move the seat back and forth to be sure it is locked in
place.
Page 36 of 413
Black plate (3,1)Chevrolet Impala Owner Manual (GMNA-Localizing-U.S./Canada-7576026) -
2015 - crc 2nd edition - 8/21/14
Keys, Doors, and Windows 2-3
Remote Keyless Entry
(RKE) System Operation
The transmitter functions may work
up to 60 m (197 ft) away from the
vehicle.
Keep in mind that other conditions,
such as those previously stated, can
impact the performance of the
transmitter.
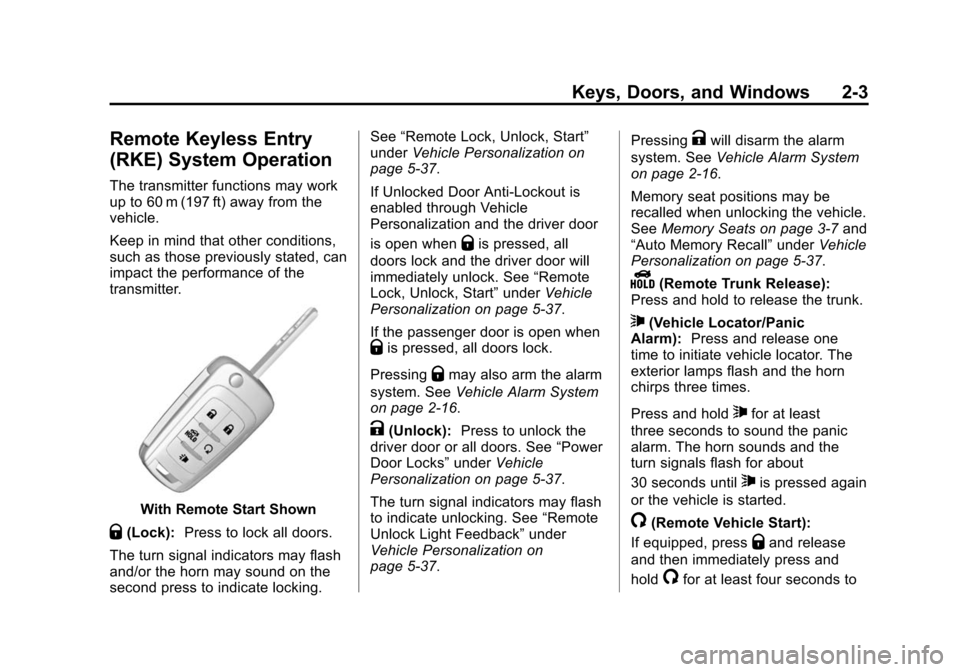
With Remote Start Shown
Q(Lock):Press to lock all doors.
The turn signal indicators may flash
and/or the horn may sound on the
second press to indicate locking. See
“Remote Lock, Unlock, Start”
under Vehicle Personalization on
page 5-37.
If Unlocked Door Anti-Lockout is
enabled through Vehicle
Personalization and the driver door
is open when
Qis pressed, all
doors lock and the driver door will
immediately unlock. See “Remote
Lock, Unlock, Start” underVehicle
Personalization on page 5-37.
If the passenger door is open when
Qis pressed, all doors lock.
Pressing
Qmay also arm the alarm
system. See Vehicle Alarm System
on page 2-16.
K(Unlock): Press to unlock the
driver door or all doors. See “Power
Door Locks” underVehicle
Personalization on page 5-37.
The turn signal indicators may flash
to indicate unlocking. See “Remote
Unlock Light Feedback” under
Vehicle Personalization on
page 5-37. Pressing
Kwill disarm the alarm
system. See Vehicle Alarm System
on page 2-16.
Memory seat positions may be
recalled when unlocking the vehicle.
See Memory Seats on page 3-7 and
“Auto Memory Recall” underVehicle
Personalization on page 5-37.
Y(Remote Trunk Release):
Press and hold to release the trunk.
7(Vehicle Locator/Panic
Alarm): Press and release one
time to initiate vehicle locator. The
exterior lamps flash and the horn
chirps three times.
Press and hold
7for at least
three seconds to sound the panic
alarm. The horn sounds and the
turn signals flash for about
30 seconds until
7is pressed again
or the vehicle is started.
/(Remote Vehicle Start):
If equipped, press
Qand release
and then immediately press and
hold
/for at least four seconds to
Page 49 of 413

Black plate (16,1)Chevrolet Impala Owner Manual (GMNA-Localizing-U.S./Canada-7576026) -
2015 - crc 2nd edition - 8/21/14
2-16 Keys, Doors, and Windows
trunk and lift to open. SeeRemote
Keyless Entry (RKE) System
Operation on page 2-3.
When closing the trunk, use the
pull cup.
Emergency Trunk Release
Handle
{Caution
Do not use the emergency trunk
release handle as a tie-down or
anchor point when securing items
in the trunk as it could damage
the handle.
There is a glow-in-the-dark
emergency trunk release handle on
the trunk lid. This handle will glow
following exposure to light. Pull the
release handle to open the trunk
from the inside.
After use, return to the stored
position.
Vehicle Security
This vehicle has theft-deterrent
features; however, they do not make
the vehicle impossible to steal.
Vehicle Alarm System
This vehicle has an anti-theft alarm
system.
If equipped with the anti-theft alarm
system, the indicator light, on the
instrument panel near the
windshield, indicates the status of
the system.
Page 304 of 413
Black plate (29,1)Chevrolet Impala Owner Manual (GMNA-Localizing-U.S./Canada-7576026) -
2015 - crc 2nd edition - 8/21/14
Vehicle Care 10-29
{Caution
Improper lamp assembly removal
and installation can cause leaks
and water intrusion which may
cause damage to the taillamp. Do
not remove the taillamp assembly
to replace a bulb. Use the trunk
opening to access the bulb.
To replace one of these bulbs:
1. Open the trunk. See Trunk on
page 2-15.
2. Remove the push pins and pull the trunk trim away from the
taillamp assembly.
3. Remove the bulb socket from the taillamp assembly by turning
it counterclockwise.
4. Remove the bulb from the socket by turning the bulb
counterclockwise one-quarter
turn and pulling it straight out.
5. Install a new bulb into the socket. 6. Install the bulb socket into the
taillamp assembly by turning it
clockwise.
7. Install the trunk trim and push pins.
License Plate Lamp
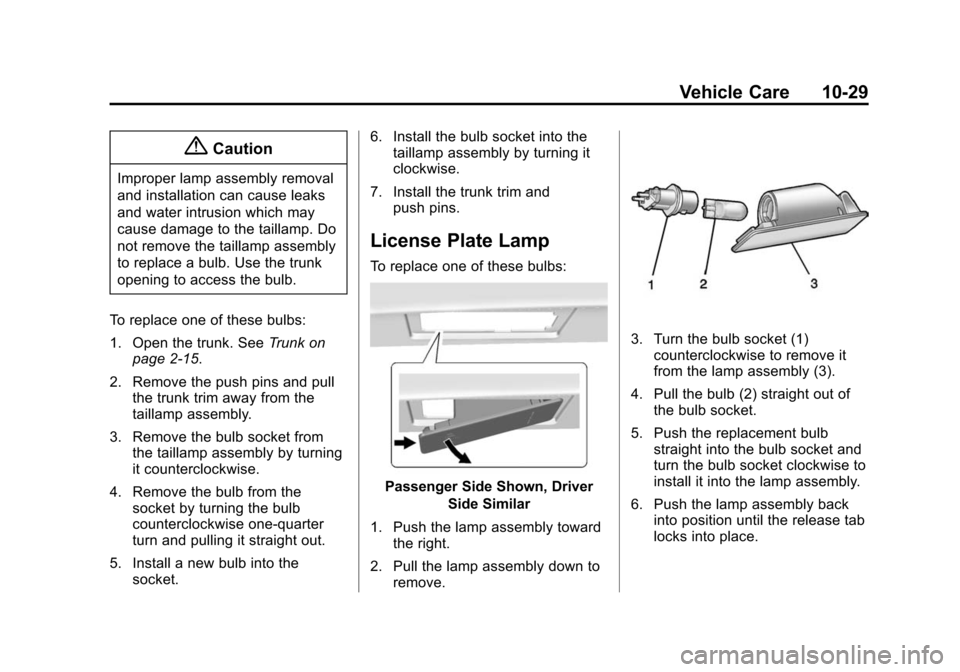
To replace one of these bulbs:
Passenger Side Shown, Driver
Side Similar
1. Push the lamp assembly toward the right.
2. Pull the lamp assembly down to remove.
3. Turn the bulb socket (1)counterclockwise to remove it
from the lamp assembly (3).
4. Pull the bulb (2) straight out of the bulb socket.
5. Push the replacement bulb straight into the bulb socket and
turn the bulb socket clockwise to
install it into the lamp assembly.
6. Push the lamp assembly back into position until the release tab
locks into place.
Page 309 of 413
Black plate (34,1)Chevrolet Impala Owner Manual (GMNA-Localizing-U.S./Canada-7576026) -
2015 - crc 2nd edition - 8/21/14
10-34 Vehicle Care
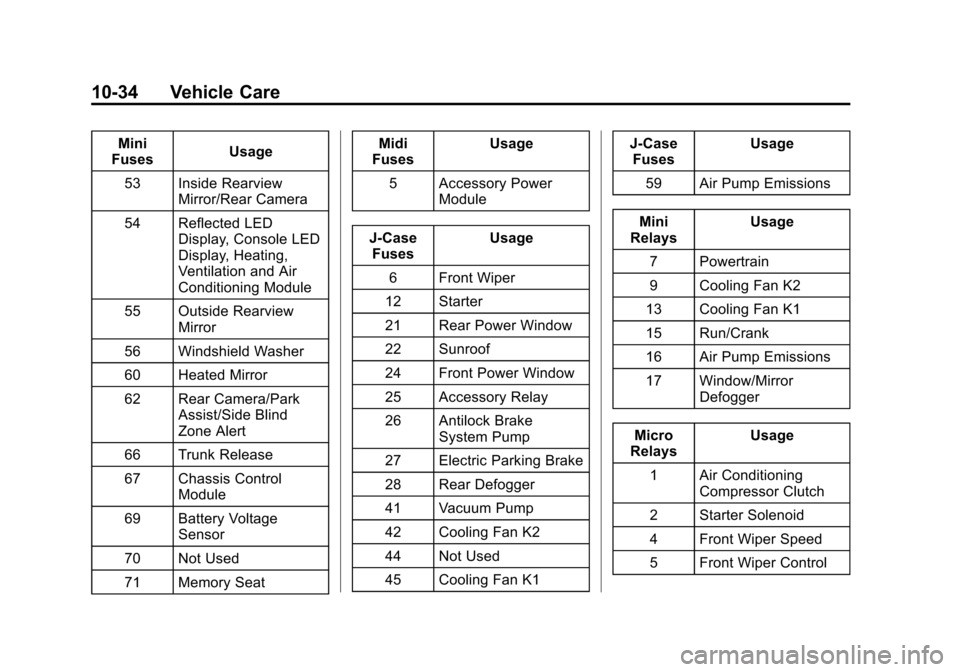
Mini
Fuses Usage
53 Inside Rearview Mirror/Rear Camera
54 Reflected LED Display, Console LED
Display, Heating,
Ventilation and Air
Conditioning Module
55 Outside Rearview Mirror
56 Windshield Washer
60 Heated Mirror
62 Rear Camera/Park Assist/Side Blind
Zone Alert
66 Trunk Release
67 Chassis Control Module
69 Battery Voltage Sensor
70 Not Used
71 Memory Seat Midi
Fuses Usage
5 Accessory Power Module
J-Case Fuses Usage
6 Front Wiper
12 Starter
21 Rear Power Window
22 Sunroof
24 Front Power Window
25 Accessory Relay
26 Antilock Brake System Pump
27 Electric Parking Brake
28 Rear Defogger
41 Vacuum Pump
42 Cooling Fan K2
44 Not Used
45 Cooling Fan K1 J-Case
Fuses Usage
59 Air Pump Emissions
Mini
Relays Usage
7 Powertrain
9 Cooling Fan K2
13 Cooling Fan K1
15 Run/Crank
16 Air Pump Emissions
17 Window/Mirror Defogger
Micro
Relays Usage
1 Air Conditioning Compressor Clutch
2 Starter Solenoid
4 Front Wiper Speed
5 Front Wiper Control
Page 311 of 413
Black plate (36,1)Chevrolet Impala Owner Manual (GMNA-Localizing-U.S./Canada-7576026) -
2015 - crc 2nd edition - 8/21/14
10-36 Vehicle Care
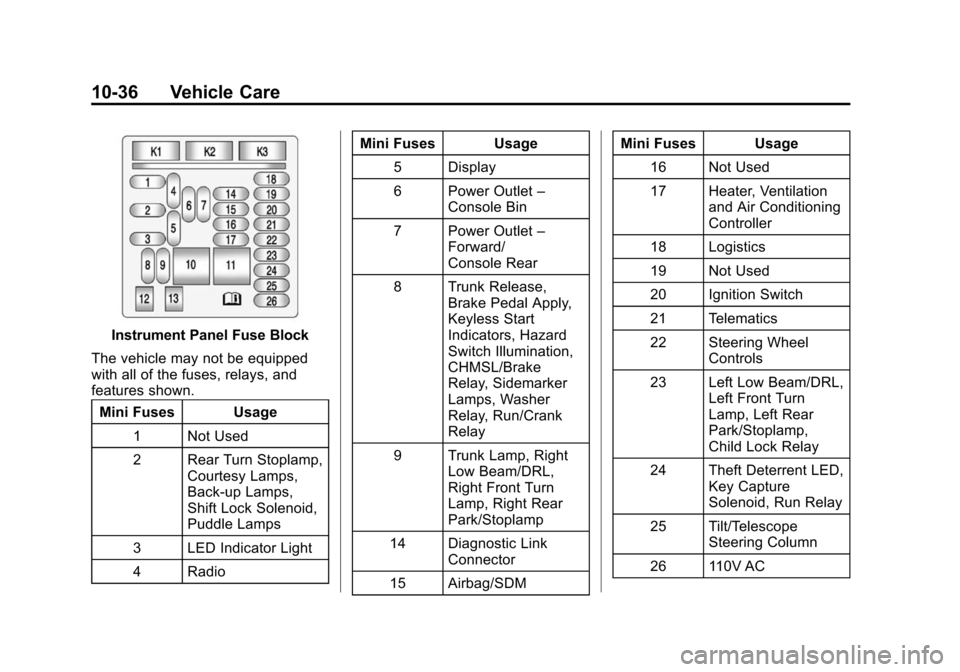
Instrument Panel Fuse Block
The vehicle may not be equipped
with all of the fuses, relays, and
features shown. Mini Fuses Usage
1 Not Used
2 Rear Turn Stoplamp, Courtesy Lamps,
Back-up Lamps,
Shift Lock Solenoid,
Puddle Lamps
3 LED Indicator Light
4 Radio Mini Fuses Usage
5 Display
6 Power Outlet –
Console Bin
7 Power Outlet –
Forward/
Console Rear
8 Trunk Release, Brake Pedal Apply,
Keyless Start
Indicators, Hazard
Switch Illumination,
CHMSL/Brake
Relay, Sidemarker
Lamps, Washer
Relay, Run/Crank
Relay
9 Trunk Lamp, Right Low Beam/DRL,
Right Front Turn
Lamp, Right Rear
Park/Stoplamp
14 Diagnostic Link Connector
15 Airbag/SDM Mini Fuses Usage
16 Not Used
17 Heater, Ventilation and Air Conditioning
Controller
18 Logistics
19 Not Used
20 Ignition Switch
21 Telematics
22 Steering Wheel Controls
23 Left Low Beam/DRL, Left Front Turn
Lamp, Left Rear
Park/Stoplamp,
Child Lock Relay
24 Theft Deterrent LED, Key Capture
Solenoid, Run Relay
25 Tilt/Telescope Steering Column
26 110V AC