fold seats CHEVROLET IMPALA 2018 Owner's Manual
[x] Cancel search | Manufacturer: CHEVROLET, Model Year: 2018, Model line: IMPALA, Model: CHEVROLET IMPALA 2018Pages: 345, PDF Size: 5.81 MB
Page 14 of 345
Chevrolet Impala Owner Manual (GMNA-Localizing-U.S./Canada-11348316) -
2018 - CRC - 8/22/17
In Brief 13
Before storing, adjust all available
memory feature positions. Turn the
ignition on and then press and
release SET; a beep will sound.
Then immediately press and hold 1,
2, or
B(Exit) on the driver door
until two beeps sound. To manually
recall these positions, press and
hold 1, 2, or
Buntil the saved
position is reached.
When Auto Memory Recall is
enabled in the personalization
menu, positions previously stored to
memory buttons 1 and 2 are
recalled when the ignition is
changed from off to on or ACC/
ACCESSORY.
When Easy Exit Options is enabled
in the personalization menu, the
feature automatically recalls the
previously stored exit position when
exiting the vehicle. See Memory
Seats 056.
Second Row Seats
The rear seatbacks can be folded
down to increase cargo space. See
Rear Seats 060.
Heated and Ventilated
Seats
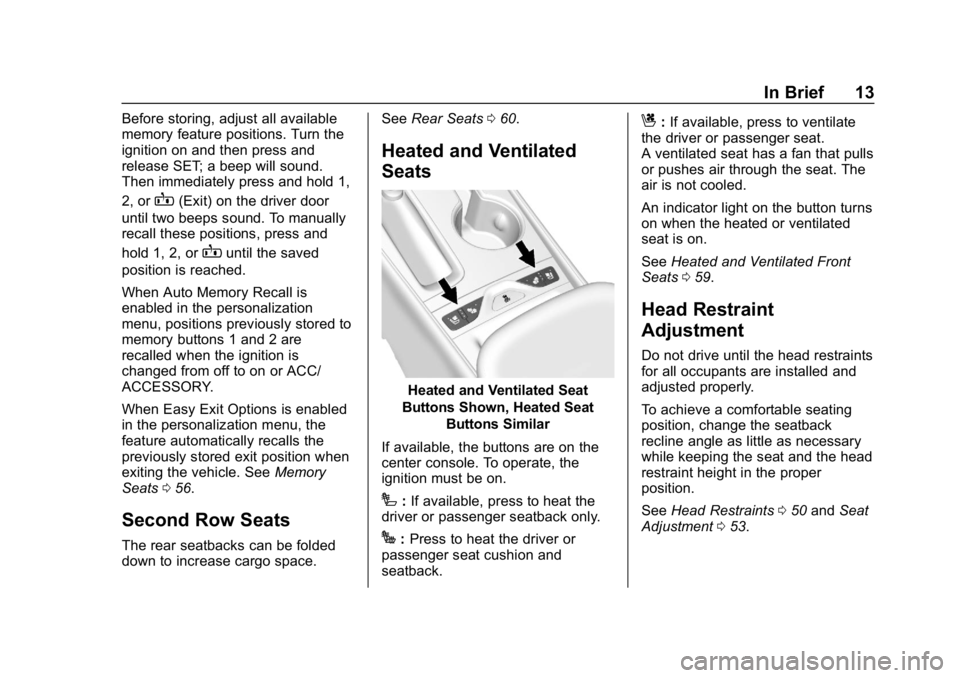
Heated and Ventilated Seat
Buttons Shown, Heated Seat Buttons Similar
If available, the buttons are on the
center console. To operate, the
ignition must be on.
I: If available, press to heat the
driver or passenger seatback only.
J: Press to heat the driver or
passenger seat cushion and
seatback.
C: If available, press to ventilate
the driver or passenger seat.
A ventilated seat has a fan that pulls
or pushes air through the seat. The
air is not cooled.
An indicator light on the button turns
on when the heated or ventilated
seat is on.
See Heated and Ventilated Front
Seats 059.
Head Restraint
Adjustment
Do not drive until the head restraints
for all occupants are installed and
adjusted properly.
To achieve a comfortable seating
position, change the seatback
recline angle as little as necessary
while keeping the seat and the head
restraint height in the proper
position.
See Head Restraints 050 and Seat
Adjustment 053.
Page 45 of 345
Chevrolet Impala Owner Manual (GMNA-Localizing-U.S./Canada-11348316) -
2018 - CRC - 8/22/17
44 Keys, Doors, and Windows
Side Blind Zone Alert (SBZA)
The vehicle may have SBZA. See
Side Blind Zone Alert (SBZA)0198.
Lane Change Alert (LCA)
The vehicle may have LCA. See
Lane Change Alert (LCA) 0198.
Turn Signal Indicator
The vehicle may have a turn signal
indicator on the mirror housings.
The indicator will flash when a turn
signal or the hazard warning
flashers are used.
Puddle Light
The vehicle may have a puddle light
on the mirror housings. The light will
illuminate the ground when the door
is opened.
Folding Mirrors
Manual Folding Mirrors
The vehicle has manual folding
mirrors. These mirrors can be folded
inward to prevent damage when
going through an automatic car wash. To fold, pull the mirror toward
the vehicle. Push the mirror outward
to return it to the original position.
Heated Mirrors
If equipped with heated mirrors:
K:
The rear window defogger also
heats the outside mirrors.
See Dual Automatic Climate Control
System 0150.
Automatic Dimming
Mirror
The vehicle has an automatic
dimming outside mirror on the driver
side. The mirror will adjust for the
glare of headlamps behind you.
Reverse Tilt Mirrors
If equipped with memory seats, the
passenger and/or driver mirror tilts
to a preselected position when the
vehicle is in R (Reverse). This
allows the curb to be seen when
parallel parking. The mirror(s) return to the original
position when:
.
The vehicle is shifted out of
R (Reverse), or remains in
R (Reverse) for about
30 seconds.
. The ignition is turned off.
. The vehicle is driven in
R (Reverse) above a set speed.
To turn this feature on or off, see
Vehicle Personalization 0128.
Page 51 of 345
Chevrolet Impala Owner Manual (GMNA-Localizing-U.S./Canada-11348316) -
2018 - CRC - 8/22/17
50 Seats and Restraints
Head Restraints
{Warning
With head restraints that are not
installed and adjusted properly,
there is a greater chance that
occupants will suffer a neck/
spinal injury in a crash. Do not
drive until the head restraints for
all occupants are installed and
adjusted properly.
If your vehicle has rear head
restraints that fold down, always
return them to the full upright
position whenever an occupant is
seated in the seat.
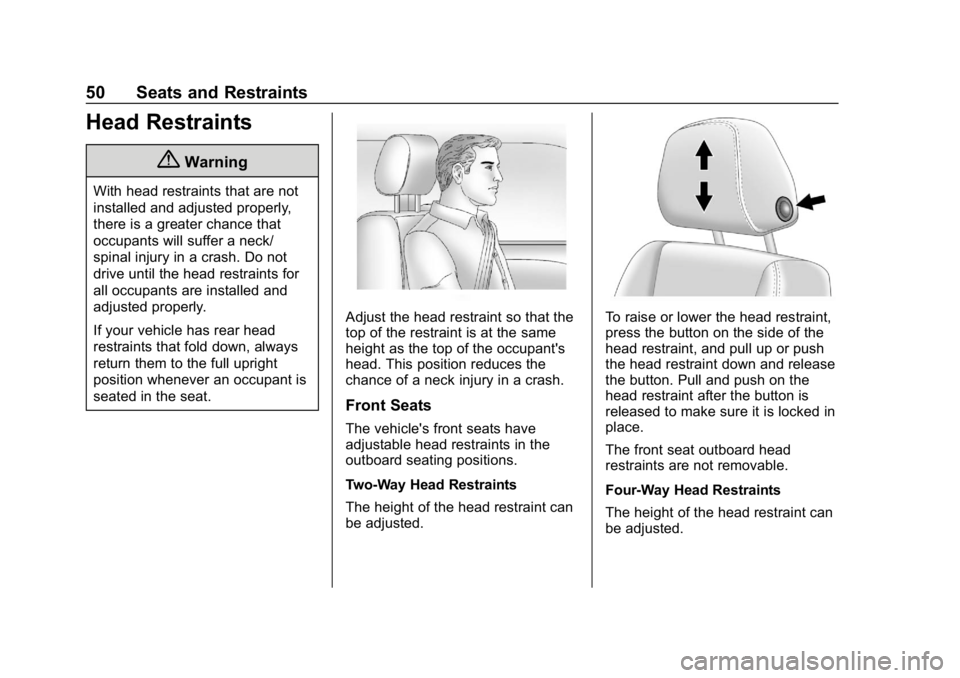
Adjust the head restraint so that the
top of the restraint is at the same
height as the top of the occupant's
head. This position reduces the
chance of a neck injury in a crash.
Front Seats
The vehicle's front seats have
adjustable head restraints in the
outboard seating positions.
Two-Way Head Restraints
The height of the head restraint can
be adjusted.
To raise or lower the head restraint,
press the button on the side of the
head restraint, and pull up or push
the head restraint down and release
the button. Pull and push on the
head restraint after the button is
released to make sure it is locked in
place.
The front seat outboard head
restraints are not removable.
Four-Way Head Restraints
The height of the head restraint can
be adjusted.
Page 53 of 345
Chevrolet Impala Owner Manual (GMNA-Localizing-U.S./Canada-11348316) -
2018 - CRC - 8/22/17
52 Seats and Restraints
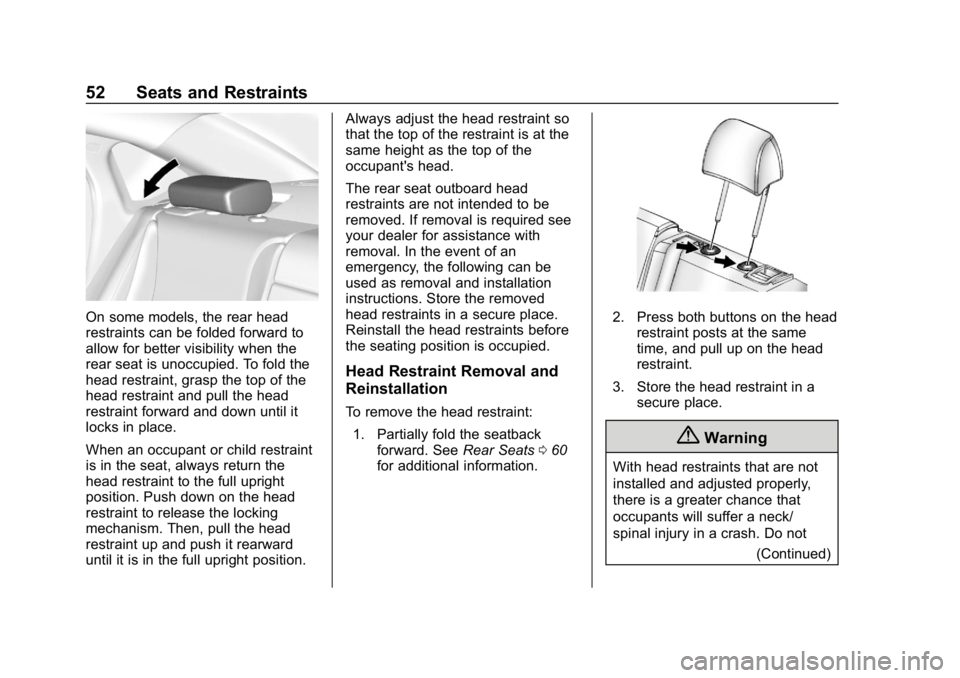
On some models, the rear head
restraints can be folded forward to
allow for better visibility when the
rear seat is unoccupied. To fold the
head restraint, grasp the top of the
head restraint and pull the head
restraint forward and down until it
locks in place.
When an occupant or child restraint
is in the seat, always return the
head restraint to the full upright
position. Push down on the head
restraint to release the locking
mechanism. Then, pull the head
restraint up and push it rearward
until it is in the full upright position.Always adjust the head restraint so
that the top of the restraint is at the
same height as the top of the
occupant's head.
The rear seat outboard head
restraints are not intended to be
removed. If removal is required see
your dealer for assistance with
removal. In the event of an
emergency, the following can be
used as removal and installation
instructions. Store the removed
head restraints in a secure place.
Reinstall the head restraints before
the seating position is occupied.
Head Restraint Removal and
Reinstallation
To remove the head restraint:
1. Partially fold the seatback forward. See Rear Seats060
for additional information.
2. Press both buttons on the head
restraint posts at the same
time, and pull up on the head
restraint.
3. Store the head restraint in a secure place.
{Warning
With head restraints that are not
installed and adjusted properly,
there is a greater chance that
occupants will suffer a neck/
spinal injury in a crash. Do not
(Continued)
Page 61 of 345

Chevrolet Impala Owner Manual (GMNA-Localizing-U.S./Canada-11348316) -
2018 - CRC - 8/22/17
60 Seats and Restraints
I:If equipped, press to heat the
driver or passenger seatback only.
J: Press to heat the driver or
passenger seat cushion and
seatback.
C: If equipped, press to ventilate
the driver or passenger seat.
A ventilated seat has a fan that pulls
or pushes air through the seat. The
air is not cooled.
An indicator light on the button turns
on when the heated or ventilated
seat is on.
Press the button once for the
highest setting. With each press of
the button, the seat will change to
the next lower setting, and then to
the off setting. The lights near the
button indicate three for the highest
setting and one for the lowest. If the
heated seats are on high, the level
may automatically be lowered after
approximately 30 minutes.
The passenger seat may take
longer to heat up. Remote Start Auto Heated and
Ventilated Seats
During a remote start, the heated or
ventilated seats, if equipped, can be
turned on automatically. When it is
cold outside, the heated seats turn
on, and when it is hot outside the
ventilated seats turn on. The heated
or ventilated seats are canceled
when the ignition is turned on. Press
the button to use the heated or
ventilated seats after the vehicle is
started.
The heated or ventilated seat
indicator lights on the button do not
turn on during a remote start.
The heated seat temperature
performance of an unoccupied seat
may be reduced. This is normal.
The heated or ventilated seats will
not turn on during a remote start
unless they are enabled in the
vehicle personalization menu.
See
Remote Vehicle Start 034 and
Vehicle Personalization 0128.
Rear Seats
Folding the Seatback
Either side of the seatback can be
folded for more cargo space. Fold a
seatback only when the vehicle is
not moving.
Caution
Folding a rear seat with the seat
belts still fastened may cause
damage to the seat or the seat
belts. Always unbuckle the seat
belts and return them to their
normal stowed position before
folding a rear seat.
Page 62 of 345
Chevrolet Impala Owner Manual (GMNA-Localizing-U.S./Canada-11348316) -
2018 - CRC - 8/22/17
Seats and Restraints 61
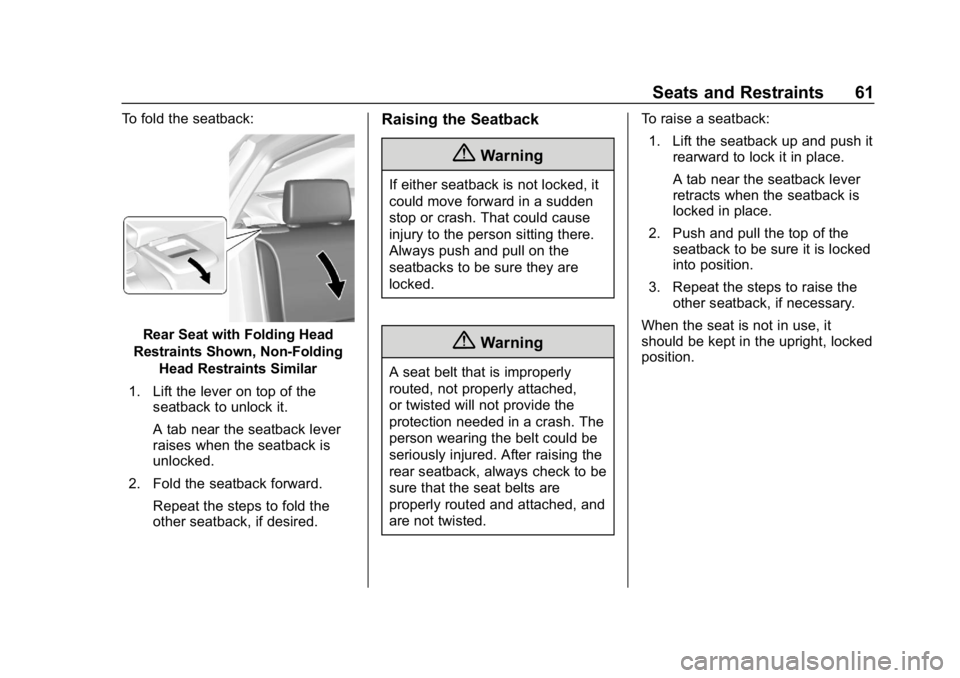
To fold the seatback:
Rear Seat with Folding Head
Restraints Shown, Non-Folding Head Restraints Similar
1. Lift the lever on top of the seatback to unlock it.
A tab near the seatback lever
raises when the seatback is
unlocked.
2. Fold the seatback forward. Repeat the steps to fold the
other seatback, if desired.
Raising the Seatback
{Warning
If either seatback is not locked, it
could move forward in a sudden
stop or crash. That could cause
injury to the person sitting there.
Always push and pull on the
seatbacks to be sure they are
locked.
{Warning
A seat belt that is improperly
routed, not properly attached,
or twisted will not provide the
protection needed in a crash. The
person wearing the belt could be
seriously injured. After raising the
rear seatback, always check to be
sure that the seat belts are
properly routed and attached, and
are not twisted. To raise a seatback:
1. Lift the seatback up and push it rearward to lock it in place.
A tab near the seatback lever
retracts when the seatback is
locked in place.
2. Push and pull the top of the seatback to be sure it is locked
into position.
3. Repeat the steps to raise the other seatback, if necessary.
When the seat is not in use, it
should be kept in the upright, locked
position.
Page 92 of 345
Chevrolet Impala Owner Manual (GMNA-Localizing-U.S./Canada-11348316) -
2018 - CRC - 8/22/17
Seats and Restraints 91
Warning (Continued)
but it cannot do this if it is
wrapped around a child’s neck.
If the shoulder belt is locked and
tightened around a child’s neck,
the only way to loosen the belt is
to cut it.
Buckle any unused seat belts
behind the child restraint so
children cannot reach them. Pull
the shoulder belt all the way out
of the retractor to set the lock,
and tighten the belt behind the
child restraint after the child
restraint has been installed.
Caution
Do not let the LATCH
attachments rub against the
vehicle’s seat belts. This may
damage these parts. If necessary,
move buckled seat belts to avoid
rubbing the LATCH attachments.(Continued)
Caution (Continued)
Do not fold the rear seatback
when the seat is occupied. Do not
fold the empty rear seat with a
seat belt buckled. This could
damage the seat belt or the seat.
Unbuckle and return the seat belt
to its stowed position, before
folding the seat.
If you need to secure more than one
child restraint in the rear seat, see
Where to Put the Restraint 086.
You cannot secure three child
restraints using the LATCH anchors
in the rear seat at the same time,
but you can install two of them.
If you want to do this, install one
LATCH child restraint in the right
rear seating position, and install the
other one either in the left rear
seating position or in the center
seating position. If you need to
install child restraints in both the
center and left rear seating
positions, the one in the center seating position will need to be
secured using the vehicle seat belts
instead of the LATCH anchors.
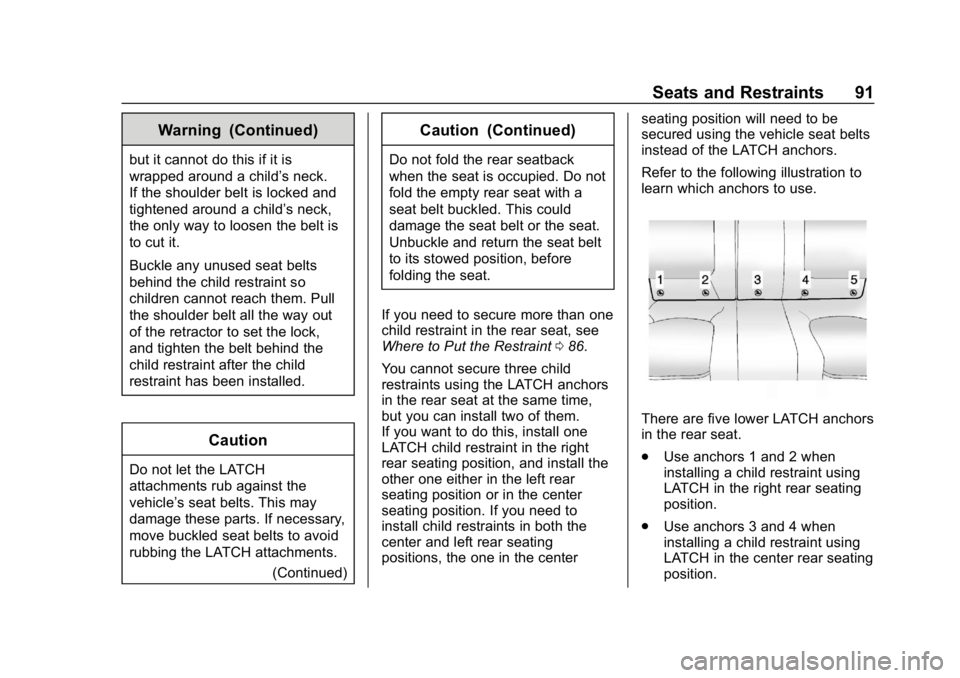
Refer to the following illustration to
learn which anchors to use.
There are five lower LATCH anchors
in the rear seat.
.
Use anchors 1 and 2 when
installing a child restraint using
LATCH in the right rear seating
position.
. Use anchors 3 and 4 when
installing a child restraint using
LATCH in the center rear seating
position.
Page 337 of 345

Chevrolet Impala Owner Manual (GMNA-Localizing-U.S./Canada-11348316) -
2018 - CRC - 8/22/17
336 Index
Dual Automatic ClimateControl System . . . . . . . . . . . . . . . . 150
E
E85 or FlexFuel . . . . . . . . . . . . . . . . 203
Electric Parking Brake . . . . . . . . . . 178
Electric Parking Brake Light . . . . 120
Electrical Equipment,
Add-On . . . . . . . . . . . . . . . . . . . . . . . 211
Electrical System Engine Compartment FuseBlock . . . . . . . . . . . . . . . . . . . . . . . . 243
Fuses and Circuit Breakers . . . 243
Instrument Panel Fuse Block . . . . . . . . . . . . . . . . . . . . . . . . 246
Overload . . . . . . . . . . . . . . . . . . . . . 242
Emergency
OnStar . . . . . . . . . . . . . . . . . . . . . . . 322
Engine Air Cleaner/Filter . . . . . . . . . . . . . 224
Check Light (MalfunctionIndicator) . . . . . . . . . . . . . . . . . . . . .118
Compartment Overview . . . . . . . 217
Coolant Temperature Gauge . . . . . . . . . . . . . . . . . . . . . . .115
Cooling System . . . . . . . . . . . . . . . 225
Drive Belt Routing . . . . . . . . . . . . 306
Exhaust . . . . . . . . . . . . . . . . . . . . . . 174 Engine (cont'd)
Heater . . . . . . . . . . . . . . . . . . . . . . . . 171
Oil Life System . . . . . . . . . . . . . . . 222
Oil Pressure Light . . . . . . . . . . . . 123
Overheated Protection
Operating Mode . . . . . . . . . . . . . 230
Overheating . . . . . . . . . . . . . . . . . . 229
Power Messages . . . . . . . . . . . . . 128
Running While Parked . . . . . . . . 174
Starting . . . . . . . . . . . . . . . . . . . . . . . 169
Entry Lighting . . . . . . . . . . . . . . . . . . . 144
Equipment, Towing . . . . . . . . . . . . . 210
Event Data Recorders . . . . . . . . . . 319
Exit Lighting . . . . . . . . . . . . . . . . . . . . 144
Extended Parking . . . . . . . . . . . . . . . 174
Extender, Seat Belt . . . . . . . . . . . . . . 67
Exterior Lamp Controls . . . . . . . . . 139
Exterior Lamps Off Reminder . . . 140
Exterior Lighting Battery Saver . . . . . . . . . . . . . . . . . . . . . . . . . 145
F
FeaturesMemory . . . . . . . . . . . . . . . . . . . . . . . . . 12
Filter, Engine Air Cleaner . . . . . . . . . . . 224
Flash-to-Pass . . . . . . . . . . . . . . . . . . . 140
Flashers, Hazard Warning . . . . . . 141 Flat Tire . . . . . . . . . . . . . . . . . . . . . . . . 269
Changing . . . . . . . . . . . . . . . . . . . . . 270
FlexFuel E85 . . . . . . . . . . . . . . . . . . . . . . . . . . . 203
Floor Mats . . . . . . . . . . . . . . . . . . . . . . 289
Fluid Automatic Transmission . . . . . . 223
Brakes . . . . . . . . . . . . . . . . . . . . . . . . 232
Washer . . . . . . . . . . . . . . . . . . . . . . . 230
Folding Mirrors . . . . . . . . . . . . . . . . . . 44
Forward Automatic Braking . . . . . 197
Forward Collision Alert (FCA) System . . . . . . . . . . . . . . . . . 195
Frequency Statement Radio . . . . . . . . . . . . . . . . . . . . . . . . . 317
Front Seats
Adjustment . . . . . . . . . . . . . . . . . . . . . 53
Heated and Ventilated . . . . . . . . . . 59
Fuel . . . . . . . . . . . . . . . . . . . . . . . . . . . . 202 Additives . . . . . . . . . . . . . . . . . . . . . 203
Economy Driving . . . . . . . . . . . . . . . 26
Filling a Portable FuelContainer . . . . . . . . . . . . . . . . . . . 206
Filling the Tank . . . . . . . . . . . . . . . 204
Foreign Countries . . . . . . . . . . . . 203
Gauge . . . . . . . . . . . . . . . . . . . . . . . . .114
Low Fuel Warning Light . . . . . . . 123
Requirements, California . . . . . 202
Page 340 of 345

Chevrolet Impala Owner Manual (GMNA-Localizing-U.S./Canada-11348316) -
2018 - CRC - 8/22/17
Index 339
M
MaintenanceRecords . . . . . . . . . . . . . . . . . . . . . . 303
Maintenance and Care Additional . . . . . . . . . . . . . . . . . . . . . 298
Maintenance Schedule . . . . . . . . . 293 Recommended Fluids andLubricants . . . . . . . . . . . . . . . . . . . 301
Malfunction Indicator Lamp . . . . . 118
Manual Mode . . . . . . . . . . . . . . . . . . . 177
Memory Features . . . . . . . . . . . . . . . . 12
Memory Seats . . . . . . . . . . . . . . . . . . . 56
Messages Engine Power . . . . . . . . . . . . . . . . 128
Vehicle . . . . . . . . . . . . . . . . . . . . . . . 127
Vehicle Speed . . . . . . . . . . . . . . . . 128
Mirrors Automatic Dimming . . . . . . . . . . . . . 44
Automatic DimmingRearview . . . . . . . . . . . . . . . . . . . . . . 45
Convex . . . . . . . . . . . . . . . . . . . . . . . . . 43
Folding . . . . . . . . . . . . . . . . . . . . . . . . . 44
Heated . . . . . . . . . . . . . . . . . . . . . . . . . 44
Manual Rearview . . . . . . . . . . . . . . . 45
Power . . . . . . . . . . . . . . . . . . . . . . . . . . 43
Tilt in Reverse . . . . . . . . . . . . . . . . . . 44
Mirrors, Interior Rearview . . . . . . . . 45 Monitor System, Tire
Pressure . . . . . . . . . . . . . . . . . . . . . . 258
N
Navigation
OnStar . . . . . . . . . . . . . . . . . . . . . . . 323
Net, Convenience . . . . . . . . . . . . . . 102
New Vehicle Break-In . . . . . . . . . . . 167
O
Odometer . . . . . . . . . . . . . . . . . . . . . . . 113
Trip . . . . . . . . . . . . . . . . . . . . . . . . . . . .113
Off-Road
Recovery . . . . . . . . . . . . . . . . . . . . . 159
Oil Engine . . . . . . . . . . . . . . . . . . . . . . . . 220
Engine Oil Life System . . . . . . . 222
Pressure Light . . . . . . . . . . . . . . . . 123
Older Children, Restraints . . . . . . . 81
Online Owner Center . . . . . . . . . . . 310
OnStar . . . . . . . . . . . . . . . . . . . . . . . . . 320
OnStar Additional Information . . . . . . . . . . . . . . . . . . . . 327
OnStar Connections . . . . . . . . . . . . 324
OnStar Diagnostics . . . . . . . . . . . . . 326
OnStar Emergency . . . . . . . . . . . . . 322
OnStar Navigation . . . . . . . . . . . . . . 323
OnStar Overview . . . . . . . . . . . . . . . 321
OnStar Security . . . . . . . . . . . . . . . . 323 Operating Mode
Overheated Engine
Protection . . . . . . . . . . . . . . . . . . . 230
Ordering Service Publications . . . . . . . . . . 316
Outlets Power . . . . . . . . . . . . . . . . . . . . . . . . 106
Overheated Engine Protection Operating Mode . . . . 230
Overheating, Engine . . . . . . . . . . . . 229
P
Park Shifting Into . . . . . . . . . . . . . . . . . . . 172
Shifting Out of . . . . . . . . . . . . . . . . 173
Parking Brake and P (Park)
Mechanism Check . . . . . . . . . . 235
Extended . . . . . . . . . . . . . . . . . . . . . 174
Over Things That Burn . . . . . . . 173
Parking Assist . . . . . . . . . . . . . . . . . . 192
Parking or Backing
Assistance Systems . . . . . . . . . . 192
Passenger Airbag Status Indicator . . . . . . . . . . . . . . . . . . . . . . 116
Passenger Compartment Air
Filter . . . . . . . . . . . . . . . . . . . . . . . . . . 155
Passenger Sensing System . . . . . 74