stop start CHEVROLET IMPALA 2020 Owner's Guide
[x] Cancel search | Manufacturer: CHEVROLET, Model Year: 2020, Model line: IMPALA, Model: CHEVROLET IMPALA 2020Pages: 328, PDF Size: 5.07 MB
Page 194 of 328
Chevrolet Impala Owner Manual (GMNA-Localizing-U.S./Canada-13688912) -
2020 - CRC - 6/11/19
Driving and Operating 193
When parking your vehicle and your
trailer on a hill:1. Press the brake pedal, but do not shift into P (Park) yet. Turn
the wheels into the curb if
facing downhill or into traffic if
facing uphill.
2. Have someone place chocks under the trailer wheels.
3. When the wheel chocks are in place, gradually release the
brake pedal to allow the chocks
to absorb the load of the trailer.
4. Reapply the brake pedal. Then apply the parking brake and
shift into P (Park).
5. Release the brake pedal.
Leaving After Parking on a Hill
1. Apply and hold the brake pedal.
.Start the engine.
. Shift into a gear.
. Release the parking brake.
2. Let up on the brake pedal. 3. Drive slowly until the trailer is
clear of the chocks.
4. Stop and have someone pick up and store the chocks.
Maintenance when Trailer
Towing
The vehicle needs service more
often when used to tow trailers. See
Maintenance Schedule 0276. It is
especially important to check the
automatic transmission fluid, engine
oil, axle lubricant, belts, cooling
system, and brake system before
and during each trip.
Check periodically that all nuts and
bolts on the trailer hitch are tight.
Engine Cooling when Trailer
Towing
The cooling system may temporarily
overheat during severe operating
conditions. See Engine Overheating
0 212.
Trailer Towing
Caution
Towing a trailer improperly can
damage the vehicle and result in
costly repairs not covered by the
vehicle warranty. To tow a trailer
correctly, follow the directions in
this section and see your dealer
for important information about
towing a trailer with the vehicle.
Trailer Weight
{Warning
Never exceed the towing capacity
for your vehicle.
Safe trailering requires monitoring
the weight, speed, altitude, road
grades, outside temperature,
dimensions of the front of the trailer,
and how frequently the vehicle is
used to tow a trailer.
Before towing a trailer, always
separately weigh:
Page 199 of 328
Chevrolet Impala Owner Manual (GMNA-Localizing-U.S./Canada-13688912) -
2020 - CRC - 6/5/19
198 Vehicle Care
Vehicle Care
General Information
General Information . . . . . . . . . . 199
California Proposition65 Warning . . . . . . . . . . . . . . . . . 199
California Perchlorate Materials Requirements . . . . . 200
Accessories and Modifications . . . . . . . . . . . . . . . . 200
Vehicle Checks
Doing Your OwnService Work . . . . . . . . . . . . . . . 200
Hood . . . . . . . . . . . . . . . . . . . . . . . . . 201
Engine Compartment Overview . . . . . . . . . . . . . . . . . . . . 203
Engine Oil . . . . . . . . . . . . . . . . . . . . 204
Engine Oil Life System . . . . . . . 206
Automatic Transmission Fluid . . . . . . . . . . . . . . . . . . . . . . . . 207
Engine Air Cleaner/Filter . . . . . . 208
Cooling System . . . . . . . . . . . . . . 209
Engine Overheating . . . . . . . . . . 212
Overheated Engine Protection Operating Mode . . . . . . . . . . . . . 213
Washer Fluid . . . . . . . . . . . . . . . . . 214
Brakes . . . . . . . . . . . . . . . . . . . . . . . 214
Brake Fluid . . . . . . . . . . . . . . . . . . . 215 Battery - North America . . . . . . 216
Starter Switch Check . . . . . . . . . 217
Automatic Transmission Shift
Lock Control Function
Check . . . . . . . . . . . . . . . . . . . . . . . 217
Park Brake and P (Park) Mechanism Check . . . . . . . . . . 218
Wiper Blade Replacement . . . . 218
Windshield Replacement . . . . . 219
Gas Strut(s) . . . . . . . . . . . . . . . . . . 219
Headlamp Aiming
Front Headlamp Aiming . . . . . . 220
Bulb Replacement
Bulb Replacement . . . . . . . . . . . . 221
Halogen Bulbs . . . . . . . . . . . . . . . . 221
High Intensity Discharge (HID) Lighting . . . . . . . . . . . . . . . . . . . . . 221
LED Lighting . . . . . . . . . . . . . . . . . 221
Headlamps, Front Turn Signal, Sidemarker, and Parking
Lamps . . . . . . . . . . . . . . . . . . . . . . 221
Taillamps, Turn Signal, Stoplamps, and Back-Up
Lamps . . . . . . . . . . . . . . . . . . . . . . 223
License Plate Lamp . . . . . . . . . . 224
Electrical System
High Voltage Devices and Wiring . . . . . . . . . . . . . . . . . . . . . . . 225 Electrical System Overload . . . 225
Fuses and Circuit Breakers . . . 226
Engine Compartment Fuse
Block . . . . . . . . . . . . . . . . . . . . . . . . 226
Instrument Panel Fuse
Block . . . . . . . . . . . . . . . . . . . . . . . . 229
Wheels and Tires
Tires . . . . . . . . . . . . . . . . . . . . . . . . . . 231
All-Season Tires . . . . . . . . . . . . . . 232
Winter Tires . . . . . . . . . . . . . . . . . . 233
Low-Profile Tires . . . . . . . . . . . . . 233
Summer Tires . . . . . . . . . . . . . . . . 233
Tire Sidewall Labeling . . . . . . . . 234
Tire Designations . . . . . . . . . . . . . 236
Tire Terminology andDefinitions . . . . . . . . . . . . . . . . . . 237
Tire Pressure . . . . . . . . . . . . . . . . . 239
Tire Pressure for High-Speed Operation . . . . . . . . . . . . . . . . . . . 240
Tire Pressure Monitor System . . . . . . . . . . . . . . . . . . . . . . 241
Tire Pressure Monitor Operation . . . . . . . . . . . . . . . . . . . 242
Tire Inspection . . . . . . . . . . . . . . . . 245
Tire Rotation . . . . . . . . . . . . . . . . . 245
When It Is Time for New Tires . . . . . . . . . . . . . . . . . . . . . . . . 246
Buying New Tires . . . . . . . . . . . . . 247
Different Size Tires and Wheels . . . . . . . . . . . . . . . . . . . . . . 249
Page 213 of 328
Chevrolet Impala Owner Manual (GMNA-Localizing-U.S./Canada-13688912) -
2020 - CRC - 6/5/19
212 Vehicle Care
surge tank pressure cap and
upper radiator hose, is no
longer hot.
Turn the pressure cap slowly
counterclockwise about
one-quarter of a turn. If you
hear a hiss, wait for that to
stop. This will allow any
pressure still left to be vented
out the discharge hose.
2. Keep turning the pressure cap slowly and remove it.
3. Fill the coolant surge tank with the proper mixture to the
indicated level mark.
4. With the coolant surge tank pressure cap off, start the
engine and let it run until you
can feel the upper radiator
hose getting hot. Watch out for
the engine cooling fans.
By this time, the coolant level
inside the coolant surge tank
may be lower. If the level is
lower, add more of the proper
mixture to the coolant surge
tank until the level reaches the
indicated level mark. 5. Replace the pressure cap
tightly.
6. Verify coolant level after the engine is shut off and the
coolant is cold. If necessary,
repeat coolant fill procedure
Steps 1–6.
If the coolant still is not at the
proper level when the system
cools down again, see your
dealer.
Caution
If the pressure cap is not tightly
installed, coolant loss and engine
damage may occur. Be sure the
cap is properly and tightly
secured.
Engine Overheating
There is a coolant temperature
gauge on the instrument cluster that
indicates an overheated engine
condition. See Engine Coolant
Temperature Gauge 0100. If the decision is made not to lift the
hood when this warning appears,
get service help right away. See
Roadside Assistance Program
0
294.
If the decision is made to lift the
hood, make sure the vehicle is
parked on a level surface.
Then check to see if the engine
cooling fans are running. If the
engine is overheating, the fans
should be running. If not, do not
continue to run the engine and have
the vehicle serviced.
Caution
Do not run the engine if there is a
leak in the engine cooling system.
This can cause a loss of all
coolant and can damage the
system and vehicle. Have any
leaks fixed right away.
Page 226 of 328
Chevrolet Impala Owner Manual (GMNA-Localizing-U.S./Canada-13688912) -
2020 - CRC - 6/5/19
Vehicle Care 225
Electrical System
High Voltage Devices and
Wiring
{Warning
Exposure to high voltage can
cause shock, burns, and even
death. The high voltage
components in the vehicle can
only be serviced by technicians
with special training.
High voltage components are
identified by labels. Do not
remove, open, take apart,
or modify these components.
High voltage cable or wiring has
orange covering or labels. Do not
probe, tamper with, cut, or modify
high voltage cable or wiring.
Electrical System
Overload
The vehicle has fuses and circuit
breakers to protect against an
electrical system overload.
When the current electrical load is
too heavy, the circuit breaker opens
and closes, protecting the circuit
until the current load returns to
normal or the problem is fixed. This
greatly reduces the chance of circuit
overload and fire caused by
electrical problems.
Fuses and circuit breakers protect
power devices in the vehicle.
Replace a bad fuse with a new one
of the identical size and rating.
If there is a problem on the road and
a fuse needs to be replaced, the
same amperage fuse can be
borrowed. Choose some feature of
the vehicle that is not needed to use
and replace it as soon as possible.
Headlamp Wiring
An electrical overload may cause
the lamps to go on and off, or in
some cases to remain off. Have the
headlamp wiring checked right away
if the lamps go on and off or
remain off.
Windshield Wipers
If the wiper motor overheats due to
heavy snow or ice, the windshield
wipers will stop until the motor cools
and will then restart.
Although the circuit is protected
from electrical overload, overload
due to heavy snow or ice may
cause wiper linkage damage.
Always clear ice and heavy snow
from the windshield before using the
windshield wipers.
If the overload is caused by an
electrical problem and not snow or
ice, be sure to get it fixed.
Page 229 of 328
Chevrolet Impala Owner Manual (GMNA-Localizing-U.S./Canada-13688912) -
2020 - CRC - 6/5/19
228 Vehicle Care
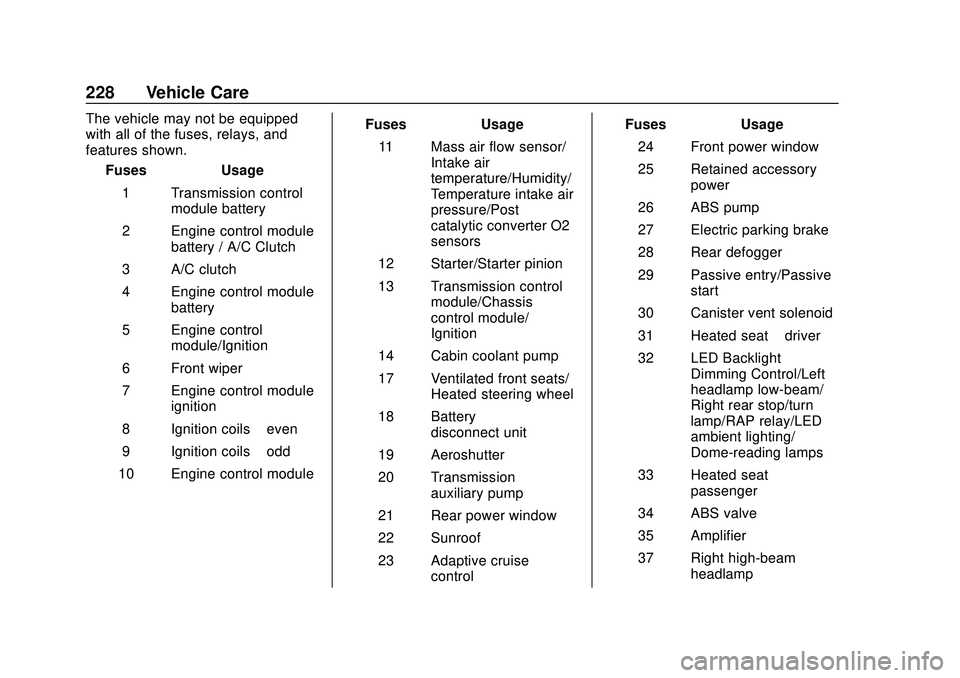
The vehicle may not be equipped
with all of the fuses, relays, and
features shown.Fuses Usage
1 Transmission control module battery
2 Engine control module battery / A/C Clutch
3 A/C clutch
4 Engine control module battery
5 Engine control module/Ignition
6 Front wiper
7 Engine control module ignition
8 Ignition coils –even
9 Ignition coils –odd
10 Engine control module Fuses Usage
11 Mass air flow sensor/ Intake air
temperature/Humidity/
Temperature intake air
pressure/Post
catalytic converter O2
sensors
12 Starter/Starter pinion
13 Transmission control module/Chassis
control module/
Ignition
14 Cabin coolant pump
17 Ventilated front seats/ Heated steering wheel
18 Battery disconnect unit
19 Aeroshutter
20 Transmission auxiliary pump
21 Rear power window
22 Sunroof
23 Adaptive cruise control Fuses Usage
24 Front power window
25 Retained accessory power
26 ABS pump
27 Electric parking brake
28 Rear defogger
29 Passive entry/Passive start
30 Canister vent solenoid
31 Heated seat –driver
32 LED Backlight Dimming Control/Left
headlamp low-beam/
Right rear stop/turn
lamp/RAP relay/LED
ambient lighting/
Dome-reading lamps
33 Heated seat –
passenger
34 ABS valve
35 Amplifier
37 Right high-beam headlamp
Page 231 of 328
Chevrolet Impala Owner Manual (GMNA-Localizing-U.S./Canada-13688912) -
2020 - CRC - 6/5/19
230 Vehicle Care
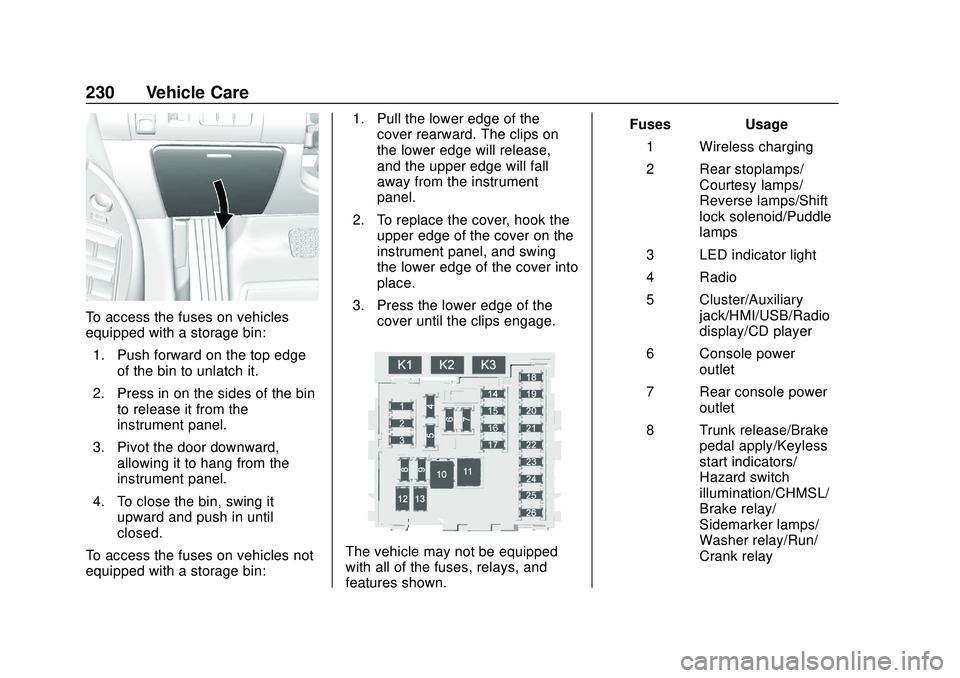
To access the fuses on vehicles
equipped with a storage bin:1. Push forward on the top edge of the bin to unlatch it.
2. Press in on the sides of the bin to release it from the
instrument panel.
3. Pivot the door downward, allowing it to hang from the
instrument panel.
4. To close the bin, swing it upward and push in until
closed.
To access the fuses on vehicles not
equipped with a storage bin: 1. Pull the lower edge of the
cover rearward. The clips on
the lower edge will release,
and the upper edge will fall
away from the instrument
panel.
2. To replace the cover, hook the upper edge of the cover on the
instrument panel, and swing
the lower edge of the cover into
place.
3. Press the lower edge of the cover until the clips engage.
The vehicle may not be equipped
with all of the fuses, relays, and
features shown. Fuses Usage
1 Wireless charging
2 Rear stoplamps/ Courtesy lamps/
Reverse lamps/Shift
lock solenoid/Puddle
lamps
3 LED indicator light
4 Radio
5 Cluster/Auxiliary jack/HMI/USB/Radio
display/CD player
6 Console power outlet
7 Rear console power outlet
8 Trunk release/Brake pedal apply/Keyless
start indicators/
Hazard switch
illumination/CHMSL/
Brake relay/
Sidemarker lamps/
Washer relay/Run/
Crank relay
Page 243 of 328
Chevrolet Impala Owner Manual (GMNA-Localizing-U.S./Canada-13688912) -
2020 - CRC - 6/5/19
242 Vehicle Care
remain continuously illuminated.
This sequence will continue upon
subsequent vehicle start-ups as
long as the malfunction exists.
When the malfunction indicator is
illuminated, the system may not be
able to detect or signal low tire
pressure as intended. TPMS
malfunctions may occur for a variety
of reasons, including the installation
of replacement or alternate tires or
wheels on the vehicle that prevent
the TPMS from functioning properly.
Always check the TPMS malfunction
telltale after replacing one or more
tires or wheels on your vehicle to
ensure that the replacement or
alternate tires and wheels allow the
TPMS to continue to function
properly.
SeeTire Pressure Monitor
Operation 0242.
See Radio Frequency Statement
0 300.Tire Pressure Monitor
Operation
This vehicle may have a Tire
Pressure Monitor System (TPMS).
The TPMS is designed to warn the
driver when a low tire pressure
condition exists. TPMS sensors are
mounted onto each tire and wheel
assembly, excluding the spare tire
and wheel assembly. The TPMS
sensors monitor the air pressure in
the tires and transmit the tire
pressure readings to a receiver
located in the vehicle.
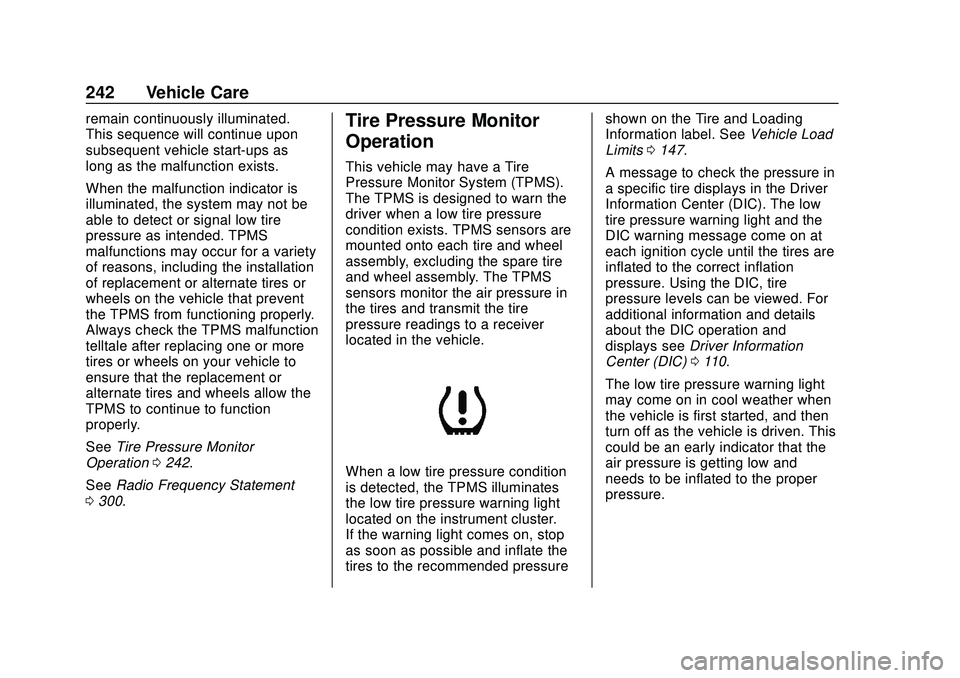
When a low tire pressure condition
is detected, the TPMS illuminates
the low tire pressure warning light
located on the instrument cluster.
If the warning light comes on, stop
as soon as possible and inflate the
tires to the recommended pressure shown on the Tire and Loading
Information label. See
Vehicle Load
Limits 0147.
A message to check the pressure in
a specific tire displays in the Driver
Information Center (DIC). The low
tire pressure warning light and the
DIC warning message come on at
each ignition cycle until the tires are
inflated to the correct inflation
pressure. Using the DIC, tire
pressure levels can be viewed. For
additional information and details
about the DIC operation and
displays see Driver Information
Center (DIC) 0110.
The low tire pressure warning light
may come on in cool weather when
the vehicle is first started, and then
turn off as the vehicle is driven. This
could be an early indicator that the
air pressure is getting low and
needs to be inflated to the proper
pressure.
Page 245 of 328
Chevrolet Impala Owner Manual (GMNA-Localizing-U.S./Canada-13688912) -
2020 - CRC - 6/5/19
244 Vehicle Care
could prevent the TPMS from
functioning properly. SeeBuying
New Tires 0247.
. Operating electronic devices or
being near facilities using radio
wave frequencies similar to the
TPMS could cause the TPMS
sensors to malfunction.
If the TPMS is not functioning
properly it cannot detect or signal a
low tire pressure condition. See
your dealer for service if the TPMS
malfunction light and DIC message
comes on and stays on.
TPMS Sensor Matching
Process
Each TPMS sensor has a unique
identification code. The identification
code needs to be matched to a new
tire/wheel position after rotating the
vehicle’s tires or replacing one or
more of the TPMS sensors. The
TPMS sensor matching process
should also be performed after
replacing a spare tire with a road
tire containing the TPMS sensor.
The malfunction light and the DIC
message should go off at the next ignition cycle. The sensors are
matched to the tire/wheel positions,
using a TPMS relearn tool, in the
following order: driver side front tire,
passenger side front tire, passenger
side rear tire, and driver side rear.
See your dealer for service or to
purchase a relearn tool. A TPMS
relearn tool can also be purchased.
See Tire Pressure Monitor Sensor
Activation Tool at
www.gmtoolsandequipment.com or
call 1-800-GM TOOLS
(1-800-468-6657).
There are two minutes to match the
first tire/wheel position, and
five minutes overall to match all four
tire/wheel positions. If it takes
longer, the matching process stops
and must be restarted.
The TPMS sensor matching
process is:
1. Set the parking brake.
2. Place the vehicle in Service Mode. See Ignition Positions
0 151. 3. Make sure the Tire Pressure
info page option is turned on.
The info pages on the DIC can
be turned on and off through
the Settings menu. See Driver
Information Center (DIC) 0110.
4. Use the DIC controls on the right side of the steering wheel
to scroll to the Tire Pressure
screen under the DIC
info page.
5. Press and hold
Vin the center
of the DIC controls.
The horn sounds twice to
signal the receiver is in relearn
mode and the TIRE
LEARNING ACTIVE message
displays on the DIC screen.
6. Start with the driver side front tire.
7. Place the relearn tool against the tire sidewall, near the valve
stem. Then press the button to
activate the TPMS sensor.
A horn chirp confirms that the
sensor identification code has
been matched to this tire and
wheel position.
Page 283 of 328

Chevrolet Impala Owner Manual (GMNA-Localizing-U.S./Canada-13688912) -
2020 - CRC - 6/5/19
282 Service and Maintenance
.To avoid break-down or failure to
start the vehicle, maintain a
battery with full cranking power.
. Trained dealer technicians have
the diagnostic equipment to test
the battery and ensure that the
connections and cables are
corrosion-free.
Belts
. Belts may need replacing if they
squeak or show signs of
cracking or splitting.
. Trained dealer technicians have
access to tools and equipment
to inspect the belts and
recommend adjustment or
replacement when necessary.
Brakes
Brakes stop the vehicle and are
crucial to safe driving.
. Signs of brake wear may include
chirping, grinding, or squealing
noises, or difficulty stopping. .
Trained dealer technicians have
access to tools and equipment
to inspect the brakes and
recommend quality parts
engineered for the vehicle.
Fluids
Proper fluid levels and approved
fluids protect the vehicle’s systems
and components. See
Recommended Fluids and
Lubricants 0284 for GM approved
fluids.
. Engine oil and windshield
washer fluid levels should be
checked at every fuel fill.
. Instrument cluster lights may
come on to indicate that fluids
may be low and need to be
filled.
Hoses
Hoses transport fluids and should
be regularly inspected to ensure
that there are no cracks or leaks.
With a multi-point inspection, your
dealer can inspect the hoses and
advise if replacement is needed. Lamps
Properly working headlamps,
taillamps, and brake lamps are
important to see and be seen on
the road.
.
Signs that the headlamps need
attention include dimming, failure
to light, cracking, or damage.
The brake lamps need to be
checked periodically to ensure
that they light when braking.
. With a multi-point inspection,
your dealer can check the lamps
and note any concerns.
Shocks and Struts
Shocks and struts help aid in control
for a smoother ride.
. Signs of wear may include
steering wheel vibration, bounce/
sway while braking, longer
stopping distance, or uneven
tire wear.
. As part of the multi-point
inspection, trained dealer
technicians can visually inspect
the shocks and struts for signs
Page 316 of 328
Chevrolet Impala Owner Manual (GMNA-Localizing-U.S./Canada-13688912) -
2020 - CRC - 6/5/19
Connected Services 315
vehicles, the SSID and
password can be changed in
the Wi-Fi Hotspot menu.
After initial set-up, your vehicle’s
Wi-Fi hotspot will connect
automatically to your mobile
devices. Manage data usage by
turning Wi-Fi on or off on your
mobile device, using the
myChevrolet mobile app, or by
contacting an OnStar Advisor. On
some vehicles, Wi-Fi can also be
managed from the Wi-Fi
Hotspot menu.
MyChevrolet Mobile App (If
Available)
Download the myChevrolet mobile
app to compatible Apple and
Android smartphones. Chevrolet
users can access the following
services from a smartphone:
. Remotely start/stop the vehicle,
if factory-equipped.
. Lock/unlock doors, if equipped
with automatic locks.
. Activate the horn and lamps. .
Check the vehicle’s fuel level, oil
life, or tire pressure,
if factory-equipped with the Tire
Pressure Monitor System.
. Send destinations to the vehicle.
. Locate the vehicle on a map
(U.S. market only).
. Turn the vehicle's Wi-Fi hotspot
on/off, manage settings, and
monitor data consumption,
if equipped.
. Locate a dealer and schedule
service.
. Request roadside assistance.
. Set a parking reminder with pin
drop, take a photo, make a note,
and set a timer.
. Connect with Chevrolet on social
media.
Features are subject to change. For
myChevrolet mobile app information
and compatibility, see
my.chevrolet.com.
An active OnStar or connected
service plan may be required.
A compatible device, factory-installed remote start, and
power locks are required. Data rates
apply. See www.onstar.com for
details and system limitations.
Remote Services
Contact an OnStar Advisor to
unlock the doors or sound the horn
and flash the lamps.
Marketplace
OnStar Advisors can provide offers
from restaurants and retailers on
your route, help locate hotels,
or book a room. These services
vary by market.
Diagnostics
By monitoring and reporting on the
vehicle's key systems, OnStar
Advanced Diagnostics, if equipped,
provides a way to keep up on
maintenance. Capabilities vary by
model. See www.onstar.com for
details and system limitations.
Features are subject to change. For
updates on feature capabilities, see
my.chevrolet.com. Message and
data rates may apply.