display CHEVROLET IMPALA 2020 Workshop Manual
[x] Cancel search | Manufacturer: CHEVROLET, Model Year: 2020, Model line: IMPALA, Model: CHEVROLET IMPALA 2020Pages: 328, PDF Size: 5.07 MB
Page 184 of 328
Chevrolet Impala Owner Manual (GMNA-Localizing-U.S./Canada-13688912) -
2020 - CRC - 6/11/19
Driving and Operating 183
When the vehicle is started, both
outside mirror LCA displays will
briefly come on to indicate the
system is operating. When the
vehicle is in a forward gear, the left
or right side mirror display will light
up if a moving vehicle is detected in
the next lane over in that blind zone
or rapidly approaching that zone.
If the turn signal is activated in the
same direction as a detected
vehicle, this display will flash as an
extra warning not to change lanes.
LCA can be disabled through
vehicle personalization. See
“Collision/Detection Systems”under
Vehicle Personalization 0113.
If LCA is disabled by the driver, the
LCA mirror displays will not light up.
When the System Does Not
Seem to Work Properly
The LCA system requires some
driving for the system to calibrate to
maximum performance. This
calibration may occur more quickly if
the vehicle is driven on a straight
highway road with traffic and
roadside objects (e.g., guardrails, barriers). During a trip, the LCA
system is not operational until the
vehicle first reaches a speed of
24 km/h (15 mph).
LCA displays may not come on
when passing a vehicle quickly, for
a stopped vehicle, or when towing a
trailer. The LCA detection zones
that extend back from the side of
the vehicle do not move further back
when a trailer is towed. Use caution
while changing lanes when towing a
trailer. LCA may alert to objects
attached to the vehicle, such as a
trailer, bicycle, or object extending
out to either side of the vehicle.
Attached objects may also interfere
with the detection of vehicles. This
is normal system operation; the
vehicle does not need service.
LCA may not always alert the driver
to vehicles in the next lane over,
especially in wet conditions or when
driving on sharp curves. The system
does not need to be serviced. The
system may light up due to
guardrails, signs, trees, shrubs, and
other non-moving objects. This is
normal system operation; the
vehicle does not need service.
LCA may not operate when the LCA
sensors in the left or right corners of
the rear bumper are covered with
mud, dirt, snow, ice, or slush, or in
heavy rainstorms. For cleaning
instructions, see "Washing the
Vehicle" under
Exterior Care0264.
If the DIC still displays the system
unavailable message after cleaning
both sides of the vehicle toward the
rear corners of the vehicle, see your
dealer.
If the LCA displays do not light up
when moving vehicles are in the
side blind zone or rapidly
approaching this zone and the
system is clean, the system may
need service. Take the vehicle to
your dealer.Radio Frequency Information
See Radio Frequency Statement
0 300.
Page 205 of 328
Chevrolet Impala Owner Manual (GMNA-Localizing-U.S./Canada-13688912) -
2020 - CRC - 6/5/19
204 Vehicle Care
1.Engine Air Cleaner/Filter 0208.
2. Engine Oil Fill Cap. See Engine Oil 0204.
3. Engine Oil Dipstick. See Engine Oil 0204.
4. Engine Cooling Fans (Out of View). See Cooling System
0 209.
5. Engine Cover.
6. Transmission Fluid Cap and Dipstick (Out of View). See
Automatic Transmission Fluid
0207.
7. Brake Fluid Reservoir. See Brake Fluid 0215.
8. Coolant Surge Tank and Pressure Cap. See Cooling
System 0209.
9. Battery - North America 0216.
10. Windshield Washer Fluid Reservoir. See Washer Fluid
0 214.
11. Engine Compartment Fuse
Block 0226.Engine Oil
To ensure proper engine
performance and long life, careful
attention must be paid to engine oil.
Following these simple, but
important steps will help protect
your investment:
.
Use engine oil approved to the
proper specification and of the
proper viscosity grade. See
“Selecting the Right Engine Oil”
in this section.
. Check the engine oil level
regularly and maintain the
proper oil level. See “Checking
Engine Oil” and“When to Add
Engine Oil” in this section.
. Change the engine oil at the
appropriate time. See Engine Oil
Life System 0206.
. Always dispose of engine oil
properly. See “What to Do with
Used Oil” in this section.
Checking Engine Oil
Check the engine oil level regularly,
every 650 km (400 mi), especially
prior to a long trip. The engine oil
dipstick handle is a loop. See
Engine Compartment Overview
0203 for the location.
{Warning
The engine oil dipstick handle
may be hot; it could burn you.
Use a towel or glove to touch the
dipstick handle.
If a low oil Driver Information Center
(DIC) message displays, check the
oil level.
Follow these guidelines:
. To get an accurate reading, park
the vehicle on level ground.
Check the engine oil level after
the engine has been off for at
least two hours. Checking the
engine oil level on steep grades
or too soon after engine shutoff
can result in incorrect readings.
Accuracy improves when
Page 208 of 328
Chevrolet Impala Owner Manual (GMNA-Localizing-U.S./Canada-13688912) -
2020 - CRC - 6/5/19
Vehicle Care 207
the best conditions, the oil life
system might indicate that an oil
change is not necessary for up to a
year. The engine oil and filter must
be changed at least once a year
and, at this time, the system must
be reset. Your dealer has trained
service people who will perform this
work and reset the system. It is also
important to check the oil regularly
over the course of an oil drain
interval and keep it at the proper
level.
If the system is ever reset
accidentally, the oil must be
changed at 5 000 km (3,000 mi)
since the last oil change.
Remember to reset the oil life
system whenever the oil is changed.
How to Reset the Engine Oil
Life System
1. Using the DIC controls on theright side of the steering wheel,
display REMAINING OIL LIFE
on the DIC. See Driver
Information Center (DIC) 0110.
When remaining oil life is low, the CHANGE ENGINE OIL
SOON message will appear on
the display.
2. Press
Von the DIC controls
and hold down for a few
seconds to clear the CHANGE
ENGINE OIL SOON message
and reset the oil life at 100%.
Be careful not to reset the oil
life display accidentally at any
time other than after the oil is
changed. It cannot be reset
accurately until the next oil
change.
The oil life system can also be reset
as follows: 1. Display REMAINING OIL LIFE on the DIC. See Driver
Information Center (DIC) 0110.
2. Fully press and release the accelerator pedal three times
within five seconds.
The system is reset when the
CHANGE ENGINE OIL SOON
message is off and the REMAINING
OIL LIFE message is displayed. If the CHANGE ENGINE OIL SOON
message comes back on when the
vehicle is started, the engine oil life
system has not been reset. Repeat
the procedure.
Automatic Transmission
Fluid
How to Check Automatic
Transmission Fluid
It is not necessary to check the
transmission fluid level.
A transmission fluid leak is the only
reason for fluid loss. If a leak
occurs, take the vehicle to your
dealer service department and have
it repaired as soon as possible.
There is a special procedure for
checking and changing the
transmission fluid. Because this
procedure is difficult, you should
have this done at your dealer
service department. Contact your
dealer for additional information or
the procedure can be found in the
service manual. To purchase a
service manual, see
Publication
Ordering Information 0299.
Page 214 of 328
Chevrolet Impala Owner Manual (GMNA-Localizing-U.S./Canada-13688912) -
2020 - CRC - 6/5/19
Vehicle Care 213
If Steam Is Coming from the
Engine Compartment
{Warning
Steam and scalding liquids from a
hot cooling system are under
pressure. Turning the pressure
cap, even a little, can cause them
to come out at high speed and
you could be burned. Never turn
the cap when the cooling system,
including the pressure cap, is hot.
Wait for the cooling system and
pressure cap to cool.
See Overheated Engine Protection
Operating Mode 0213 for
information on driving to a safe
place in an emergency.
If No Steam Is Coming from
the Engine Compartment
If an engine overheat warning is
displayed but no steam can be seen
or heard, the problem might not be
too serious. Sometimes the engine
can get a little too hot when the
vehicle: .
Climbs a long hill on a hot day.
. Stops after high-speed driving.
. Idles for long periods in traffic.
. Tows a trailer.
If the overheat warning displays with
no sign of steam: 1. Turn the air conditioning off.
2. Turn the heater on to the highest temperature and to the
highest fan speed. Open the
windows as necessary.
3. When it is safe to do so, pull off the road, shift to P (Park) or
N (Neutral), and let the
engine idle.
If the coolant temperature gauge is
no longer in the overheat zone, the
vehicle can be driven. Continue to
drive the vehicle slowly for about
10 minutes. Keep a safe vehicle
distance from the vehicle in front.
If the warning does not come back
on, continue to drive normally and
have the cooling system checked
for proper fill and function. If the warning continues, pull over,
stop, and park the vehicle
right away.
If there is no sign of steam, idle the
engine for three minutes while
parked. If the warning is still
displayed, turn off the engine until it
cools down. Also, see
Overheated
Engine Protection Operating Mode
0 213.
Overheated Engine
Protection
Operating Mode
This emergency operating mode
allows the vehicle to be driven to a
safe place in an emergency
situation. If an overheated engine
condition exists, an overheat
protection mode which alternates
firing groups of cylinders helps
prevent engine damage. In this
mode, there is significant loss in
power and engine performance.
The engine coolant temperature
gauge indicates if an overheat
condition exists. Driving extended
Page 220 of 328
Chevrolet Impala Owner Manual (GMNA-Localizing-U.S./Canada-13688912) -
2020 - CRC - 6/5/19
Vehicle Care 219
2. Lift up on the latch in themiddle of the wiper blade
where the wiper arm attaches.
3. With the latch open, pull the wiper blade down toward the
windshield far enough to
release it from the J-hooked
end of the wiper arm.
4. Remove the wiper blade.
5. Reverse Steps 1–3 for wiper blade replacement.
Windshield Replacement
Driver Assistance Systems
If the windshield needs to be
replaced and the vehicle is
equipped with a front camera sensor
for the Driver Assistance Systems, a
GM replacement windshield is
recommended. The replacement
windshield must be installed
according to GM specifications for
proper alignment. If it is not, these
systems may not work properly, they
may display messages, or they may
not work at all. See your dealer for
proper windshield replacement.
Acoustic Windshield
The vehicle is equipped with an
acoustic windshield. If the
windshield needs to be replaced, be
sure to get an acoustic windshield
so you will continue to have the
benefits an acoustic windshield can
provide.
Gas Strut(s)
This vehicle is equipped with gas
strut(s) to provide assistance in
lifting and holding open the hood/
trunk/liftgate system in full open
position.
{Warning
If the gas struts that hold open
the hood, trunk, and/or liftgate fail,
you or others could be seriously
injured. Take the vehicle to your
dealer for service immediately.
Visually inspect the gas struts for
signs of wear, cracks, or other
damage periodically. Check to
make sure the hood/trunk/liftgate
(Continued)
Warning (Continued)
is held open with enough force.
If struts are failing to hold the
hood/trunk/liftgate, do not
operate. Have the vehicle
serviced.
Caution
Do not apply tape or hang any
objects from gas struts. Also do
not push down or pull on gas
struts. This may cause damage to
the vehicle.
See Maintenance Schedule 0276.
Page 230 of 328
Chevrolet Impala Owner Manual (GMNA-Localizing-U.S./Canada-13688912) -
2020 - CRC - 6/5/19
Vehicle Care 229
FusesUsage
38 Left high-beam headlamp
41 Vacuum pump
42 Cooling fan high speed
44 Starter control
45 Cooling fan low speed
46 Cooling fan control
47 Pre catalytic converter O2 sensors/Canister
purge solenoid
49 Right HID headlamp
50 Left HID headlamp
51 Horn
52 Display/Ignition
53 Inside rearview mirror/ Rear vision camera
54 Instrument panel/ Ignition
55 Exterior rearview mirror
56 Front washer Fuses
Usage
60 Heated mirror
62 Obstacle detection
64 Rain sensor/Rear seat audio
66 Trunk release
67 Chassis control module
69 Battery voltage sensor
71 Memory seat
Relays Usage
1 A/C clutch
2 Starter pinion
4 Front wiper speed
5 Front wiper control
6 Cabin Coolant pump/ Air solenoid
7 Powertrain
8 Transmission auxiliary pump
9 Cooling fan high speed Relays
Usage
10 Cooling fan low speed 11 Starter
13 Cooling fan control
14 Low-beam HID headlamp
15 Run/Crank
17 Rear window defogger
Instrument Panel Fuse
Block
The instrument panel fuse block is
in the instrument panel, on the
driver side of the vehicle.
Page 231 of 328
Chevrolet Impala Owner Manual (GMNA-Localizing-U.S./Canada-13688912) -
2020 - CRC - 6/5/19
230 Vehicle Care
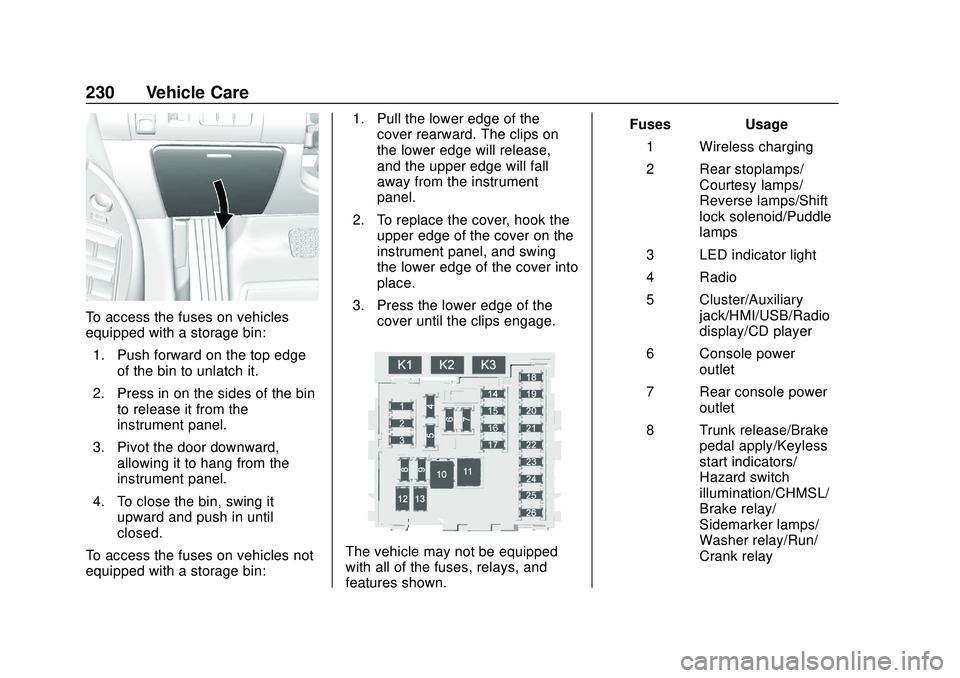
To access the fuses on vehicles
equipped with a storage bin:1. Push forward on the top edge of the bin to unlatch it.
2. Press in on the sides of the bin to release it from the
instrument panel.
3. Pivot the door downward, allowing it to hang from the
instrument panel.
4. To close the bin, swing it upward and push in until
closed.
To access the fuses on vehicles not
equipped with a storage bin: 1. Pull the lower edge of the
cover rearward. The clips on
the lower edge will release,
and the upper edge will fall
away from the instrument
panel.
2. To replace the cover, hook the upper edge of the cover on the
instrument panel, and swing
the lower edge of the cover into
place.
3. Press the lower edge of the cover until the clips engage.
The vehicle may not be equipped
with all of the fuses, relays, and
features shown. Fuses Usage
1 Wireless charging
2 Rear stoplamps/ Courtesy lamps/
Reverse lamps/Shift
lock solenoid/Puddle
lamps
3 LED indicator light
4 Radio
5 Cluster/Auxiliary jack/HMI/USB/Radio
display/CD player
6 Console power outlet
7 Rear console power outlet
8 Trunk release/Brake pedal apply/Keyless
start indicators/
Hazard switch
illumination/CHMSL/
Brake relay/
Sidemarker lamps/
Washer relay/Run/
Crank relay
Page 243 of 328
Chevrolet Impala Owner Manual (GMNA-Localizing-U.S./Canada-13688912) -
2020 - CRC - 6/5/19
242 Vehicle Care
remain continuously illuminated.
This sequence will continue upon
subsequent vehicle start-ups as
long as the malfunction exists.
When the malfunction indicator is
illuminated, the system may not be
able to detect or signal low tire
pressure as intended. TPMS
malfunctions may occur for a variety
of reasons, including the installation
of replacement or alternate tires or
wheels on the vehicle that prevent
the TPMS from functioning properly.
Always check the TPMS malfunction
telltale after replacing one or more
tires or wheels on your vehicle to
ensure that the replacement or
alternate tires and wheels allow the
TPMS to continue to function
properly.
SeeTire Pressure Monitor
Operation 0242.
See Radio Frequency Statement
0 300.Tire Pressure Monitor
Operation
This vehicle may have a Tire
Pressure Monitor System (TPMS).
The TPMS is designed to warn the
driver when a low tire pressure
condition exists. TPMS sensors are
mounted onto each tire and wheel
assembly, excluding the spare tire
and wheel assembly. The TPMS
sensors monitor the air pressure in
the tires and transmit the tire
pressure readings to a receiver
located in the vehicle.
When a low tire pressure condition
is detected, the TPMS illuminates
the low tire pressure warning light
located on the instrument cluster.
If the warning light comes on, stop
as soon as possible and inflate the
tires to the recommended pressure shown on the Tire and Loading
Information label. See
Vehicle Load
Limits 0147.
A message to check the pressure in
a specific tire displays in the Driver
Information Center (DIC). The low
tire pressure warning light and the
DIC warning message come on at
each ignition cycle until the tires are
inflated to the correct inflation
pressure. Using the DIC, tire
pressure levels can be viewed. For
additional information and details
about the DIC operation and
displays see Driver Information
Center (DIC) 0110.
The low tire pressure warning light
may come on in cool weather when
the vehicle is first started, and then
turn off as the vehicle is driven. This
could be an early indicator that the
air pressure is getting low and
needs to be inflated to the proper
pressure.
Page 244 of 328
Chevrolet Impala Owner Manual (GMNA-Localizing-U.S./Canada-13688912) -
2020 - CRC - 6/5/19
Vehicle Care 243
A Tire and Loading Information
label, attached to your vehicle,
shows the size of the original
equipment tires and the correct
inflation pressure for the tires when
they are cold. SeeVehicle Load
Limits 0147, for an example of the
Tire and Loading Information label
and its location. Also see Tire
Pressure 0239.
The TPMS can warn about a low
tire pressure condition but it does
not replace normal tire
maintenance. See Tire Inspection
0 245, Tire Rotation 0245 and
Tires 0231.
Caution
Tire sealant materials are not all
the same. A non-approved tire
sealant could damage the TPMS
sensors. TPMS sensor damage
caused by using an incorrect tire
sealant is not covered by the
vehicle warranty. Always use only
(Continued)
Caution (Continued)
the GM approved tire sealant
available through your dealer or
included in the vehicle.
TPMS Malfunction Light and
Message
The TPMS will not function properly
if one or more of the TPMS sensors
are missing or inoperable. When the
system detects a malfunction, the
low tire pressure warning light
flashes for about one minute and
then stays on for the remainder of
the ignition cycle. A DIC warning
message also displays. The
malfunction light and DIC warning
message come on at each ignition
cycle until the problem is corrected.
Some of the conditions that can
cause these to come on are:
.One of the road tires has been
replaced with the spare tire. The
spare tire does not have a
TPMS sensor. The malfunction
light and DIC message should
go off after the road tire is replaced and the sensor
matching process is performed
successfully. See
“TPMS Sensor
Matching Process” later in this
section.
. The TPMS sensor matching
process was not done or not
completed successfully after
rotating the tires. The
malfunction light and the DIC
message should go off after
successfully completing the
sensor matching process. See
"TPMS Sensor Matching
Process" later in this section.
. One or more TPMS sensors are
missing or damaged. The
malfunction light and the DIC
message should go off when the
TPMS sensors are installed and
the sensor matching process is
performed successfully. See
your dealer for service.
. Replacement tires or wheels do
not match the original equipment
tires or wheels. Tires and wheels
other than those recommended
Page 245 of 328
Chevrolet Impala Owner Manual (GMNA-Localizing-U.S./Canada-13688912) -
2020 - CRC - 6/5/19
244 Vehicle Care
could prevent the TPMS from
functioning properly. SeeBuying
New Tires 0247.
. Operating electronic devices or
being near facilities using radio
wave frequencies similar to the
TPMS could cause the TPMS
sensors to malfunction.
If the TPMS is not functioning
properly it cannot detect or signal a
low tire pressure condition. See
your dealer for service if the TPMS
malfunction light and DIC message
comes on and stays on.
TPMS Sensor Matching
Process
Each TPMS sensor has a unique
identification code. The identification
code needs to be matched to a new
tire/wheel position after rotating the
vehicle’s tires or replacing one or
more of the TPMS sensors. The
TPMS sensor matching process
should also be performed after
replacing a spare tire with a road
tire containing the TPMS sensor.
The malfunction light and the DIC
message should go off at the next ignition cycle. The sensors are
matched to the tire/wheel positions,
using a TPMS relearn tool, in the
following order: driver side front tire,
passenger side front tire, passenger
side rear tire, and driver side rear.
See your dealer for service or to
purchase a relearn tool. A TPMS
relearn tool can also be purchased.
See Tire Pressure Monitor Sensor
Activation Tool at
www.gmtoolsandequipment.com or
call 1-800-GM TOOLS
(1-800-468-6657).
There are two minutes to match the
first tire/wheel position, and
five minutes overall to match all four
tire/wheel positions. If it takes
longer, the matching process stops
and must be restarted.
The TPMS sensor matching
process is:
1. Set the parking brake.
2. Place the vehicle in Service Mode. See Ignition Positions
0 151. 3. Make sure the Tire Pressure
info page option is turned on.
The info pages on the DIC can
be turned on and off through
the Settings menu. See Driver
Information Center (DIC) 0110.
4. Use the DIC controls on the right side of the steering wheel
to scroll to the Tire Pressure
screen under the DIC
info page.
5. Press and hold
Vin the center
of the DIC controls.
The horn sounds twice to
signal the receiver is in relearn
mode and the TIRE
LEARNING ACTIVE message
displays on the DIC screen.
6. Start with the driver side front tire.
7. Place the relearn tool against the tire sidewall, near the valve
stem. Then press the button to
activate the TPMS sensor.
A horn chirp confirms that the
sensor identification code has
been matched to this tire and
wheel position.